Yet another Arduino clock thread!

Advert

Yet another Arduino clock thread!

Home Forums Clocks and Scientific Instruments Yet another Arduino clock thread!

Viewing 25 posts - 1 through 25 (of 103 total)
  • Author
    Posts
  • #3996
    John Haine
    Participant
      @johnhaine32865
      Advert
      #630578
      John Haine
      Participant
        @johnhaine32865

        Having recently been making better progress with the new clock project I though that I'd post some details in a new thread so as not to divert Dave's.

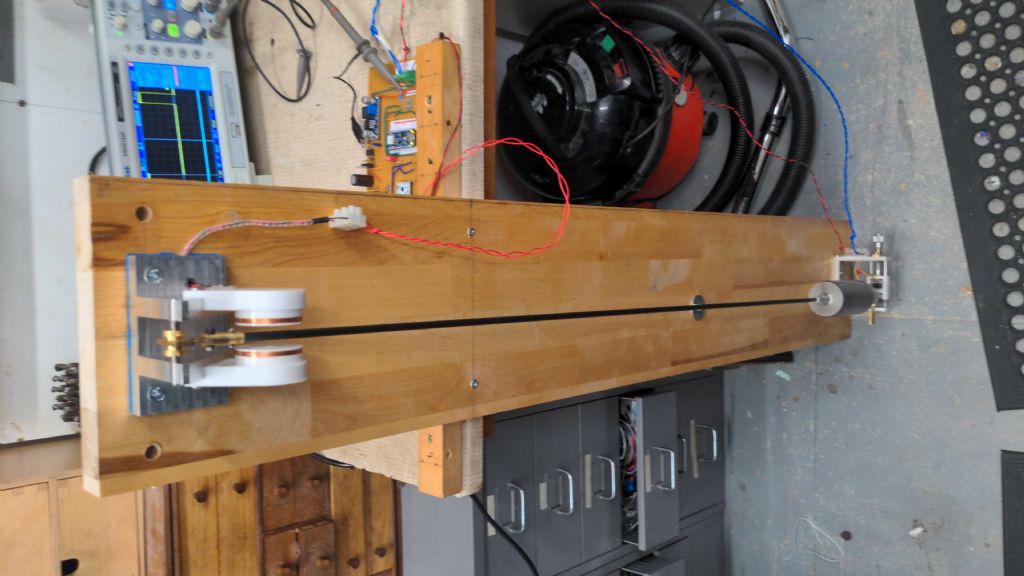
        img-20230118-wa0007.jpeg

        At the moment the pendulum and sensors are assembled on a bit of laminated birch plank screwed and bolted to the bench – not ideal but fine for initial testing. Sorry the photo is on its side, could a kind moderator please rotate it?

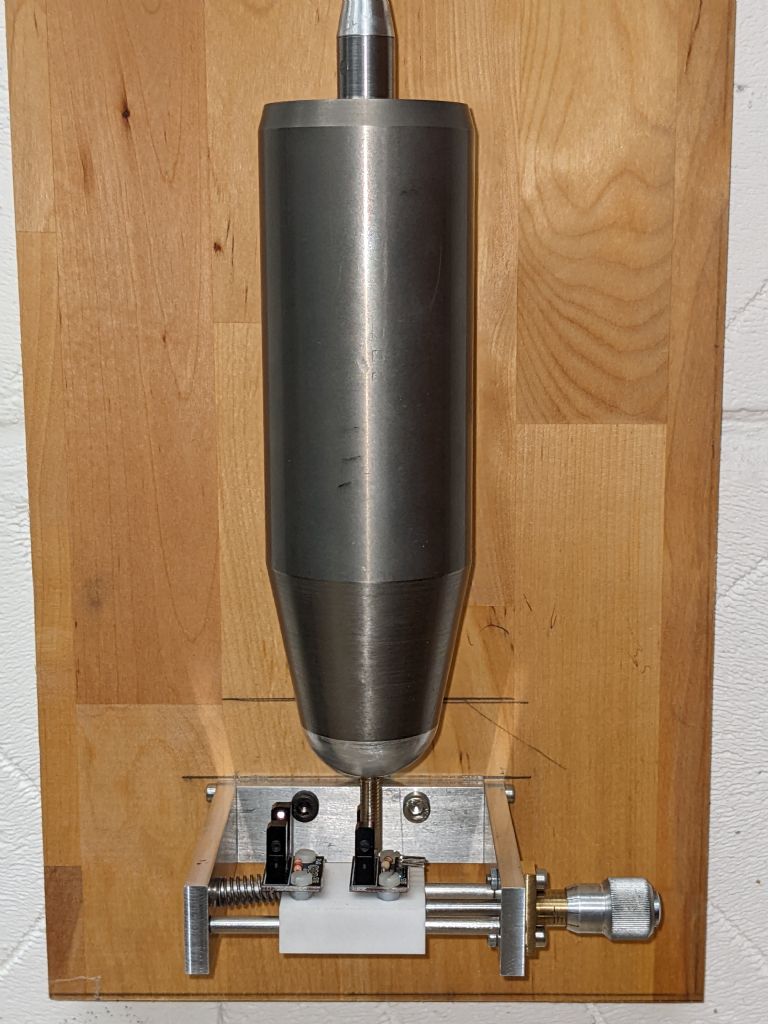
        pxl_20221119_175710132.jpg

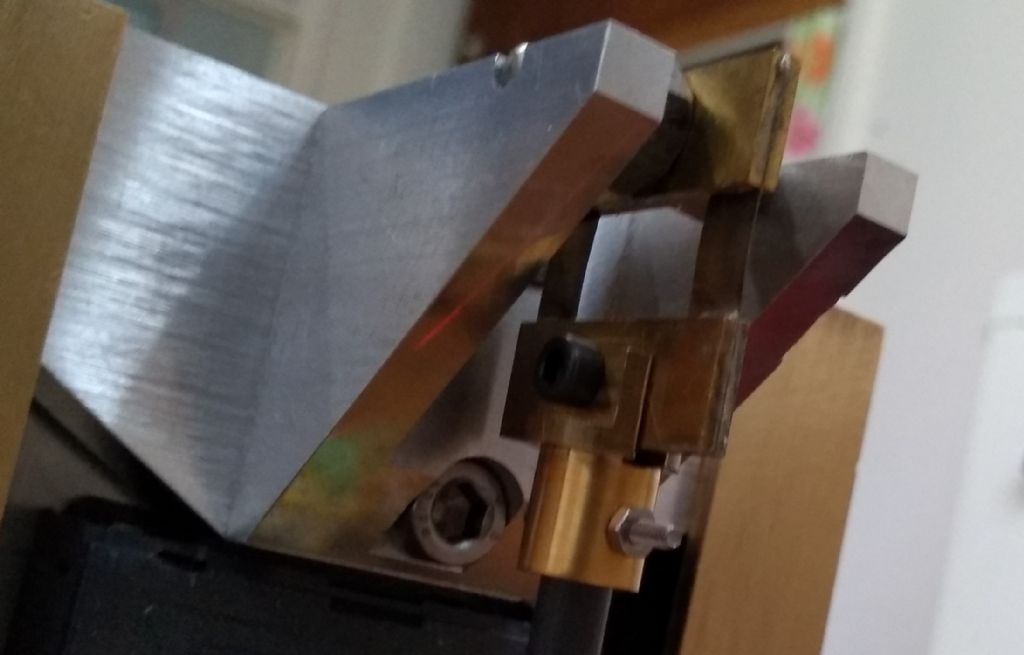
        The bob is of tungsten alloy, made for a different purpose and adapted. It had a recess at the top end into which is loctited a steel plug for the rod attachment. I didn't fancy drilling the material so this will be a source of temperature error. Underneath the bob are the opto sensors, one on the centreline for impulsing, the other offset for amplitude control. The Sharp optos are mounted on a small block of Corian running on stainless steel rails, sprung against a micrometer for adjusting the zero position. In the photo there's a pin to interrupt the bean but this has been replaced with a brass vane with a 10mm wide slot in line with the pendulum axis, which inverts the logic level of the optos. So when the pendulum swings through zero the opto generates a +5v pulse about 160ms long.

        Mod edit rotated photo.

        Edited By SillyOldDuffer on 22/01/2023 12:35:32

        #630583
        John Haine
        Participant
          @johnhaine32865

          By the way the bottom end of the bob was machined off square so there's a spherical aluminium fairing araldited to it to improve the aerodynamics.

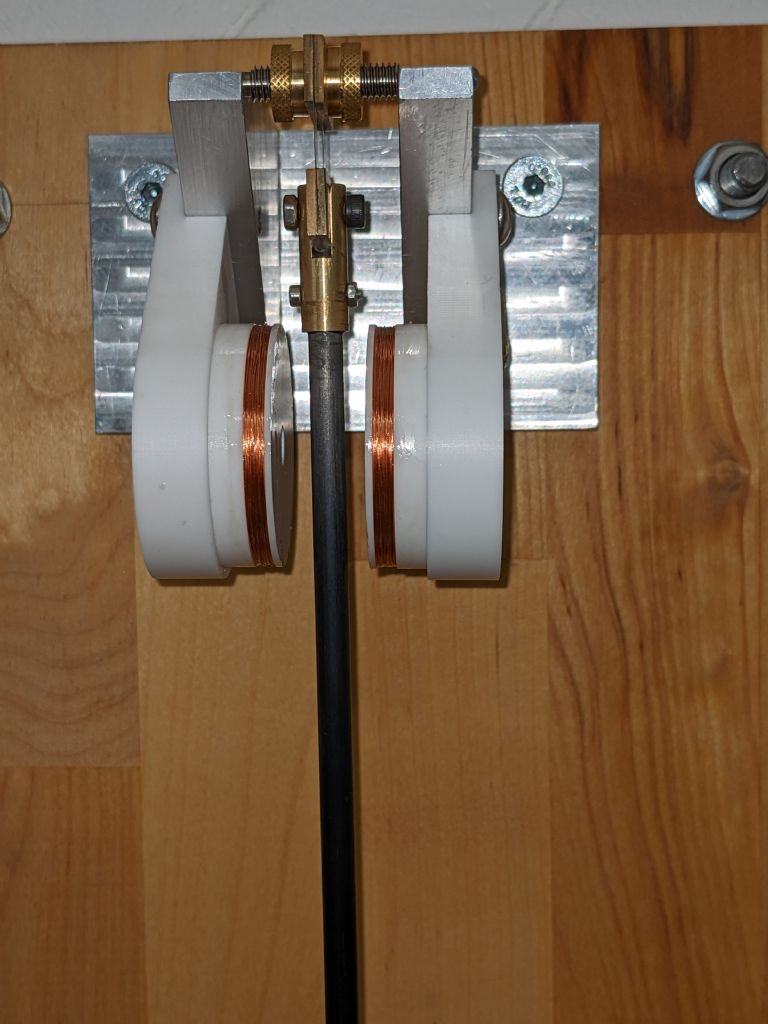
          pxl_20221119_175738639.jpg

          At the top of the rod there are a pair of "Helmholtz Coils" mounted on Corian brackets screwed to the suspension bracket. The coils themselves are 200 turns each of 0.15mm wire, diameter of the coil is 40mm and spacing 20mm. The rod is carbon fibre and mounted inside it so its centre is (I hope) on the axis of the coils is a 13x3mm Neodymium magnet. The coils and magnet form a sort of "moving magnet galvanometer" – when a current is passed through the coils the magnet tries to line itself up with the axial field and in doing so exerts a torque on the rod.

          Though there is an Arduino to control the clock, the actual pulses from the centre opto are applied directly in hardware to the coil driver – this is the ancient but useful L298 full-bridge driver. The processor tells the driver which way to drive the coil, alternating on alternate swings.

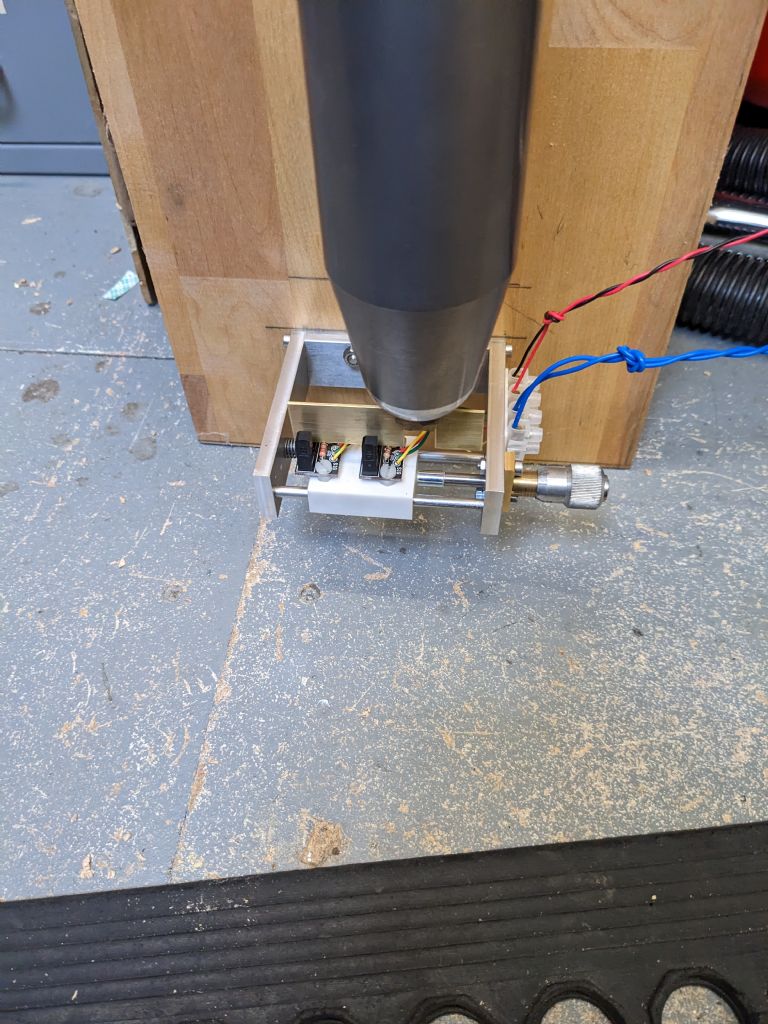
          pxl_20230121_124116198.jpg

          This is another photo of the sensors with the vane rather than the pin.

          #630586
          John Haine
          Participant
            @johnhaine32865

            pxl_20230121_124435589.jpg

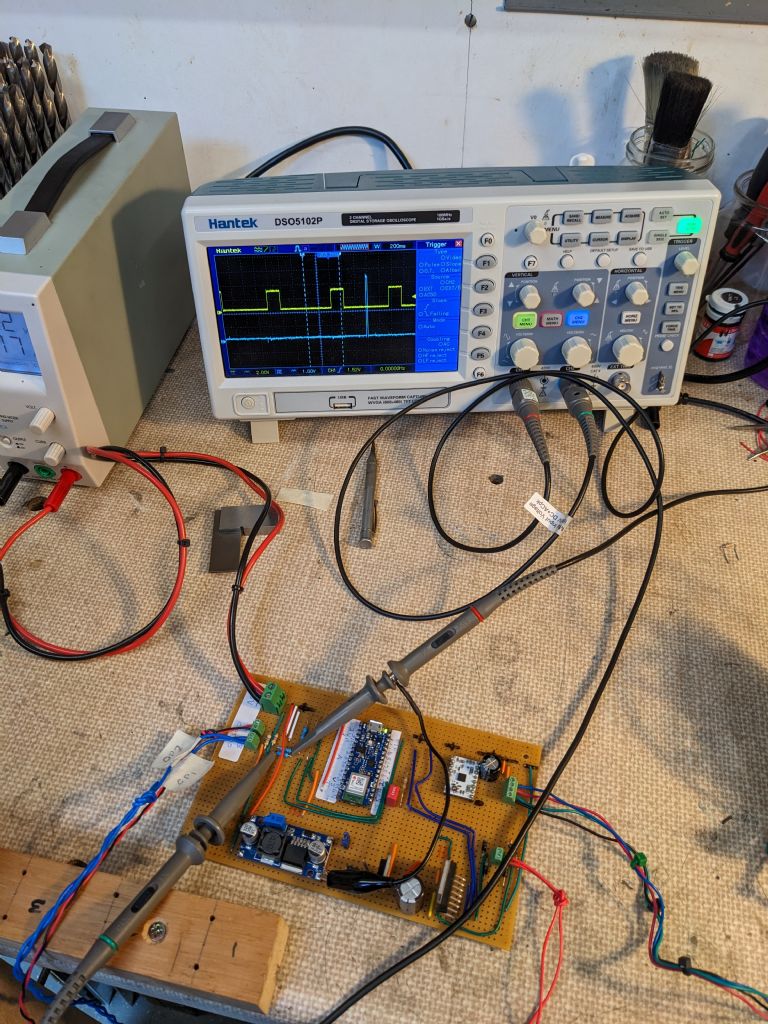
            This photo shows the (regrettable) breadboard layout. The scope trace shows the ticks from the centre sensor on the yellow trace, while the blue shows the amplitude control pulse. When the amplitude of a swing reaches the level set by the spacing between the sensors, this pulse tells the processor to inhibit impulsing for the next 2 swings. It also incidentally "reminds" the processor which side the pendulum is swinging to make sure the impulses are applied in the right direction .

            At the top right of the board is a TI DRV8834 stepper motor driver on a breakout board. These drivers are wonderful as they can operate down to ~3v supply though here it's running on 5v. This drives a stepper that drives the dial.

            pxl_20230121_124317091.jpg

            Driving the dial is a processor's busiest task. The stepper drives the seconds (centre) arbor – now steppers generally do 200 or an even multiple thereof steps per rev, so 60 seconds won't divide into a whole number of steps. I use 4x microstepping, or 800 steps/rev. 800/60 = 13.33…, so actually the processor generates a sequence of 13,13,and 14 steps per pendulum tick. You can just see the slight stuttering of the seconds hand but I'm hoping that in operation it will be unnoticeable.  Both optos generate interrupts.  The timing interrupt just resets the routine that generates the dial pulses; and the amplitude one just sets a counter that counts down from 3 (set by the interrrupt) to zero each swing.  Impulsing is only enabled when this counter is zero.  I wrote and debugged the software using another Arduino to generate "pseudo pendulum" pulses, to my considerable surprise when it was loaded on the target and connected to the hardware it just ran.

            Edited By John Haine on 22/01/2023 12:22:38

            #630589
            John Haine
            Participant
              @johnhaine32865

              Obviously a lot more to do. A case for one thing. The power supply arrangements aren't ideal, the L298 supply voltage is derived from a variable boost converter (bottom left of board) driven from 5V As the coil current needs to be ~300mA, and ~18V supply is needed to drive this through the 50 ohm coils, the booster draws over an amp from the supply! I think it would be better to have a 12v supply which would also be easy to backup with a small SLA battery; and use a cheap buck converter to supply the 5V.

              Most importantly of course the clock needs to be measured so I need to reassemble my piPET system to do this.

              Speaking of which there is no rating nut or other way to adjust the native pendulum period. The design period is 0.5s ("seconds beating" ) and according to the scope the actual period is about 10ms faster than that. Rating will be done by the processor so that the dial is withing a second or better of actual time. I'm also hoping to use the sort of technique that Dave is applying to compensate for temperature and pressure, though as the density of the bob is 2.5x a steel bob of the same size, or 1.5x a lead one, the baro sensitivity should be correspondingly lower.

              #630592
              John Haine
              Participant
                @johnhaine32865

                Thanks for that Dave!

                #630617
                duncan webster 1
                Participant
                  @duncanwebster1

                  Looking very nice. I used a 48 step motor in my slave clock, geared 2:5 to the minute hand, then one step is 1/2 minute. Motor came out of an old printer I think.

                  #630620
                  John Haine
                  Participant
                    @johnhaine32865

                    Thanks Duncan.

                    Do you have a seconds hand? I've got a couple of those 48 step motors and one could make the pendulum beat at 1.25s but I thought it wouldn't look right having the seconds hand moving in bigger steps and the pendulum would need to be 50% longer. Or am I missing something?

                    #630644
                    duncan webster 1
                    Participant
                      @duncanwebster1

                      No second hand, I drive the minute hand from the stepper via a pair of gears. However just looking at it again, the minute hand advances once every 15 seconds, so the ratio is (1/48)1/240), which is 5:1). The gear on the motor is the one it came with, I bought all the rest from hpc. If I wanted to drive a seconds hand in one second jumps I'd have say 48t on the motor and 60t on the seconds hand shaft. I've got a photo of the mechanism but it's on the computer in the dining room, which is like Siberia at the moment. I'll dig it out when it warms up a bit.
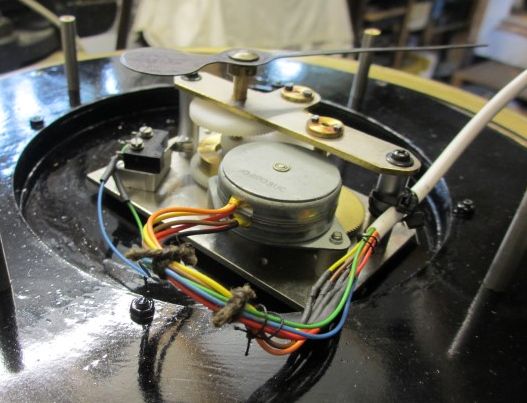
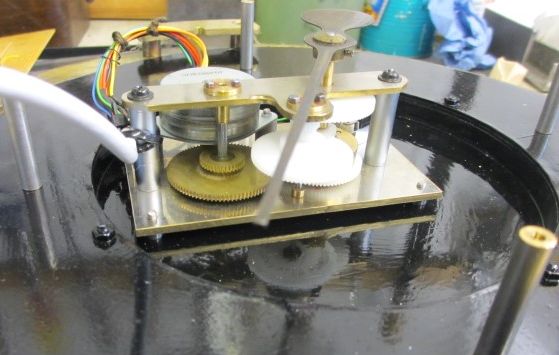
                      Incidentally, the hour shaft has a snail cam which operates a microswitch, triggering an input to the Arduino which controls the whole shebang and rings the hours on a very old Midland Railway signal box bell which I resuscitated.

                      Is your pendulum Bob a surplus armour piercing round? Synchronome used WW1 shells as pendulum nobs, so you'd be in good company.

                      #630661
                      duncan webster 1
                      Participant
                        @duncanwebster1

                        not very good photos I fear, but I'm not taking it apart to get more. It looks as tho there is an idler between the stepper and the minute hand which came out of the scrap box as well, the white plastic ones were bought. It's a long time ago, but it has run for many years with just an odd drop of oil

                        stepper clock 2.jpg

                        stepper clock 1.jpg

                        #630680
                        John Haine
                        Participant
                          @johnhaine32865

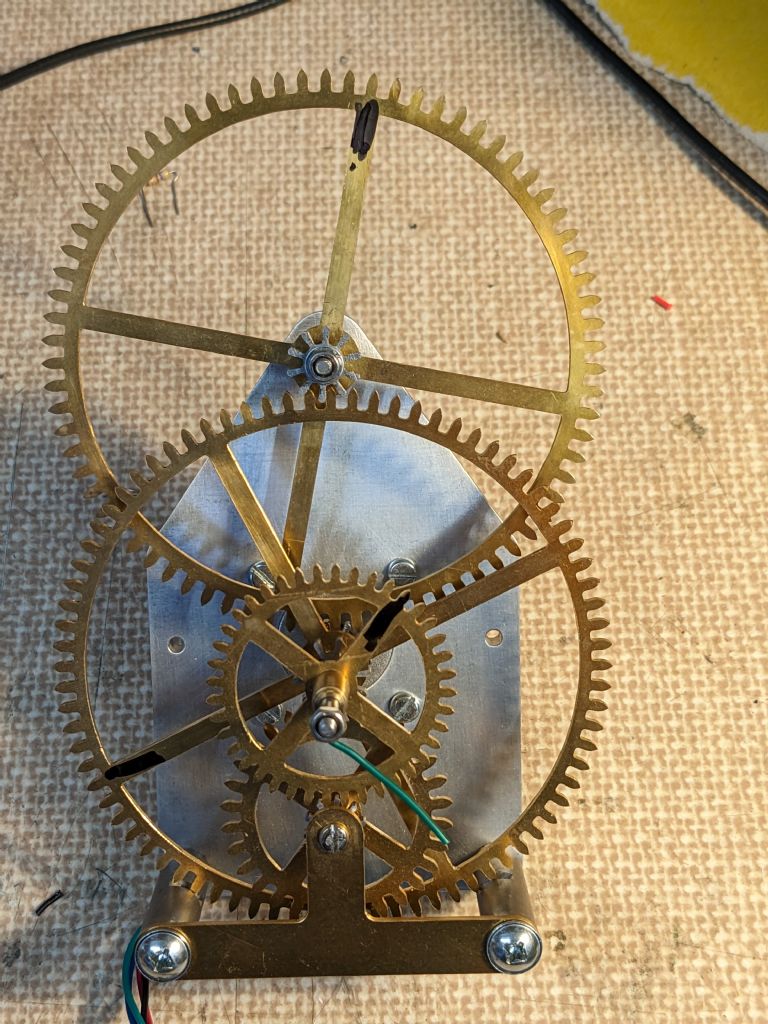
                          Neat, Duncan. My dial is so big because I profiled out the gears on the cnc, and the smallest cutter I can use is 1mm (speed limitation). That means the smallest module is around the same size for cycloidal teeth (bigger for involute). Large wheels have 75 and 80 teeth so correspondingly big.

                          #630762
                          S K
                          Participant
                            @sk20060

                            Hello John,

                            Excellent work! I'm building a somewhat similar project, and have several questions for you.

                            • Why are you using a Helmholtz coil configuration vs. say a one-sided solenoid? I get that it provides a more uniform magnetic field, but what are your thoughts about it?
                            • Why is it positioned almost at the top? Wouldn't that require far more force than nearer the bottom, and also possibly upset the nearby spring hinge unnecessarily?
                            • Why did you move from a pin to a slot for the optical switches?
                            • Which specific model optical switches you are using and why? (I'm looking for the fastest and hence hopefully highest time-resolution ones I can find.)

                            I have more, but these will do for now. Again, nice work!

                            Thank you.

                            #630804
                            John Haine
                            Participant
                              @johnhaine32865

                              Answering in a slightly different order…

                              • When a bar magnet with dipole moment K is "immersed" in a uniform field B it generates a torque KB around an axis mutually orthogonal to the field and the dipole axis. In this case the torque axis is perpendicular to the plane of swing. If you think of the magnet somehow being mounted actually at the suspension point, the sideways force on the bob would be KB/L if L is the pendulum length. If the magnet and coils were placed at the bottom of the pendulum, the sideways force on the pivot will also be KB/L, and for equilibrium the opposite force must act on the bob. So the force on the bob turns out to be the same wherever the magnet is – I thought that must be true and a mathematician friend proved it.

                                However if the coils and magnet are at the bottom, the gap has to be larger and the coils correspondingly bigger to accommodate the swing amplitude and possibly the bob. And if the bob is iron it has to be kept away from the coils. Putting the "motor" at the top minimises the coil size needed, allows you to mount the coils on the pendulum suspension bracket, and hence minimises the number of places where the pendulum "touches" the backboard. The only significant bit of steel at the top of the pendulum is the trunnion to accommodate back-to-front movement, which is non-magnetic stainless. The bracket is fabricated from aluminium, the suspension springs are beryllium copper, and miscellaneous screws etc are again non-magnetic stainless or brass. There is probably a small eddy-current reaction from the conductive bits but this is only transient at the start and end of the impulse.

                              • The HH configuration creates a symmetrical field which is fairly uniform in the gap, and in particular can be calculated from a well known equation. There is an excellent website that gives lots of information on magnets and has a calculator to give K for bar magnets of any given size and material. This means that the drive current needed for a given pendulum can be calculated.
                              • The optos I use are made by Sharp and have integral Schmitt triggers. Type is GP1A57HRJ00F and available from various retailers. I recommend you also buy the breakout board as the pinout is tricky. Note that though the devices have an integral pullup it's not very strong and I add a 470R to make sure I get a fast edge at the right level. I've done some measurements on these to gauge their repeatability and reported them on here somewhere – well into the submicron level. Robert Atkinson responded to confirm that he had made similar observations. He also suggested using a slotted vane rather than a pin to minimise ambient light sensitivity, and Doug Bateman's clock does the same (see HJ some years back) and Doug didn't observe any light sensitivity either. A previous clock I made using the same device showed strange errors at the same time every spring afternoon, which turned out to be when the low sun was shining on the case through the kitchen window! So I had to hide the bob and sensor in the dark.

                                What swung it for me though is that the opto output directly drives the "enable" input on the L298 driver which is active high and matches the opto output when not interrupted. The L298 has separate inputs to decide which was to drive and these are "anded" with enable internally and are driven by the processor. Saves an inverter chip which I didn't have in stock!

                              Sorry to go on a bit, I hope this helps.

                              #630807
                              SillyOldDuffer
                              Moderator
                                @sillyoldduffer
                                Posted by S K on 23/01/2023 21:25:06:

                                Hello John,

                                Excellent work! I'm building a somewhat similar project, and have several questions for you.

                                • Why are you using a Helmholtz coil configuration vs. say a one-sided solenoid? I get that it provides a more uniform magnetic field, but what are your thoughts about it?
                                • Why is it positioned almost at the top? Wouldn't that require far more force than nearer the bottom, and also possibly upset the nearby spring hinge unnecessarily?
                                • Why did you move from a pin to a slot for the optical switches?
                                • Which specific model optical switches you are using and why? (I'm looking for the fastest and hence hopefully highest time-resolution ones I can find.)

                                I have more, but these will do for now. Again, nice work!

                                Thank you.

                                Welcome to the forum. Excellent to have another pendulista asking good questions. Can you share what you're doing please? I find it really useful to see how others approach these problems.

                                How to post photos on our slightly eccentric forum described here. Also, the best search box is half-way down the home page, not the obvious one top right.

                                Dave

                                #630843
                                S K
                                Participant
                                  @sk20060

                                  Thank you for the reply to my questions.

                                  Thanks for the optical switch part number. At the moment, I'm using a cheap no-name switch with roughly 1 us rise/fall times. A part in 10^6-ish seems OK, but I'll see if that part can do better.

                                  The slot approach reducing stray light makes sense, thanks. I've mocked up the use a pin just for low air resistance, but will reconsider.

                                  Concerning the position of the coils, I can see your points, but it still bothers me. In a conventional pendulum clock, the impulse is most often somewhat near the top, either made by the escapement directly or through a fork a little lower around the shaft. So that's in line with your choice, at least.

                                  In the Shortt-Synchronome, the impulse is applied roughly one-third down from the top of the shaft, but that may have been for convenience, e.g. at a position in which the swing is an appropriate width.

                                  I guess my "bother" concerns the shaft and how stiff or flexible it is, and how the position of the impulse on a non-ideal shaft might influence performance. If I were to just naively guess where the optimum position might be, I'd guess either the bottom, the center of gravity, or the center of percussion. But I'm not sure which and haven't studied the math nor made a computer model.

                                  The center of percussion doesn't feel right because the pendulum is not floating free in space, it's constrained at one end, and the goal is not to shift the whole pendulum horizontally. If impulsed there, an equal force on the hinge would seem to be applied. Therefore, I'd guess that below the COP would be better. The COG would probably be close to the COP, and also doesn't feel right for similar reasons. Therefore, I've naively presumed that as close to the bottom as practical would be best, if only because that would appear to apply the smallest force to the hinge (is this wrong?).

                                  In a pendulum with a light carbon shaft and a very heavy bob (I'm jealous of your tungsten-alloy one!), both the COP and COG are likely to be very low anyway – maybe even within the bob in your case. My shaft is Invar and my bob is a brass weight that looks far lighter than yours, so that's not the case in my setup.

                                  As Invar is only weakly magnetic (it's essentially a stainless steel), I was intending to use a steel collar a little above the weight, impulsed by an open solenoidal coil. Its position was to be just far enough above the bob for any air turbulence due to the coil to be low. I have not made the coil yet, but my thought is that the amount of energy needed to be imparted should be rather low, so the distance from the shaft to the coil may not be a difficult impediment to overcome.

                                  It will take me a while to work through your explanation about the coils themselves.

                                  Any further thoughts or explanations? I'll be watching this thread for sure!

                                  Thank you again.

                                  #630849
                                  John Haine
                                  Participant
                                    @johnhaine32865

                                    Thanks for the observations. In a mechanical clock the impulse has to be applied near the top because that's near the mechanism. This is slightly true of the Synchronome too though the dial is remote. A problem with Synchronomes is that the impulse is too far above the COP so it pushes the top of the rod sideways against the suspension spring and that causes a spurious lateral oscillation which can be seen in detailed timekeeping measurements. The same things happens in my version, in some ways it's even worse because the COP is probably nearly coincident with the CoG because the carbon fibre is so light. This could be a problem with the new one, we'll see when I start measuring it. Of course if any such vibrations are the same each time it doesn't matter.

                                    Fedchenko's clock on the other hand was impulsed magnetically just below the bob, and that was the most accurate pendulum clock ever made!

                                    #630859
                                    S K
                                    Participant
                                      @sk20060

                                      It may be that the forces are so low that your spring will not be unduly affected. I presume yours is one or two pieces of thin flat spring steel or similar? It's a little hard to see in your dead-on photo. It sure looks solidly constructed, though!

                                      What is the spring material, thickness, width and free length that you are using? It kind of looks to me like they are longer than necessary or optimum. I think a shorter spring is usually preferred, though I'm unsure of the scale in the photos.

                                      For my "spring," I have been intending to use tool-steel knife-edges on some pieces of very flat borosilicate glass. The fact that the knives just pivot freely on glass is the reason I've felt so concerned about forces on the "spring." I can't afford for them to "walk" or bounce even slightly.

                                      #630864
                                      S K
                                      Participant
                                        @sk20060

                                        I looked at that Sharp photointerrupter.

                                        At 10mm, it's the widest-gap one that Sharp makes. The detector aperture is rather large at 1.8 mm, though, and distinctly larger than most other options.

                                        It has voltage regulation up to a 17V supply and a Schmitt trigger circuit, which are both nice. Its rise/fall time is quoted as distinctly faster than what I measured for mine, but it has a long-ish propagation delay. The latter should not matter as long as it's uniform.

                                        I also looked at some larger-gap Omron and Lite-On ones. For example, the Omron EE-SX3070/-SX4070 is interesting. It has a 8mm gap, a 0.5mm detector aperture and a Schmitt trigger circuit, but no regulation and considerably slower rise/fall times.

                                        Anyway, your Sharp one looks like a good over-all choice. I'll pick some up instead of continuing with my no-name versions.

                                        Thanks!

                                        #630867
                                        John Haine
                                        Participant
                                          @johnhaine32865

                                          img_20201118_143314743.jpg

                                          This is the suspension of the same design in another clock. The springs are 6mm wide and the free length 10mm. Material is 0.1mm BeCu. I've made a little soldering jig so I can make these to a common design. I believe the free length is not critical as most of the bending is very close to the top chop.

                                          Knife edges are problematic from what I've read, the pressure on the edge is so high that they easily deform and performance becomes unpredictable. Also need very careful levelling so you may need to provide a gimbal to make sure both knives carry equal load. All the precision clocks I know of use spring suspension, though Clock B's crutch I think uses knife edges. There is a chap in the US who built a 2-pendulum clock with knife edges, but I think he ground vee grooves in the lower part that the edges rested on.

                                          #630868
                                          SillyOldDuffer
                                          Moderator
                                            @sillyoldduffer
                                            Posted by S K on 24/01/2023 17:14:46:

                                            What is the spring material, thickness, width and free length that you are using? It kind of looks to me like they are longer than necessary or optimum. I think a shorter spring is usually preferred, though I'm unsure of the scale in the photos.

                                            Any rationale supporting optimum spring dimensions? I ask because it's an open question on my clock. I started by using the carbon fibre rod as a spring, so no suspension at all. Q was low, so the latest version uses a spring made from the blade of a disposable safety razor 0.1mm thick. The length available for bending is about 1mm on a rod of less than 300mm*, but this was a wild guess. Pure luck, Q about 9000 on a good day. I've not found much on suspension spring dimensions or proportions in my various books.

                                            * my experimental clock is constructionally almost the opposite of John's. It's small, pulsed from the side at the bottom, and uses standard Arduino kit modules rather than special electronics. For example, I'm using a slightly modified IR Obstacle Sensor to detect beam break, which is crude compared to a decent Sharp sensor.

                                            The pendulum is sensitive enough for the period to be effected by air-pressure changes as well as temperature. I also discovered that my carbon fibre spring pendula was more sensitive to humidity than temperature, not a problem with Invar.

                                            The idea is partly to see how far I can get by replacing well-made mechanics with software backed by statistical analysis, hopefully filtering out noise caused by the basic beam break electronics and other causes. Performance is measured relative to GPS and NTP.

                                            Can't claim the project is going well, but the clock's inching forward and it keeps me amused!

                                            Dave


                                            Edited By SillyOldDuffer on 24/01/2023 19:29:39

                                            #630869
                                            S K
                                            Participant
                                              @sk20060

                                              Where did you get the thin BeCu strip? I've been looking for some of that!

                                              You may find the book "Accurate Clock Pendulums" by Robert James Matthys interesting. I think some of the material in it, such as suggested spring dimensions, is more anecdotal than rigorously scientific, but he basically claims "the shorter the better" to minimize undesired movement, e.g. wobbling at the bottom of the spring due to the impulse's effect on the top of the rod. But anyway, there's a lot of excellent information in it.

                                              Yes, I'm aware of the many pitfalls of using knives, but that's where I'm headed for now. I'm mostly interested in making a precision pendulum for the moment. In fact, I'm not even explicitly trying for a second's pendulum. And even pendulums mounted on a spring often use gimbals to insure that the orthogonal axis is perfectly level.

                                              I did make a 3D printed set of knives and anvils for the pendulum just to test the concept. It worked surprisingly well despite the dull edge and high friction. Starting with maybe five degrees of swing, it rocked freely for a good half-hour or more. There was no perceptible walking, though I don't know how well it would work over days or months. Now I have to test my extremely limited machining skills, on extremely limited equipment, to make a proper version. But if I had some nice spring material I might abandon the knives after all.

                                              If I did add time-keeping, I'd likely go with a purely electronic readout, or else three dials and three steppers rather than one stepper and a gear-train. I'd rate the speed of the clock mathematically rather than attempt to dial-in the pendulum's period.

                                              Thanks again!

                                              #630872
                                              S K
                                              Participant
                                                @sk20060

                                                Duffer:

                                                I've watched your project since you began posting with great interest.

                                                To be honest, I did not feel that using a rigidly-attached thin carbon rod as a pendulum would likely work out well, but it's been very interesting to see the progress, especially your detailed data analysis. I wish I could figure out why you have those strange discontinuities in timing. It's got to be something simple and basic – one of those slap-your-forehead moments.

                                                For a light pendulum, a very thin spring (e.g. 0.002&quot maybe 1/8 to 1/4" in width, and a spring length of maybe 1/8 inch is in the ballpark as recommended in that book.

                                                Carbon fiber is indeed capable of absorbing moisture. If it's "raw", you might think about putting a thin wipe-on polyurethane coating on it.

                                                I also think you should consider switching to the Sharp. It will be much better, and it's dead easy to use with an Arduino!

                                                Anyway, I shouldn't hijack this thread too much. I can comment more in your thread.

                                                Edited By S K on 24/01/2023 20:19:39

                                                Edited By S K on 24/01/2023 20:31:53

                                                #630876
                                                duncan webster 1
                                                Participant
                                                  @duncanwebster1
                                                  Posted by S K on 24/01/2023 15:46:24:

                                                  ……

                                                  The center of percussion doesn't feel right because the pendulum is not floating free in space, it's constrained at one end, and the goal is not to shift the whole pendulum horizontally. If impulsed there, an equal force on the hinge would seem to be applied. Therefore, I'd guess that below the COP would be better. The COG would probably be close to the COP, and also doesn't feel right for similar reasons. Therefore, I've naively presumed that as close to the bottom as practical would be best, if only because that would appear to apply the smallest force to the hinge (is this wrong?).

                                                  By definition if you hit something at the centre of percussion you get zero reaction at the point of support. Known as the "sweet spot" by cricketers as it doesn't hurt your hands.

                                                  #630877
                                                  S K
                                                  Participant
                                                    @sk20060
                                                    Posted by duncan webster on 24/01/2023 20:19:18:
                                                    By definition if you hit something at the centre of percussion you get zero reaction at the point of support. Known as the "sweet spot" by cricketers as it doesn't hurt your hands.

                                                    If you imagine the object is simply a uniform rod, floating weightless in space, and you hit it in the center (that would be the center of percussion in this case), then the entire rod will move in the direction of the force, including an imaginary support at one end.

                                                    It's not the case that the support will not feel a force. If it didn't feel any force, then that end would not move by definition, regardless if it's held or left free. You may mean something similar, like there's no rotational torque. No? (I'm not claiming knowledge here, I'm inquiring.)

                                                    #630885
                                                    duncan webster 1
                                                    Participant
                                                      @duncanwebster1

                                                      Nope! The centre of percussion is not the point where you choose to hit the object, it is the point where if you hit the object there is no reaction at the point of support. I suggest you let Google be your friend

                                                      Edited By duncan webster on 24/01/2023 22:23:29

                                                    Viewing 25 posts - 1 through 25 (of 103 total)
                                                    • Please log in to reply to this topic. Registering is free and easy using the links on the menu at the top of this page.

                                                    Advert

                                                    Latest Replies

                                                    Viewing 25 topics - 1 through 25 (of 25 total)
                                                    Viewing 25 topics - 1 through 25 (of 25 total)

                                                    View full reply list.

                                                    Advert

                                                    Newsletter Sign-up