Workshop crane project

Advert

Workshop crane project

Home Forums Work In Progress and completed items Workshop crane project

Viewing 25 posts - 26 through 50 (of 72 total)
  • Author
    Posts
  • #718913
    Nigel Graham 2
    Participant
      @nigelgraham2

      Odd. I came straight here without logging-on!

      The industrial version of your bean tin, for larger chain-blocks, is something resembling a duffle-bag, and I have used similar. I’ve also used an old plastic bucket but that is bulky. An empty, large plastic paint-can might suit.

      Advert
      #718924
      JA
      Participant
        @ja

        I am interested in how you are going to build the cube. Pully blocks etc are the easy bits.

        JA


        #718929
        Neil A
        Participant
          @neila

          The neutral central position on lever hoists should only freewheel if there is no load on the chain. If there is a load on the chain the brake is engaged and the load held. At least this is how mine works, I think this is a standard feature of lever hoists, otherwise you would dump the load going from lifting to lowering.

          I hope that others will confirm what I have said, the instructions on these can be a bit confusing until you actually use one.

          Neil

          #718942
          Nicholas Farr
          Participant
            @nicholasfarr14254

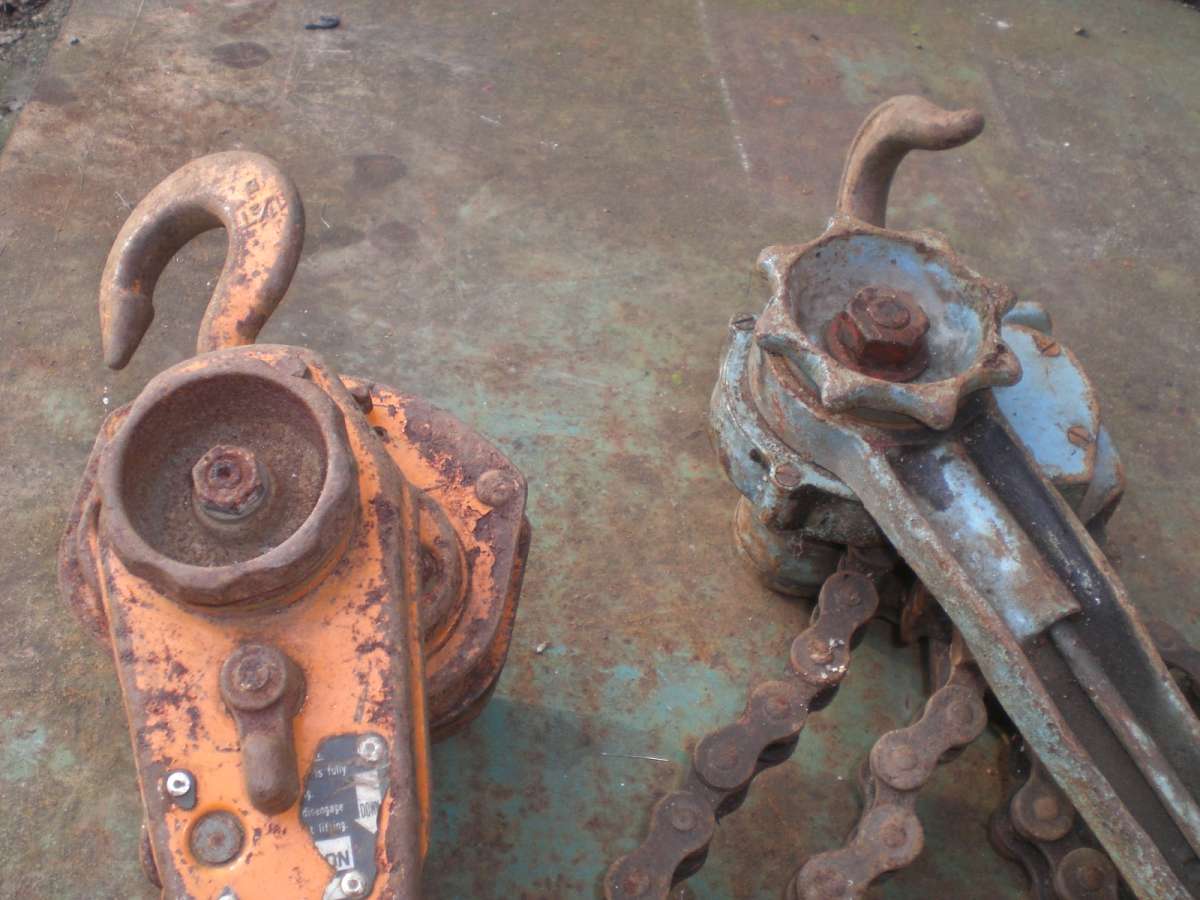
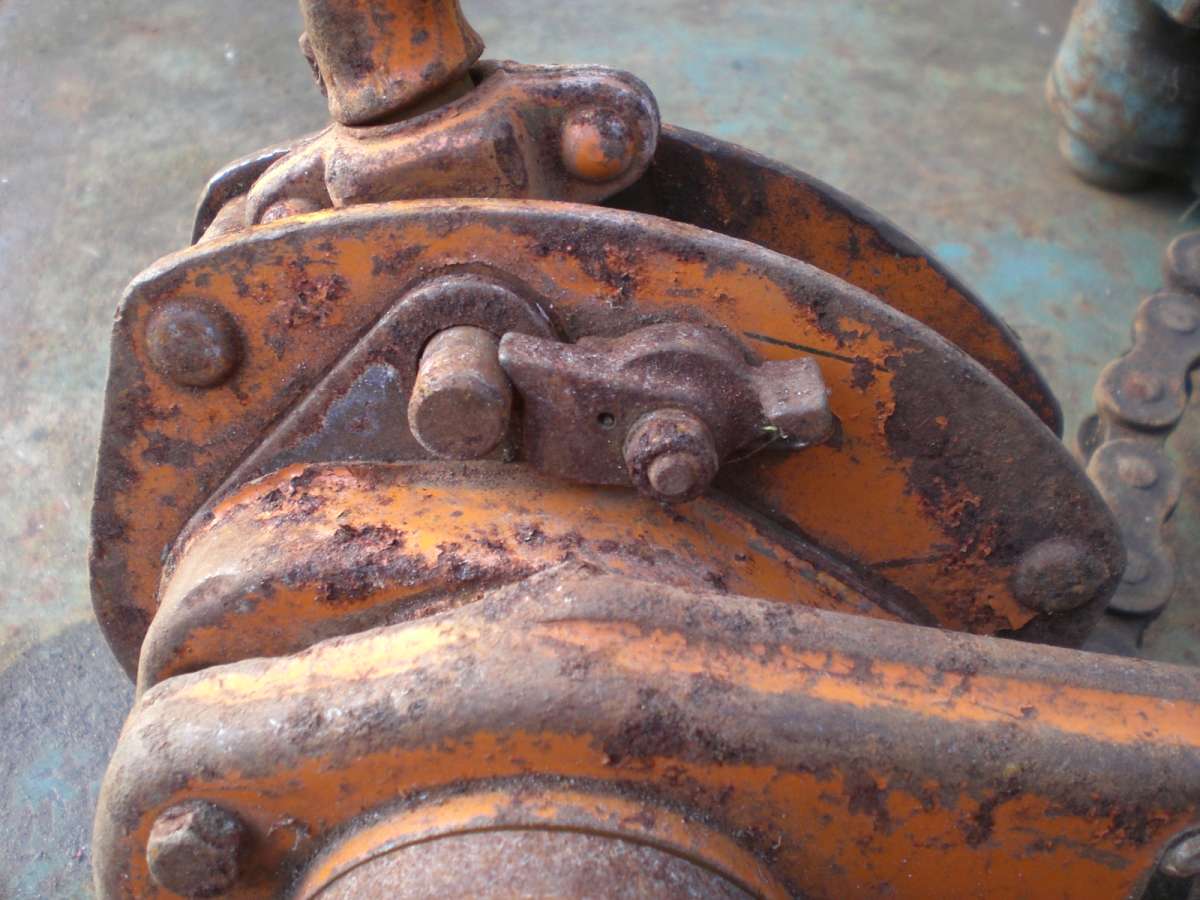
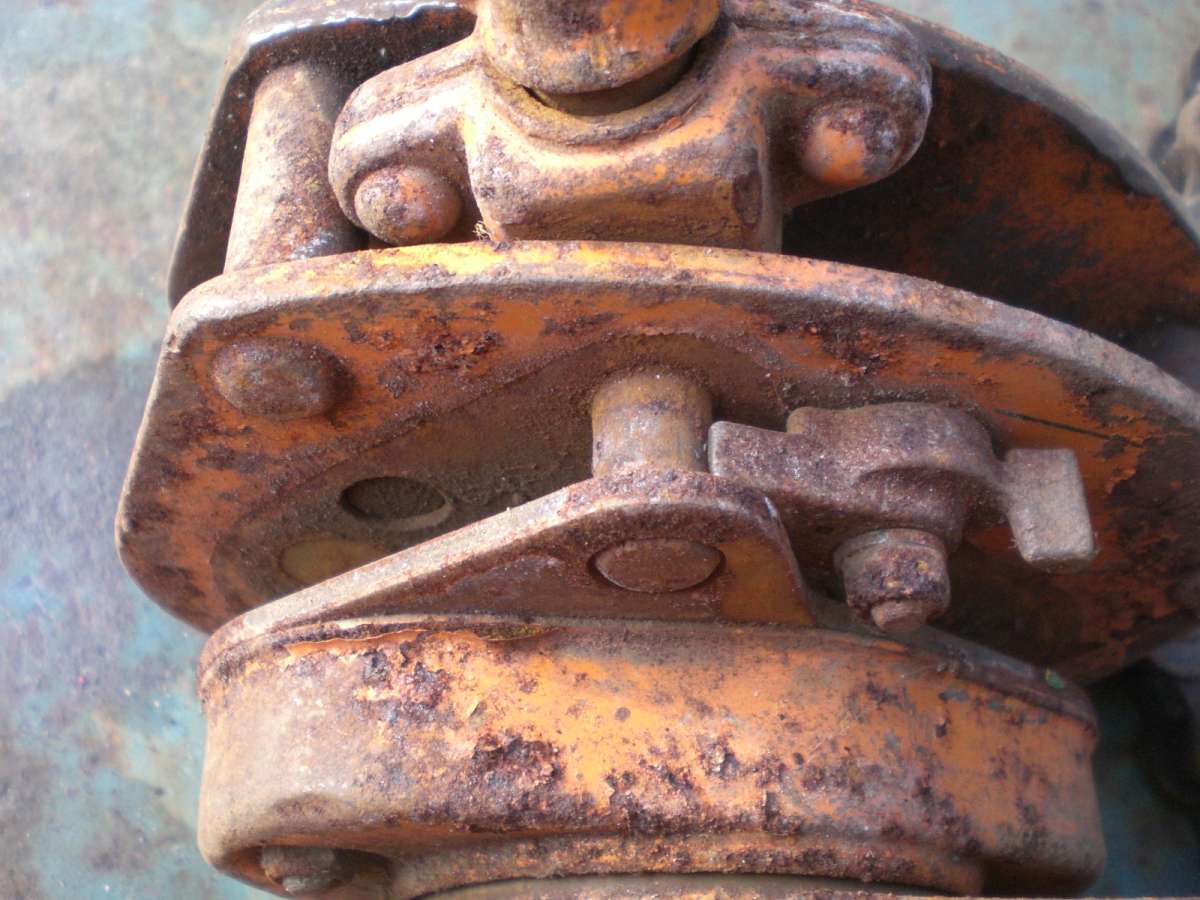
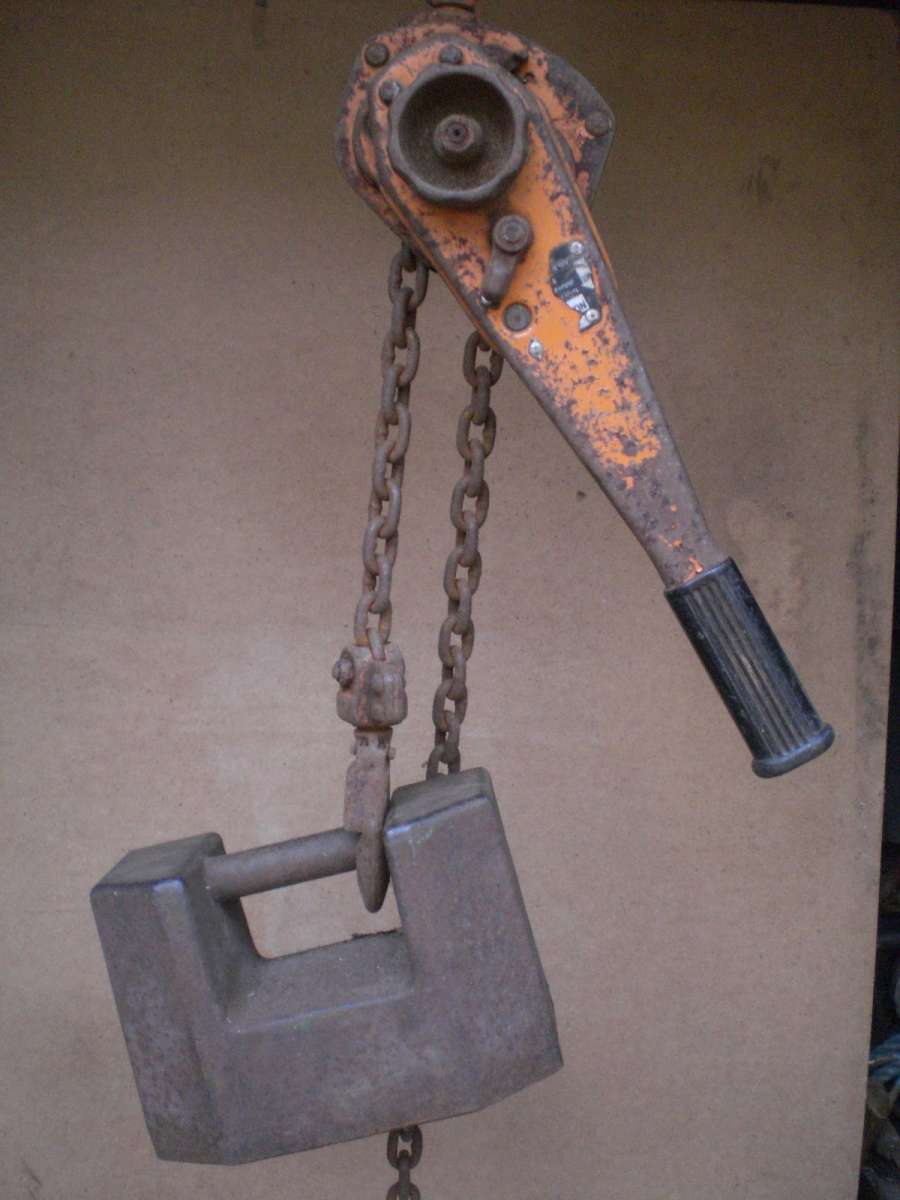
            Hi, I’ve used these lever type hoists throughout my working life, very frequently, and of various makes, none that I’ve ever used will freewheel downwards with the up/down lever in mid position, even if it is unloaded, some you can take up the slack with the lever in mid position by pulling on the slack end of the chain. However, my orange one in the photos below has the option of taking the operating lever out of gear altogether, with a separate locking lever, which will allow the chain to move freely both up and down, but you can’t really unlock it accidently, as you need both hands to unlock and disengage it out of the gear, and if there is a heavy load on it, you won’t be able to disengage the lever from the gear, the first one of the locking lever, shows it locked in, and the second one with the operating lever disengaged.

            CIMG3353

            CIMG3356

            CIMG3357

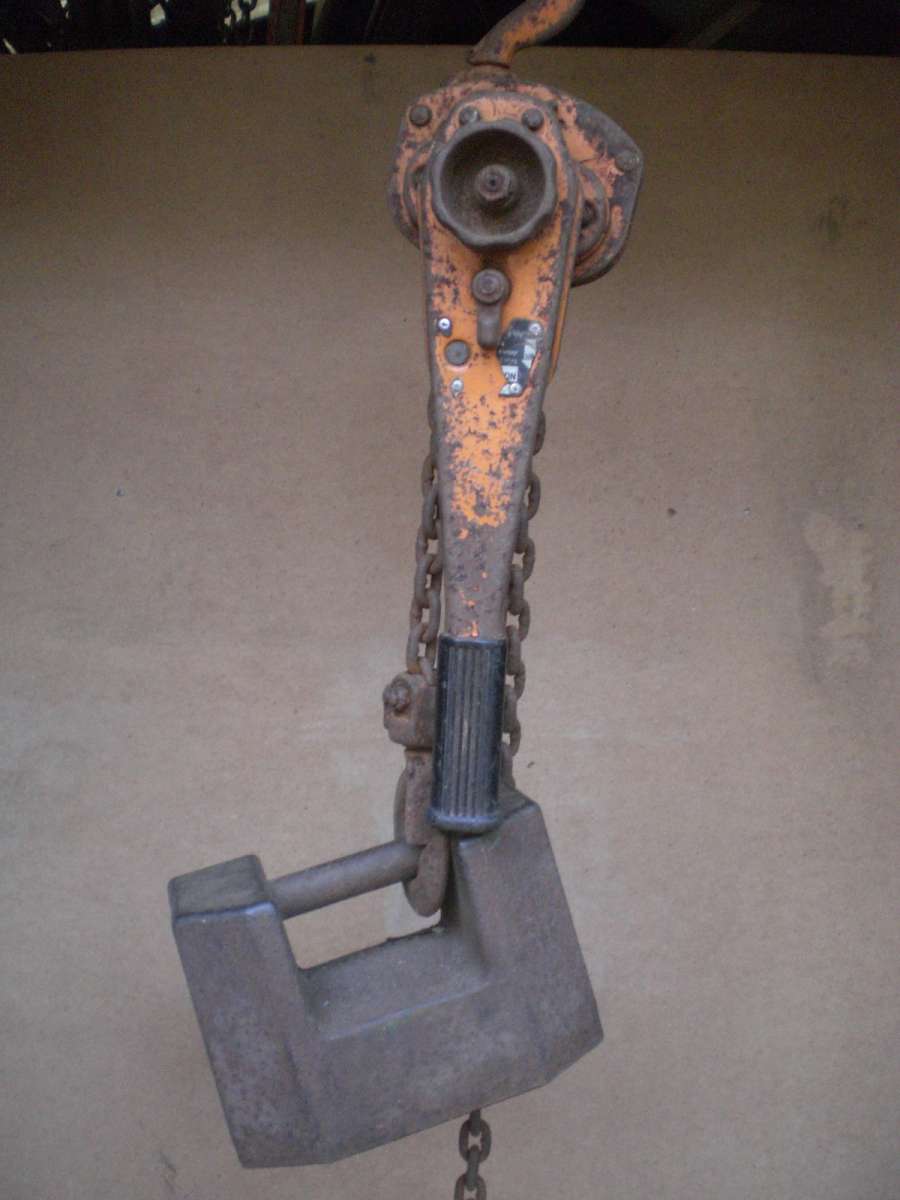
            Below it is holding up a 25Kg weight, with the up/down lever in mid position, the operating lever can the be swung up out of the way, and parking it by moving the up/down lever to the up position, but it could also be swung up and parked on the other side.

            CIMG3358b

            CIMG3359b

            If you read through the description in the link that Sonic Escape posted, it will tell you that you can lift and land your load safely, so yes I’m confident that your load will hold with the up/down lever in its mid position, as it only disengages the operating lever and nothing else, and there is no suggestion that the chain can free wheel downwards.

            Regards Nick.

            #719025
            Sonic Escape
            Participant
              @sonicescape38234

              Today I had some time to work on the cube. I cut the pipes with an Evolution TCT saw. In the past when I built the workbench I borrowed a saw with a large abrasive disc. It worked but it made a lot of noise and dust. The new saw is a huge improvement. I cuts metal like a hot knife in butter. No dust. No hot metal.

              Also the cut looks perfect. I started with an inverted U shape section that is the front of the cube. I used an auxiliary piece of metal to keep the two legs from moving during welding. The rusty one at the bottom. A hint from watching too many Pakistani welders videos 🙂  I welded it only in a few point to be able to cut it easily.

              My welding skills improved a little from the last time. Al least I’m not making holes so easy 🙂 I used 6013 electrode because they start the arc very easy. This is the welding machine. I set it to 65A. The pipe wall is 3mm thick.

              But I still struggle when the surface is not flat. The melted metal refuse to go when it supposed to.

              Then I decided to switch to ESAB 7018 electrodes (2mm). These are a pain in the ass to start the arc. They remain welded to the pipe sometimes! Horrible. But once I’m able to ignite the arc they produce a better weld in these corners. Also I read that 7018 welds are less prone to snapping. I also increased the current to 90A. And made a few holes as a result. This is one example.

              At the end I removed the auxiliary pipe. To my surprise, the two legs immediately came 5cm closer. The two 45 degree pipes that I added to each corner created a lot of tension. It still eludes me how to avoid this kind of distortions. Because of these I change the tactic. The second U will be replace by a with a full rectangle frame.


              #719035
              Nigel Graham 2
              Participant
                @nigelgraham2

                The full-frame is the better design generally.

                Also try tack-welding it, corner by corner, a bit at a time, before making the full-length welds. That tends to lessen the distortion.

                Assembling it lying directly on those slabs won’t help accuracy. I appreciate it’s a large frame so not easy to handle, but clamp spare pieces of material across to hold the tubes correctly to each other, and put packing such as bits of hardboard, plywood etc. under the tubes near the welds to set everything square and parallel before you start welding.

                It’s worth using a spirit-level and packing to help alignment.

                Did you clean the steel close to the joints beforehand? Any mill-scale, oil, etc. will hamper obtaining decent welds.

                I’d also suggest experimenting for settings and practice on off-cuts before the real thing.

                Can can raise the frame parts to a more comfortable working height, to help you? Portable benches, folding steps, stacks of concrete blocks, etc., anything like that as long as they are stable and you can set the tubes level across them.

                The rest is down to the welder not welding-set: what makes my welding generally ropey is I don’t do enough to be good at aiming and feeding the rod properly, and I have always had wobbly hands! Though I do prepare the steel first by cleaning and bevelling the edges, to give me a fighting chance. (I used very little welding on my workshop crane, and only in places where failure is unlikely and would not have disastrous results. Otherwise it is all bolted.)

                #719067
                Sonic Escape
                Participant
                  @sonicescape38234

                  I did tack-welding very careful. The shape remain perfect after I finished the welding. The problem is that there was a lot of tension in the frame. And when I removed the bottom side the end of the two legs came closer.

                  Is not a serious issue. I can pull them apart before welding them on the next part. But is is annoying. At least all three sides remain coplanar.

                  I have a large and very flat concrete surface. But is is behind the house and there was no sun there. Yesterday was around 0°C here. But in the sun it was quite warm. Cold drains energy faster.

                  I never cleaned the metal before welding. I thought that stick welding is immune to dirt/rust/paint. At least after the arc is ignited. Anyway there pipes are brand new. They are black but it is not paint. Must be something from hot rolling.

                  For a long time I keep thinking to build a large outdoor welding table. But it will look ugly since I don’t have a place where to store it. Unless I made detachable legs, hmm …


                  #719097
                  Pete Rimmer
                  Participant
                    @peterimmer30576

                    The middle lever position on every lever chain hoist I ever used simply allowed the handle to swing freely, the load is always held by the clutch.

                    #719103
                    Nicholas Farr
                    Participant
                      @nicholasfarr14254

                      Hi Sonic Escape, I largely agree with what Nigel Graham has said about tacking all the pieces together before welding any parts fully, it’s common fabrication practice. Once tacked, it’s best to weld in a sequence, and doing welds on opposite corners / sides, will help to keep distortion under control. The black stuff on your metal, is called Mill Scale, and should be removed from the areas you want to weld, as it has resistance to electricity, which will often result in arcing where you don’t want it too, and very often not where you do want it too, hence, where you have one of your welds onto a cut edge, but has missed the uncut / unclean edge, and of course, Mill Scale is an impurity, which you really don’t want in your welds.

                      Pete Rimmer has endorsed exactly what I’ve said in my post yesterday.

                      Regards Nick.

                      #719136
                      Sonic Escape
                      Participant
                        @sonicescape38234

                        Now you made me curious, I’ll remove the mill scale to see the difference. So far I didn’t paid much attention to metal surface before welding.
                        Today I welded the second part. A full rectangle frame.

                        It is very heavy and looks pretty solid. After many hours of cutting and welding I wanted to put it on top on the yesterday frame. And then the horror happened!

                        I saw that there is a 20cm difference in width between the two!!! How could this be?! I didn’t decided yet if this is funny or embarrassing. My wife started to remind me about the old saying “measure twice and cut once”. I suggested that this might not be a good moment.

                        But quickly I realized that this is not a as bad as it seems. Actually quite the opposite. The two bottom sides don’t have to be parallel anymore. This doesn’t limit in any way the cube to slide over the mill. But it makes it easier to turn in small spaces. I looks like “it’s a feature not a bug” can be extended also to metal works! And one more reason to work without very detailed plans.

                        Now to end with something positive, the magnetic stick that came with the saw works great. I didn’t even knew that this things exist.


                        #720260
                        Sonic Escape
                        Participant
                          @sonicescape38234

                          Today I made some progress with the cube. I drilled the holes for the castors on the lower sides:

                          I’m going to put 4 wheel on each side instead of only two. Just to be sure.

                          So I need to order 4 more. These things are not cheap unfortunately. After this I started to assemble the two frames. I don’t have a large enough flat surface so this was tricky. First I checked with a level if the two 100×100 bottom sides are horizontal. If yes, than that means they are coplanar. Next I checked again with the level if this plane is perfectly horizontal. I had to add some 5mm metal plates under. Then I used a ladder to support the first vertical frame before welding it.

                          In the same way I added the second frame.

                          The welding quality is still not great. But I’m adding 45 degree short tubes on every corner. This is greatly increase the rigidity and reduce the stress on the welds.

                          I think tomorrow I’ll finish most of the welding. Unfortunately this week rained a lot and everything is rusty now. But this should not be a problem for the rust converting solution.

                          By the way, the cube is designed in a way to allow me to use the mill while it sits on top of it. This is possible because of the awkward location of the hand wheels on this machine. So I can save space in the garage.

                          #720336
                          Diogenes
                          Participant
                            @diogenes

                            Sonic, maybe it would be worth checking those lower welds with an angle grinder to reassure yourself that you are getting the penetration and completeness of weld that you expect.

                            ..maybe the earth-clamp isn’t giving the best contact..?

                            #720343
                            Sonic Escape
                            Participant
                              @sonicescape38234

                              I have to wait for a working day for the grinder. The frame resonates or something because it makes a terrible noise, much stronger that you would expect. I can’t do it without headphones and in weekend is too quiet here. I’m thinking at the neighbors.

                              The clamp is fine because I easily make holes in the 3mm thick tube at 70A with a 2mm stick if I’m not careful. I’m considering “renting” a welding expert for one day to enlighten me what I’m doing wrong. Also I have a friend who struggles with welding. Hi believes that the solution is a MIG machine. Next week he will to buy one and I will visit him.

                              #721042
                              Sonic Escape
                              Participant
                                @sonicescape38234

                                Today I painted the frame with a zinc phosphate primer. Before that I cleaned the steel with the angle grinder with a wire brush. Then I washed it with white spirit and cover it with rust converter. Next I’m going to paint it with a red Hammerite paint.

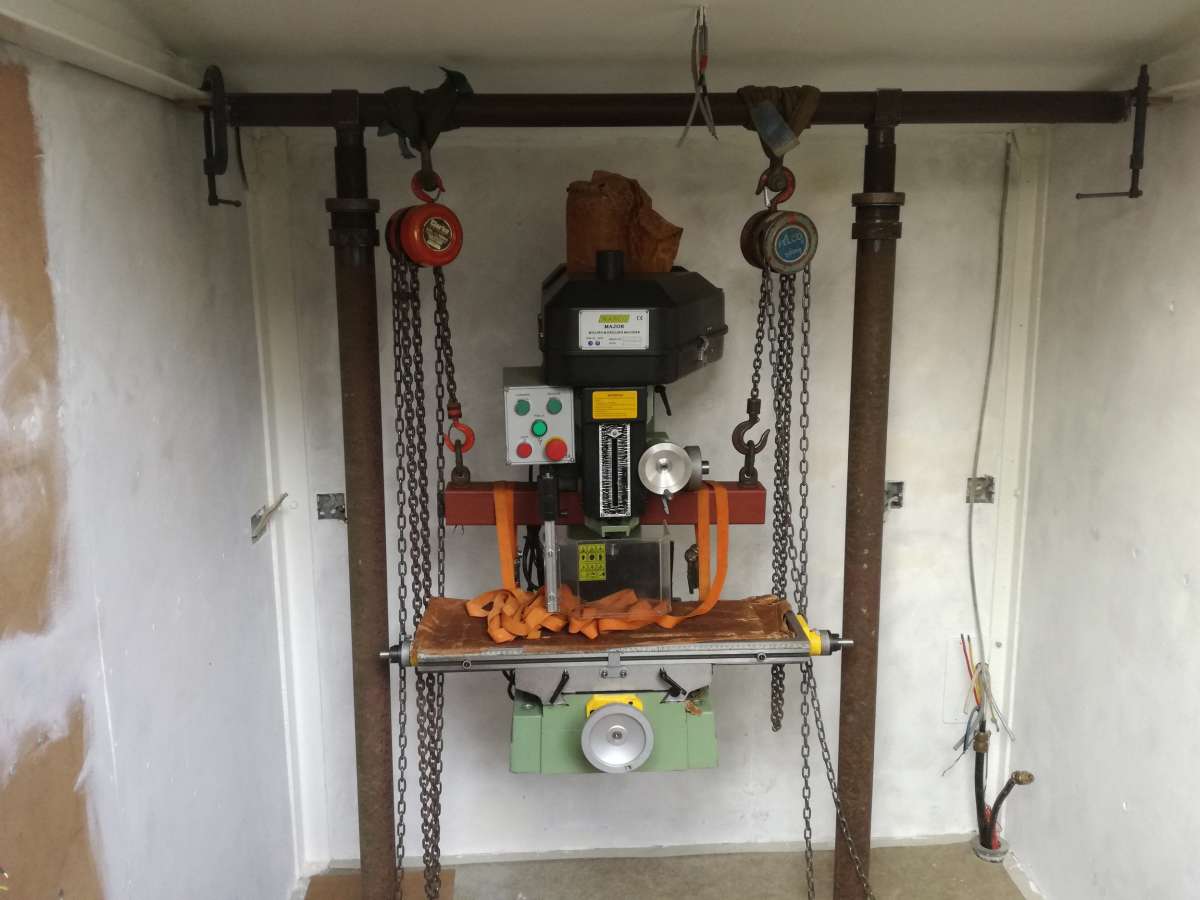
                                In the end I ordered two of these 2t chain blocks. I liked more the lever type hoists but they cost 3 times for the same lifting weight. I want to use both to lift the mill. One chain block for the two back lifting points and the other block for the front. For some reason the chain blocks manufacturer disagrees with my plan …


                                #721062
                                Mark Rand
                                Participant
                                  @markrand96270

                                  Be warned that MIG welding sets can easily make very ‘pretty’ welds, with almost no strength!

                                  It is a good idea to practice welding the joints that you want to use on pieces of metal that you can then cut into 50mm sections to inspect the welds and to try to break them in a vice with a hammer.

                                  If you can obtain a 2% nitric acid solution in alcohol, you can polish a section of the weld and use the mixture to show you how far the weld has penetrated into the metal.

                                  #721173
                                  Nicholas Farr
                                  Participant
                                    @nicholasfarr14254

                                    Hi Sonic Escape, looks like I’ve been doing it wrong as well.

                                    Test Lift

                                    Must have been trained wrong in my day job as well, I guess, but we very often had to lift very large items using two and sometimes three chain blocks, as there was no other way to do some jobs.

                                    Regards Nick.


                                    #721225
                                    Mark Rand
                                    Participant
                                      @markrand96270

                                      Nothing wrong with using two or more hooks for one load provided all are working within their limits!

                                      It’s difficult to do things like turn a steam turbine top casing the right way up without wrecking it (or the floor) or install a generator stator with only one crane. For that matter, it would have been darned near impossible to safely turn the Beaver milling machine column and knee castings over, so they could be scraped, with only one hook in the shed  😀

                                      #721244
                                      SillyOldDuffer
                                      Moderator
                                        @sillyoldduffer

                                        Sorry to arrive late with a negative observation about Sonic’s structure, but still worth making I feel.

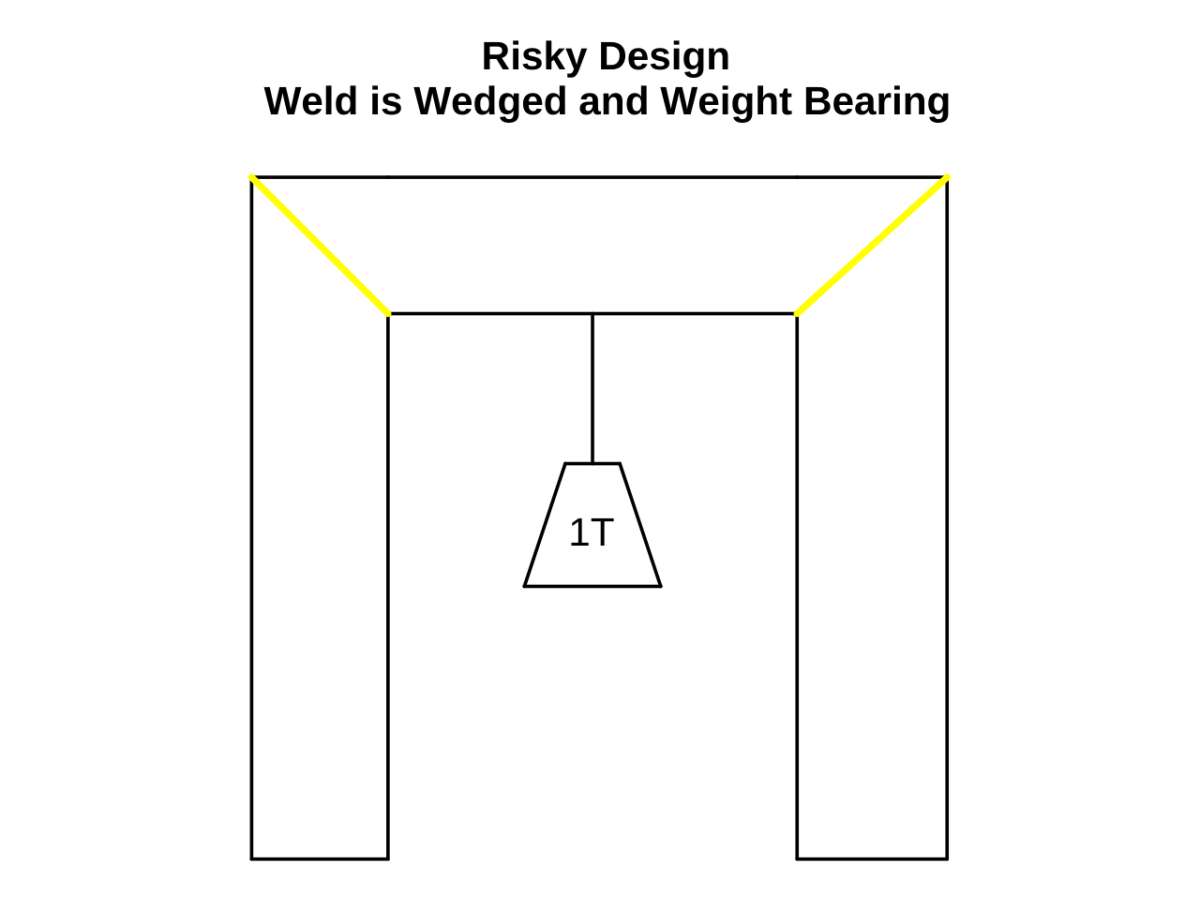
                                        Sonic’s crane design connects box tubing with diagonal welds at the corners, which is risky:


                                        https://i.ibb.co/H23ByLg/image.png

                                        Consider three possible arrangements.

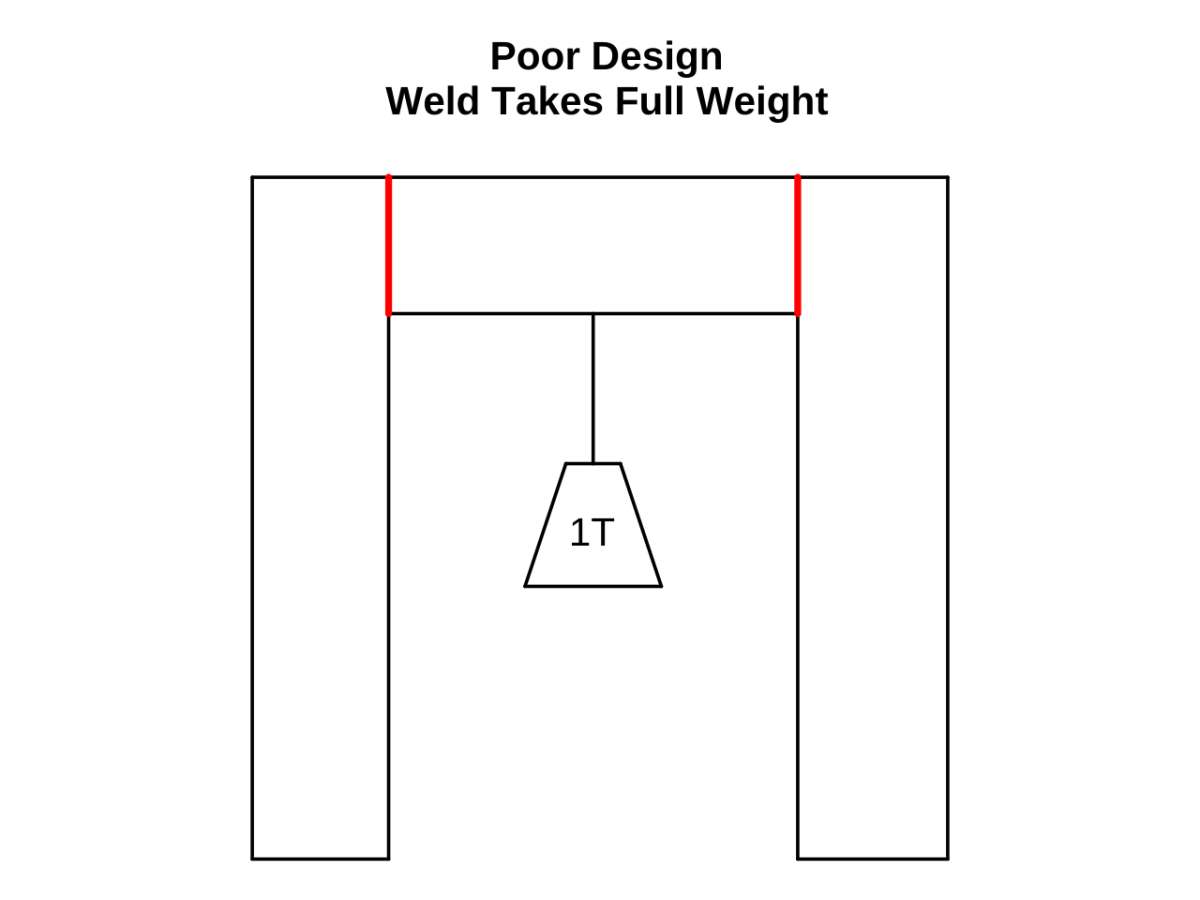
                                        1.  The top beam is welded to the columns.  This is bad because the welds have to be perfect, which can’t be guaranteed in the absence of proper equipment, training, experience and x-ray crack detection.  If a weld fails, the structure collapses.

                                        poor

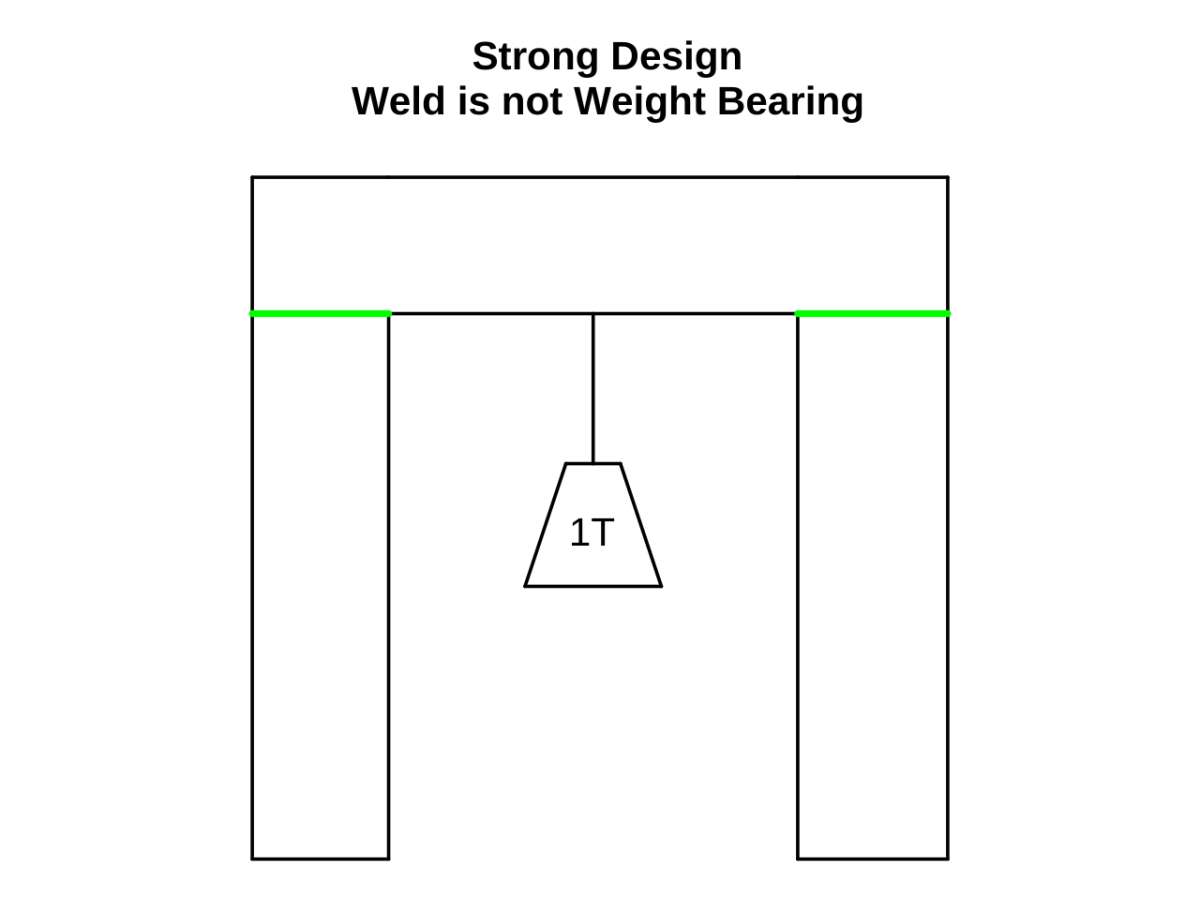
                                        2.  The need for perfect welding can be removed by altering the design so that the weld doesn’t need to be strong:

                                        strong

                                        Sonic’s corner design is risky, not awful but not ideal either.   The diagonal welds are stressed by the load, and the joint shape tends to wedge the columns apart sideways.  If a faulty weld fails the structure will collapse.

                                        wedged


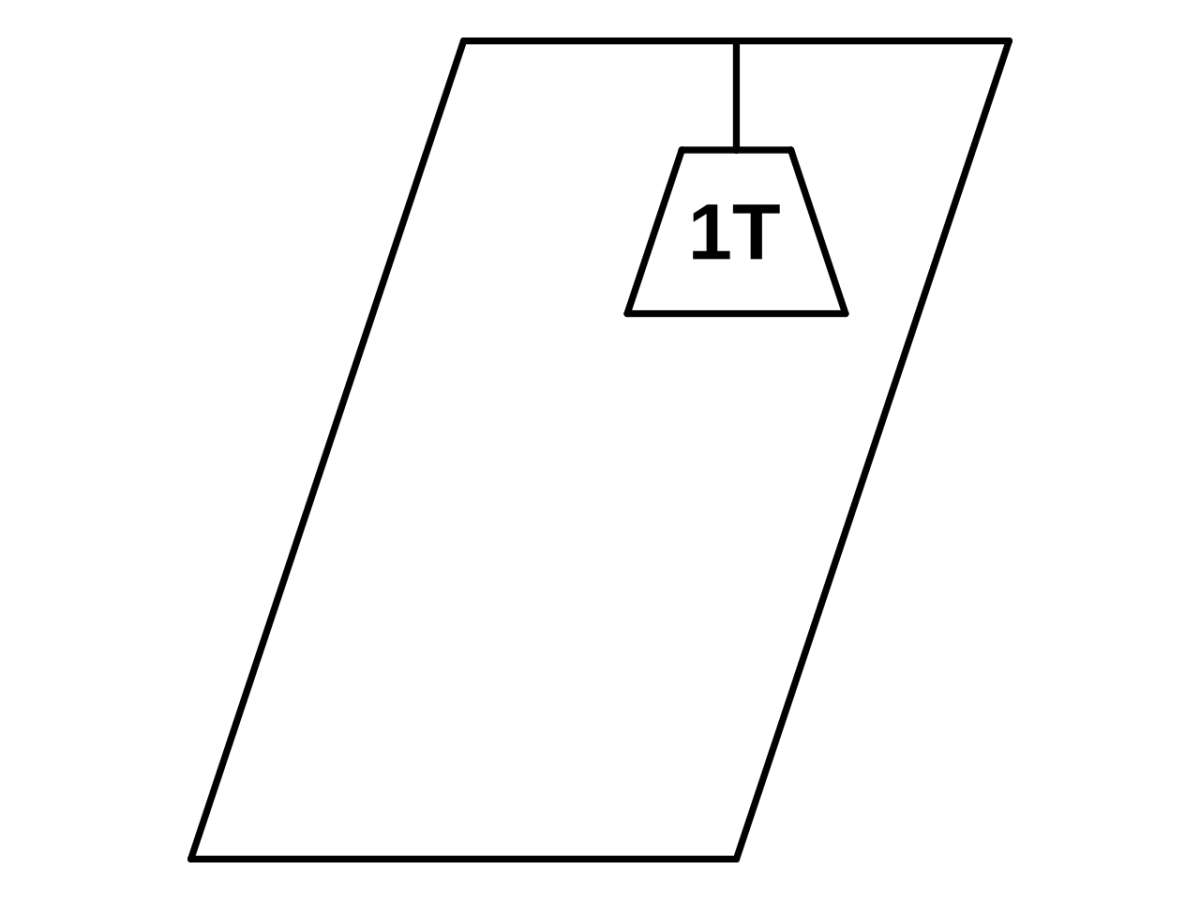
                                        Of course the risk of collapse in the real build is mitigated by Sonic’s diagonal side braces, but I think these are only intended to resist a parallelogrammic / scissor collapse whilst the crane is moving.  However, assuring the strength of these welds is also important.

                                        parallel

                                        There’s another worrying issue.  Sonic wants to use a crane rather than rollers because his workshop is in a domestic room with underfloor heating and a delicate tile surface.   The idea may be flawed – even though rubber tyres help, wheels generally exert more pressure on the floor than rollers because their bearing area is smaller.  Therefore, I suggest laying a temporary steel plate track across the floor for the wheels to run on during the move, it’s purpose being to spread the wheel pressure over many tiles.

                                        Also, I suggest the mill be lifted up just high enough for girders to be slid under it and the crane base.  Before moving the crane, the mill is set down on the girders.  Then the base takes all the weight whilst the crane is moved, removing most of the strain off the structure, eliminating scissoring, and reducing the risk of the mill toppling.  (Toppling is always a problem with machine tools because of their horrible high centre of gravity.)

                                        Solid ground floors are usually plenty strong enough to take the weight of even a massive machine, but I’ve no idea how much weight an underfloor heating system will take before breaking. Anyone know anything about them?

                                        Dave


                                        #721273
                                        JA
                                        Participant
                                          @ja

                                          Dave

                                          I am glad someone else has found this structure risky. I have been following this topic with a sort of morbid fascination.

                                          The main reason for not posting anything is that I have too many comments. Just making two:

                                          I have seen too many failed fillet welds in my life. The firm I worked for for most of my life generally banned fillet welds. Before that, in the steel industry, it was generally on award winning designs using our tubes such as ski lifts and play ground swings.

                                          In industry, in the UK at least, the stresses in such a structure would be assessed.

                                          In my opinnion it is not a fail safe structure. More worryingly I cannot suggest simple ways of improving it. I expect most on this forum would say I am wrong.

                                          JA


                                          #721455
                                          Mark Rand
                                          Participant
                                            @markrand96270
                                            On JA Said:

                                            Dave

                                            I am glad someone else has found this structure risky. I have been following this topic with a sort of morbid fascination.

                                            The main reason for not posting anything is that I have too many comments. Just making two:

                                            I have seen too many failed fillet welds in my life. The firm I worked for for most of my life generally banned fillet welds. Before that, in the steel industry, it was generally on award winning designs using our tubes such as ski lifts and play ground swings.

                                            They aren’t fillet welds. They’re butt welds!

                                            As to not using mitre joints, for rectangular box section it’s the best weld to use. It has the longest weld length (lowest stress) and is the only corner joint where the sections match up.

                                            One should also point out that this is a very low stress structure…

                                            #721716
                                            Sonic Escape
                                            Participant
                                              @sonicescape38234

                                              I’m more optimistic about this structure. I used larger tubes with thicker walls than necessary to compensate for my poor welding skills. In this way there is enough welding length to keep tings together.

                                              Now I realized that there was a better way. I used castors instead of much more reliable rollers to be able to rotate the frame in close spaces. With the milling machine suspended. I wasn’t sure if with rollers this would be possible. But there is no need for this. When I want to make a turn I could simply lower the mill on the floor, rotate the frame in the desired direction and then lift it back! No need to have castors. So I’m contemplating to buy some rollers.

                                              This is how it is looking now. It needs a second coat of paint. I can move it with one hand only. Unfortunately not all wheels are always on the ground. Turns out that the surface is not so flat afterall. One more reason to use rollers. 

                                              I suppose the yellow rope will hold the weight. I need only to cut one more bar to add it to the base on the open side. This piece will be hold by screws and I’ll add it after the mill is inside. Without it the two sides might depart from each other.

                                              About the floor. I’m not worry that it will crack. But it might crack the walls. In the living room wall I saw a few tiny horizontal  cracks about 40cm in length. I think the foundation of the house is not deep or strong enough. If I add a few tons of stuff in the garage maybe the walls might crack there too. In the last years here there was a housing boom and unfortunately nobody is checking the building quality.

                                              #721734
                                              Nicholas Farr
                                              Participant
                                                @nicholasfarr14254

                                                Hi Sonic Escape, I was wondering if you were going to put a bolt on bar across the front at the bottom, and I recommend you do before lifting any weight, but I wouldn’t use rope to hang your chain blocks on, although I don’t know if you can get endless straps where you are, which come in various lengths and load capabilities.

                                                e.g. https://www.rhtltd.co.uk/product/2-tonne-round-slings/

                                                The 0.5 meter ones would probably do, so when you pass one end over your lifting point, and then through the other end of the strap, your block hook will be closer to the beam, when hooked in the the loop hanging through, it’s what is known as “choking” and will prevent your strap from sliding along the bar, and nothing can come undone during your lift.

                                                Regards Nick.

                                                #721738
                                                noel shelley
                                                Participant
                                                  @noelshelley55608

                                                  I have refrained from comment until now, unskilled use of a welder fills me with fear for those who will use or be near the construction. This job is a graphic example of what I mean, the poor welding of a load bearing structure.

                                                  The welding rod you have used to start with eg 6013, the first 2 numbers give the tensile strength the others the coating type etc. For this work 6013 is the right rod to use but there are many types / quality of 6013 rod, some much easier to use than others. 7013 will be no benefit. Cheap welders or a low open circuit voltage don’t make starting the arc easy and mains voltage drop may make matters worse. Did you dry the rods before use, this is important. Blowing holes is often caused by setting the current too low – YES low !

                                                  A fitting formed over the top rail to take the chain blocks will reduce the block height and be MUCH safer than the rope !. Use a ring bolt or lifting eye.

                                                  IF you are not skilled in MIG welding PLEASE DO NOT use one on this type of work.

                                                  Having all castored wheels runs the risk of loosing control of the load if the surface is not flat.

                                                  Good Luck. Noel.

                                                  #721971
                                                  jaCK Hobson
                                                  Participant
                                                    @jackhobson50760

                                                    Lifting heavy things gives me the willies which I think is a very healthy feeling to maintain whatever equipment is being used and helps make up a bit for a lack of knowledge or certified equipment. Same when using powered saws, planers, and buffing wheels (although I get lulled into false sense of security with them.. which is why they are so dangerous). I think I’d prefer to be using this lifting crane than my engine hoist and I enjoyed the detail in the thread. Thanks Sonic.

                                                    #722115
                                                    John Doe 2
                                                    Participant
                                                      @johndoe2

                                                      Yikes !

                                                      Sorry, but looking at that welding, and joint orientation, I would not want to be standing nearby when a heavy load was hoisted or supported. It just feels wrong.

                                                      When designing a structure, you need the structure to support the load, and the joints just hold the structure together and stabilise it in position. Ideally you should not have to rely on the strength of any joints in supporting the load – just in case. The top load bearing pieces should rest fully across flat tops on the uprights, like the lintel over a house doorway, not relying on a questionable 45° weld.

                                                      SoD’s comprehensive post above, and those from the other experts are worth reading again, and please be careful. Consider what would happen if a joint suddenly let go under load, and the item being moved fell without warning and tipped over on top of you. Wear appropriate safety gear, e.g toe-tectors.

                                                    Viewing 25 posts - 26 through 50 (of 72 total)
                                                    • Please log in to reply to this topic. Registering is free and easy using the links on the menu at the top of this page.

                                                    Advert

                                                    Latest Replies

                                                    Viewing 25 topics - 1 through 25 (of 25 total)
                                                    Viewing 25 topics - 1 through 25 (of 25 total)

                                                    View full reply list.

                                                    Advert

                                                    Newsletter Sign-up