Which Stuart engine is this

Advert

Which Stuart engine is this

Home Forums Stationary engines Which Stuart engine is this

Viewing 25 posts - 26 through 50 (of 54 total)
  • Author
    Posts
  • #101814
    NJH
    Participant
      @njh

      Hi Ian

      I agree with Michael and think that blued steel was originally supplied with the kit. My own preferencs is for wood of some sort – I just think it looks nicer!

      I have sent you a PM.

      Regards

      Norman

      Advert
      #101944
      Ian S C
      Participant
        @iansc

        I made a cardboard template this evening for the cladding.I think I'v worked out how I'll make the butterfly valve for the govenor. I'v got oil cups to do, and drain cocks. I'm thinking of modifying, some little plug cocks that used to be part of an aquarium air system. I noticed that on the bearing area on the side opposite the flywheel there is a large area that has been filled with bronze, whether the casting was damaged like that (blow hole), or damaged by the person who mutilated the rest of it don't know, but it will be ok. Ian S C

        #101945
        JasonB
        Moderator
          @jasonb

          The butterfly valve can be made by mounting a sutable dia rod at an angle in the mill vice, use a slitting saw to cut the end at an angle and then lower the saw to take a slice off the rod. Thats how I did the one on my Stuart beam.

          Drain cocks can be made with a simple home made tapered reamer

          #102078
          Ian S C
          Participant
            @iansc

            JasonB, the butterfly was a piece of cake, set the rod over to about 20*, and cut off a slice, the spindle is 5/32", and I split that to take the butterfly. After I sort the linkage, a drop of soft solder will hold it in place, I had thought of drilling and tapping — too much like hard work. The bit that is puzzling me next is the linkage between the flyweights, is there a little bit that fits over the shaft, and sticks out of the slots. At least now I know that the rotating parts require a keyway on the inner part with the pully, would a grub screw through the outer part be enough to take the drive, maybe a brass one. Tomorrow, the Swivel block lever bracket, the Swivel block and the lever, and theValve Lever, I'll leave the connecting rod untill I'v assembled things. Ian S C

            #102833
            Ian S C
            Participant
              @iansc

              Just a little question, what clearance should I allow for the con rod hole in the front cover of the cylinder, I'll be using teflon tape for packing in the gland. I'v got the govenor sorted, but something is a bit out, it needs about 7/16" joggle in the link from the govenor to the govenor body on the steam chest, never mind I'm not changing it. Ian S C

              #103815
              Ian S C
              Participant
                @iansc

                I'm looking at the crankshaft, the keyway has been chewed out by some metal eating insect, well I think the other chap tried using

                the lathe as a shaper to plane the keyway, but it did'nt work. I think I should fill the origional keyway, and start again. Is the key all that holds the flywheel to the shaft, or does it have a grub screw?

                Ian S C

                #103818
                JasonB
                Moderator
                  @jasonb

                  Several of their other engines use just a grub screw so the No9 may well be the same. If its just going to run for show then a grub screw will be fine but if you intend to drive something then a key would be better.

                  A tapered gib head key should hold tight on its own or you can add a grun screw to bear on the key which saves marking the crankshaft.

                  Whats the fit of the flywheel like on the shaft? if its loose it may be better to bore out teh flywheel and fit a bush, the bush can be slit beforehand to form the keyway.

                  J

                  #103839
                  Ian S C
                  Participant
                    @iansc

                    Jason, I'v cut the keyway a few thou deeper, and straightened things out a bit with a slot drill, have not measured thw keyway in the flywheel yet, but (in full size) I'm used to making keys to fit unequal sized keyways, so I should be able to fit this one , so tomorrow I'll make a little gib head key. The flywheel fits quite firmly, so thats a good start.

                    I was reading a bit this afternoon about tapered collets, but I think I'll stay away from that for this engine, it would go well on a hot air engine.

                    Grub screw damage: on my hot air engines I use brass screws on pullies etc., as these are changed frequently. Two brass screws hold any of the bits on my motors as they don't produce much more than 5 watts at the crankshaft. Ian S C

                    #103840
                    NJH
                    Participant
                      @njh

                      Hi Ian

                      "Tubal Cain" shows just the key – no grub screw – in his instructions.

                      Regards

                      Norman

                      #103857
                      Ian S C
                      Participant
                        @iansc

                        Thanks Norman, thats the way I'm going. Ian S C

                        #103860
                        Sarah F
                        Participant
                          @sarahf

                          Hi Ian,

                          i know you are going with the Keyway, but just for information the new Stuart No.1's have gone from a Keyway to a grub screw. The crankshaft diameter has been reduced where the flywheel fits, this allows the flywheel to butt up against the larger diameter on the crankshaft. The grub screw fitting in at an angle not only stops the flywheel from rotating on the shaft, it holds it snug against the increase in diameter of the crankshaft.

                          I presume that if there isn't a change in diameter on the crankshaft then the keyway is the better way to go.

                          Regards,

                          Sarah

                          #103877
                          Terryd
                          Participant
                            @terryd72465
                            Posted by Ian S C on 16/11/2012 10:10:55:
                            ………………

                            Grub screw damage: on my hot air engines I use brass screws on pullies etc., as these are changed frequently. Two brass screws hold any of the bits on my motors as they don't produce much more than 5 watts at the crankshaft. Ian S C

                            Hi Ian,

                            To prevent Grub screw damage I drop a slug of copper sheet in the hole before assembly. I know a grub screw should really cut into the shaft for security but on my small engines etc ultimate strength is not a problem.

                            Best regards

                            Terry

                            #103929
                            Ian S C
                            Participant
                              @iansc

                              Agreed Terry, you can also cut a reduced diameter where the grubscrew beds, or drill a dimple in the shaft.

                              Sarah, This engine is a fair age, it has a forged crankshaft, the flywheel buts against the eccentric that drives the water pump. I made a little gib head key, it fits perfectly, and looks good.    Ian S C

                              Edited By Ian S C on 17/11/2012 07:30:09

                              #103961
                              NJH
                              Participant
                                @njh

                                Quite so Ian

                                Whilst a grub screw might work OK on a model you would need a blooming big screwdriver or allen key to tighten one on a full size engine!

                                What's more the key looks the part.

                                Regards

                                Norman

                                #104051
                                Ian S C
                                Participant
                                  @iansc

                                  Your not wrong there Norman, been working with our museum's Ruston Hornsby 6HR oil engine at an open day today, 6' flywheel, keyed to the shaft (how else). The little gib key 1/8th" x 1/8th"x about 5/8th" long looks just right, about a .005" taper was just right. Ian S C

                                  #104882
                                  Ian S C
                                  Participant
                                    @iansc

                                    Well I'm getting there, Just discovered I don't know anything about timing the valve gear, Clues perhaps?Please. Ian S C

                                    #104891
                                    JasonB
                                    Moderator
                                      @jasonb

                                      The valve needs to be ahead of the piston by 90deg plus a little lead of say 7-8 deg.

                                      So looking at the valve chest side of the engine set the crank so the crankpin is furthest from the cylinder (dead centre) then with the grunscrew on the eccentric loosened move it so the max throw is at 90deg and then a further 7or 8.

                                      If you want the flywheel to rotate clockwise as viewed from this side then the max throw will be between the 12 and 1 o'clock position or if you want it to go anticlockwise then it will be between 5 & 6 O'clock

                                      Once you have the timing set you need to ensure the valve opens equally each side, take the valve chest cover off and rotate the engine and watch to see that each port is being opened by the same amount, adjust the valove rod until you get things equal and away you go.

                                      #104969
                                      Ian S C
                                      Participant
                                        @iansc

                                        Thanks for that Jason, I was thinking more of 180* + or _, although I have'nt quite got to setting the valve, it may be this afternoon. Ian S C

                                        #104983
                                        Ian S C
                                        Participant
                                          @iansc

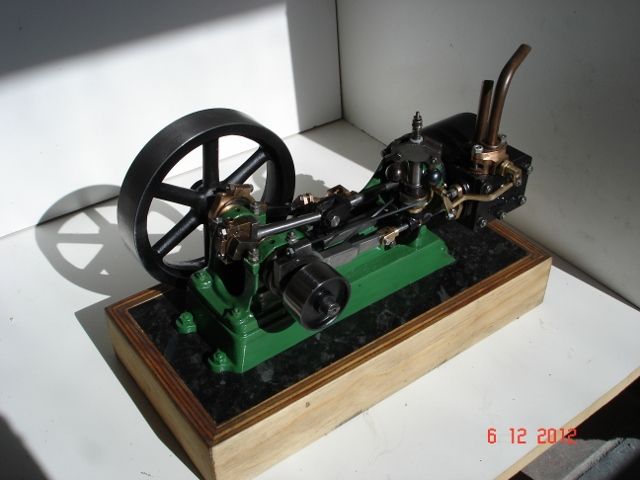
                                          IT GOES,I'v run the engine for about 1/2 hr, it needs about 40psi, its a little stiff as yet. I now need to link up the govenor. I might then look at the feed pump, although its not going to be doing anything. Thank everyone, it looks a lot better than it did, and the wheels go round. I used some Green enamel thats been lying around the workshop for many years, and the black is satin aerosol spray, It looks ok to me, hope the owner likes it cause thats what hes got.

                                          It sure uses a bit of air to run it, my compressor can only just keep up, that will improve as the engine gets run in. Ian S C

                                          #105153
                                          Ian S C
                                          Participant
                                            @iansc

                                            Got the engine down to running on 15psi now. Running it this morning, and PING, the vertical shaft on the govenor snapped off at the bottom end of the thread at the top "B****R", did'nt have a 7BA die to thead a new shaft, so I made a new shaft to the top of the larger dia, then drilled a hole in the end, and Loctited a bit of bike spoke in the top, I think it will work better than before. The broken bit looks as if it had been bent, and straightened. Ian S C

                                            #105155
                                            NJH
                                            Participant
                                              @njh

                                              Good show Ian!

                                              How about a snap or two of the finished project?

                                              Norman

                                              #105165
                                              Ian S C
                                              Participant
                                                @iansc

                                                Norman, I'll have a go in the next day or so, it looks a little better tn it did when I first got it, it will be hard to let it go, but it will be on display at a private museum about 100m down the road from me, so it won't be too bad. Ian S C

                                                #105172
                                                Sub Mandrel
                                                Participant
                                                  @submandrel

                                                  Good stuff Ian, let's see those pics!

                                                  Neil

                                                  #105592
                                                  Ian S C
                                                  Participant
                                                    @iansc

                                                       016 (640x480).jpg                                                                                 

                                                    Edited By Ian S C on 06/12/2012 13:02:01

                                                    #105596
                                                    NJH
                                                    Participant
                                                      @njh

                                                      Well done Ian

                                                      Good pics too.

                                                      You have certainly managed to breathe some life back into this little engine. Yes I guess it is sad to let it go after all your efforts but. if it's only 100m away, you can always visit – and it will free up just a little space in the workshop!

                                                      Now then – what's the next project I wonder?

                                                      Regards

                                                      Norman


                                                      Edited By NJH on 06/12/2012 13:38:10

                                                    Viewing 25 posts - 26 through 50 (of 54 total)
                                                    • Please log in to reply to this topic. Registering is free and easy using the links on the menu at the top of this page.

                                                    Advert

                                                    Latest Replies

                                                    Home Forums Stationary engines Topics

                                                    Viewing 25 topics - 1 through 25 (of 25 total)
                                                    Viewing 25 topics - 1 through 25 (of 25 total)

                                                    View full reply list.

                                                    Advert

                                                    Newsletter Sign-up