‘What LatheXXXXX sorry 3D Printer should I buy’

Advert

‘What LatheXXXXX sorry 3D Printer should I buy’

Home Forums 3D Printers and 3D Printing ‘What LatheXXXXX sorry 3D Printer should I buy’

Viewing 25 posts - 76 through 100 (of 232 total)
  • Author
    Posts
  • #327558
    Neil Wyatt
    Moderator
      @neilwyatt

      I keep trying and failing with Blender.

      I have no trouble producing traditional 'engineered' shapes but I would like to make things like handsets that are nice rounded 'organic' shapes.

      Neil

      Advert
      #327561
      Iain Downs
      Participant
        @iaindowns78295

        I've had a few go's with blender and I never got anywhere. Partly because it was on the cusp of a major rewrite so all the online material was for different versions. Partly because it's HORRIBLY complicated.

        My younger son has artistic skills and I'm trying to talk him into Google Sketch up (which is a lot easier, but I still never mastered) which I think is a bit of a halfway house.

        iain

        #327568
        blowlamp
        Participant
          @blowlamp
          Posted by Neil Wyatt on 16/11/2017 21:46:34:

          I keep trying and failing with Blender.

          I have no trouble producing traditional 'engineered' shapes but I would like to make things like handsets that are nice rounded 'organic' shapes.

          Neil

          I hear Silo is good for $99

          Martin.

          #332830
          Iain Downs
          Participant
            @iaindowns78295

            Today I took delivery of my Factory 3d Kit!

            I've not quite unpacked it yet, but have looked at the build manual. I will never complain about Ikea furniture again!

            Still I'm a hobby engineer so will persevere and no doubt build it with only 2 or 3 bolts left over!

            For those Interested, Mike seems to offer a decent discount if you approach him directly and don't need to go through eBay.

            I shall report on progress.

            Iain

            #332840
            Neil Wyatt
            Moderator
              @neilwyatt
              Posted by blowlamp on 16/11/2017 23:11:58:

              Posted by Neil Wyatt on 16/11/2017 21:46:34:

              I keep trying and failing with Blender.

              I have no trouble producing traditional 'engineered' shapes but I would like to make things like handsets that are nice rounded 'organic' shapes.

              Neil

              I hear Silo is good for $99

              Martin.

              If I understood what 'UV Unwrapping' was I might agree

              #333092
              Iain Downs
              Participant
                @iaindowns78295

                Start of the printer build today. Instructions are clear with loads of pictures. found a packet which should be countersunk bolts and are cap head and am seeking advice (from Mike at Factory 3D, not you lot!). It's time for bed anyway to try and eliminate my lovely Christmas Cold before Christmas really looms.

                If you try this and if you can a clean work area and floor would be advantageous. There are dozens to hundreds of tiny parts some of which have already made a bid for freedom into the mess on my study floor. Naturally, the carpet is one of those fleck ones which could hide half a (small) army of bits.

                Iain

                #333189
                Iain Downs
                Participant
                  @iaindowns78295

                  Time for lunch and a break.

                  It's fiddly stuff this. Mike has very kindly sent off the countersunk bolts (I think) but in the meantime has checked that the cap head bolts can actual fit without fouling anything, so I've carried on with the build.

                  One of the tricky bits is adjusting the lower frame (made out of M10 and M8 stud) so that the carriage runs freely. I mean what is 'freely'?

                  Of course it's also somewhat like a lot of hobby engineering. It's muck around with the bolts till it works. tighten a bit. Muck around again until it works again. Rinse. Repeat.

                  Next step is to centralise the Y motor and idler and add the timing belt.

                  But first, a cuppa and a break.

                  y axis 1.jpg

                  P.S. the apparent squintess of the frame is parallax.I hope. I'm not the best photographer.

                  Iain

                  #333193
                  Journeyman
                  Participant
                    @journeyman

                    I found one of the more difficult parts of the build was to get the main frame at 90deg to the base. I see Mike has changed the design of the Y axis bearing which are now bolted in, better than zip-ties. See ***HERE *** for my build efforts.

                    John

                    #333205
                    Russ B
                    Participant
                      @russb
                      Posted by Neil Wyatt on 13/11/2017 21:56:16:

                      PLA well suited to lost 'wax' casting aluminium crankcases, I would have thought.

                      For some reason I haven't tried casting aluminium, although it's much easier to melt than brass.

                      Neil,

                      This is on my "to try" list for lost casting. I like that it has such a low print temperature (70°C) – I hope to be able to easily smooth the surface with flame.

                      https://www.imakr.com/en/home/611-emate-low-temperature-filament.html

                      Edited By Russ B on 21/12/2017 14:07:57

                      #333219
                      Iain Downs
                      Participant
                        @iaindowns78295

                        Thanks, John.

                        I think I need to find a properly flat surface as a starting point and restart the process. Perhaps with that I can see if the vertical plate is (vertical).

                        Hmm. Surface plate is a little overkill. I will get marmalised if I try and do this on the granite kitchen surfaces….

                        Out to the shed, but I don't think I've anything suitable. B&Q here I come

                        Iain

                        #333231
                        Journeyman
                        Participant
                          @journeyman

                          Iain, yes the flat surface definitely helps the build, you may already have found that the Y-axis frame has a tendancy to twist just to make things a little more difficult. Being able to push the corners down onto something solid as you tighten the nuts helps. Once everything is together the construction is reasonably rigid. The build surface can also double up as a solid base to stand the printer on when it is up and running. Taking a bit of time to make sure everything is square during the build may well save time later trying to fix crooked prints!

                          Enjoy the build, you should be ready to print in time for Christmas, think of all the useless artifacts you can make to amuse family and friends wink

                          John

                          #333232
                          Neil Wyatt
                          Moderator
                            @neilwyatt

                            I just used a digital caliper to check all the spacings were the same.

                            I might add slightly longer Y rails (+30 to 40mm) and bars to allow me to print across the whole of the buildplate.

                            Alternative is making a new machine with a 350W 300 x300mm buildplate

                            Today's task – change the teflon lined feed tube as the filament was sticking in it. Two aborted prints before I realised the problem

                            Neil

                            #333233
                            simondavies3
                            Participant
                              @simondavies3
                              Posted by Russ B on 21/12/2017 14:07:18:

                              Posted by Neil Wyatt on 13/11/2017 21:56:16:

                              PLA well suited to lost 'wax' casting aluminium crankcases, I would have thought.

                              For some reason I haven't tried casting aluminium, although it's much easier to melt than brass.

                              Neil,

                              This is on my "to try" list for lost casting. I like that it has such a low print temperature (70°C) – I hope to be able to easily smooth the surface with flame.

                              **LINK**

                              Edited By Russ B on 21/12/2017 14:07:57

                              Has anybody tried using the PVA filement that they sell for support structures (e.g. **LINK**

                              My logic is that it could be washed out of a mould (assuming it wasn't too intricate) rather than going through a burn out exercise.

                              I have no experience of using it so not sure if it is capable of being used in this fashion.

                              #333247
                              Iain Downs
                              Participant
                                @iaindowns78295

                                I've struck out in my shed for a solid base. I've got some thin MDF and some furniture board, but they've been in the cold and damp for a couple of years, so I doubt they are still flat.

                                I did think about a PC case (a good one), but I don't think that would be stable enough either without some mucking around.

                                No spare kitchen worktops and no-one around here obviously sells offcuts.

                                I thought a piece of granite, but they're all closed up for Xmas.

                                Fall back position is 3 bits of 18mm MDF (homebase 10 quid) glued together. I think that should work and would welcome any input.

                                Iain

                                #333256
                                Martin Newbold
                                Participant
                                  @martinnewbold

                                  Hi everyone interesting thread on 3d printing having read it am suprised looking at the kits that no one is making a printer from scratch as the most complicated part requires a plasma cut plate i cant see why this is not being done am I missing the compexities. I am presuming the heads are available as is the stepper motors .

                                  I am unfamiliar with the cad software but have done modeling work. I notice blender has been noted and is good software for virtual models in the gaming world . However the windows compatibility with familiar control sets is missing. The main reason fail with blender is the double edged learning you are pushed to learn a new command set whilst you learn vector based manipulation of objects. The basis of these objects is either a vertex object or a spline object which starts a process of you being able to manipulate the objects your build in either environment. I am not suggesting Blender or any other virtual modeling system is easy to use . There are others which are more windows compliant. There are some very good instruction videos on Youtube . I would suggest anyone interested in modeling make one of these models on Youtube step by step. This is the fastest method to learn , however you will need to spend a lot of time with it. Modeling on these systems is usually the manipulation of primative shapes thats can be then changed and added together to make a whole model. The most important thing is look at your object that you are trying to build and break it down into simple shapes. i hope this helps with your frustration over blender. Do these printers suppor .*dae or *obj format files?

                                  Martin

                                  #333258
                                  Neil Wyatt
                                  Moderator
                                    @neilwyatt
                                    Posted by Simon0362 on 21/12/2017 16:19:28:

                                    Posted by Russ B on 21/12/2017 14:07:18:

                                    Posted by Neil Wyatt on 13/11/2017 21:56:16:

                                    PLA well suited to lost 'wax' casting aluminium crankcases, I would have thought.

                                    For some reason I haven't tried casting aluminium, although it's much easier to melt than brass.

                                    Neil,

                                    This is on my "to try" list for lost casting. I like that it has such a low print temperature (70°C) – I hope to be able to easily smooth the surface with flame.

                                    **LINK**

                                    Edited By Russ B on 21/12/2017 14:07:57

                                    Has anybody tried using the PVA filement that they sell for support structures (e.g. **LINK**

                                    My logic is that it could be washed out of a mould (assuming it wasn't too intricate) rather than going through a burn out exercise.

                                    I have no experience of using it so not sure if it is capable of being used in this fashion.

                                    You may have loss of definition if surrounding PVA with wet plaster, of course this could help obscure the 3D printed finish if you use a relatively coarse layer thickness.

                                    I work on the principle that if I want the plaster mould completely dry and pre-heated before pouring red-hot brass into it, a couple of minutes extra under the flame to get the last of the PLA out isn't a big issue. The advantage of PLA is its predictability if you want good quality prints.

                                    #333260
                                    Neil Wyatt
                                    Moderator
                                      @neilwyatt
                                      Posted by Martin Newbold on 21/12/2017 17:34:54:

                                      Hi everyone interesting thread on 3d printing having read it am suprised looking at the kits that no one is making a printer from scratch as the most complicated part requires a plasma cut plate i cant see why this is not being done am I missing the compexities. I am presuming the heads are available as is the stepper motors .

                                      I looked into this and I know people who have made printers large and small (and huge).

                                      If you want a desktop printer it really isn't worth the hassle as the cost difference is minute. As you build a kit you see all sorts of things that could be done to make it more rigid – but ironically many of the 'upgrades' are probably psychological…

                                      I may go for a bigger machine, but other than a larger bed and new, braced, vertical frame and uprated heater electrics and perhaps different stepper drivers (more microsteps=quieter, not better quality) I'm pretty sure everything else would just be vanilla Prusa.

                                      Neil

                                      #333261
                                      Neil Wyatt
                                      Moderator
                                        @neilwyatt

                                        Posted by Martin Newbold on 21/12/2017 17:34:54:

                                        Do these printers suppor .*dae or *obj format files?

                                        Martin

                                        Printers generally use G-code, Marlin compatible being the favourite 'flavour'.

                                        Most slicing software can cope with OBJ files, but STL is the usual format used, easily generated but not to edit!

                                        I generally work in TurboCAD and export to STL then slice to g-code in one of a few programs, but usually an older version of Cura without too many bells and whistles.

                                        Experience suggests designing supports into your model (or ideally designing them out), removable if required, works vastly better than any automatic placement for all but the simplest of cases.

                                        #333263
                                        Journeyman
                                        Participant
                                          @journeyman
                                          Posted by Martin Newbold on 21/12/2017 17:34:54:

                                          Hi everyone interesting thread on 3d printing having read it am suprised looking at the kits that no one is making a printer from scratch as the most complicated part requires a plasma cut plate i cant see why this is not being done am I missing the compexities. I am presuming the heads are available as is the stepper motors …

                                          Yes all the parts are available, print heads, motors, controllers, heated beds even the frames are available. The only slightly difficult parts are the plastic corners which are of course 3D printed but they could be made from aluminium or sourced from a 3D print firm. I don't think you would save anything by sourcing the parts seperately.

                                          Some sort of drawing package is necessary to produce your own parts. I use Alibre which is a 3D CAD program. The files are output as STL format (Blender outputs the same format). The STL files need to be converted into g-code which is what the printer understands. The conversion to g-code is done by a "slicer" program such as Cura. Sounds complicated but once you get the hang of each stage it all works pretty well.

                                          John

                                          Neil types faster than mesmiley

                                          Edited By Journeyman on 21/12/2017 17:55:20

                                          #333266
                                          Martin Newbold
                                          Participant
                                            @martinnewbold

                                            Thanks Neil I presume the G-Code is for controller board for the the stepper motor control and heating nozzle and feed guides. here are new pretty neat microprocessor boards out there now at around £30.00 that are well featured and being used in all types of humonoid/Robot builds. i wonder if they could be used here . I notice there seems to be a lot of problems being addressed with the hardware requiring further purchases THe gearing and basic parts shown in images here dont seem to beyond most of the steam modelers here. I have to wonder if you are all buying a kit anyway ?

                                            If this G-Code is as i have suggested then you must have some transfer software to move the vector object points and steps to next point  in to motor drive steps in G-Code?


                                            Martin

                                            Edited By Martin Newbold on 21/12/2017 18:23:27

                                            #333295
                                            Dod Mole
                                            Participant
                                              @georgeclarihew
                                              Posted by Neil Wyatt on 19/12/2017 21:37:36:

                                              Posted by blowlamp on 16/11/2017 23:11:58:

                                              Posted by Neil Wyatt on 16/11/2017 21:46:34:

                                              I keep trying and failing with Blender.

                                              I have no trouble producing traditional 'engineered' shapes but I would like to make things like handsets that are nice rounded 'organic' shapes.

                                              Neil

                                              I hear Silo is good for $99

                                              Martin.

                                              If I understood what 'UV Unwrapping' was I might agree

                                              I understand "UV Unwrapping" to be opening the box on a sunny day cheeky

                                              #333317
                                              Neil Wyatt
                                              Moderator
                                                @neilwyatt
                                                Posted by Martin Newbold on 21/12/2017 18:02:03:

                                                I have to wonder if you are all buying a kit anyway ?

                                                Most of us have bought 'kits', but as I said if you want the printed parts this is cheaper than getting them all individually. A premium kit will include better instructions, pre-loaded & calibrated software and some upgraded parts.

                                                What most people don't realise is that unlike a lathe or mill where the wear happens on all that separate tooling, most of the wear on a 3D printer is consumables like nozzles and heatbreak tubes (with plastic liners).

                                                There are also things like thermistors and hot ends that need some looking after. I eventually realised my thermistors were desoldering because I was neatly wrapping their wiring close to the heater cables, for example.

                                                In any case the 3D -print philosophy is generally one of continuous experimentation and improvement as different materials and objects tend to have different requirements.

                                                My heater tube replacement took about 10 minutes, aided by some extra connectors to make hotend swaps fast, but that included a second dis-assembly as I realised I could route some wires better which I wish I had done months ago!

                                                Neil

                                                #333391
                                                Colin LLoyd
                                                Participant
                                                  @colinlloyd53450

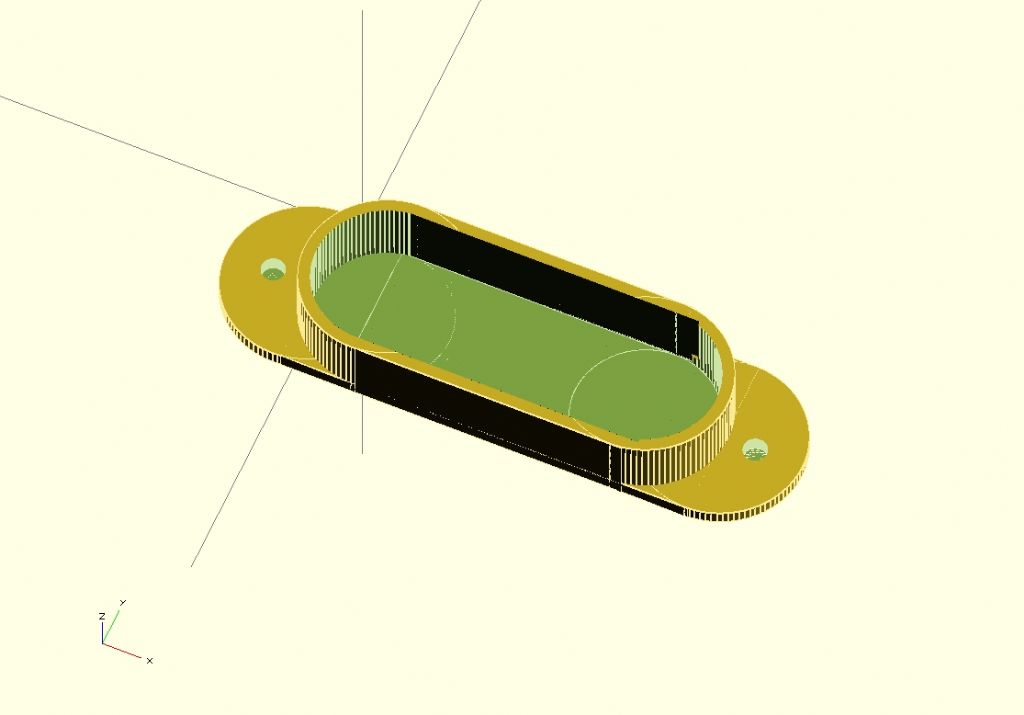
                                                  Just an update on recent 3D printing experience. I thought I was doing very well with my ABS printing until I tried to make an open guitar Pickup Cover for a Uketele project (It's a Ukelele with a solid Telecaster body for a friend's young son). All seemed to go well with my normal hairspray adhesive coating to the heated bed at 100 deg C and extruder at 230 deg C. First few layers all OK – but as the sides built up, the ends were beginning to curl away from the heated bed – eventually the whole build detached from the bed and followed the nozzle around the table in a sort of Viennese Waltz. My conclusion is that the bottom layer was lacking in material to adhere to the bed. My solution (although I haven't yet tried it) is to infill the bottom layer with a thin but extensive rgion to provide the adhesion – this infill will then be cut out afterwards. The photo shows my OpenSCAD drawing of the pickup cover with the infill region (the light green region at the bottom of the "walled" area). I'm also waiting for some Kapton tape to arrive – will give that a try as also the diluted PVA glue approach. I'm told that "Purple" glue Sticks also work as a bed adhesive – anyone know what these are?uketele_pickup_open_cover.jpg

                                                  #333413
                                                  Jeff Dayman
                                                  Participant
                                                    @jeffdayman43397

                                                    Hi Colin, the geometry of your part may have contributed to the peel-away. All thermoplastics shrink on cooling, whether 3D printed or injection moulded. The oblong ring may have shrunk inward as every layer was added, which will distort the ends upward since there is more "pull" from shrinkage along the straight sides. This might be mitigated by using a raft outboard of the main part. What I mean by raft is a ring of sacrificial material a few layers thick spaced away from the part, following the outside contour, but with a gap to the main part and joined to the main part only by a few narrow spokes of material. The raft will stay attached to the bed well since it has little shrink to induce it to peel away, and as the build continues the spokes will hold the main part in place even if main part peels away a bit.

                                                    Other strategies to help reduce warp and shrink effects with 3D prints:

                                                    -thinner vertical walls

                                                    -slots in vert walls if designs permit

                                                    -if you have control over 'honeycombing' density of the walls, make honeycomb less dense

                                                    -pause printing for more cooling / stress stabilization between layers

                                                    Hope these ideas help. Merry Christmas to all forum members.

                                                    #333415
                                                    Neil Wyatt
                                                    Moderator
                                                      @neilwyatt
                                                      Posted by Colin LLoyd on 22/12/2017 11:40:51:

                                                      Just an update on recent 3D printing experience. I thought I was doing very well with my ABS printing until I tried to make an open guitar Pickup Cover for a Uketele project (It's a Ukelele with a solid Telecaster body for a friend's young son). All seemed to go well with my normal hairspray adhesive coating to the heated bed at 100 deg C and extruder at 230 deg C. First few layers all OK – but as the sides built up, the ends were beginning to curl away from the heated bed – eventually the whole build detached from the bed and followed the nozzle around the table in a sort of Viennese Waltz. My conclusion is that the bottom layer was lacking in material to adhere to the bed. My solution (although I haven't yet tried it) is to infill the bottom layer with a thin but extensive rgion to provide the adhesion – this infill will then be cut out afterwards. The photo shows my OpenSCAD drawing of the pickup cover with the infill region (the light green region at the bottom of the "walled" area). I'm also waiting for some Kapton tape to arrive – will give that a try as also the diluted PVA glue approach. I'm told that "Purple" glue Sticks also work as a bed adhesive – anyone know what these are?

                                                      Colin – if using Cura tell it to provide a 'brim' – it's exactly what you have done, a single layer all round the part (inside and outside), you decide how many rings. Easily peeled of and tidied with a craft knife (I use a deburrer).

                                                      I now use a brim whenever I do a print with the slightest risk of peeling or coming loose. A few minutes more print time, far fewer failures.

                                                      I find the dilute PVA is much, much better than hairspray. If you have trouble releasing, let the part cool fully, then wait another 20-30 minutes and a blade under one corner will make it pop off.

                                                      Purple glue sticks are Pritt with a dye so you can see where you have put it that dries transparent. Ordinary glue sticks work fine.

                                                      Neil

                                                      Edited By Neil Wyatt on 22/12/2017 14:25:57

                                                    Viewing 25 posts - 76 through 100 (of 232 total)
                                                    • Please log in to reply to this topic. Registering is free and easy using the links on the menu at the top of this page.

                                                    Advert

                                                    Latest Replies

                                                    Viewing 25 topics - 1 through 25 (of 25 total)
                                                    Viewing 25 topics - 1 through 25 (of 25 total)

                                                    View full reply list.

                                                    Advert

                                                    Newsletter Sign-up