What did you do today? 2023

Advert

What did you do today? 2023

Home Forums The Tea Room What did you do today? 2023

Viewing 25 posts - 26 through 50 (of 474 total)
  • Author
    Posts
  • #630477
    Oldiron
    Participant
      @oldiron

      Spent a hour or so this morning in the workshop making a piston for a friends 50+ year old Diana air pistol. A bit of turning, drilling, counterbore & grooving on some PB1 bronze. Fitted an "O" ring as a seal.

      Some not very good Photos here

      regards

      Advert
      #630654
      Nigel Graham 2
      Participant
        @nigelgraham2

        Returned to designing (using the term loosely) my steam-wagon's transmission.

        I wanted to know the tooth-count on the differential sprocket, on a rear axle I'd made, umm, a lot of years ago but still needs some detail work doing.

        The sprocket and various lengths of chain I'd amassed are all "new to me" stuff but it didn't occur to me to examine them closely at the time. It was only when the chain would not wrap round the sprocket properly, that I found it is a metric gear – evidence supported by careful measuring – but the driving sprocket and chain are Imperial!

        So now the chassis is propped up an ungainly angle on axle-stands; the axle out and partly dismantled, the sprocket removed from the diff. casing, to work out which to replace. ( The differential is an ex- Austin front-wheel drive unit modified to operate the prototypical, traction-engine type, axle.)

        Then to wind up TurboCad to see how to squeeze the two-speed transmission gears into the space available while keeping the outwards appearance close to the spirit of the 114 year old photographs that are my primary "drawings".

        Since none of the originals were identical in detail, judging by the contemporary photos, Inspector Meticulous cannot complain too much; but I don't want to deviate too much from them.

        #630670
        Paul M
        Participant
          @paulm98238

          Spent most of Sunday trying to set the Stevenson valve gear on my loco. After a few hours decided I really had no idea what I was doing. Watched rugby instead.

          #630673
          Nigel Graham 2
          Participant
            @nigelgraham2

            Paul –

            If you've not already done so, ask on the Locomotives section, identify the loco and describe the problem and your attempts to solve it in more detail, you may find others who can help, possibly ones who have built the same engine.

            For now the basic rule is that the engine is all symmetrical: eccentric throws and rod-lengths, port dimensions, valve travel about the port-face centre-line, port openings at both ends of the and both forwards and reverse.

            There may be something inherent in the specific locomotive's design that makes valve-event symmetry difficult to achieve, necessitating a degree of compromise. However, if all the parts are as they should be, it should not be too difficult to time the valves correctly – though it may be a bit long-winded if you have to keep removing the eccentric-straps to adjust the sheave settings.

            #630696
            Samsaranda
            Participant
              @samsaranda

              Spent yesterday tackling a leak on my workshop roof, it was leaking from a box gutter that was where two existing sheds were side by side and converted into one building forming my workshop. The box gutter had been formed using Sterling board and then a couple of layers of torch on felt. My son in law, who is a lead worker, suggested that the felt in the box gutter would be better replaced with lead, the gutter is two metres long about 100 mm deep and 260 mm wide. When we exposed the Sterling board we found a fair amount of rot so we had to cut back and replace more than intended, no problem though it is now rebuilt with 19 mm exterior ply. The gutter is now lined with lead and well and truly solid, hopefully leaks all sorted now. The only drawback to working outside on a roof in January is the cold, it was bitter cold and only 2 degrees C, we didn’t get finished until the sun went down so getting even colder then. Dave W

              #630697
              duncan webster 1
              Participant
                @duncanwebster1

                as well as the good advice from Nigel, get a copy of Don Ashton's book on Stephenson's.

                #630718
                Swarf, Mostly!
                Participant
                  @swarfmostly

                  I prefer to do my silver soldering out of doors rather than in the workshop. I had hoped to do a little silver soldering job today but it's so cold outside I don't think the propane will want to come out of the bottle.

                  Best regards,

                  Swarf, Mostly!

                  #631077
                  Nigel Graham 2
                  Participant
                    @nigelgraham2

                    Started assembling my steam-wagon's ash-pan (Version 3…)

                    It is D-shaped in plan – a circle with two tangential sides – to accompany the vertical cylindrical firebox.

                    Top and floor of 1mm steel sheet "flanged" wiv an 'ammer over a former cut from an old car brake-disc, side wall rolled from 40 X 1 mm steel strip from B&Q. The top has a circular hole flanged inwards, for rigidity. This accommodates the downwards projection of the inner firebox.

                    The sheet material was an old heating boiler panel, supplied by a friend in the building & plumbing trade.

                    I'd discounted welding even by MIG, in favour of rivets that would be more prototypical anyway, although nearly invisible when installed. It is temporarily held together by little M3 hex.-socket, round-head screws and nuts, but those will probably become permanent as they resemble rivets, especially when painted over.

                    .

                    I do own a "jenny" but cannot get the hang of using it to flange discs. I end up simply mangling the metal.

                    #631078
                    Bill Davies 2
                    Participant
                      @billdavies2

                      Replaced a dripping ball valve in the expansion tank (F&E tank). We have recently had an extension built and I initially thought it was tthe increased capacity of the central heating system causing the periodic drips. But no, there was a slow drip from the valve, and bending of the ball valve lever arm failed to fix it.

                      I bought a replacement, intending to replace just the front part of the valve, but I caused a slight leak in the copper pipe feeding the valve in trying to undo the parts. So I replaced the lot.

                      So now I have an aching back from sitting on joists working in a cold loft. Getting too old for this!

                      Bill

                      #631079
                      Jelly
                      Participant
                        @jelly

                        Finally got round to fitting new drive belts on the Harrison mill I picked up for a pittance, substituting the awkward "release tension on the motor" step for brute force and ignorance, which sped the job up considerably.

                        With the new (and crucially not perished) belts it no longer creates an ear splitting din.

                        Followed up by getting the coolant pump working, and freshening up the gearbox oil… The power feed motor is still kaput, but I quite want to fit a reversing switch for that anyway, so no biggie for now.

                        .

                        I also worked out a solid plan for how to adapt the vertical heat I bought to fit the mill, it's a lot more involved than I wanted it to be requiring me to re-machine a rather large and awkwardly shaped casting, and make a fairly substantial weldment, with a parallellism between an inside and outside face…

                        But, doing it that way will allow me to both maximise the working envelope and achieve much greater rigidity.

                        My final debate is whether to cut the parts of the weldment myself with the cutting torch, or to send out to the profiler who could water jet them accurately ready for welding, I am leaning towards DIY as I have a suitable piece of 20mm S355 just sat there, but it will be much more effort to get the desired result.

                        #631080
                        Hopper
                        Participant
                          @hopper

                          Jelly, you need to buy yourself a plasma cutter. New toys are always better outsourcing jobs!

                          #631081
                          Lee Rogers
                          Participant
                            @leerogers95060

                            Laid the Vinyl floor in the new workshop. The floor is a sandwich of 22mm OSB, 60mm Kingspan Greenguard rigid foam ,18mm OSB t&g floor panels with the vinyl as a finishing touch. The rest of the building is 100mm SIPs.

                            #631084
                            Jelly
                            Participant
                              @jelly
                              Posted by Hopper on 27/01/2023 03:30:39:

                              Jelly, you need to buy yourself a plasma cutter. New toys are always better outsourcing jobs!

                              I recently did… but my plasma will "only" cut upto about 12mm cleanly. I could achieve a "severance cut" in 20mm plate but it would be a much worse quality cut than doing a good job with the gas torch.

                              I probably don't need to use 20mm thick steel for the job, but I'm working on the assumption that using steel rather than C.I. is going to increase the potential for vibration so I want to maximize mass and rigidity to compensate.

                              #631309
                              Chris Mate
                              Participant
                                @chrismate31303

                                Did some small woodwork(It seems to like climb milling where possible(10mm4FL carbide endmill) on my mill to make swarf containers for vice using disk magnets & parts of face shields cut, face shields are cheap and cut well with a scissor to size wanted.

                                #631312
                                Bazyle
                                Participant
                                  @bazyle

                                  Lee the workshop build sounds interesting. Photos? more details? (in another thread to avoid topic concentration in this one.)

                                  #631694
                                  GordonH
                                  Participant
                                    @gordonh

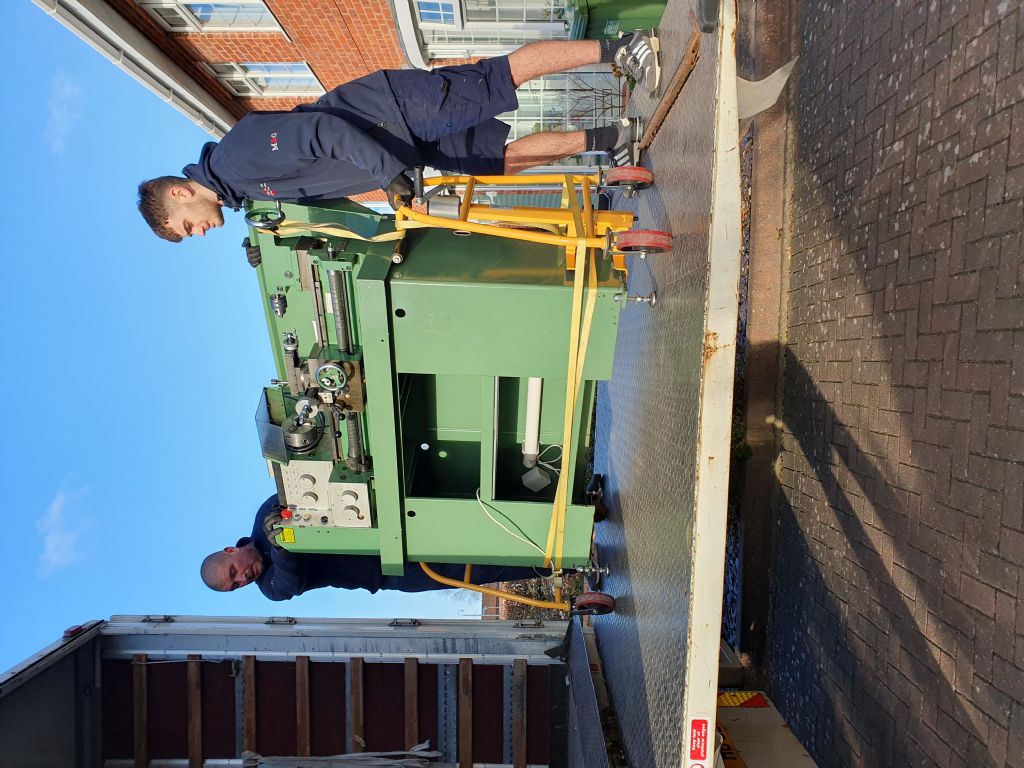
                                    Today, I said au revoir to my lathe and the bulk of my workshop which is now in storage while I sell my house. My Bridgeport was sold just before Christmas, I’d looked at the cost of storing it but the size and shape of the Bridgeport meant I would need a storage container, the cost of the container and transporting the mill to it then onwards to where I’m moving to was prohibitive. The cheapest quote one prospective purchaser obtained was £500 to transport the mill 25 miles!

                                    To keep me occupied until I’m reunited with my equipment, I’ve bought a little Taig on eBay and I’ll probably retrieve my old Sigma Jones Jig Borer and renovate/update it. I have a bench drill, but its seen better days. Any serious milling and drilling will have to go to my model engineering club.

                                    Apologies for the rotated photo, I hope that a Moderator will edit it to portrait orientation in my post and album. I fail to understand why this forum defaults photos to landscape mode and has no visible means of correcting the orientation. I searched Neil’s Sticky, but the discussion petered out with the assumption that photos should naturally be in Landscape mode.


                                    au revior.jpg

                                    Edited By GordonH on 01/02/2023 23:44:57

                                    Edited By SillyOldDuffer on 02/02/2023 09:42:10

                                    #631813
                                    Iain Downs
                                    Participant
                                      @iaindowns78295

                                      I don't know about you all, but I find my 3D printer is a bit … sensitive.

                                      It works fine for a while then needs a lot of TLC to get back in working order.

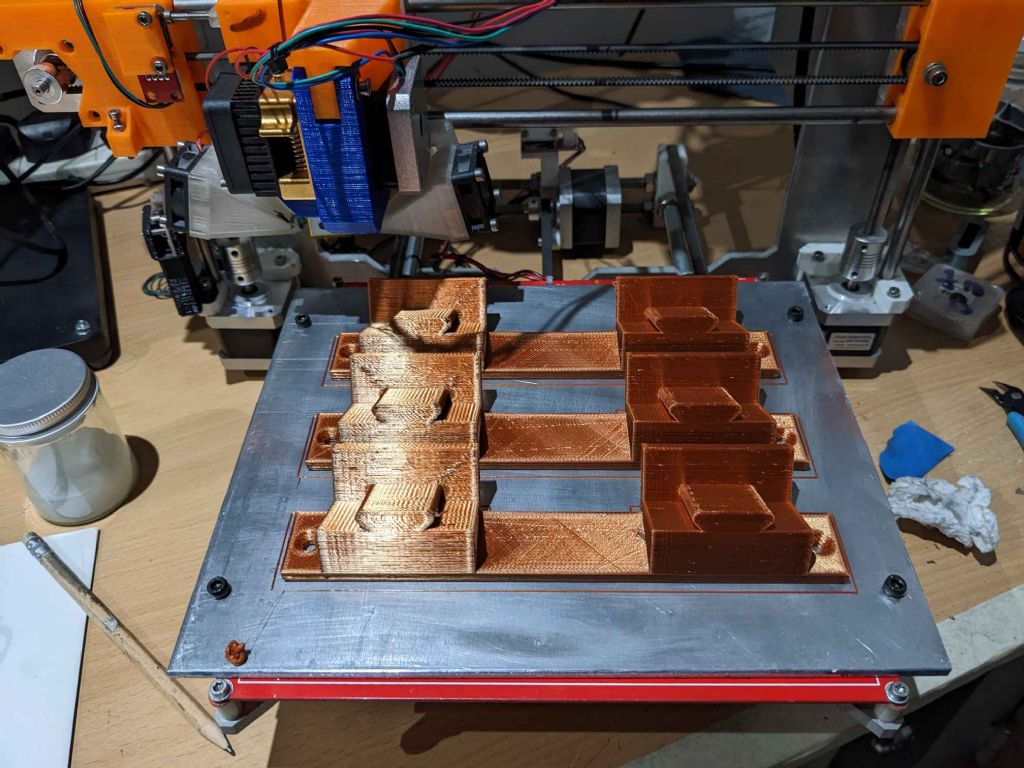
                                      The latest challenge seems to have stemmed from a glass bed (mirror tile) which was bowed by about 0.2mm. It seems like the don't like to make them out of glass much these days (apart from some probably new old stock which some printer firms are selling off at outrageous prices).

                                      So I thought I'd try making an aluminium bed instead – the plate being cheaper than the 'proper' glass tiles I could get…

                                      ally printer bed.jpg

                                      The thing I didn't think about (of course) was the thermal mass and conductivity of ally. This was resolved by setting the bed temp to 70 which amounts to 55 – 60 on the top. Seems to be working quite well now!


                                      Iain

                                      Edited By Iain Downs on 02/02/2023 22:19:10

                                      #631816
                                      Nicholas Farr
                                      Participant
                                        @nicholasfarr14254

                                        Hi. I watched the Apprentice this evening, and I've often wondered what makes most of those candidates supposably highly intelligent, and why does the one who gets fired, always thinks Lord Sugar has made a big mistake? Lord Sugar was a successful businessman long before any of them were born. I'm no businessman of any sort, but I didn't see one good idea from any of them. Quite glad I was a "Blue Collar worker" at least I had a good sense of direction in my chosen trade by the time I left school. Yes I still had a lot to learn and I made mistakes, but I did approach jobs the way I was shown, and didn't modify the tasks until I was able and confident to do them in a more efficient way, and was very successful with the work I did.

                                        Regards Nick.

                                        #631821
                                        duncan webster 1
                                        Participant
                                          @duncanwebster1

                                          Did a test run on air with latest loco. Couldn't understand why it was only chuffing twice per rev. I've just realised that the gasket on the exhaust manifold should have a hole in the middle to let the air through. That's tomorrow's job!

                                          #631825
                                          Nigel Graham 2
                                          Participant
                                            @nigelgraham2

                                            Duncan –

                                            Been there all right!

                                            My club once built a loco as a club project, as a portable-track work-horse.

                                            The motion-work was made by some of the most skilled and experienced members, all excellent craftsman, but would that chassis run on air?

                                            It would struggle round half a turn, suddenly leap to the other dead-centre, struggle round….. It baffled the builders for months, until a chance blow of air on hand revealed a tiny perforation from an over-deep cross-drilling, leading to the discovery of the exhaust-gasket with no hole!

                                            ;;;;

                                            What Did I Do Today, though…

                                            .

                                            £70 poorer from an ear-flushing. Wax removal used to be carried out free, on the rates, by the nurse at the GP's surgery.

                                            That aside, Task Number One was cementing a loose brick back into the house wall. The original Edwardian mortar is badly weathered and this particular brick had lost the cobwebs holding it in.

                                            Ladders and I have An Arrangement. If I don't climb them, they won't alarm me. However, with the aid of a confection of scaffolding parts to make a stabilising frame, a 15-foot ladder section, rope and caving equipment, I succeeded in that little project. Only another umpteen feet of re-pointing to do…..

                                            '

                                            Then after tea….

                                            '

                                            Screwed the three main parts of my steam-wagon's ash-pan together. The temporary assembling used M3 round-head socket-screws and nuts but I ran out, so have replaced them just as successfully and probably more cheaply with Phillips-head versions from 'ToolStation'. Once painted they will look reasonably like rivets to anyone desperate enough to lie on the floor and peer underneath.

                                            It's not complete. The main part, Version Three, is done, but I've still to sort out its suspension below the boiler, and to make a damper. The former's location constrained on one side by the steering drag-link, the latter's by the front axle. Nothing's easy on this project!

                                            Edited By Nigel Graham 2 on 03/02/2023 01:03:08

                                            #631920
                                            duncan webster 1
                                            Participant
                                              @duncanwebster1
                                              Posted by duncan webster on 02/02/2023 22:57:10:

                                              Did a test run on air with latest loco. Couldn't understand why it was only chuffing twice per rev. I've just realised that the gasket on the exhaust manifold should have a hole in the middle to let the air through. That's tomorrow's job!

                                              It works a lot better now!

                                              #632015
                                              Nicholas Farr
                                              Participant
                                                @nicholasfarr14254

                                                Hi, today I had to fit a new horn on my car, which was a pain to get at to say the least, unless I went through the whole rigmarole of removing the front bumper as described in the Haynes workshop manual and I would have had to have an assistant to lift it off as well, which I don't have, and I didn't know if the horn itself was the problem or a wiring fault. This is the first horn that I've ever had to change in my life and on all the cars that I have ever owned. I found it was the horn at fault yesterday afternoon, and fetch a new one ready to fit today, but of course the new one came with spade connections, whereas the original has a plug in connection, and the new horn has the connections on the other side as well, now I know I could have snipped the plug off and crimped spade connections on, but the ends were much too short, coming out of the wiring loom and that would have been awkward to do as well, however, luck was on my side, as the socket on the old horn was clipped on with plastic retainers and once it was removed, revealed a pair of bullet type connections in the socket piece, so I just made up two short leads with one end bullets and the other end spades crimped on and I put some heatshrink sleeving over the exposed parts and onto the wire covering, which should stop water and dirt ingress getting into the crimped areas.

                                                Regards Nick.

                                                #633059
                                                Keith Bloor
                                                Participant
                                                  @keithbloor37728

                                                  A message to Jelly please. I like where you have put your heater, thinking of doing a similar setup. Where did you get the ducting and outlets from?. I presume they are 75mm.

                                                  #633072
                                                  Jelly
                                                  Participant
                                                    @jelly
                                                    Posted by Keith Bloor on 11/02/2023 16:15:38:

                                                    A message to Jelly please. I like where you have put your heater, thinking of doing a similar setup. Where did you get the ducting and outlets from?. I presume they are 75mm.

                                                    I ordered with Duct Store who were cheap, fast and good.

                                                    My setup is 80mm (nearest to 75 in spiral ducting), and works fine.

                                                    I would consider using an adapter as close as possible to the heater and running 100mm or 125mm as the pressure drop from the narrow ducting does seem to have an impact on the volume of air moved at lower power levels (although obviously bigger ducts does reduce flow velocity, so would reduce the "throw" of the supply valves).

                                                    It's worth noting that if you buy their push fit connectors with rubber seals on (very hand to not need to use sealant), the first few runs at full power will result in a really unpleasant synthetic rubber smell, which goes away, but appears to be years of low-level off-gassing accelerated into to a couple of hours.


                                                    My other suggestion would be to duct the air intake of the heater to draw air from floor level, to encourage mixing.

                                                    The current setup heats the room to a very comfortable temperature from waist height up, but doesn't have the oomph to push warm air down to floor level.

                                                    The alternative solution would be to use an in-line fan (probably a cheap mixed flow fan) to increase the velocity in the duct enough to reach floor level but it would take some careful setting of the speed controller to prevent it pulling too much air through the heater reducing it's effectiveness.


                                                    Also, worth knowing is that you can cut the hose barbs off the heater and pump fuel connections with a hacksaw, file the burr down and then use suitable brass compression fittings (5mm on the pump, 4mm on the heater) and microbore copper tube to run the fuel line.

                                                    I got those from BES.

                                                    Because I had ¼" microbore to hand I used 4mm/5mm compression to ⅛ BSP fittings joined to ¼" compression to ⅛ BSP fittings with a ⅛ BSP female × female pipe nipples; each assembly only cost a few quid and it's a lot more secure than plastic piping; I would expect you'd need to do that to make up the 4mm connector on the heater at least, which does allow you to use a 90° elbow fitting for neatness.

                                                    My fuel tank is outside and comes in via a ⅝" bulkhead fitting (with ¼" × ¼" compression connectors) attached to a metal plate which is screwed over a 32mm hole in the wall (to allow me to get a spanner in to access the compression fitting in the future if needed).

                                                    The pump and power supply are in a steel enclosure too for neatness and protection.


                                                    I can add pictures of my fuel and power setup later if you're interested, will just have to find them, though the ones I have are a bit messy as I took them before I replaced the stock wiring looms with a dedicated 7-core automotive cable and grouped all the wires at the heater end into one superseal connector…

                                                    Which is also a good upgrade as it turns out.

                                                    Edited By Jelly on 11/02/2023 18:37:03

                                                    #633108
                                                    Keith Bloor
                                                    Participant
                                                      @keithbloor37728

                                                      Many thanks for your reply Jelly. A lot to work with when I get my heater, again many thanks.

                                                    Viewing 25 posts - 26 through 50 (of 474 total)
                                                    • The topic ‘What did you do today? 2023’ is closed to new replies.

                                                    Advert

                                                    Latest Replies

                                                    Home Forums The Tea Room Topics

                                                    Viewing 25 topics - 1 through 25 (of 25 total)
                                                    Viewing 25 topics - 1 through 25 (of 25 total)

                                                    View full reply list.

                                                    Advert

                                                    Newsletter Sign-up