What did you do today? 2023
What did you do today? 2023
Home › Forums › The Tea Room › What did you do today? 2023
- This topic has 473 replies, 109 voices, and was last updated 28 December 2023 at 08:43 by
Matt T.
-
AuthorPosts
-
10 July 2023 at 21:37 #651612
Mick B1
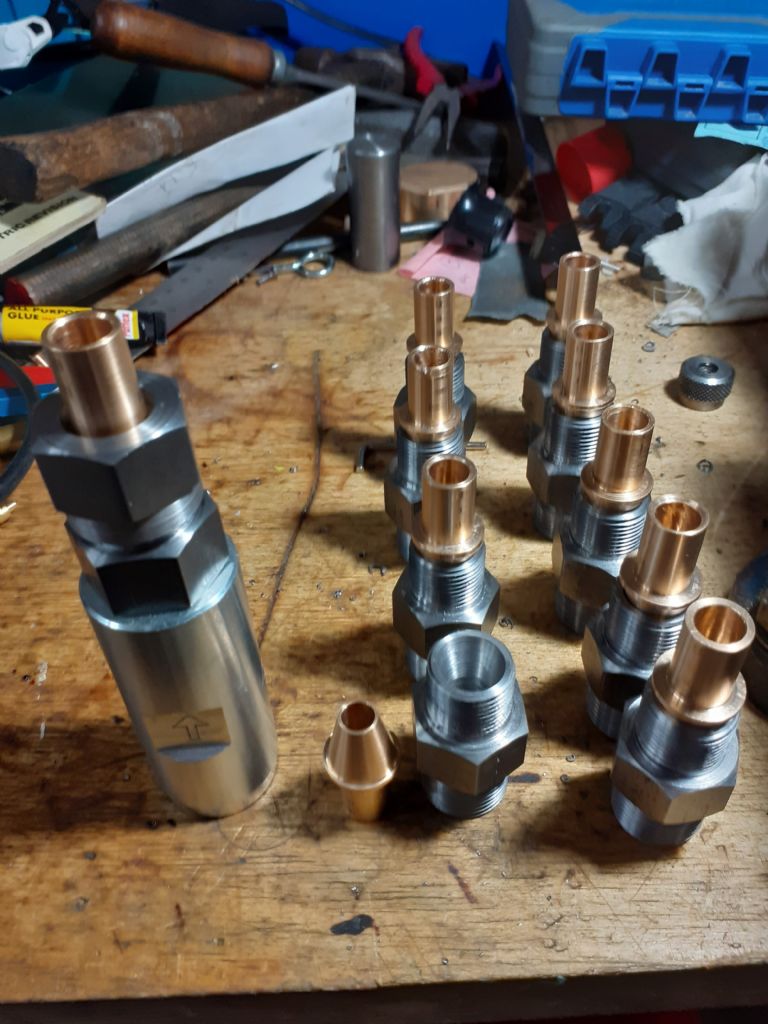
Participant@mickb1Finished and delivered some lubricator pipe unions to the railway.
The non-return valve is a bought-out item with a 7/8"x14 UNF internal thread both ends. They wanted me to make the LG2 cone to be soldered onto 3/8" dia pipe, plus an adaptor threaded M20 x 1,5 to fit lubricator nuts. The adaptor was made from 1" AF hex EN1A.
So the end that takes the cone is the M20 fine, and t'other is 7/8 UNF to screw into the non-return valve. I made the cones with a 14° taper per side, and the female taper in the adaptor 15° per side, so that tightening the nut will compress the pointy end of the cone and improve the seal at the tip.
There were only 10 to do – carbon steel dies cut smoothly and well, and remained sharp by the finish.
I do this stuff as a volunteer simply because I enjoy the work.
 12 July 2023 at 00:18 #651754
Nigel Graham 2
Participant@nigelgraham2A little more work on the steam-wagon.
"Improved" the smoke-box blower-pipe elbow and now need order some copper tube for it.
Made the gauge-glass blow-down pipe. It only just goes past the steering drag-link. I gave it a little brass retainer for its lower end, held to the blow-down valve spout by using as nut, a screw-on extension I have fitted to that so operation does not pressure-wash the ash-pan.
Now, how the heck is the exhaust pipe going to thread its way from the vicinity of the LP valve-chest not yet made, round the firebox while passing the injector someone has unhelpfully installed in its way, to the smoke-box connection only just higher than the axle?
Mick's locomotive lubricators evidently have American fittings, but UN threads are about the only ones my beast does not have! I've spent so long making it, made so many revisions, so many poor "design" decisions, that it holds an unholy mixture of BSF, BSW, BA, ISO-M, BSB, BSP and ME! Ummm, what shall I make the new spring-retainer studs…Holtzappfel?
.
Sent a "Help"! enquiry to the TurboCAD Users' Forum. I don't use TC much now and tried using Alibre again yesterday only after a very long break, but all of my inadequate, poor-quality drawings of my wagon parts are TurboCAD.
The one I wanted is a putative GA for the engine and transmission area. Or volume, rather.
I wanted to experiment with modifying the gears layout. TurboCAD's technique for moving drawing objects is very easy; but when I set the rectangle representing the chain-sprocket to go vertically, it moved horizontally! The X and Y directions had decided to change places but the planes-symbol still showed correctly.
Every object on this drawing raises work-plane error messages every time I select it, its co-ordinate values do not matching the Y-axis margin scale and non-existent X-scale. These are probably from TurboCAD trying to force 3D modelling mode.
That reversal of the two planes though, was totally new to me. When I re-opened the programme and drawing afresh, the same thing happened. Even more weirdly, it seemed to affect only that rectangle – oh, and its +/- directions are reversed too!
Hence my enquiry – what have I done wrong now?
12 July 2023 at 03:32 #651755Chris Mate
Participant@chrismate31303Busy with compressor enclosure:Bearings lid old stuff I had.
-Made bearing holders/shaft.bracket for lid attachment(2x20mm MDF glued ) to be a workspace & be able to swing it upwards to access compressor from the top. Side panels 20mm MDF painted with waterbase paint that seal and don't effect MDF(No swelling). Installed light, so inside of compressor is lit up, so I can see guages and control switch & connections(For external pipings).
–Bottom MDF plates still to be made.
–On top of lid, I will fit an RF-115 Rongfu bandsaw I am busy restoring, which will be swung upwards when not in use, so I have a stainless steel covered workspace for lathe, the whole contraption can move around on heavy duty castors.
–Its more work than I thought.12 July 2023 at 09:16 #651771Dalboy
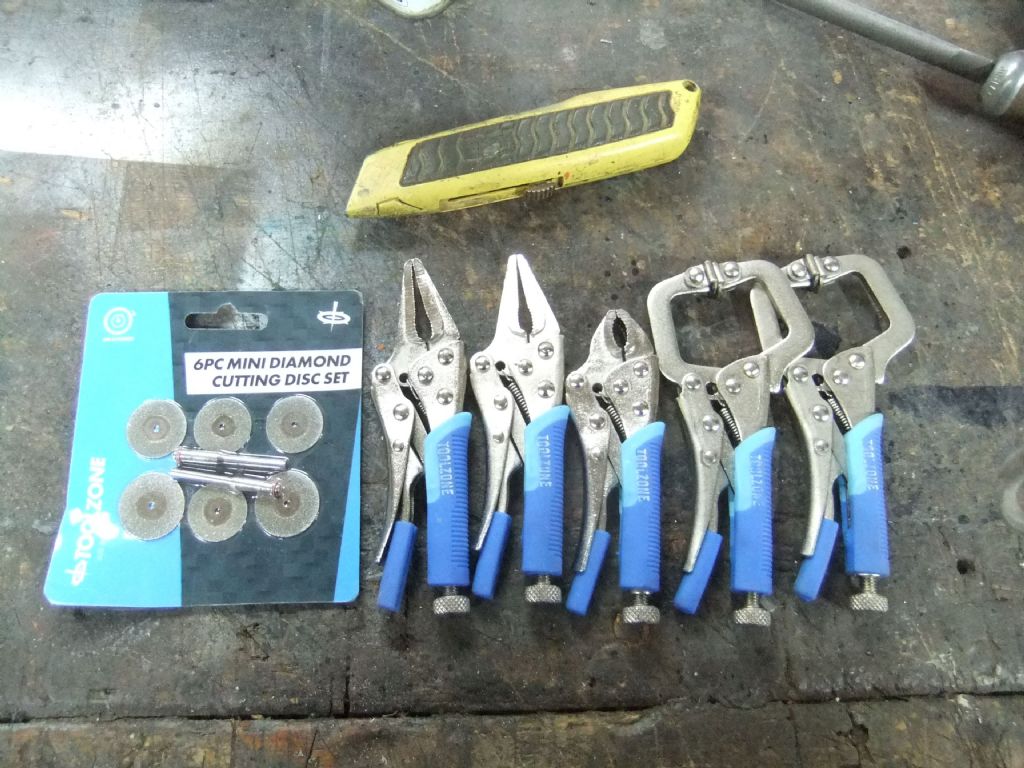
Participant@dalboyI was at a car show on Saturday and managed to pick up these six items(Stanley knife for scale) I thought at £5 for three items was a cheap enough buy to use them for small soldering jobs without too much heat loss.
They seem to have a positive feel to them for something so cheap.
Not sure how the plastic handle will hold up to heat
12 July 2023 at 11:04 #651789SillyOldDuffer
Moderator@sillyolddufferPosted by Nigel Graham 2 on 12/07/2023 00:18:37:
…Now, how the heck is the exhaust pipe going to thread its way from the vicinity of the LP valve-chest not yet made, round the firebox while passing the injector someone has unhelpfully installed in its way, to the smoke-box connection only just higher than the axle?
…
Sent a "Help"! enquiry to the TurboCAD Users' Forum. I don't use TC much now and tried using Alibre again yesterday only after a very long break, but all of my inadequate, poor-quality drawings of my wagon parts are TurboCAD.
The one I wanted is a putative GA for the engine and transmission area. Or volume, rather.
I wanted to experiment with modifying the gears layout. TurboCAD's technique for moving drawing objects is very easy; but when I set the rectangle representing the chain-sprocket to go vertically, it moved horizontally! The X and Y directions had decided to change places but the planes-symbol still showed correctly.
Every object on this drawing raises work-plane error messages every time I select it, its co-ordinate values do not matching the Y-axis margin scale and non-existent X-scale. These are probably from TurboCAD trying to force 3D modelling mode.
That reversal of the two planes though, was totally new to me. When I re-opened the programme and drawing afresh, the same thing happened. Even more weirdly, it seemed to affect only that rectangle – oh, and its +/- directions are reversed too!
Hence my enquiry – what have I done wrong now?
The usual – trying to run before you can walk, changing horses in mid-stream, and leaving a gap long enough to forget Alibre! If you can possibly avoid it, don't take long breaks whilst learning CAD, and don't attempt two or more CAD packages at the same time!
Changing horses in mid-stream is a classic mistake. Both horses run away, everyone laughs when you fall in, even if you hit your head, drown, or die of pneumonia. Though I know FreeCAD, Fusion360, and SolidEdge moderately well, I find it difficult to switch between them. Their basics are all a bit different, so even simple stuff like creating a cube with a hole in it require a mental reset. Imagine owning two lathes where the controls are in different places and set up in the opposite sense: turning the carriage wheel clockwise moves the saddle right on one and left on the other; lever down to engage cross-feed vs lever-up; lever down to engage half-nut feed vs lever-up'; and then all these controls are positioned on their respective aprons in the opposite order. Even experienced operators take time to switch between contrary machines and are liable to get the controls wrong in an emergency. Alibre and TurboCAD have far more differences than a pair of topsy-turvy lathes.
I advise spending the time necessary to manually convert all the TurboCAD drawings into Alibre, and then dump TurboCAD. (Or the other way round if you must – the only daft choice is doing both!)
When 3D-CAD has been used to develop and assembly of parts, routing pipes between parts is relatively easy once how to draw lines in X, Y and Z has been mastered. But I would say pipe routing is advanced work, because it depends on mastering a raft of simpler tools and concepts first. Routing isn't beginner friendly.
I wonder if if would be better to develop the design using traditional methods rather than 3D-CAD?
Before plunging into Drawing Office detail, the original truck would have started as a series of rough sketches to pinned down the approximate location, size and weights of all the major components. Quite likely, several candidate designs would have been crudely small-scale modelled to check fit. Boiler represented by a cardboard tube, wooden discs for wheels, plasticine, wire and balsa etc.. This type of simple model makes it easy to spot major errors before tackling details, and it's likely several models of increasing accuracy would be made before the Drawing Office started work. And more models were often made to check and steer the Drawing Office as the design improved. Full-size prototypes were common: hopefully ready to go, but deliberately built expecting to find trouble before going into production. The process is slow and costly in time and materials, but not difficult.
Once 3D-CAD has been mastered, modelling on a computer saves an enormous amount of time and effort compared with developing physical models. But learning CAD is a major challenge, and the effort may not pay-off, especially if CAM isn't on the agenda as well.
So instead of struggling with 3D-CAD, why not tackle it traditionally. Make a simple model of the model to get the GA, and produce 2D drawings from that. The downside of course, is making models of models is time-consuming and not very rewarding – after a lot of work is put into painfully solving a problem, they're thrown away!
Here's a modern example, a Renault Twizy, made of clay, full-size by the look of it. Note the wheels, which aren't models!

Dave
12 July 2023 at 15:57 #651833Nigel Graham 2
Participant@nigelgraham2Good Heavens! I'll stick with my other Renault (a Kangoo – just as daft a name!). At least Renault has the benefit of a vast accumulation of expertise, experience, facilities and Francs – sorry, Euros..
.
Please don't mis-read me, Dave; but I take your point about the problem of long breaks. Especially in trying to learn something so difficult before you can even draw the simplest part, let alone the entirety, of an antique machine.
It's two different problems anyway, one CAD (just drawing it) the other Design (working out how to make it).
.
I had started transferring from TurboCAD to Alibre because I thought the latter easier, as a trial revealed. However, all of the drawings I had made for the project are still in TurboCAD so I need keep that alive even if I make all new drawings in Alibre.
Or revert to manual draughting… having dismantled my drawing-board beyond restoring, in a fit of digital over-optimism!
I can usually use TC orthographically to a basic but adequate level, but find its 3D mode impossible; hence deciding to move to the simpler Alibre whose 3D modelling will generate the orthographic elevations for workshop use, from the model. TC will too, of course, but in a far more obscure manner.
Whichever package I use though, I could never draw the whole lorry in 3D CAD. Simple parts, maybe, but that's all.
.
That's the CAD answered, but it only adds horrendous extra difficulty between designing and making the thing.
Now the Design – a skill different again from "just" drawing the items.
.
Yes, I should have designed the lorry from the outset, but the first obstacle was big discrepancies between the assorted scraps of archive material I have collected – over several years – due to the makers varying the vehicles, and sometimes giving trade-magazine reviewers specifications for models other than the physical review sample. (That alone held me up for some three or four years.)
Then I had to learn how to replicate an ancient wagon from a few old advertisements, early 20C general-engineering text-books, and modern model-engineering literature.
Quite a few people said I was brave to take on a project like that when plenty of successful alternatives exist, designed in miniature form by professional model-engineers having access to original works drawings and surviving prototypes. (Drawings made by hand, using loose squares on elm boards…) .
I soon realised I was going nowhere until I started cutting steel, but could not have foreseen future problems. Narrowing the front of the chassis too far back, cramps the machinery space; worsened by the driving-chain being a bit too far inboard. I had the boiler built commercially but not realised the implications of its peculiar shape and being under-scale for the chassis width and smokebox diameter. I machined the cylinder, passage and ports from a solid block, but failed to consider the battle for space by all the studs, starting-valve, external inlets and outlets, etc.
All mistakes I have to live with and work around. I never claimed accuracy to the last nth rivet!
'
When I started the project it would have been unique. Since then I know of one other model of similar scale and a full-size replica having been completed in a fraction of the time I have spent so far, and now fear never finishing it – and don't know if it will work if I do.
Yes, the Cardboard Aided Draughting would certainly have helped but I did not realise that until far too late!.
13 July 2023 at 14:53 #652069Jelly
Participant@jellyI received a nice letter from the IChemE confirming that I have now justified that between my HND, 13 years experience and MSc, I do indeed meet the knowledge and understanding requirements for Chartered Chemical Engineer…
So I can now submit them a new form showing my mentoring program which developed me to an appropriate level to submit the next form.
I really don't think the Engineering Council ever considered that people would apply at different career stages, or how painful they were making it for applicants when they standardised the CEng requirements between institutions.
15 July 2023 at 00:46 #652344Nigel Graham 2
Participant@nigelgraham2Managed to miss the first half-hour of the opening concert of The Proms, that's what! At least, I learnt later, it will be repeated on Monday afternoon. If I remember. – though I do have the Radio Times' pull-out Proms programme.
How did I manage to miss it?
Too engrossed in machining a large brass nut from hexagon to dodecagon, for a special pipe union that adapts a half-inch tube to standard 15mm plumbing pipe, while also respecting long-established practices for joining iron pipe.
The nuts for these are sometimes 8, perhaps only rarely 12 -sided, presumably to assist assembly in tight spaces, and a single nut holds together nipples screwed directly onto the pipes, with one nipple having a threaded flange.
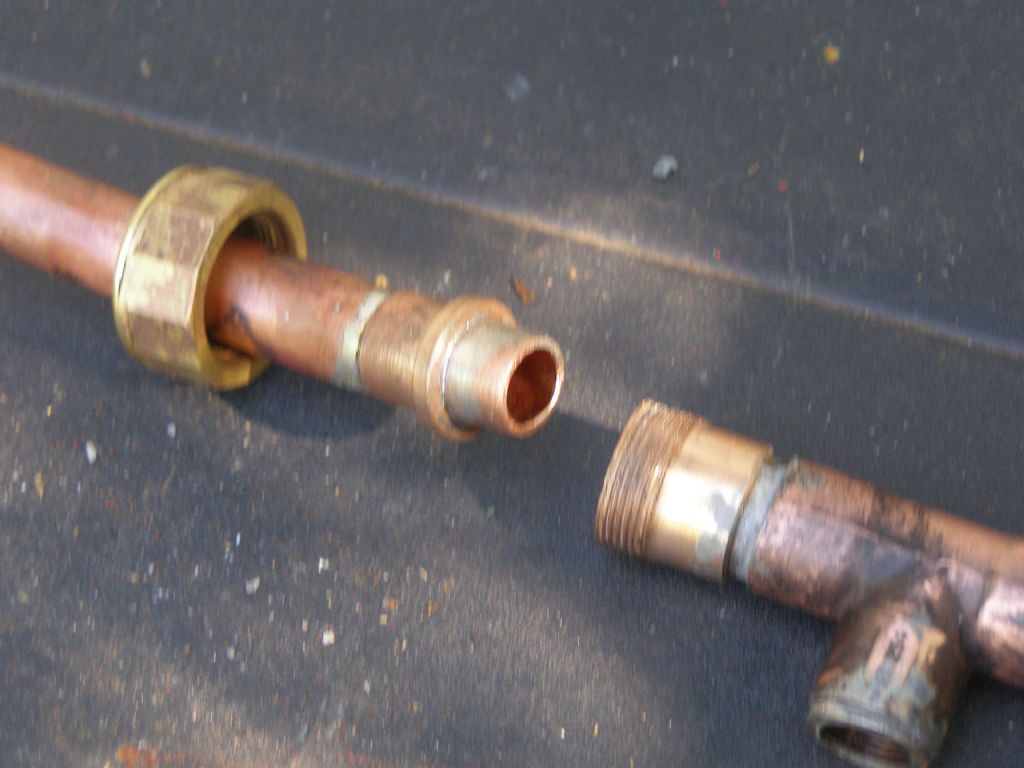
The union I made consists of two plain-flanged nipples turned from leaded bronze ' cos that's what I had in stock, to be soldered onto the tubes. The larger fits the 15mm pipe, and its broad flange is threaded 3/4" BS Brass. The smaller, on the 1/2" pipe, has a flange slightly under thread-root diameter, and carries the nut, a 1" A/F brass hexagon slice tapped through then with a back-plate plate silver-soldered on and bored to size.
.
I do not claim credit for that method of fabricating union nuts. It was published in ME some while ago now, and I apologise for not being able to cite the author.
Nor for using silver-solder "paillons", I think Luker was the one who introduced many of us to that technique.
.
This for the exhaust on my steam-lorry. The old photos suggest the originals were largely plumbed with ordinary iron pipe and screwed joints. Brass costs brass, even in Bourton!
The 1/2" pipe I have decided appropriate for the engine's LP exhaust, has to wend its tortuous way from high above the man-stand, round the firebox and down to an elbow on the underside of the smokebox. I knew trying to make a one-piece pipe would be a nightmare and probable disaster, and will need at least two sections.
That elbow is a commercial 15mm fitting screwed into the blast-pipe plinth, and I replaced its rather gawky hexagonal nut with a neater ribbed one, on the inlet's normal compression-fitting.
Behind that, will be a short stub of 15mm tube continuing through a solder-fitted Tee for perhaps an inch further to the afore mentioned joint. Thus I can fit the down-coming tube with plenty of angular latitude.
The Tee-piece? The stem will point down, and hold a brass liner tapped for a simple plug for both a steam-raising blower connection, and on disposal, to drain the system's inherent, deep U-bend. Not prototypical I know, but sufficiently out of sight even for a discrete drain-cock.
The plumbing down here can be soft-soldered as it is out in the fresh air and will carry only cool, low-pressure steam even on double-high starting. (I have not tried to calculate the theoretical release pressure, but it won't be much even for the 2" X 2" LP cylinder on simple working at 75% cut-off – if the 90psi boiler can keep up.)
I took some time to examine the likely visual effect, and decided the bunkers and wheels make the area barely noticeable without grovelling on the floor.
15 July 2023 at 10:21 #652358Oldiron
Participant@oldironPosted by Jelly on 13/07/2023 14:53:17:I received a nice letter from the IChemE confirming that I have now justified that between my HND, 13 years experience and MSc, I do indeed meet the knowledge and understanding requirements for Chartered Chemical Engineer…
So I can now submit them a new form showing my mentoring program which developed me to an appropriate level to submit the next form.
I really don't think the Engineering Council ever considered that people would apply at different career stages, or how painful they were making it for applicants when they standardised the CEng requirements between institutions.
Congratulations Jelly. Glad you got a good result at last.
regards
15 July 2023 at 21:30 #652428Colin Heseltine
Participant@colinheseltine48622Went to the Small Power Engine Rally at the Anson Engine Museum. Great to see lots of small engines and to chat to Graham Corry and sons from Alyn Foundry. I will certainly visit the museum again, minus wife next time. She enjoyed it and found it interesting for couple of hours but I would like to spend a lot longer there.
Would certainly recommend a visit.
Colin
16 July 2023 at 13:00 #652498bernard towers
Participant@bernardtowers3773816 July 2023 at 13:50 #652504Oldiron
Participant@oldiron17 July 2023 at 14:11 #652626SillyOldDuffer
Moderator@sillyolddufferYesterday I cleared my bench to make a simple brass adaptor to connect a vacuum pump to a capped length of PVC downpipe. A mild complication was the need to tap it BSP G1/8 to take a vacuum gauge. I need to measure how good or bad my ancient vacuum pump is.
PVC pipe and both end-caps were ready to go when I noticed I'd blocked the nozzle with plasticine. I carried the cap to my junk box in hope of finding a suitable poker. Having failed to find anything to fit the nozzle, I walked back to find a suitable punch. In the minute or two it took to find a punch, the end-cap disappeared.
Not tiny: the cap is an ⌀80mm Aluminium disc with a large brass pipe nozzle mounted on it. Wasted an hour last night searching, and decided it must have rolled out of sight over the floor. Sterner measures required.
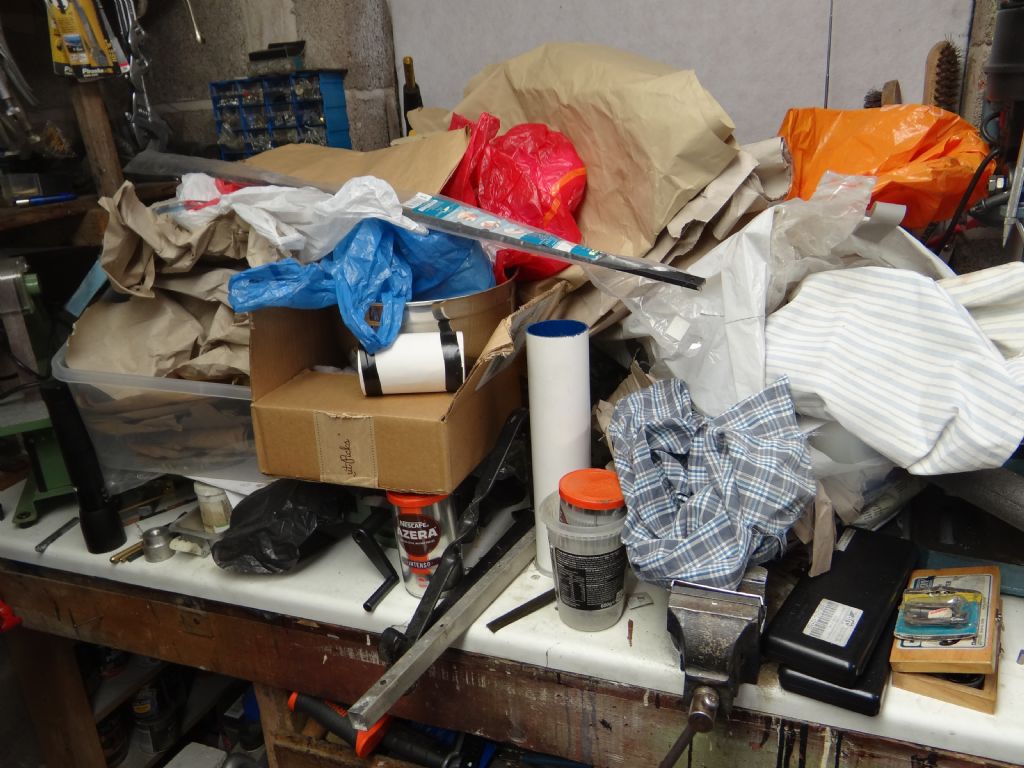
Today, 3 hours wasted so far. A quick enjoyable turning and tapping job has become a massive hateful frustrating tidy up. I'm at the 'worse before it gets better' stage; this is my bench now:
To rub salt in the wound, I almost immediately found a tiny part dropped 2 or 3 years ago. It also was the subject of a long failed search.
Aaargh!
Dave
17 July 2023 at 14:15 #652627Nigel Graham 2
Participant@nigelgraham2They do say great minds think alike, Dave….
Now, where is my…… ?
18 July 2023 at 22:12 #652820Nigel Graham 2
Participant@nigelgraham2Some progress! The culmination of assorted days actually:
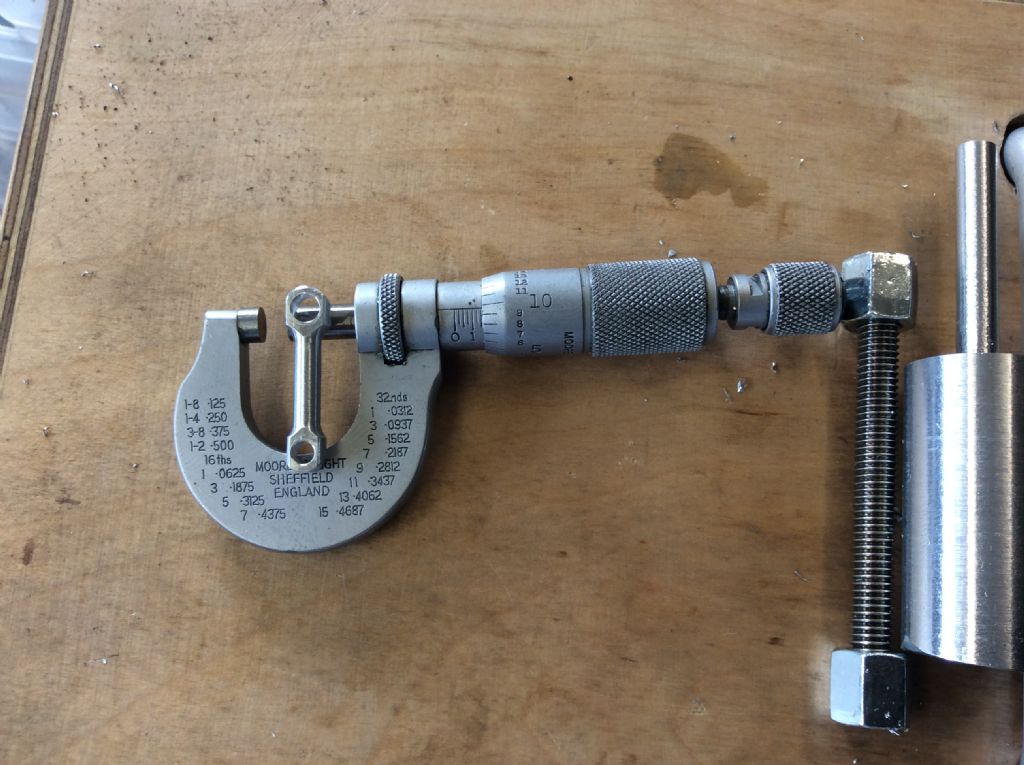
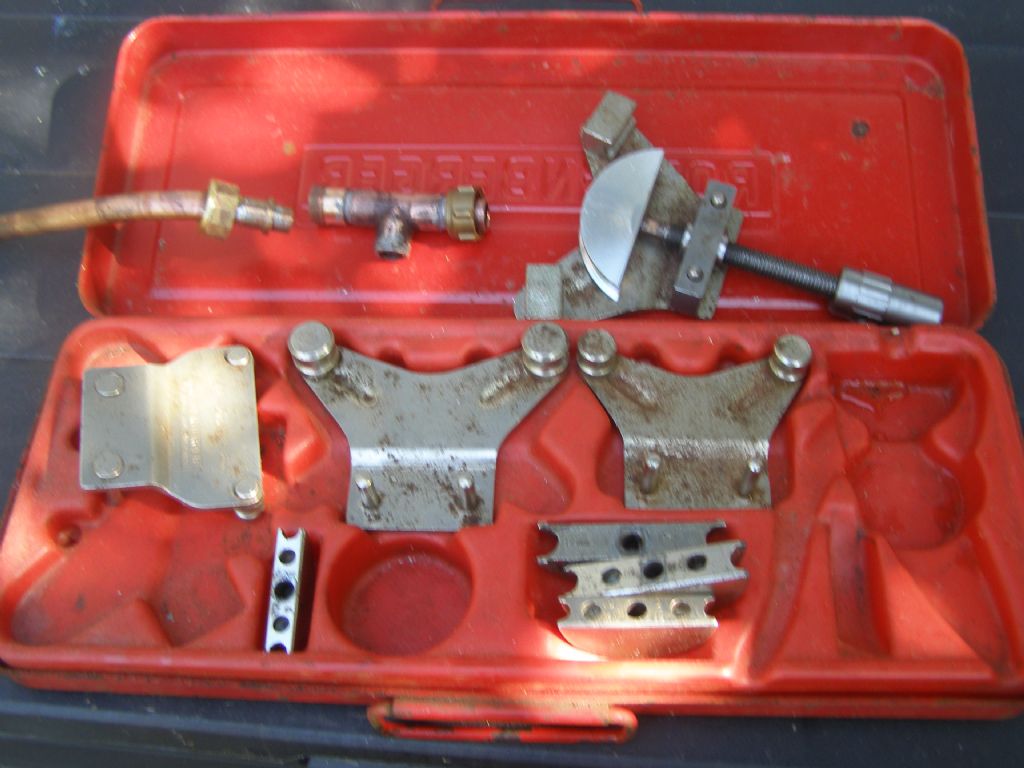
I needed a new driver for my Rothenburger pipe-bender set – replacing its original, broken ratchet-drive with a screw press action. That was a while ago…
…. The needed create a very wriggly exhaust pipe for my steam wagon, necessitating making a die for 1/" o.d. tube, in aluminium. The existing blocks on the original tool accommodate that diameter. The larger segment is the "off-cut" with two small holes by which I screwed the turned disc to a block of wood to hold on the band-saw. I'll keep that so if the spirit moveth me to make a roller-action bender, I already have the former……
…. A special 1/2" to 15mm adaptor soldered into a T-piece whose spout will take a drain-plug / steam-raising blower connection. The union for the exhaust-pipe itself is made in a style reasonably close to a common type used on iron pipe-fitting. The nipples are of flat-face, soft-soldered to the pipes. I fabricated the nut from hexagon bar and 16swg brass plate; and milled it to 12 sides. The assembly fits a standard 15mm compression-elbow into the smoke-box.
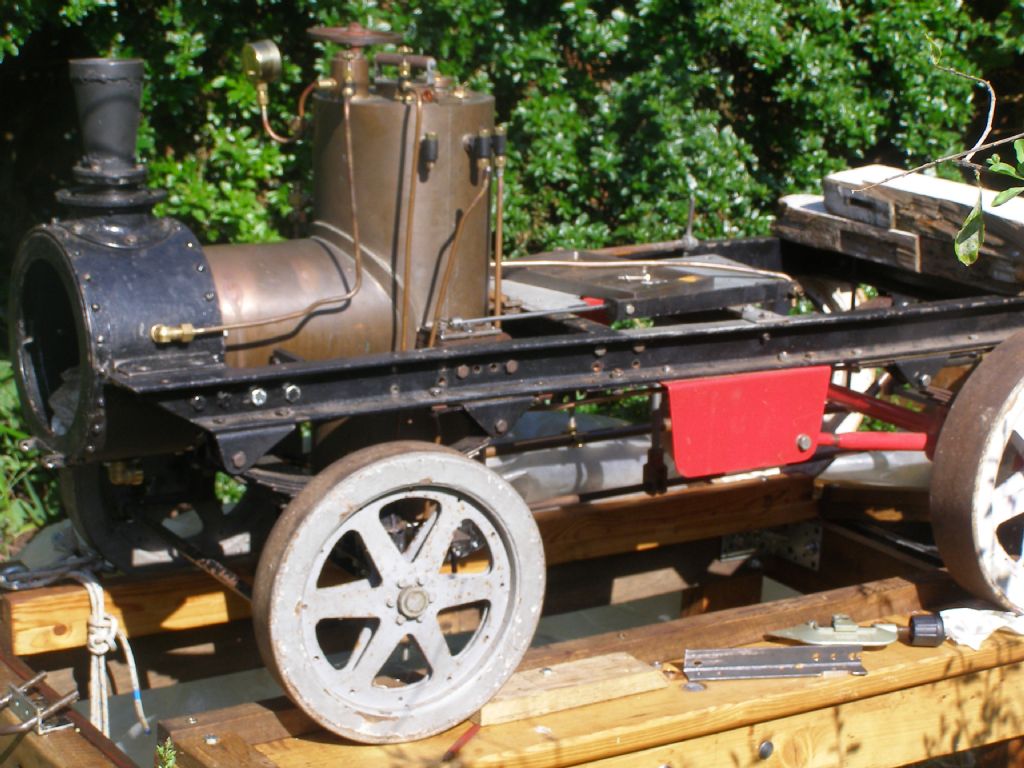
The bends are not as elegant as I'd hoped but not too bad (largely hidden anyway) and weaving the pipe into the chassis is a bit like those metal-puzzles they used to put in packets of cornflakes. It's there now though, (but not on the photo) with an upstanding section yet to be cut to appropriate length and fitted with a union when there is an engine to use it.
Edited By Nigel Graham 2 on 18/07/2023 22:15:15
18 July 2023 at 23:17 #652826Versaboss
Participant@versabossHmm, almost a bit concerned about disturbing Nigel's efforts, but here is something not really from today, but from the last couple of weeks.
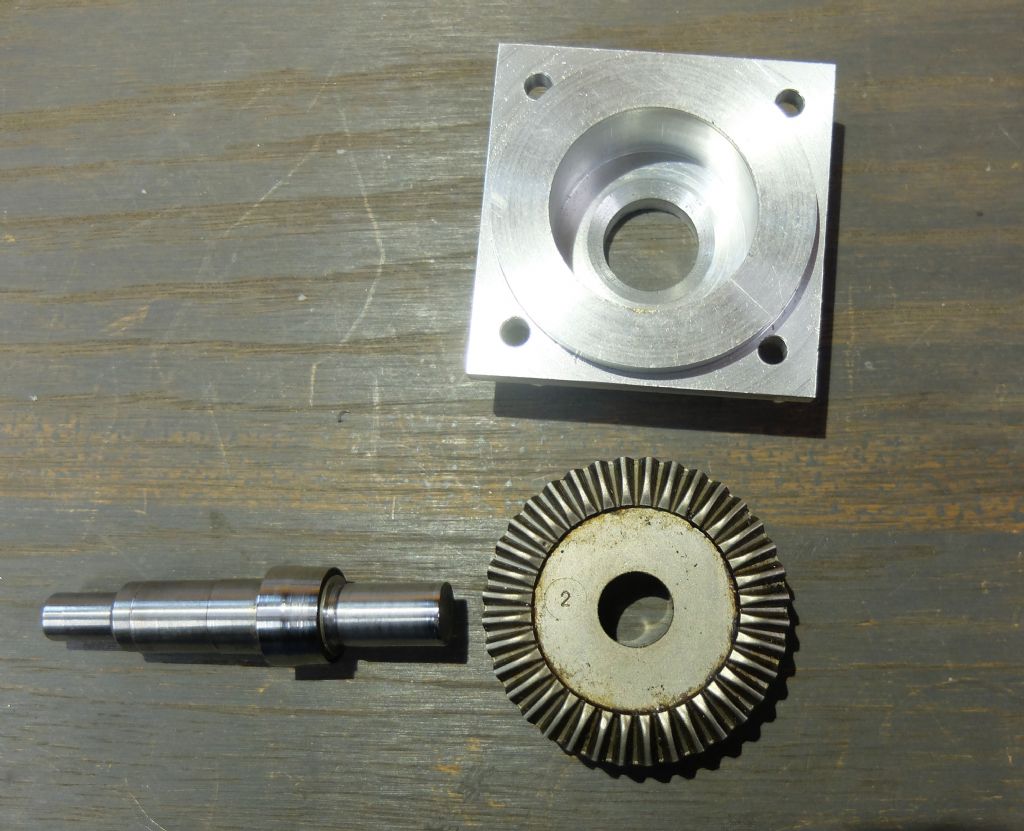
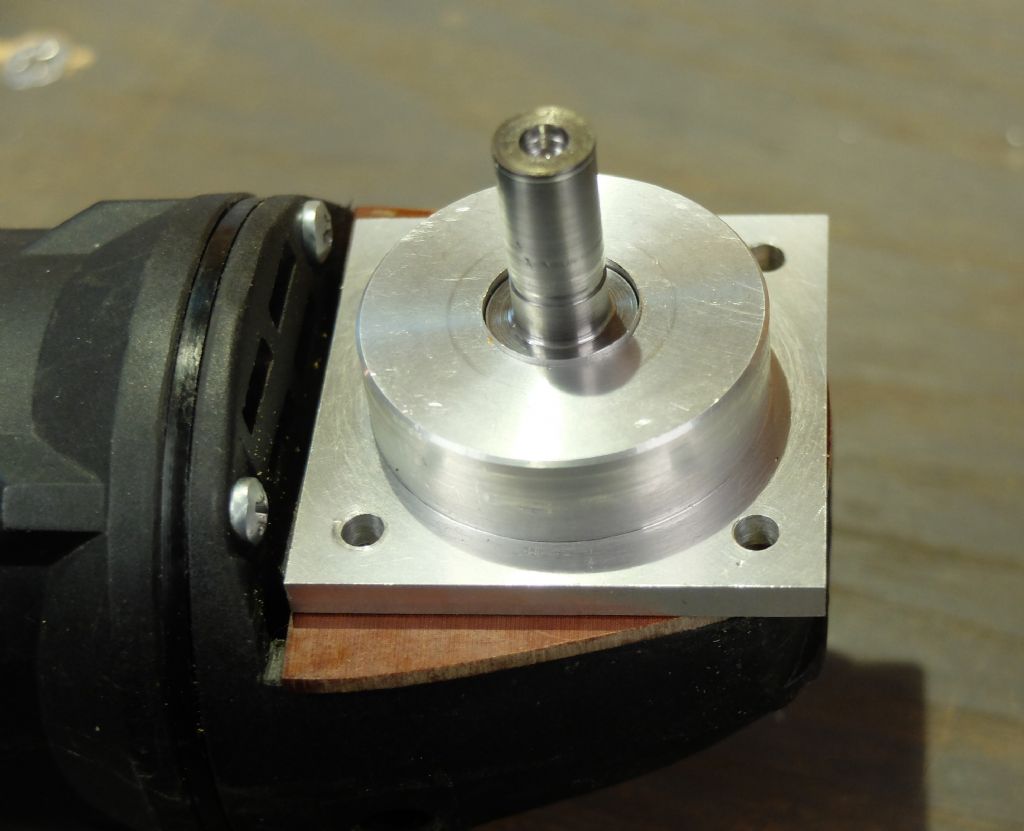
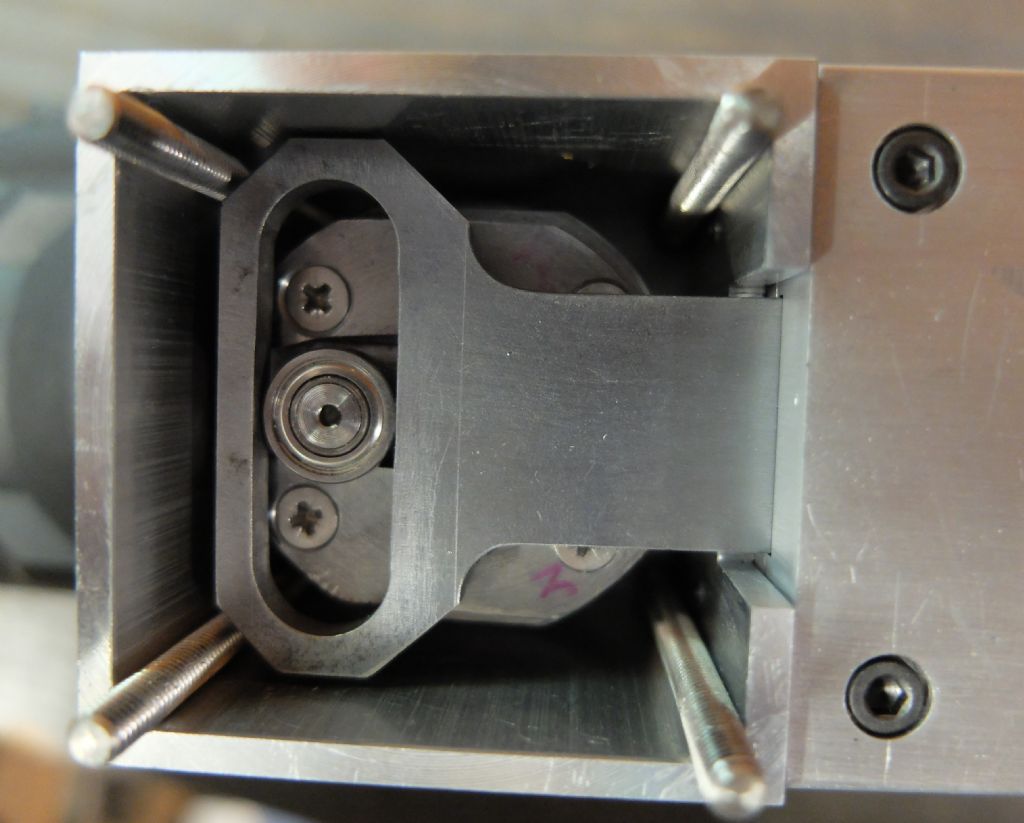
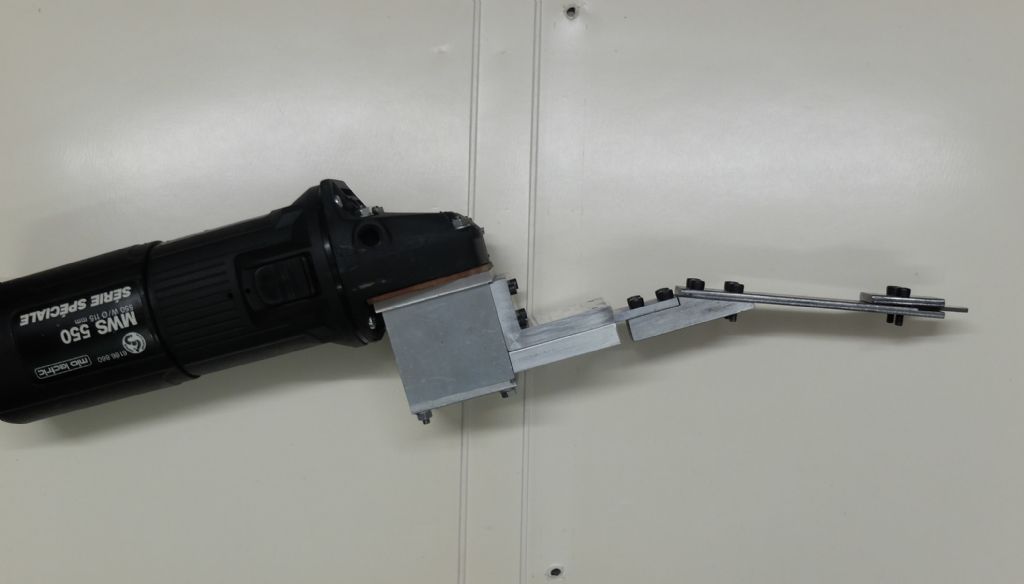
I built a scraping machine. You know, perhaps, that it is possible to buy one, But the prices, even for used ones, are way over my budget. Some years ago I tried to make such a machine from an old sabre saw, but it was much too wobbly and finally I gave up. Then I saw a short report from someone who built a scraper from an old angle grinder, and even with using some 3D printed parts. So I bought the cheapest (used) angle grinder I could find, and went to work.What I didn't see in the seller's picture was that the head of that grinder was not a casting, but a plastic part. But this was the smallest problem. My first difficulty was to remove the axle from the bevel gear. With much ddifficulties I finally managed that, and could then modify and shorten the axle. A new housing was turned from an aluminium bar, and a steel round with a slot served as holder and guide for a variable eccentric. A scotch yoke moves the scraping tool, and the whole apparatus has room in a piece of square alu tube. Well, that's it, in a nutshell
Oh, I almost forgot to mention that the machine does not run on grid power (that would be MUCH TOO fast!),
but on an old 19V laptop power supply.Kind regards,
HansEdited By Versaboss on 18/07/2023 23:20:27
21 July 2023 at 22:17 #653198Nigel Graham 2
Participant@nigelgraham2Treated myself to a break from frazzling my brain trying to arrange the fixtures and fittings on a steam-wagon – though did screw a few bits back together this evening.
Instead I saw bits of Dorset I'd never seen previously, all within ten miles of home; courtesy of a short bus ride then a walk of about 5 miles on footpaths including about a mile of the South-West Coast Path – with fine views.
I determined the distance on returning home, by using a map-measurer on the 1:25 000 OS Map (about 2.5 ins = 1 mile).
The first section was actually along the last section, Portesham to Abbotsbury, of the track-bed of the long-dead branch-line to the latter village. I used local knowledge to help me locate its not-obvious start from the road, but soon the flatness, straightness and shallow topography indicated I was on the route.
I passed a platelayer's hut, minus door, window and furniture, but surprisingly with quite new corrugated-iron on the roof. Perhaps a farmer sometimes uses it for short-term storage or a field-shelter.
Later, another surprise: shallow indentations left by sleepers. Yet the line closed in the 1950s!
Abbotsbury Station goods-shed is all securely locked, probably used as a farm store, and still has the loading-gauge hanging from the wagon-door lintel. Just beyond, the original station building is now part of, or been replaced by, a big modern home; but the platform is still there, peeping out from among shrubs.
My return path was along a ridge to the South of this line, which follows a vale all the way from the main line, and from here the railway was clearly marked by a shallow embankment and in places, lines of trees.
The line was one of those 19C speculative things that ambled across the countryside and never made any money. As well as passenger trains, its good trains took coal and other materials along the vale, and returned with agricultural produce, fish (caught off Chesil beach, near Abbotsbury), and stone quarried from the Portland Stone formation on the hill above Portesham. Iron-ore too, quarried at Abbotsbury, but that was a short-lived venture as the iron-stone was too rich in silica to be economical. Its builders (GWR I think) had had hopes of extending it Westwards to Bridport and beyond, but that never happened.
Edited By Nigel Graham 2 on 21/07/2023 22:20:48
21 July 2023 at 23:08 #653201lee webster
Participant@leewebster72680Today I planted a rose bush given to me as a birthday prezzie. A few friends held a party/get together at my house yesterday. There were six of us. One of them gave me the rose bush. We sat in the conservatory and everyone was amazed by one of my roses, a large plant with purple flowers. They thought it quite rare to see a purple rose. There is only one rose open on it at the moment, several weeks ago there were at least forty. I also picked several beetroot to give to my friend who gave me the rose. Others at the party have also asked for some beetroot and rhubarb. Tomorrow I will go to a local (small) market for a look round. I am now actively looking for a one-person brake bleeding kit that doesn't rely on a spare tyre to work.
22 July 2023 at 07:24 #653207Craig Brown
Participant@craigbrown60096Posted by Versaboss on 18/07/2023 23:17:14:I built a scraping machine.
Nice looking modifications Hans. The million dollar question is how does it perform?
22 July 2023 at 17:33 #653266Chris Mate
Participant@chrismate31303Well I semi finished the Compressor sound issue. All sides closed with 20mm MDF & painted. Inside another layer of MDF distractions, thick foam & I decided to add 2x extractor fans, one on the rear near compressor fan, and one on the side smaller pointing the direction of other fan. I also added lights inside. The front panel has holes for my hands to see gauges and switch and levers.
-I started it up, its a delight of no irritating noise, you can of course hear it, but it sounds pleasant now.
-The motor gets 1/3 of previous heat to fill tank to level always used, so the airflow is right.
-The lid I completed withlarge stainless tray swinging up to access compressor from top and stay open like a cars bonnet, if need be I can swing it right over and rest on floor or something, its heavy 2x 20mm MDF glued together plust tray genkemmed.So I am very happy with this outcome, another week of final touches, then adding and resotre the swinging metal bandsaw on top of tray, easy to clean.
Edited By Chris Mate on 22/07/2023 17:36:09
22 July 2023 at 18:43 #653270 BazyleParticipant@bazyle
Interesting description of your walk Nigel which enabled me to find both the goods shed and two candidates for platelayer's hut on google earth.
Yesterday I and a Warden did some emergency repairs to the Church valley gutters and tower roof. It started raining today about midday and the first 3 hours showed that the previous leaks had at least been curtailed. I will shortly go up to close up and hope it is still dry inside after teh non-stop rain all afternoon. If not the steady drip drip during the service might encourage some more donations to the repair fund tomorrow.
22 July 2023 at 19:23 #653275duncan webster 1
Participant@duncanwebster1Attempted to get into the workshop, but for the 6th day on the trot got family visitors. You can have too much of a good thing!
22 July 2023 at 20:52 #653293DMB
Participant@dmbWent to club's track day, needed to stay to the end to count takings and take them home, ready to bank and got soaked for my trouble! Given that the annual public Liability insurance, monthly electric and water Direct Debits together equal £100 per track day, we made quite a loss on the day. That doesn't include the council's rent and other more minor costs. Teabags, coffee cakes and goodies all supplied free by members. Surprising how many people turned up later in the afternoon when it was getting wetter. Third poor or non existent track day – first it wasn't safe to operate with so few members on site, next track day also cancelled, not safe to run with a broken elm tree branch hanging by a piece of its bark about 12ft above the track. When council contractor's cut it down, I counted 10 rings then estimated total must have been 60+, so you imagine the size of it. Took them 4hours to do. Today, we were on the point of cancelling due to the weather but very young passengers arrived in slowly increasing numbers. Nothing like a normal day of course. Cold, wet and windy, quite a horrible day.
John
22 July 2023 at 21:45 #653297Nigel Graham 2
Participant@nigelgraham2Bazyle –
Thankyou!
The stretch I walked is from the West edge of Portesham. I saw only one hut, which appears rather oddly as if recently re-roofed, a bit crudely but reasonably effectively. It's about a third of the way to Abbotsbury, maybe less, and on the left. It could be the splodge that Google Earth shows, by two opposite field entrances.
I'm intrigued by Google Earth marking the Goods Shed as a now a museum ("temporarily closed"
 . I don't know what that was about!
It is also noticeable that the station was rather short of the village but there is a vague hint of the line starting to curve away to the North-West there, as it would have needed do to have continued to Bridport.
I hope the roof repairs have succeeded!
=======
Tea-and-natter morning at the club, with rain stopping any outdoor activities, apart from a locomotive's steam-test in the vague lea of a building.
''''''
22 July 2023 at 22:54 #653304Oldiron
Participant@oldironSpent the last couple of days replacing to top,back,bottom and both ends of a large multidrawer wooden cabinet my wife bought at a "bargain" price. It is 6ft x 3ft x 2ft deep. Full of damp rot & wood worm supposedly treated. The timber to replace the affected parts cost a lot more than the"bargain" cabinet. The only bits that survived were the mahogany front frame, the sliding glass doors with mahogany surrounds & the drawers. Just need to finish it off with some fettlin then varnish it. Oh and now it needs wall hanging in her study above the desk.
I was going to post the build of my indexing head but unfortuanatly all the photos taken during the build on the SD card turned out to be corrupt. When I get a bit more time I will strip it down and try to explain how I made some parts and modified other sourced parts to complete the project.
regards
Edited By Oldiron on 22/07/2023 22:55:25
-
AuthorPosts
- The topic ‘What did you do today? 2023’ is closed to new replies.
Latest Replies
Home › Forums › The Tea Room › Topics
-
- Topic
- Voices
- Posts
- Last Post
-
-
A grasshopper of unknown vintage
Started by:
mikemunson in: Stationary engines
- 4
- 4
-
7 July 2025 at 23:43
Nigel Graham 2
-
Bosch PBD 40 bearing upgrade
Started by:
th1980 in: Manual machine tools
- 1
- 1
-
7 July 2025 at 23:37
th1980
-
Old plastic handled screwdrivers
Started by:
 Dave Halford
in: Workshop Tools and Tooling
- 7
- 7
-
7 July 2025 at 23:29
 peak4
peak4
-
Maisie lubricator
Started by:
ferroequinologist in: Locomotives
- 8
- 12
-
7 July 2025 at 23:23
Nigel Graham 2
-
Square end on round stock – Milling?
Started by:
Roger TheShrubber in: Workshop Tools and Tooling
- 12
- 14
-
7 July 2025 at 23:09
Huub
-
How many spokes do I really need?
Started by:
 Fulmen
in: Related Hobbies including Vehicle Restoration
- 6
- 13
-
7 July 2025 at 23:05
howardb
-
motor and switch wiring Myford ML7
Started by:
1957jmh in: Workshop Tools and Tooling
- 1
- 1
-
7 July 2025 at 22:49
1957jmh
-
Herbert B drill – a question and a curiosity…
Started by:
gerry madden in: Manual machine tools
- 4
- 7
-
7 July 2025 at 21:15
gerry madden
-
Bridgeport Series 1, table power feed.
Started by:
Daedalus in: Manual machine tools
- 1
- 1
-
7 July 2025 at 21:04
Daedalus
-
File backup to external hard drive, incremental etc?
Started by:
Peter Bell in: The Tea Room
- 8
- 12
-
7 July 2025 at 20:47
ChrisLH
-
Bridgeport ways and wear
Started by:
inline in: Manual machine tools
- 5
- 15
-
7 July 2025 at 20:34
 David George 1
-
road registration and traction trailer.
Started by:
RRMBK in: Traction engines
- 8
- 12
-
7 July 2025 at 19:36
here again
-
Chester Champion, warco ZX15 drawbar
Started by:
martian in: Manual machine tools
- 1
- 1
-
7 July 2025 at 18:26
martian
-
Twin Engineering’s heavy mill/drill quill removal
1
2
Started by:
Martin of Wick in: Manual machine tools
- 11
- 31
-
7 July 2025 at 17:18
 Nicholas Farr
-
A Persistent Scam
Started by:
Chris Crew in: The Tea Room
- 7
- 8
-
7 July 2025 at 17:05
Trevor Gale
-
Readability / clarity in new combined magazine
1
2
Started by:
Trevor Gale in: Model Engineer & Workshop
- 18
- 28
-
7 July 2025 at 15:53
 Russell Eberhardt
-
Pragotron Slave Clock
Started by:
renardiere7 in: Clocks and Scientific Instruments
- 7
- 17
-
7 July 2025 at 12:32
 Robert Atkinson 2
-
Motorised Adept No. 2 Shaper
1
2
Started by:
William Ayerst in: Workshop Tools and Tooling
- 10
- 28
-
7 July 2025 at 11:43
 Bazyle
-
Starrett and other tool manufacturer wood boxes
Started by:
Ian Owen NZ in: Workshop Tools and Tooling
- 12
- 18
-
7 July 2025 at 09:56
 Mark Easingwood
-
What Did You Do Today 2025
1
2
…
7
8
Started by:
 JasonB
in: The Tea Room
- 33
- 176
-
6 July 2025 at 21:35
Nigel Graham 2
-
Speed camera
1
2
3
Started by:
 David George 1
in: The Tea Room
- 24
- 61
-
6 July 2025 at 21:05
old mart
-
New member
Started by:
nige1 in: Introduce Yourself – New members start here!
- 4
- 9
-
6 July 2025 at 19:01
 John Hinkley
-
M type top slide conversion??
Started by:
jimmyjaffa in: Beginners questions
- 7
- 14
-
6 July 2025 at 14:20
 David George 1
-
Boiler Design – issue 4765
1
2
…
7
8
Started by:
Charles Lamont in: Model Engineer & Workshop
- 26
- 180
-
6 July 2025 at 13:05
 lezsmith
-
Colchester Chipmaster Clutch question
Started by:
Peter_H in: Manual machine tools
- 4
- 7
-
6 July 2025 at 10:47
Peter_H
-
A grasshopper of unknown vintage
-
Latest Issue
Newsletter Sign-up
Latest Replies
- A grasshopper of unknown vintage
- Bosch PBD 40 bearing upgrade
- Old plastic handled screwdrivers
- Maisie lubricator
- Square end on round stock – Milling?
- How many spokes do I really need?
- motor and switch wiring Myford ML7
- Herbert B drill – a question and a curiosity…
- Bridgeport Series 1, table power feed.
- File backup to external hard drive, incremental etc?



 . I don't know what that was about!

