What did you do today? (2014)

Advert

What did you do today? (2014)

Home Forums Work In Progress and completed items What did you do today? (2014)

Viewing 25 posts - 201 through 225 (of 2,328 total)
  • Author
    Posts
  • #144971
    Tim Chambers
    Participant
      @timchambers76147

      You know if i had been told that I would be quite happy out in the workshop filing away at chunks of metal, trying to get them flat and square I would have said "Nah I haven't got the patience to do that!"

      Advert
      #145010
      John Stevenson 1
      Participant
        @johnstevenson1

        What did i do today ?

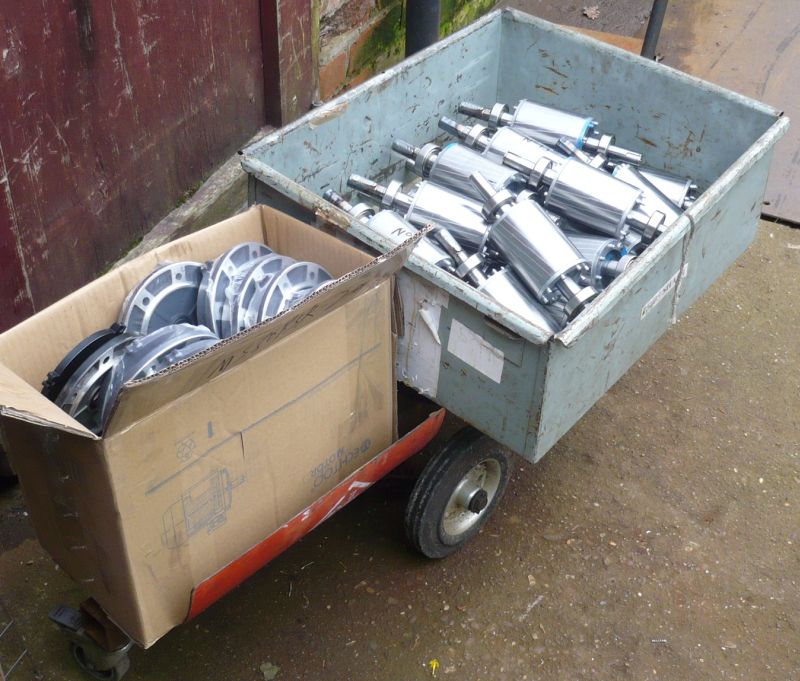
        Not a lot but 20 electric motors have just hit the deck, watch this space……….

        #145013
        ian cable
        Participant
          @iancable23486

          ye john get the destruction out of the way early then you ve got all day to sort it out, enjoy

          #145057
          jason udall
          Participant
            @jasonudall57142

            John
            .hope the bearings/feet..OK..

            #145062
            John Stevenson 1
            Participant
              @johnstevenson1

              Jason, got no feet, they are already stripped for action wink


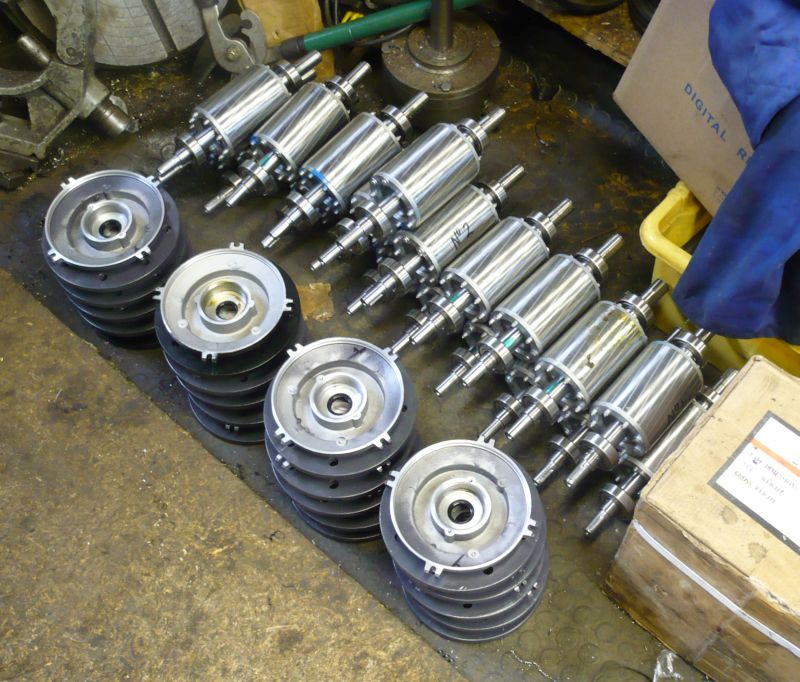
              11.54 this morning according to the camera, just had all the keyways welded up as they are changing from a 80 frame to a 71 which entails shortening, machining down from 19 to 14 and putting a 5mm keyway in.


              4:05 tonight, all done and dusted.

              20 rotors modified and the new end covers machines to fit a special application.


              Bit early for the pub, where's me brush ? ……………..

              Edited By John Stevenson on 25/02/2014 16:35:22

              #145265
              Bob Perkins
              Participant
                @bobperkins67044

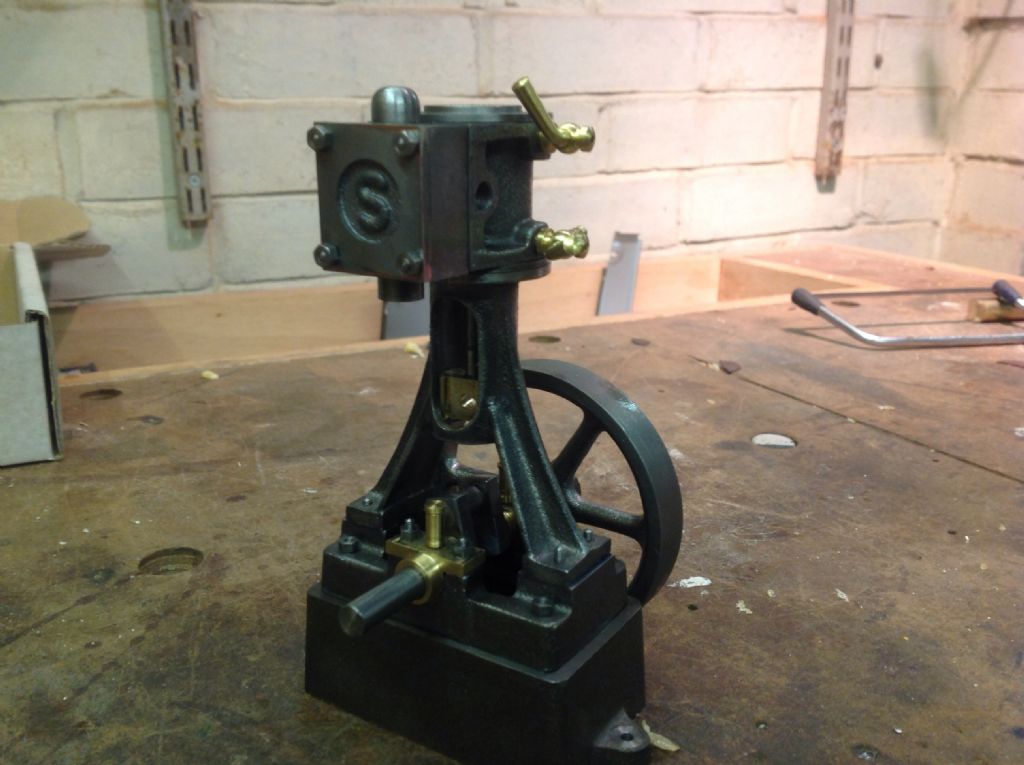
                image.jpgTime has been short in the workshop for the past few weeks as the DIY progresses. I managed to steal a bit of time to finish the piston and cross-head for my 10V. It's great when you have enough bits to start joining them together.

                #145267
                ChrisH
                Participant
                  @chrish

                  Give you this John, you fairly crack on with jobs. That is an impressive output for four and a wee bit hours ………….

                  If you are stuck until the pubs open you could always look for that two quid you are always on about…….

                  Chris

                  #145271
                  GaryM
                  Participant
                    @garym

                    Welcome to the forum Tim, as no-one else has said it. smiley

                    I think quite a few of us are happy making bits of round metal square and vice-versa. Very therapeutic.

                    Gary

                    #145274
                    John Stevenson 1
                    Participant
                      @johnstevenson1

                      Bit less than that Chris, chin wagging to the steel rep for a bit and a coffee.

                      Anyway it's Ketan that has the bloody two quid of mine.

                      Todays job.

                      WARNING **** NOT FOR THE FAINT HEARTED**********

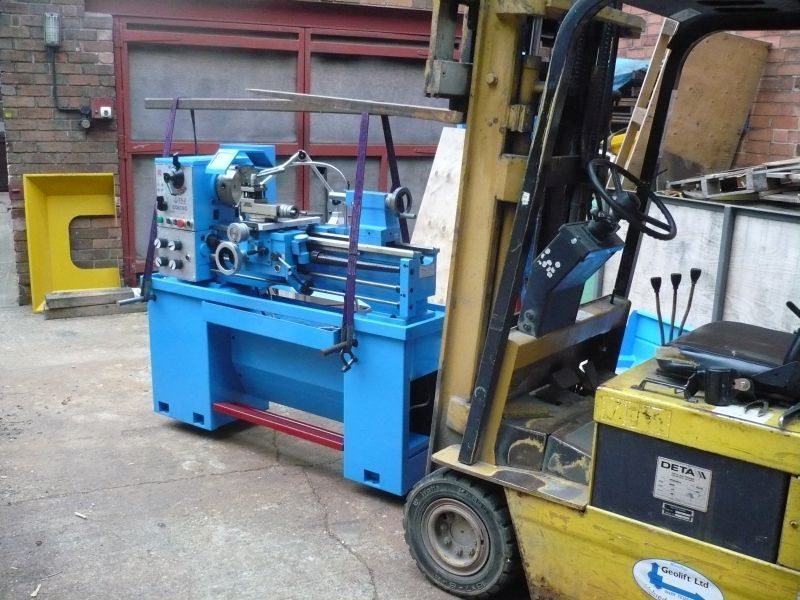
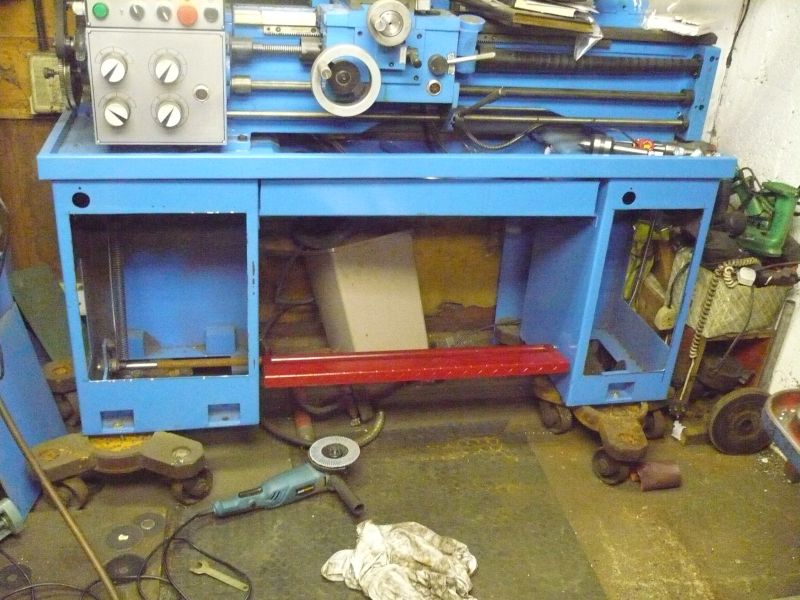
                      This was me new lathe back in July [ God was it that long ago ? ]

                      Note the silly access hatch on the end and a silly 1/2 pint coolant tank lurking inside. Only way to fill this is pour coolant into the tray until your boots fill up and it's full.

                      So today after 7 angle grinder discs we have this.

                      Told you it wasn't for the faint hearted laugh

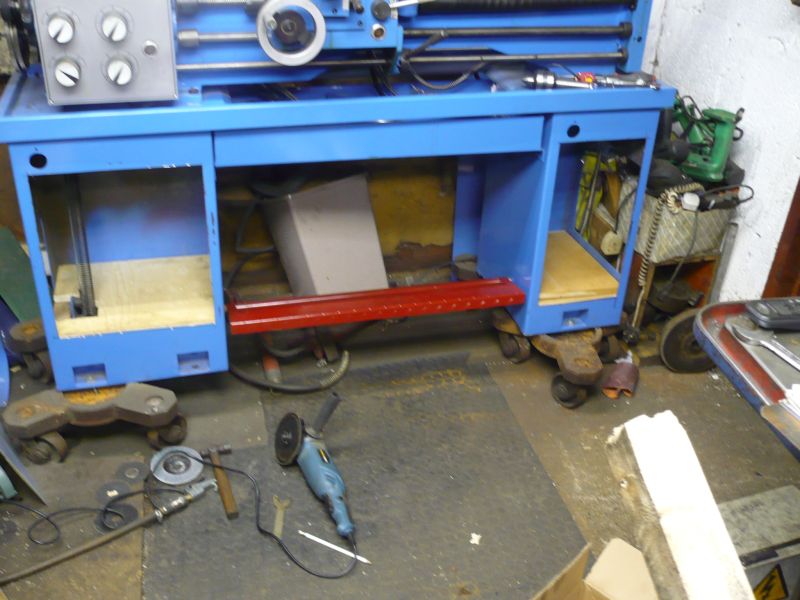
                      At close I had got this far.

                      Actually got a bit further than this but it's all unfinished bits. need to cut 6 lengths of angle for top shelf brackets, two inside the headstock and tailstock cupboards and two to bridge the gap for a shelf for chucks etc to live.

                      Big coolant tank, about 3 gallon, is going on the deck behind the brake and that tin shield has been chopped up for other things. Don't like working with that brown stuff, spent about an hour tonight trying to weld two brackets onto one piece.

                      Doors will have angled racks on the inside to hold the 5C collets, a' la the old CVA. Doors will be the same hight, headstock end had to be cut shorter to miss the foot brake mechanism.

                      Waiting for the body shop guy to come over with the paint camera to find out what RAL number the paint is so I can get some mixed. Brilliant bit of kit, you place it on the panel, press GO and it comes up with the RALl number and all the percentages of base colours to make it.

                      #145309
                      Four stroke Fred
                      Participant
                        @fourstrokefred

                        Today it was nearly 35deg.C in the shed and I chose to do casting – must have rocks in the head! After about five weeks of experimenting I think I have finally cast one of the cylinders for my Saunderson and Mills tractor but still have one more to go! Experiment one and two both had flaws and the core boxes and pattern had to be modified. The cylinder for this engine has a blind bore ( the cylinder head and cylinder all all one part), "T" valves and water cooled barrel and head. As the casting is still hot I will have to wait until tomorrow to check it out.

                        #145419
                        Gray62
                        Participant
                          @gray62

                          Well, not wanting to be outdone by that nice Mr Stevenson, I engaged in a little lathe surgery tonight.

                          Just need to find some material for shelves and doors. (and only used two 1mm cutting disks smiley

                          img_0179.jpg

                          Edited By CoalBurner on 27/02/2014 22:07:25

                          #145420
                          John Stevenson 1
                          Participant
                            @johnstevenson1

                            Bad day today, well late afternoon.

                            Some kind soul gave me an old oil cooled welder with no guts in it for a coolant tank, found a big pump and was just going to fasten it to the side [ side mounted pump ] and decided to have a quick measure up where it should go.

                            Damkit, too tall, can't get the shelf in I need. Where's me angle grinder [ I love that angle grinder love ]


                            Chopped the tank in half, ground the welds off the top support on the scrap bit and weld it back on to the new bit.


                            Then did one of Baldrick's Cunning Stunts. Drilled and tapped 6 holes in the side and two 16mm holes.

                            Cuts some profiles out on the laser, some gaskets, two whit perspex shapes, one clear shape and a steel cover piece.


                            It assembles as gasket, bit with two holes, gasket, bit with slot, gasket, clear cover than steel cover.


                            Result ?


                            Now got a sight gauge. Also welded a big 2" has thread and cap in so I can try to get some coolant in.


                            Also before someone mentions white suds not showing up on a white background [ bit like the Italian flag, white cross on white background ] this machine is going to be running neat cutting oil so it will show.


                            Bit of a flash round with a rattle can and jobs a good un.


                            [EDIT]

                            Damkit just read Coal burners post above this one, have to get me finger out.

                            Obviously coal burners are quicker than wood burners  cool

                            Edited By John Stevenson on 27/02/2014 22:08:53

                            #145503
                            Neil Wyatt
                            Moderator
                              @neilwyatt

                              Welcome to the forum, Tim C and Bob R!

                              > Waiting for the body shop guy to come over with the paint camera to find out what RAL number the paint is so I can get some mixed.

                              I'll give you a clue John, it's blue…

                              Neil

                              Edited By Neil Wyatt on 28/02/2014 15:00:46

                              #145744
                              GaryM
                              Participant
                                @garym

                                Well, the day started off well with a visit to Ellenroad Engine House **LINK** to see what inspired me to have a go at making steam engines.

                                Then after dinner (lunch if you're posh) I started a trial assembly of the S50 I'm trying to make, in order to check alignment of cylinder, crosshead, conrod and crank and then spot through the cylinder mounting holes. I used a clamp to hold the cylinder on the bed while adjusting the position. All was going well, clearances and fit of parts seemed acceptable (to my untrained eye), engine turned over with no binding or slackness. I needed to move the clamp to one side so I could get at the holes from underneath so I decided to clamp it at the end of the cylinder next to the slidebars. Unfortunately this meant that when I tightened the clamp it bent the piston rod. First part I've messed up. I imagine others have had bigger disasters though. At least it is a simple part to remake. Surprisingly demoralising though.

                                Gary

                                #145746
                                NJH
                                Participant
                                  @njh

                                  Hi Gary

                                  I feel your pain! I HATE remaking parts. As you say not so bad if it is a simple part but even then I kick myself for rushing or not thinking through the process sufficiently. ( It had nothing to do with the lunch I suppose? disgust )

                                  Norman

                                  #145757
                                  GaryM
                                  Participant
                                    @garym

                                    I doubt it Norman, it was a cheese butty. wink

                                    I usually get accused of thinking too much. That's why it takes me so long to make any progress. I'll look on it as an opportunity to make it better than the first time. I think it was annoying because I thought I was pretty close to trying the engine on compressed air for the first time.

                                    Gary

                                    #145791
                                    Michael Horner
                                    Participant
                                      @michaelhorner54327
                                      Posted by John Stevenson on 16/02/2014 22:17:53:

                                      Well attacked the tailstock this evening.

                                      This is what took the time

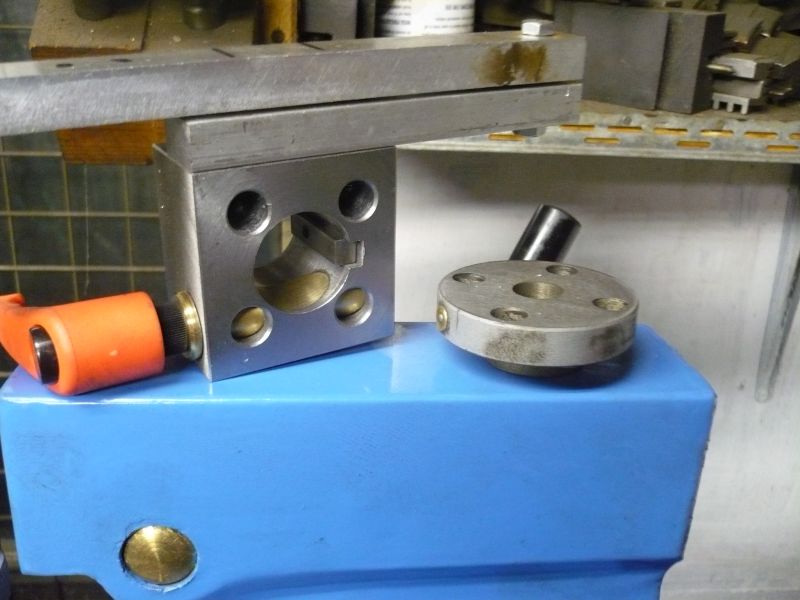
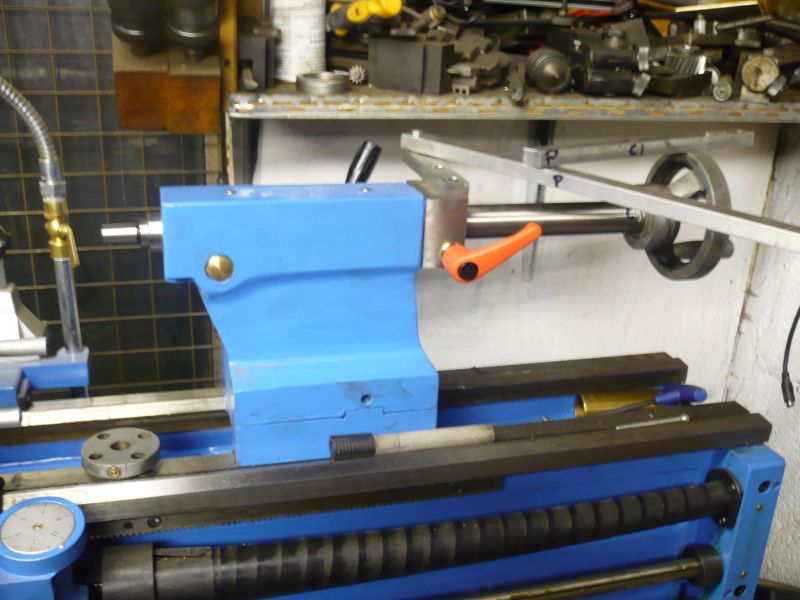
                                      That square block replaces the round keeper, it's bored the same size as the barrel, has a fixed key fitted and a lock.

                                      These are the bits that go in.

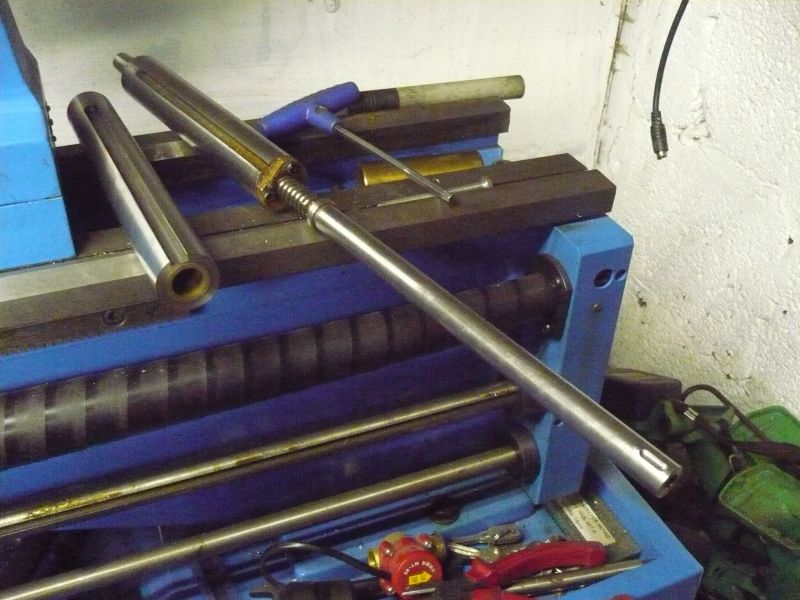
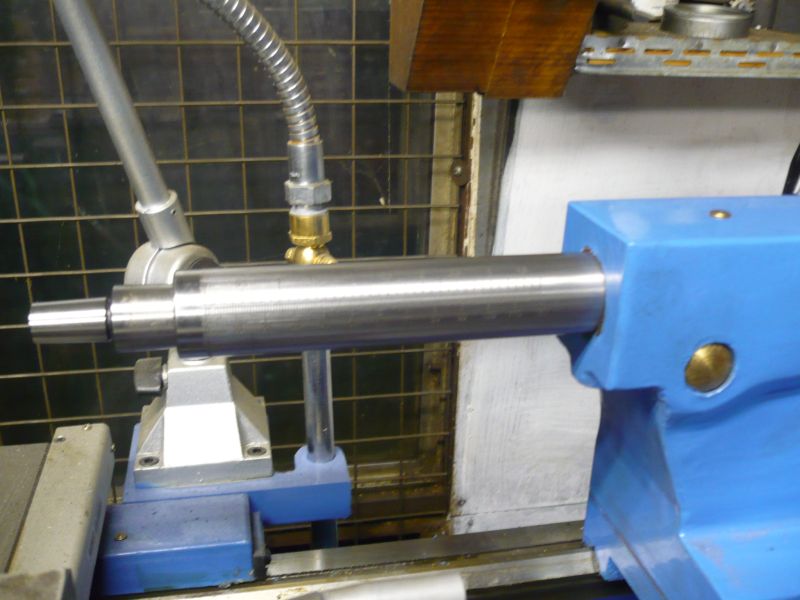
                                      On the left a dummy barrel, made out of stainless because I had it in the right size, keyway nearly to the end so it can slide thru the square keep block but not come out because of the key and bushed to take the screw shaft extension.
                                      One bush is at the end, that's the hand wheel end and the other bush is 50 mm inside because of the screw that sticks out.

                                      This dummy barrel is not connected to anything, it slides in the square block and pushes on the original barrel. The screw extension is just that, the outer end mimic the end of the screw where the hand wheel fits and the other end is threaded into the screw.

                                      This is the only part that has to be modified from original in that it has to be secured to the original screw either by drilling and pinning or loctite. I used loctite but if push comes to shove you can break the seal.

                                      This is it assembled.

                                      Linkage isn't finished.
                                      It need a clamp block right at the far end next to the handwheel to take that bar that has P [ pivot ] on it and C [ clamp ].
                                      There is a C on the end of the dummy barrel.

                                      To use you unlock the orange lever that the lever feed will push the barrel out nearly 6" pull it back, lock the orange lever and you get 4 1/2" of screw feed.

                                      However you can use both together if you want screw in on fine feed whist drilling, lever out to clear chips, lever back in, lock, and carry on using the handwheel.
                                      or lever in to get up to the job, lock, then hand wheel, or if it's just fast drill use the lever feed on it's own.

                                      Not a new idea, Clausing had a similar arrangement but it means buying a new barrel and screw so spendy. This way need no modification to the machine [ except for the dab of loctite ] and nothing has to be to microns, no taper to cut in fact it's that agricultural I did the lot with now drawings at all.

                                      max usable travel.

                                      Hi John

                                      I like this idea and want to do it to my minilathe. Is the clamp on an excentric?

                                      Cheers Michael

                                      #145793
                                      JasonB
                                      Moderator
                                        @jasonb

                                        Michael if you look at the first picture you can see the clamp barrel inside the hole which has a scallop out of it to match the hole. As the orange handle is tightened it pulls the brass barrel to one side and locks the spindle.

                                        J

                                        #145796
                                        Gray62
                                        Participant
                                          @gray62

                                          John has told me the brass clamp does not give sufficient locking force without tightening really hard and suggested a steel rather than brass clamp. I'm doing the same on my warco gh1330 and im going to try a split brass cotter first as I'm not keen on the idea of a steel against steel clamp.

                                          #145800
                                          Oompa Lumpa
                                          Participant
                                            @oompalumpa34302

                                            To throw my hat in – I think this is a great mod and I would hope to get to it at some point – in the very long list of modifications and improvements I have tabled for my gaff.

                                            graham.

                                            #145874
                                            Neil Wyatt
                                            Moderator
                                              @neilwyatt

                                              John's promised me a write up for the Myford tailstock to run in MEW. I undertstand it's slightly different to the above, but the Myford and mini-lathe tailstocks work in the same way so all that will be different are the dimensions.

                                              Hope to do the mini-lathe mod myself in due course.

                                              Neil

                                              #145889
                                              John Stevenson 1
                                              Participant
                                                @johnstevenson1

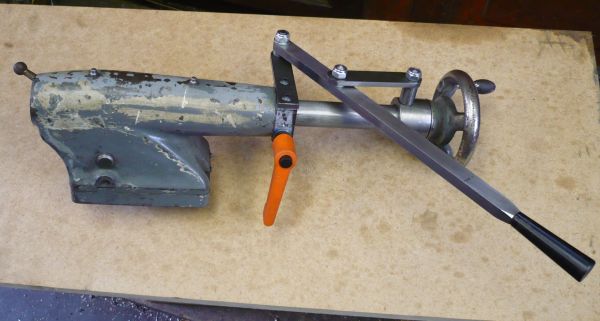
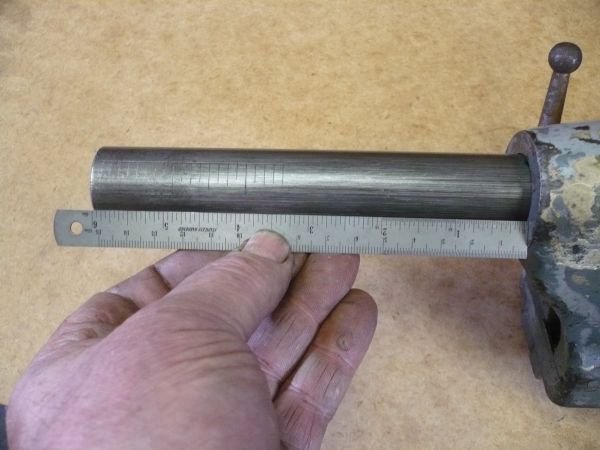
                                                Myford has been done ages ago. Pics are dated Nov.2009

                                                However in typical John no drawing and weld it where it touches mode it works but basically needs redoing to make it more presentable.

                                                Looks more tatty than it is given the tailstock came off a scrapper as it's only a concept build and it won't go back onto a machine. I don't own a S7 anyway [ I think ? surprise ]

                                                That's using lever and combined screw feed and is about the max it will do and still retain support.

                                                Like the one on the Chinese lathe only mode needed to the machine is to either loctite the screw extension or pin it.

                                                If you do pin it and later remove the lever feed to say sell the machine the pin hole is under the handwheel nut so nothing shows. Just to satisfy the Flat Earth Society

                                                #145903
                                                Nicholas Farr
                                                Participant
                                                  @nicholasfarr14254

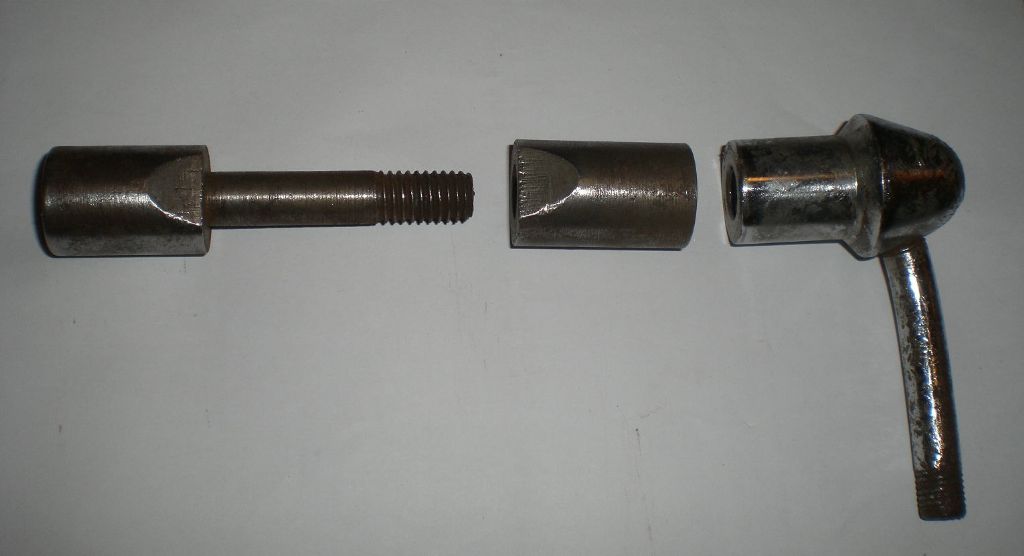
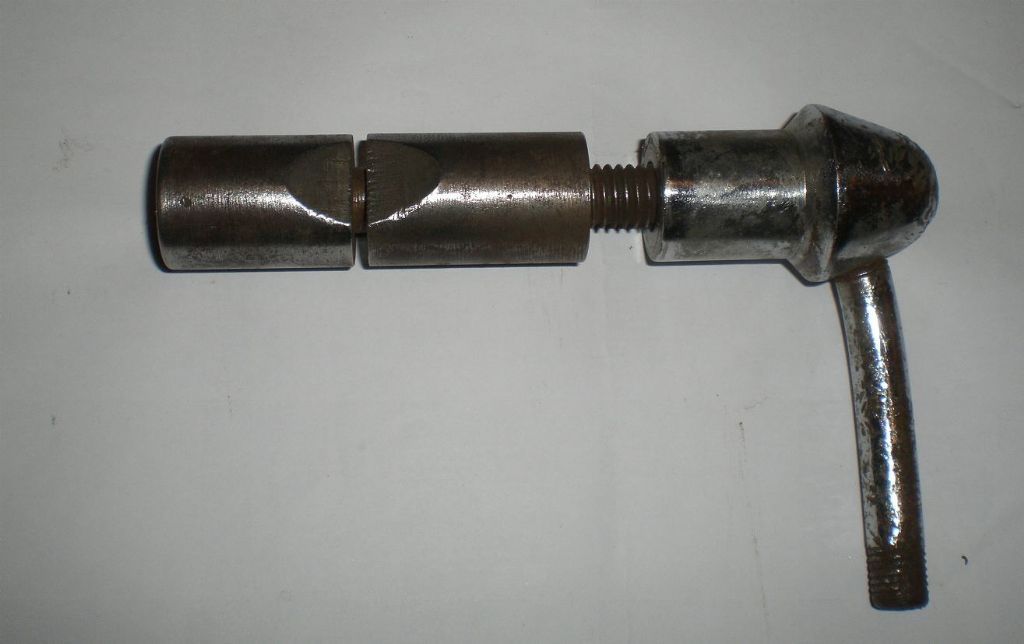
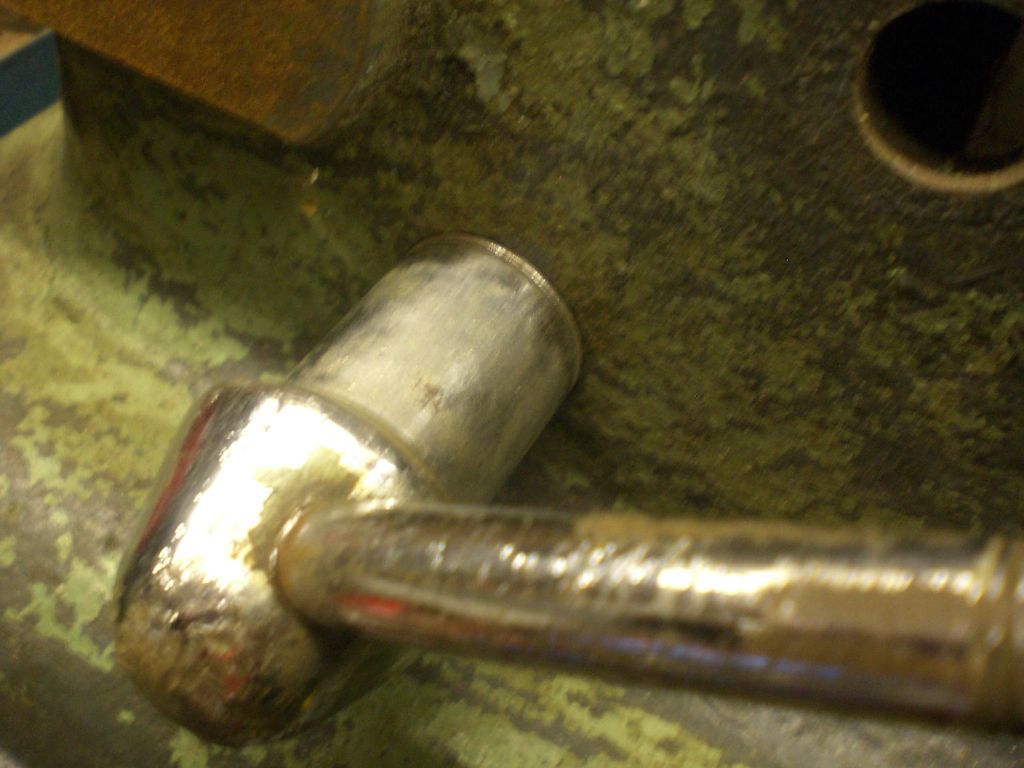
                                                  Hi, well you could always make the arrangement like the one that is on a piller drill head that I have stripped down at the moment. See bolow.

                                                  grip01.jpg

                                                  grip02.jpg

                                                  The nut only nips the two halves together and not on the frame of the drill head and will therefore nip the piller into a central position in the driil head.

                                                  grip03.jpg

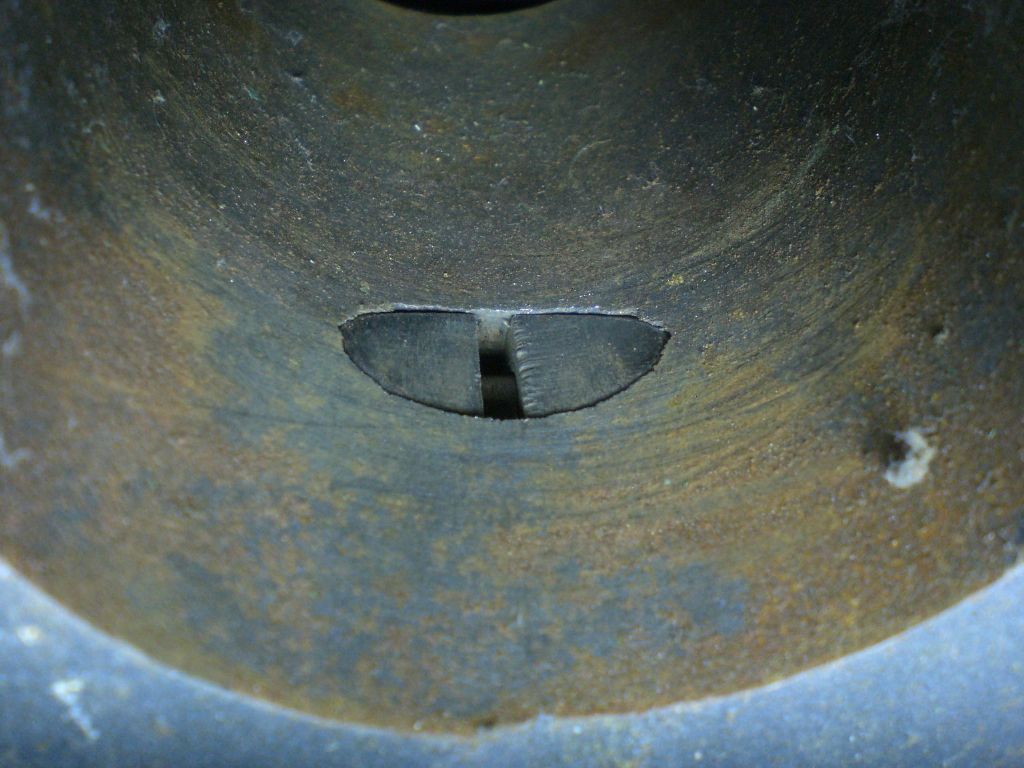
                                                  Below is a view inside the drill head where the piller is nipped by the two halves. These types usually grip very well.

                                                  grip04.jpg

                                                  Regards Nick.

                                                  #145905
                                                  Another JohnS
                                                  Participant
                                                    @anotherjohns

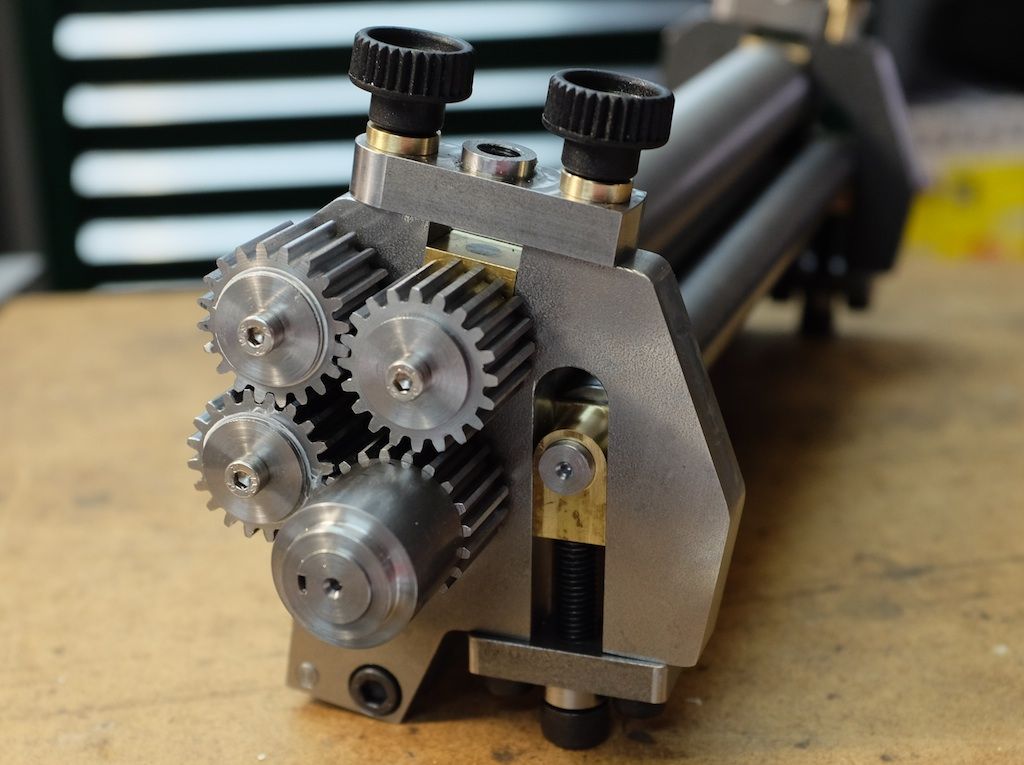
                                                    Pretty much finished up my Thomas/Hemingway Rolls kit.

                                                    Lots of fun. Waiting for Loctite, a broach, and some more Arc adjustable handles – all should be in this week.

                                                    More on CNCing part of the construction on my blog:

                                                    **LINK**

                                                    Now, back to the Ivatt…

                                                    rolls - gear end.jpg

                                                    #145909
                                                    Muzzer
                                                    Participant
                                                      @muzzer

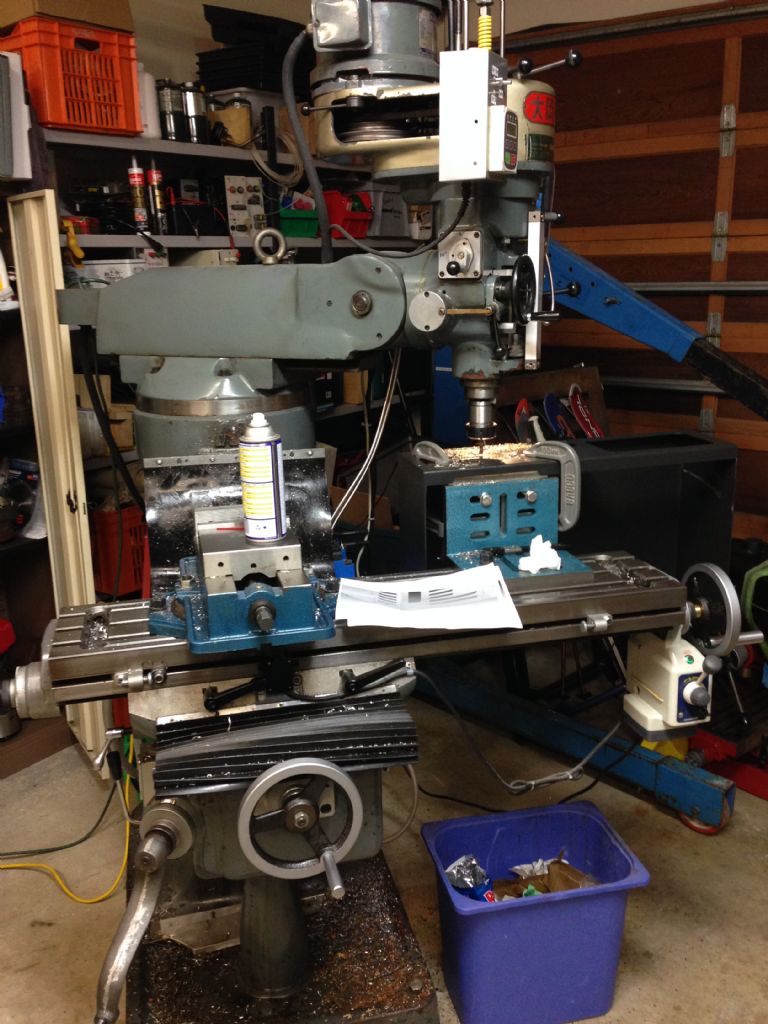
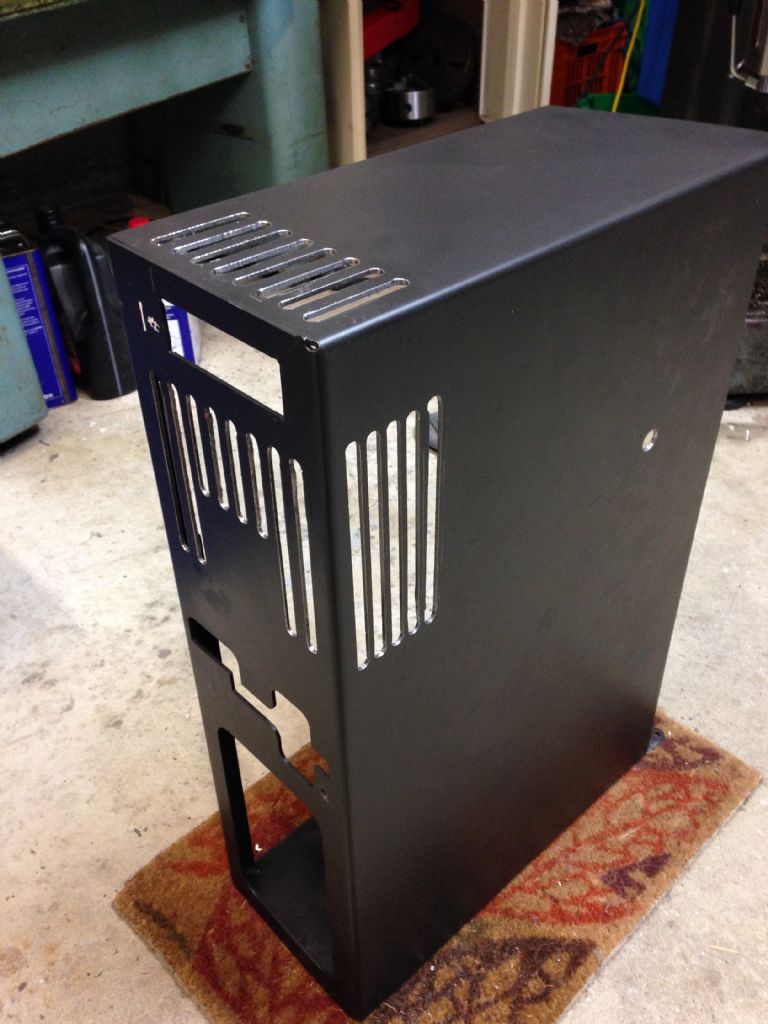
                                                      Tonight's challenge – add some 10mm ventillation obrounds to the lid of a steel battery cassette for a fork lift. 21 of them of various lengths from 60 to 160mm on 3 different faces. The lid measures about 60 x 50 x 20cm. In production, these would takes seconds on a CNC punch but I don't have one of these and it's already been folded anyway.

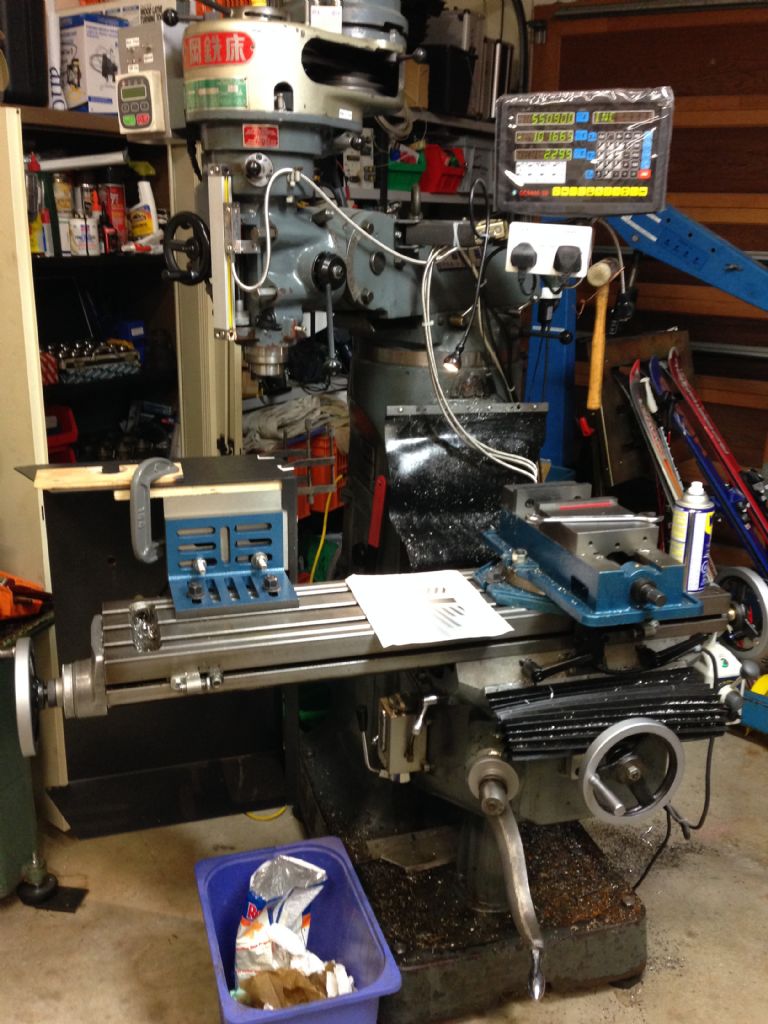
                                                      So the Blidgeport went in for a bit of serious yoga. Couple of angle plates, cassette hanging of the back of one side of the table then the other, table and ram fully extended, turret swiveled right then left. Being sheet metal (1/8", it was never going to be possible to clamp it rigidly, even without the various overhangs. Pretty noisy business, lasting just over 2 hours, a lot of it setting up. And thank god for power feed.

                                                      Stretch to the right….

                                                      Stretch to the right

                                                      …and stretch to the left….

                                                      Stretch to the left

                                                      Done now, including deburring. Managed not to ding the carbide slot drill and it's still cutting nicely.

                                                      Finished

                                                      Not the most fun I've had in an evening but a reasonable result given the circumstances.

                                                      Merry

                                                      Can't get rid of that smiley that thinks it's a right parenthesis….

                                                      Edited By Muzzer on 04/03/2014 07:04:19

                                                    Viewing 25 posts - 201 through 225 (of 2,328 total)
                                                    • Please log in to reply to this topic. Registering is free and easy using the links on the menu at the top of this page.

                                                    Advert

                                                    Latest Replies

                                                    Viewing 25 topics - 1 through 25 (of 25 total)
                                                    Viewing 25 topics - 1 through 25 (of 25 total)

                                                    View full reply list.

                                                    Advert

                                                    Newsletter Sign-up