What did you do today? (2013)

Advert

What did you do today? (2013)

Home Forums Work In Progress and completed items What did you do today? (2013)

Viewing 25 posts - 276 through 300 (of 924 total)
  • Author
    Posts
  • #118854
    Chris Heapy
    Participant
      @chrisheapy71135

      Ah. Anticipation… of making a b***s up with one and still having the other to work with Should both survive the entire process I will sell it or dispose of it some other way. Half the work is in setting up the machines for the cuts so it's not much more work to make two than it is for one – and far easier than starting again from scratch.
      Advert
      #118870
      Chris Heapy
      Participant
        @chrisheapy71135

        Ah. Anticipation… of making a b***s up with one and still having the other to work with Should both survive the entire process I will sell it or dispose of it some other way. Half the work is in setting up the machines for the cuts so it's not much more work to make two than it is for one – and far easier than starting again from scratch.

        #118888
        Chris Heapy
        Participant
          @chrisheapy71135

          Ah. Anticipation… of making a b***s up with one and still having the other to work with Should both survive the entire process I will sell it or dispose of it some other way. Half the work is in setting up the machines for the cuts so it's not much more work to make two than it is for one – and far easier than starting again from scratch.

          #118880
          Mark P.
          Participant
            @markp

            Made a superheater for a 31/2'' brit.

            Mark P.

            #118898
            Mark P.
            Participant
              @markp

              Made a superheater for a 31/2'' brit.

              Mark P.

              #118919
              Mark P.
              Participant
                @markp

                Made a superheater for a 31/2'' brit.

                Mark P.

                #118890
                Peter G. Shaw
                Participant
                  @peterg-shaw75338

                  Never got round to making the D bit, but did continue on SWMBO's garden lights. What a mess! Corrosion all over the place.

                  Wrote one off whilst dismantling the solar cell part to see how the wires were connected. Still can't see how they are connected, but now know not to dismantle that part. Anyway, the fancy multi-coloured slowly flashing LED and other bits MCI. (Might come in). Discovered they consist of single AA NiMH cell, solar cell, diode (turned out to be a Schottky diode), resistor type thing which turned out to be an inductor, small ceramic capacitor, this fancy LED, and a black oblong thing with 4 legs on it, bit like an ic on it's side. Started wondering how it worked because LED's required rather more oomph than a 1.2V cell can give. Back to t'internet.

                  Examined/tested the rest:

                  One had corroded away legs on the 4-leg device. Obviously a scrapper. Two or three others had badly corroded battery terminals. Three of the LED's had one of the legs corroded away halfway inside a plastic leg guide (strange that). Some of the connecting wires came off in my fingers.

                  So it's now a case of seeing how many I can actually get up and running by cannibalisation. So far, out of 7, I've managed 2 with a third well on the way except that it's LED won't show green. Shows Red & Blue ok, but not green. So this is an internal failure and is the first component failure I've found, all the rest being due to corrosion or my cackhandedness. It does seem that two or three may have duff solar cells or duff connecting leads but I daren't pull them apart 'cos that is very definitely terminal.

                  Carry on Tomorrow. (Now why didn't the Carry on team ever produce such a film?)

                  Regards,

                  Peter G. Shaw

                  #118910
                  Peter G. Shaw
                  Participant
                    @peterg-shaw75338

                    Never got round to making the D bit, but did continue on SWMBO's garden lights. What a mess! Corrosion all over the place.

                    Wrote one off whilst dismantling the solar cell part to see how the wires were connected. Still can't see how they are connected, but now know not to dismantle that part. Anyway, the fancy multi-coloured slowly flashing LED and other bits MCI. (Might come in). Discovered they consist of single AA NiMH cell, solar cell, diode (turned out to be a Schottky diode), resistor type thing which turned out to be an inductor, small ceramic capacitor, this fancy LED, and a black oblong thing with 4 legs on it, bit like an ic on it's side. Started wondering how it worked because LED's required rather more oomph than a 1.2V cell can give. Back to t'internet.

                    Examined/tested the rest:

                    One had corroded away legs on the 4-leg device. Obviously a scrapper. Two or three others had badly corroded battery terminals. Three of the LED's had one of the legs corroded away halfway inside a plastic leg guide (strange that). Some of the connecting wires came off in my fingers.

                    So it's now a case of seeing how many I can actually get up and running by cannibalisation. So far, out of 7, I've managed 2 with a third well on the way except that it's LED won't show green. Shows Red & Blue ok, but not green. So this is an internal failure and is the first component failure I've found, all the rest being due to corrosion or my cackhandedness. It does seem that two or three may have duff solar cells or duff connecting leads but I daren't pull them apart 'cos that is very definitely terminal.

                    Carry on Tomorrow. (Now why didn't the Carry on team ever produce such a film?)

                    Regards,

                    Peter G. Shaw

                    #118929
                    Peter G. Shaw
                    Participant
                      @peterg-shaw75338

                      Never got round to making the D bit, but did continue on SWMBO's garden lights. What a mess! Corrosion all over the place.

                      Wrote one off whilst dismantling the solar cell part to see how the wires were connected. Still can't see how they are connected, but now know not to dismantle that part. Anyway, the fancy multi-coloured slowly flashing LED and other bits MCI. (Might come in). Discovered they consist of single AA NiMH cell, solar cell, diode (turned out to be a Schottky diode), resistor type thing which turned out to be an inductor, small ceramic capacitor, this fancy LED, and a black oblong thing with 4 legs on it, bit like an ic on it's side. Started wondering how it worked because LED's required rather more oomph than a 1.2V cell can give. Back to t'internet.

                      Examined/tested the rest:

                      One had corroded away legs on the 4-leg device. Obviously a scrapper. Two or three others had badly corroded battery terminals. Three of the LED's had one of the legs corroded away halfway inside a plastic leg guide (strange that). Some of the connecting wires came off in my fingers.

                      So it's now a case of seeing how many I can actually get up and running by cannibalisation. So far, out of 7, I've managed 2 with a third well on the way except that it's LED won't show green. Shows Red & Blue ok, but not green. So this is an internal failure and is the first component failure I've found, all the rest being due to corrosion or my cackhandedness. It does seem that two or three may have duff solar cells or duff connecting leads but I daren't pull them apart 'cos that is very definitely terminal.

                      Carry on Tomorrow. (Now why didn't the Carry on team ever produce such a film?)

                      Regards,

                      Peter G. Shaw

                      #118905
                      Sub Mandrel
                      Participant
                        @submandrel

                        Hi Peter,

                        They work with a buck circuit, a bit like a spark coil. Tiny current in inductor, break circuit, current keeps flowing, voltage builds and then discharges though LED. Like a miniature spark coil, except at low voltage. Google LED boost circuit. Great way to get the very last out of a cell for long life, low current uProcessor applications.

                        Neil

                        Just for the record I'm confused by the charge pump in MEW – I thought they were a way of increasing voltage using capacitors.

                        Edited By Stub Mandrel on 08/05/2013 21:07:42

                        #118923
                        Sub Mandrel
                        Participant
                          @submandrel

                          Hi Peter,

                          They work with a buck circuit, a bit like a spark coil. Tiny current in inductor, break circuit, current keeps flowing, voltage builds and then discharges though LED. Like a miniature spark coil, except at low voltage. Google LED boost circuit. Great way to get the very last out of a cell for long life, low current uProcessor applications.

                          Neil

                          Just for the record I'm confused by the charge pump in MEW – I thought they were a way of increasing voltage using capacitors.

                          Edited By Stub Mandrel on 08/05/2013 21:07:42

                          #118942
                          Sub Mandrel
                          Participant
                            @submandrel

                            Hi Peter,

                            They work with a buck circuit, a bit like a spark coil. Tiny current in inductor, break circuit, current keeps flowing, voltage builds and then discharges though LED. Like a miniature spark coil, except at low voltage. Google LED boost circuit. Great way to get the very last out of a cell for long life, low current uProcessor applications.

                            Neil

                            Just for the record I'm confused by the charge pump in MEW – I thought they were a way of increasing voltage using capacitors.

                            Edited By Stub Mandrel on 08/05/2013 21:07:42

                            #118936
                            Chris Heapy
                            Participant
                              @chrisheapy71135

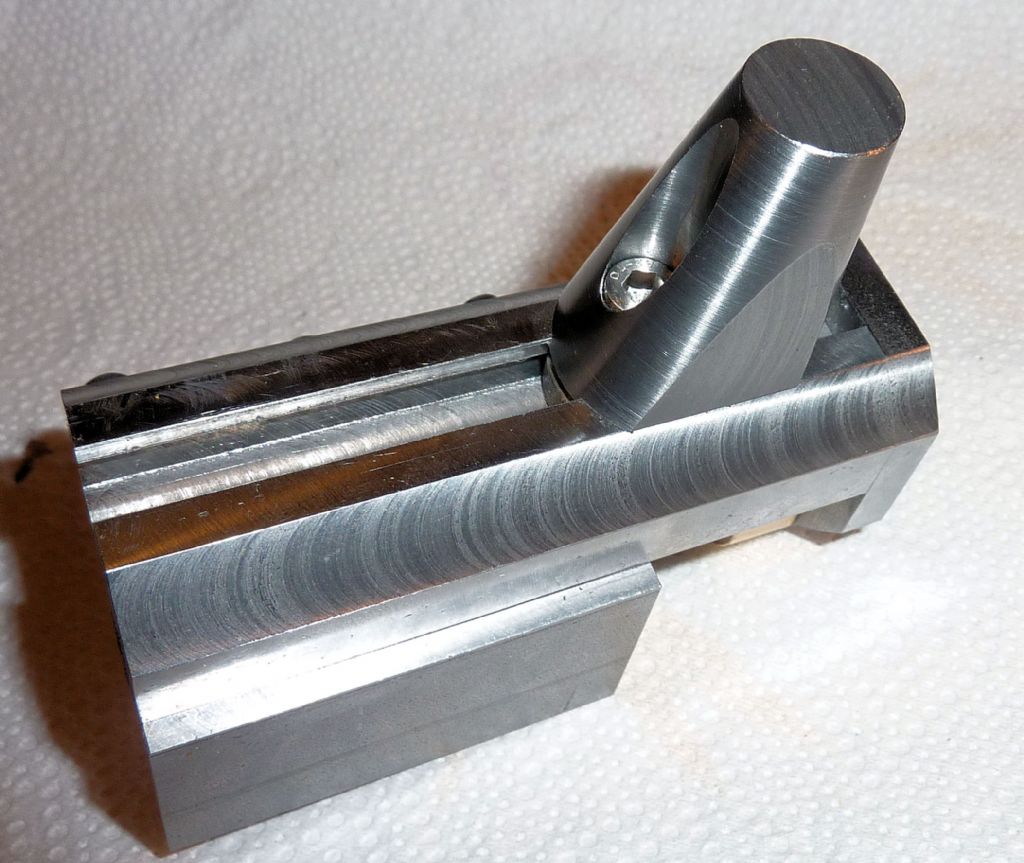
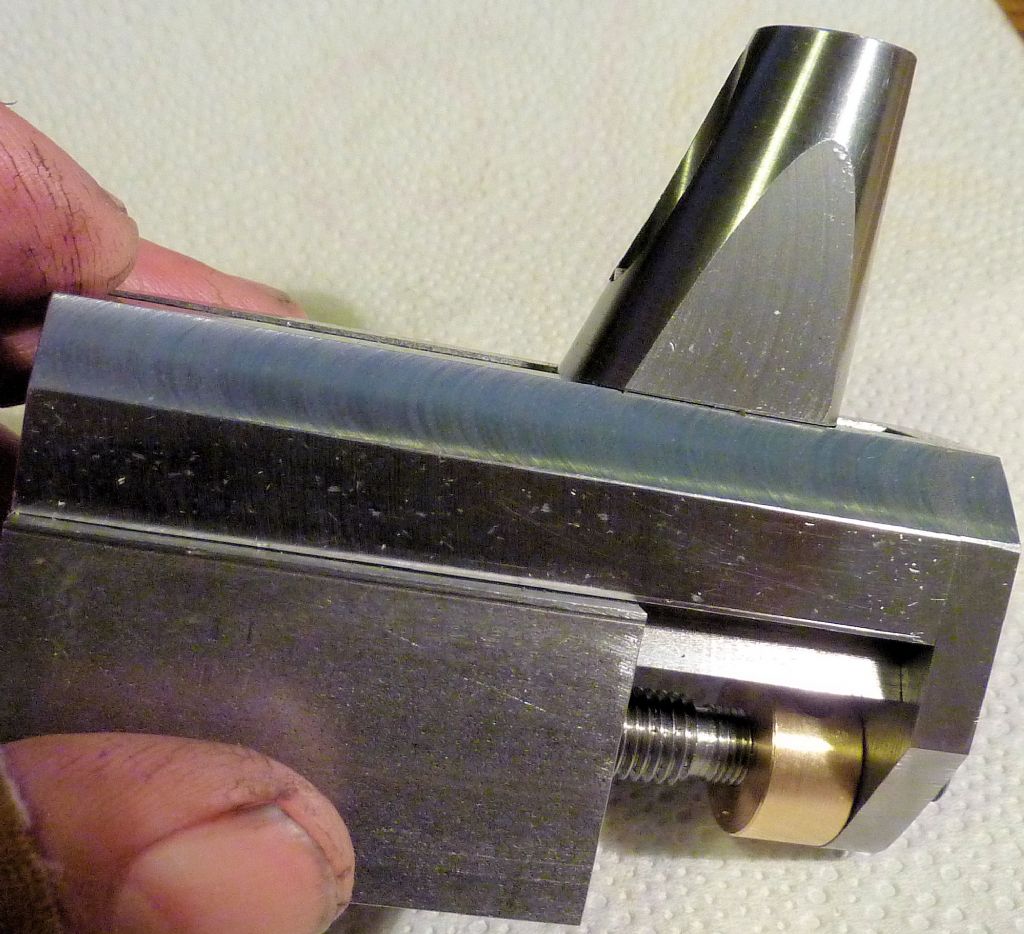
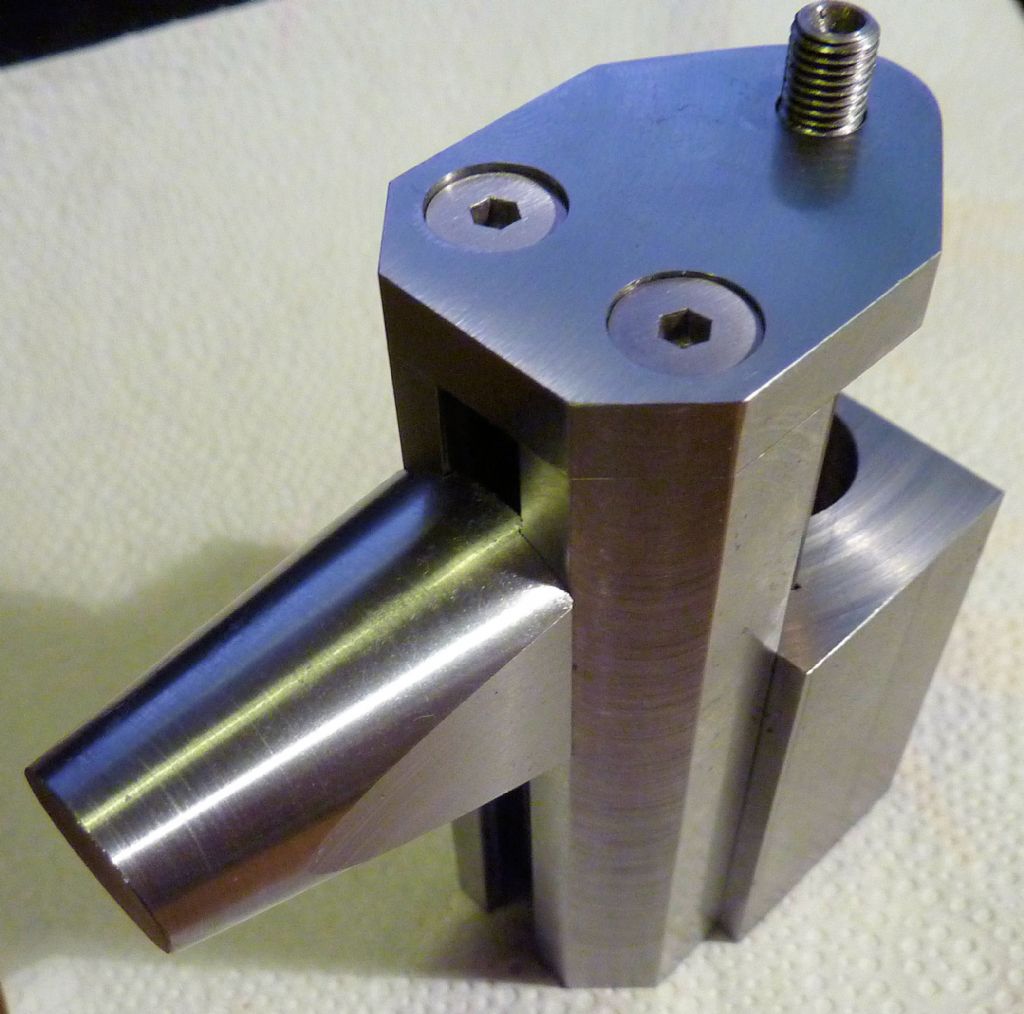
                              A rather miserable evening weather-wise, so still tucked up in the workshop. Made a tool holder – which was an interesting machining exercise. I know – it didn't have to be this shape to be purely functional, but I wanted it that shape because it was more fun to make. Locks up firmly with just one screw.

                              p1020658.jpg

                              p1020660.jpg

                              p1020661.jpg

                              #118953
                              Chris Heapy
                              Participant
                                @chrisheapy71135

                                A rather miserable evening weather-wise, so still tucked up in the workshop. Made a tool holder – which was an interesting machining exercise. I know – it didn't have to be this shape to be purely functional, but I wanted it that shape because it was more fun to make. Locks up firmly with just one screw.

                                p1020658.jpg

                                p1020660.jpg

                                p1020661.jpg

                                #118971
                                Chris Heapy
                                Participant
                                  @chrisheapy71135

                                  A rather miserable evening weather-wise, so still tucked up in the workshop. Made a tool holder – which was an interesting machining exercise. I know – it didn't have to be this shape to be purely functional, but I wanted it that shape because it was more fun to make. Locks up firmly with just one screw.

                                  p1020658.jpg

                                  p1020660.jpg

                                  p1020661.jpg

                                  #118946
                                  Sub Mandrel
                                  Participant
                                    @submandrel

                                    made a carburretor float from balsa. 5/16" diameter by 3/8" long with a bit of sewing needle through the middle (tip ground off). Gave it a first coat of 15 year old fuel proofer.

                                    I have no idea if this will work, but I might as well try!

                                    Started work on No. 4 cylinder head.

                                    Do you ever think that some parts are cursed?

                                    This time I'm taking it slow and steady.

                                    Drilled the holes for the head studs from the bottom. Not sure why I drilled any of them from the top before? After drilling the paper template with drilled holes (made from the cylinder block) looks like a perfect fit, hopefully won't need to ease any of the holes this time.

                                    Recess over the piston 1mm deep with 11mm slot drill, then with a 3/4" dovetail cutter (dont ask, it works) then another mm larger with the boring head.

                                    Over each valve a 3/8" ball end mill in 0.165" – an extra 5 thou over last time to get a slightly larger cavity.

                                    Tomorrow blend the three cavities together with the ball ended mill, then set the block up to make the fins and mill the seats for the cylinder nuts/glow plug.

                                    Neil

                                    #118963
                                    Sub Mandrel
                                    Participant
                                      @submandrel

                                      made a carburretor float from balsa. 5/16" diameter by 3/8" long with a bit of sewing needle through the middle (tip ground off). Gave it a first coat of 15 year old fuel proofer.

                                      I have no idea if this will work, but I might as well try!

                                      Started work on No. 4 cylinder head.

                                      Do you ever think that some parts are cursed?

                                      This time I'm taking it slow and steady.

                                      Drilled the holes for the head studs from the bottom. Not sure why I drilled any of them from the top before? After drilling the paper template with drilled holes (made from the cylinder block) looks like a perfect fit, hopefully won't need to ease any of the holes this time.

                                      Recess over the piston 1mm deep with 11mm slot drill, then with a 3/4" dovetail cutter (dont ask, it works) then another mm larger with the boring head.

                                      Over each valve a 3/8" ball end mill in 0.165" – an extra 5 thou over last time to get a slightly larger cavity.

                                      Tomorrow blend the three cavities together with the ball ended mill, then set the block up to make the fins and mill the seats for the cylinder nuts/glow plug.

                                      Neil

                                      #118984
                                      Sub Mandrel
                                      Participant
                                        @submandrel

                                        made a carburretor float from balsa. 5/16" diameter by 3/8" long with a bit of sewing needle through the middle (tip ground off). Gave it a first coat of 15 year old fuel proofer.

                                        I have no idea if this will work, but I might as well try!

                                        Started work on No. 4 cylinder head.

                                        Do you ever think that some parts are cursed?

                                        This time I'm taking it slow and steady.

                                        Drilled the holes for the head studs from the bottom. Not sure why I drilled any of them from the top before? After drilling the paper template with drilled holes (made from the cylinder block) looks like a perfect fit, hopefully won't need to ease any of the holes this time.

                                        Recess over the piston 1mm deep with 11mm slot drill, then with a 3/4" dovetail cutter (dont ask, it works) then another mm larger with the boring head.

                                        Over each valve a 3/8" ball end mill in 0.165" – an extra 5 thou over last time to get a slightly larger cavity.

                                        Tomorrow blend the three cavities together with the ball ended mill, then set the block up to make the fins and mill the seats for the cylinder nuts/glow plug.

                                        Neil

                                        #118999
                                        Springbok
                                        Participant
                                          @springbok

                                          Well took delivery of castings etc for my B1 tender guess what 5 wheels not 6 what was that silly old song "5 wheels on my wagon"!!! No invoice, no paperwork, will not mention the company but Fri afternoon wacky backy comes to mind. There are items in the parcel that have no relation to a B1 tender. or a B1 loco come to that.

                                          Bob

                                          #119018
                                          Springbok
                                          Participant
                                            @springbok

                                            Well took delivery of castings etc for my B1 tender guess what 5 wheels not 6 what was that silly old song "5 wheels on my wagon"!!! No invoice, no paperwork, will not mention the company but Fri afternoon wacky backy comes to mind. There are items in the parcel that have no relation to a B1 tender. or a B1 loco come to that.

                                            Bob

                                            #119034
                                            Springbok
                                            Participant
                                              @springbok

                                              Well took delivery of castings etc for my B1 tender guess what 5 wheels not 6 what was that silly old song "5 wheels on my wagon"!!! No invoice, no paperwork, will not mention the company but Fri afternoon wacky backy comes to mind. There are items in the parcel that have no relation to a B1 tender. or a B1 loco come to that.

                                              Bob

                                              #119046
                                              Peter G. Shaw
                                              Participant
                                                @peterg-shaw75338

                                                Stub/Neil

                                                Google actually came up with a circuit for the 4-leg device used in these things (52521H) which was almost exactly the same as mine. Difference was a ½wave rectifier & smoothing capacitor for the LED. Found an explanation elsewhere which said it was an oscillator, confirmed with oscilloscope. Actually got 8V across the capacitor before I found that one of the LED legs was corroded away. Normal voltage a lot less.

                                                Anyway, I've now got the third working: the remaining two look as if the solar cells have given up as there is no output even when disconnected.

                                                Discovered this am that SWMBO bought them for about 50p each. Not only that but she has another box of them. Think I've probably spent more in lighting/soldering/oscilloscope power/heating than these things are worth. I suppose the best I can say is that a) I've found out how they work; and b) I've proved that the 40 year old skills haven't yet left me.

                                                Regards,

                                                Peter

                                                #119060
                                                Peter G. Shaw
                                                Participant
                                                  @peterg-shaw75338

                                                  Stub/Neil

                                                  Google actually came up with a circuit for the 4-leg device used in these things (52521H) which was almost exactly the same as mine. Difference was a ½wave rectifier & smoothing capacitor for the LED. Found an explanation elsewhere which said it was an oscillator, confirmed with oscilloscope. Actually got 8V across the capacitor before I found that one of the LED legs was corroded away. Normal voltage a lot less.

                                                  Anyway, I've now got the third working: the remaining two look as if the solar cells have given up as there is no output even when disconnected.

                                                  Discovered this am that SWMBO bought them for about 50p each. Not only that but she has another box of them. Think I've probably spent more in lighting/soldering/oscilloscope power/heating than these things are worth. I suppose the best I can say is that a) I've found out how they work; and b) I've proved that the 40 year old skills haven't yet left me.

                                                  Regards,

                                                  Peter

                                                  #119080
                                                  Peter G. Shaw
                                                  Participant
                                                    @peterg-shaw75338

                                                    Stub/Neil

                                                    Google actually came up with a circuit for the 4-leg device used in these things (52521H) which was almost exactly the same as mine. Difference was a ½wave rectifier & smoothing capacitor for the LED. Found an explanation elsewhere which said it was an oscillator, confirmed with oscilloscope. Actually got 8V across the capacitor before I found that one of the LED legs was corroded away. Normal voltage a lot less.

                                                    Anyway, I've now got the third working: the remaining two look as if the solar cells have given up as there is no output even when disconnected.

                                                    Discovered this am that SWMBO bought them for about 50p each. Not only that but she has another box of them. Think I've probably spent more in lighting/soldering/oscilloscope power/heating than these things are worth. I suppose the best I can say is that a) I've found out how they work; and b) I've proved that the 40 year old skills haven't yet left me.

                                                    Regards,

                                                    Peter

                                                    #119063
                                                    NJH
                                                    Participant
                                                      @njh

                                                      Peter

                                                      I recall that you are another ex-BT man so you should know that, when faced with a serious problem, you should always alert higher management – I guess, in your case, she also performs the role of logistics support – so, when things go wrong, blame the storekeeper!

                                                      Your story of a little venture into the world of electronics brought back a few happy memories- from a lifetime ago. I still think fondly of BT – but I'm glad I'm not there now!

                                                      Regards

                                                      Norman

                                                    Viewing 25 posts - 276 through 300 (of 924 total)
                                                    • Please log in to reply to this topic. Registering is free and easy using the links on the menu at the top of this page.

                                                    Advert

                                                    Latest Replies

                                                    Viewing 25 topics - 1 through 25 (of 25 total)
                                                    Viewing 25 topics - 1 through 25 (of 25 total)

                                                    View full reply list.

                                                    Advert

                                                    Newsletter Sign-up