Washer for leaking 3D print nozzle?

Advert

Washer for leaking 3D print nozzle?

Home Forums 3D Printers and 3D Printing Washer for leaking 3D print nozzle?

Viewing 22 posts - 1 through 22 (of 22 total)
  • Author
    Posts
  • #635159
    John Doe 2
    Participant
      @johndoe2

      Hi folks, I have searched the forum for this but nothing came up :

      Since changing the nozzle on my 3D printer, small amounts of molten filament leak out at the join and this deposits blobs on the prints. The nozzle is not cross threaded, and was tightened with the print head up to operating temperature, so it was not solidified filament preventing it being fully tightened.

      What I need is something like an M6 fibre washer to seal it, (ID of 6.4mm), but one that will withstand up to 230°C

      Normal red fibre washers are only good to 100°C or so? A Giggle search does not bring up any suppliers of high temperature washers unless I want several hundred washers at huge cost, which I don't. Just a bag of 5, say, will do me.

      Any ideas about material and suppliers?

      Advert
      #31717
      John Doe 2
      Participant
        @johndoe2
        #635161
        Martin Kyte
        Participant
          @martinkyte99762

          Annealed copper maybe?

          #635165
          David George 1
          Participant
            @davidgeorge1

            You can use an aluminium or copper washer. Check diamiters and thickness. Easy to turn on a lathe.

            David

            #635171
            nigel jones 5
            Participant
              @nigeljones5

              adding a washer willk significantly kower your nozzle Z axis setting – be sure you have at least that amount of bed movement before adjusting. They arent designed to use a washer so its either not tight enough or the threads are not good. Ive had it happen a few times, used ptfe tape with good results. Tried loctite, very bad idea!

              #635181
              Journeyman
              Participant
                @journeyman

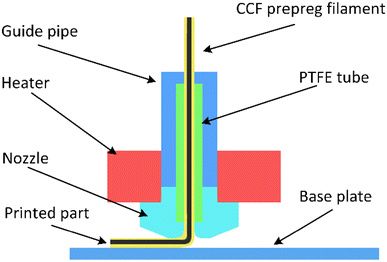
                depending on the make and model many 3D printers rely on the interface between the nozzle and the guide tube to make a leakproof seal. If the tube has turned and travelled upwards in the block it may be leaving a gap. Turning the guide tube in a half turn may fix the leak. The nozzle should contact the tube before the shoulder tightens onto the heater block.

                3dnozzle.jpg

                The diagram may help a bit. It's a matter of trying to stop the guide tube turning if there is room a couple of lock nuts on the tube can be utilized.

                John

                #635192
                John Doe 2
                Participant
                  @johndoe2

                  Ah, that could be it – it might be the guide tube. The old worn nozzle I took out had a longer body thread than the new one I have put in.

                  I was given this printer by my son, and I don't know all about them yet. There is a box of new nozzles he gave me with the machine.

                  I will have a look at the guide tube tomorrow, hopefully.


                  Thanks.


                  PS, yes, I have adjusted the Z height for the new nozzle. Very strange that to do so one has to adjust the four bed levelling screws, or the two screws that set the Z stepper motor stops. I would have expected something in the set-up menu to adjust Z height by so many 0.1mm. Seems a bit crude to have to set it mechanically, (It's an Anycubic machine).

                  Edited By John Doe 2 on 26/02/2023 22:28:36

                  #635214
                  Gerard O’Toole
                  Participant
                    @gerardotoole60348

                    If the threads in the hot-end, (the body the nozzle screws into) , are damaged it can be easily replaced.

                    You can get a couple of new hot-ends, and a set of replacement nozzles for about €6 on one of the well known auction/selling sites. I don't think i can post a link here.

                    You shouldn't fit a washer. Journeyman above, has almost certainly identified the problem. The tubing can be cut back a little to give a cleaner better fit in the hotend.

                    #635215
                    Journeyman
                    Participant
                      @journeyman

                      Z-height adjustment will definitely be in software and available from a menu. The four bed screws are for initial bed setup and levelling only. Once set level the bed should only rarely need adjusting again. Depending how old it is there may even be bed level compensation built into the operating system firmware. You can tell if before a print run it performs a series of traverses across the bed. The latest models certainly include 25 point bed levelling in firmware.

                      John

                      Edited By Journeyman on 27/02/2023 09:37:49

                      #635225
                      Ex contributor
                      Participant
                        @mgnbuk

                        Z-height adjustment will definitely be in software and available from a menu.

                        I don't recall such a software adjustment in the menus on my Anycubic Mega & the factory instructions only refer to using the heated bed levelling screws for setting the initial clearances / nozzle height. I also had to tweak the Z axis reference switch actuating screws to get the cross rail to reference parallel to the heated bed surface.

                        Could you provide a link to show where the software seting may be ?

                        Nigel B.

                        #635228
                        Robin
                        Participant
                          @robin

                          Just to state the blooming obvious… if the plastic is leaking passed the thread on the nozzle, then the seal you want to fix should be at the end that stops it ever reaching the thread, not at the end where you can see it emerging as a black glob smiley

                          #635229
                          Henry Brown
                          Participant
                            @henrybrown95529

                            Ref Z height – it isn't unusual to have to play about with the levelling screws with the standard springs. I've changed to silicone spacers that seem to be much more stable, when I felt I'd got the right compression on them (they look a little barrel like) I had to move the Z axis switch slightly to accomodate the change in height and levelled the bed.

                            #635231
                            Journeyman
                            Participant
                              @journeyman

                              It seems I was wrong about Z height being in software. Just had a look at one of the Anycubic manuals and it does seem to rely on the manual adjustment of the bed. Sorry! I am used to my Prusa and once the initial setup is done you use a menu setting to adjust the print thickness up and down.

                              John

                              #635236
                              John Doe 2
                              Participant
                                @johndoe2

                                Yes perhaps this is an old machine, (AnyCubic Mega S), but the Z height setting is bizarre.

                                The machine has an axis menu where you can drive the print head in X,Y and Z by 10, 1 and 0.1 mm steps, so why they could not simply have a key press to use that to set a new datum for Z height seems very weird to me.

                                Regarding the molten filament sealing : Now that I understand the layout of the feed to the nozzle, (thank you Journeyman for your diagram), I have pushed the PTFE filament guide tube in as hard as I could. There is a sort of "ratchet" collar that allows you to push the PTFE tube in, but stops it coming back out. So far – on a simple 53 minute print – the leak seems to have reduced a lot.

                                I know what you mean, Robin, but the reason I was thinking of an external fibre washer is that with reference to Journeyman's diagram, I cannot 'get into' the internals of the feed block – it was leaking from the join of the light blue and dark blue sections in Journeyman;'s diag, and then past the nozzle threads; even though the nozzle was screwed in tight. Hot filament under pressure can squeeze through very small gaps.

                                Also, once used, the nozzle area and threads are coated with plastic, so the only way to work on the parts is with them hot, at 230 deg C, which is a bit tricky ! So the only place I could think of easily putting a seal and be sure it was tightened, was between the nozzle and the heating block. However, now that I understand the way it works, I might have managed to seal it as designed.


                                Thanks for the help.


                                Edited By John Doe 2 on 27/02/2023 11:31:01

                                #635248
                                Ex contributor
                                Participant
                                  @mgnbuk

                                  Journeyman's sketch didn't ring true for my Mega, so I dug out my spares to check and it is different to that shown.

                                  The sketch does not show theAnycubic heatbreak arrangement correctly – on the Anycubic print head the PTFE tube fits into a recess at the top of the heatbreak & the filament path through the heatbreak to the nozzle is not via a section of PTFE tube. The heatbreak screws into the top of the heater block part way & nozzle screws into the underside of the heatblock as the sketch shows. The amount of insertion of the heatbreak has to be such that the nozzle firmly abuts the end of the heatbreak within the heater block when it is tightened – it is this abutment that makes the seal – there is no PTFE tube section between the heatbreak and the nozzle. Final tightening has to be made at operating temperature !

                                  Anycubic have a basic video covering nozzle replacement here.

                                  I don't think the Mega series printers are that old – IIRC I bought mine around 3 years ago and they were still available until quite recently. The operater interface appears to be their own and it is what it is. While it would be nice to have a few "bells and whistles" such as the abilty to easily add features like auto bed levelling sensors, mine has required little intervetion after a bit of initial fiddling to get it set up.

                                  Nigel B.

                                  #635254
                                  John Doe 2
                                  Participant
                                    @johndoe2

                                    The hot-end on my printer is similar, except that referring to Journeyman's diagram, the light and dark blue parts butt together inside the heater block and the PTFE tube goes down to butt onto the top of the nozzle – but not into the nozzle itself.

                                    I have a brand new spare hot-end assembly, and looking at this, I can see that the PTFE pipe butts onto the top of the nozzle, but doesn't go into the nozzle. I am doing a 2 hour 45 min print now, so I will see if the seal is better after everything has had a chance to get fully heat soaked – which is when the problem arose before.

                                    That video was very useful, mgnbuk, many thanks.

                                    I also need to replace a couple of the cooling fans, since their bearings are shot. Can anyone suggest a good source of spares – AnyCubic themselves perhaps?

                                    Edited By John Doe 2 on 27/02/2023 13:48:35

                                    #635257
                                    Ex contributor
                                    Participant
                                      @mgnbuk

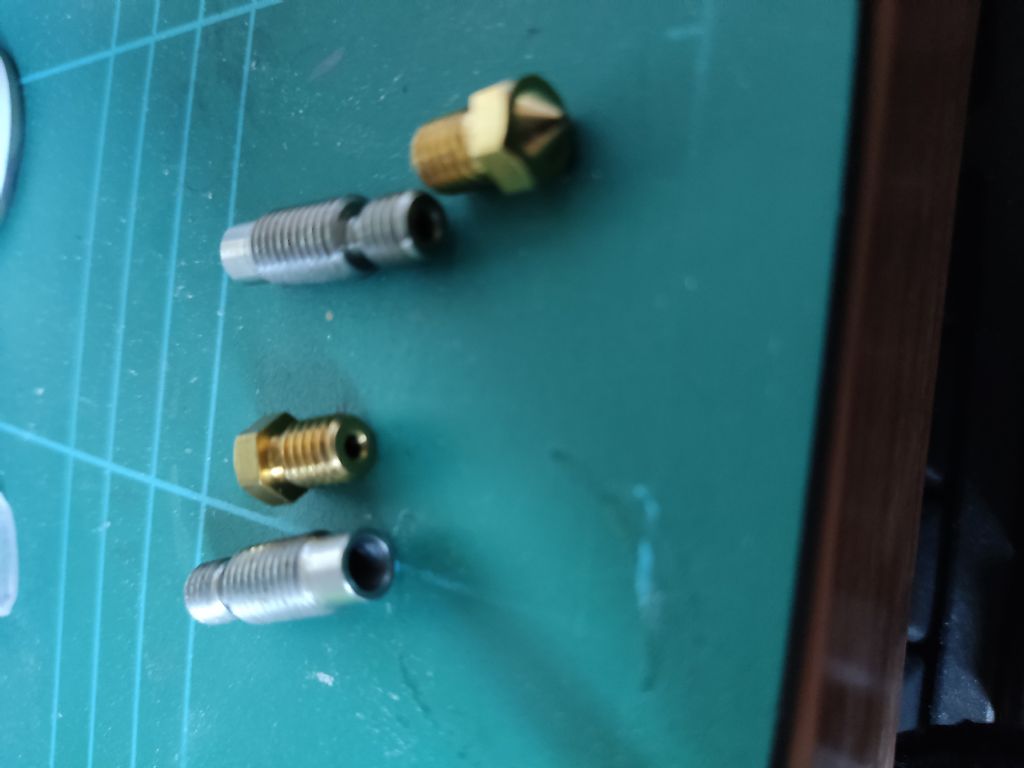
                                      img_20230227_135541.jpg

                                      Not a great picture, but hopefully you can make out the recess for the PTFE tube in the top of the heatbreak & see that the hole through the heatbreak & the entrance to the nozzle is only big enough for the filament – no room for an internal PTFE guide to bridge the gap.

                                      Ebay is my go-to source for items like small fans. The fans are sized by their outer (square) case dimensions & operating voltage. 40mm square 12V fans start at £2.29 posted.

                                      Nigel B.

                                      #635345
                                      Neil Wyatt
                                      Moderator
                                        @neilwyatt

                                        Zeroing Z-height is usually achieved by adjusting the z-stop microswitch.

                                        Bed levelling… some people do it every time with a print head mounted probe.I do it about every six months!

                                        A=zeroing z-height I do after a nozzle change or if wear means the head sits a bit high but is still printing OK.

                                        Got a big print running right now. Print before last was a bit poor and noticed the bed transport belt was a bit loose. Back to nice sharp prints

                                        Neil

                                        #635346
                                        John Doe 2
                                        Participant
                                          @johndoe2

                                          Thanks again. yes

                                          Yesterday's print had only a very very tiny leak, so I think that with the help of this thread, I have gripped it.

                                          I have a 35 hour print to do, so am happy that things seem to have settled down.

                                          #635419
                                          Clive Farrar
                                          Participant
                                            @clivefarrar90441

                                            Lots of stuff talked about but little seems to relate to your initial problem.

                                            Leave the tube out of the head and insert the nozzle finger tight until it bottoms out.

                                            Then back it off half a turn.

                                            Make sure the end of your PTFE feed tube is cut perfectly square , there are specialist cutters to do this if you can not sort it with a scalpel.

                                            fit the tube to the head and push it down as hard as you can against the nozzle.

                                            Make sure the pipe locking flange is pulled up tight and fit a micro clip to stop it moving.

                                            Tighten the nozzle fully up to the head and this should give you the good seal to stop the blow by you were getting.

                                            I learnt this a few years ago , from i think Filament Friday, it instantly stopped the mega ouze i was getting from my new nozzle.

                                            regards Clive

                                            #635436
                                            John Doe 2
                                            Participant
                                              @johndoe2

                                              Thank you, that all makes sense.

                                              If I still have problems, I will do everything you suggest. Many thanks.

                                              #635495
                                              John Doe 2
                                              Participant
                                                @johndoe2
                                                Posted by Neil Wyatt on 28/02/2023 11:55:14:

                                                Zeroing Z-height is usually achieved by adjusting the z-stop microswitch……

                                                Neil

                                                Yes, I just find it really odd that the manufacturers would have loosening and physically moving two end-stop microswitches or turning the end-stop screws, (my machine has one for each Z motor) as a way of setting a Z height to fractions of a mm.

                                                Especially when; under the axis control menu, (of my printer), Z height can be moved up or down in 0.1mm steps. So why not simply add a software button in the menu to save a new Z position that had been achieved by this axis control ? Just seems such an obvious thing to me, whereas I cannot move and re-tighten two switches to an accuracy of tenths of a mm without getting a dial indicator out and clamping etc. Just seems daft.

                                              Viewing 22 posts - 1 through 22 (of 22 total)
                                              • Please log in to reply to this topic. Registering is free and easy using the links on the menu at the top of this page.

                                              Advert

                                              Latest Replies

                                              Viewing 25 topics - 1 through 25 (of 25 total)
                                              Viewing 25 topics - 1 through 25 (of 25 total)

                                              View full reply list.

                                              Advert

                                              Newsletter Sign-up