WARCO WM-250 lathe family and WM16 mill – 001

Advert

WARCO WM-250 lathe family and WM16 mill – 001

Home Forums Workshop Tools and Tooling WARCO WM-250 lathe family and WM16 mill – 001

  • This topic has 374 replies, 62 voices, and was last updated 6 July 2020 at 23:20 by Cabinet Enforcer.
Viewing 25 posts - 51 through 75 (of 375 total)
  • Author
    Posts
  • #121296
    mechman48
    Participant
      @mechman48

      Hi Rik

      Congrats on getting your 'new toy'' sorry to hear your initial probs, forunately I didn't have any electrickery probs with mine,but as with all these chinese imports QC leaves a lot to be desired & the 'test record' can be construed as much relevance as the proverbial chocolate fire guard! as proven with my 250V-F, a few not so small probs with that on delivery but that's another story albiet resolved by Warco, I can hazard a guess that 'Dongfa Yan' may be related to Hu Flung Dung..! wink

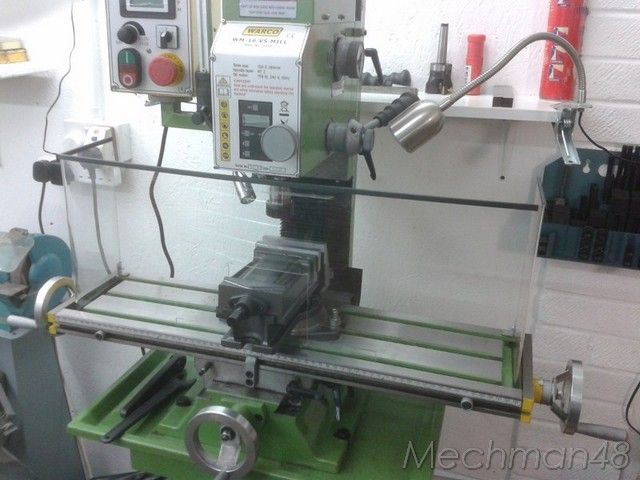
      As with Mark P I removed the guard as it was interfering with my vice too so I ended up fabricating another version out of 2mm Acetate bought from a local DIY store, I also removed the side post ,just leaving the microswitch bracket fixed & the switch permanently in contact so no bother rememberng to close the guard to energise the switch. The guard can be lifted on & off & is secured by a couple of small brackets with small nemo… neomid… neodim.. aah b*****cks! dont know a couple of small earth magnets which stick it to the table.

      Guard mods

      As supplied with machine..

      Guard mods

      2 mm Acetate fabrication..

      Guard mods

      Much better view..

      Guard mods

      Have yet to fit rear panel, can't decide whether to fit another panel or a clear PVC flexible sheet… I think The PVC sheet is the way to go thinking.. mmmm! maybe switch the front panel to the back & put the PVC sheet in front, held on with more neo..*******! earth magnets,  that way I can move the PVC easier than taking the acetate on & off, & it should act like a cricket net if anything untoward happens, absorbing any impact…?

      Regards

      George

      Edited By mechman48 on 02/06/2013 12:30:05

      Advert
      #121315
      Mark P.
      Participant
        @markp

        I must do the control box mod (ie put it on a stick) to my WM16 George, mine is the early model with the box bolted direct to the head make using the quill lock hard as it hits the reversing switch.

        Mark P.

        #121334
        Sub Mandrel
        Participant
          @submandrel

          How to combine fish-keeping and model engineering.

          Seriously, that does look a really dandy guard.

          Neil

          #121340
          mechman48
          Participant
            @mechman48

            Rik,

            When you get your WM250V-F I would carry out the same checks as the mill, backlash, snug up gib strips etc .NB. Make sure that you test the saddle for free travel all the way from tailstock to headstock without it binding anywhere, on the first delivery of mine this was a major prob' as the saddle was binding on the bed casting.. manuf /assembly / QA fault' this was soon remedied as I sent it back after a few phone calls, plus e-mail with pics to Warco, received replacement within the week so thumbs up to Warco for after sales response thumbs up.

            The compound slide gib strips are of MS & are not exactly what you would call a good fit so I intend changing them to brass… eventually ! I also checked the alignment of the tailstock & found it to be out approx' .006" ,how I found out was when using a drill once I noticed the drill (new one) pulled in toward the small center drilling, which indicated a misalignment of the tailstock barrel so out came the indicator & DTI's & after a bit of tweaking on the tailstock adjusters(I also noted that the scale on the tailstock rear didn't quite line up on the 'zeros', I've managed to get it to wtihin .0005" now & the scales read 'zero', also today when I tried drilling again the drill lined up with the centre drill so Bob's your auntie so to speak.. so check yours when you get it!.  I had a similar problem with the electrics on the lathe; no power on start up, checked around & found the tab on the drive end guard was bent & not pushing in the microswitch cut off to the motor, bent the tab out ..still no power.. found  the emergency stop retainer was loose & had also disconnected one of the wires, reconnected the wire, resecured the retainer,power on…bingo !  so much for QC, & supposedly also been checked by one of Warcos engineers… hmmm? ..dont know  so check out your electrics first when you get it.

            Another mod I did was to make a larger collar to fit over the compound slide friction scale as I couldn't get my (chubby) finger & thumb in to set a zero, obviously made to fit Chinese size fingers, dont know . Thought I had a pic in my album but not, will post it later. So that's it for now,will post again when I move pics into my album.

            Cheers

            George


            Edited By mechman48 on 02/06/2013 22:41:58

            #121344
            Rik Shaw
            Participant
              @rikshaw

              George – thanks for all your tips which I feel sure will be useful to other users as well. Have not managed yet to duplicate the test readings in the test report – I'll get the time though although I am not optimistic that the report will add to the value of the machine if I ever (unlikely) sell it on. Your comments are highly valued and I have printed them out for future reference. I have only "run the mill in" as per GRIZZLY advice and have not yet cut swarf but compared to my previous micro/mini setup this machine is VAST!! Do you remember that first girlfriend you could not stop looking at? ——– Am I sad or what? —– Rik

              #121363
              mechman48
              Participant
                @mechman48

                Rik / all

                Glad to be of assistance to you & others on this thread; check out my post as I've added a bit on the electrickery, just bear in mind that my write ups only apply to my machine & not neccessarily to other members machines, Thor, Mark P etc… you may hopefully get an updated version by the time the next shipment arrives, &/all where QC may have been improved…surprise ?

                Stub Mandrel..nice one, but if I see any fish floating around in there then I've got a BIG, BIG problem surprise laugh

                Have been giving it the once over tonight & have noted a couple of other bits re the change wheels,but am burning the midnight oil so will double check & write up later. I would be interested to know if other members have noted any other items / concerns on their machines that I have not covered..so far.

                in retrospect; before anyone pulls me up re the drill pulling in, I thought of the drill bit running out of true..but checked it out on my surface plate & no discernable eccentricity / out of round… constructive criticisms always welcome but please be gentle with me , after all I am only a junior member .. blush

                Cheers

                George

                Edited By mechman48 on 03/06/2013 01:14:15

                #121365
                Gone Away
                Participant
                  @goneaway

                  Does anyone have any practical tips for adjusting the leadscrew backlash on these machines? The Grizzly manual covers it in basic fashion but the adjustment screws are pretty much buried and I didn't have much luck on a quick-look a while ago.

                  I have a DRO and tend to make-do but it really could use some adjustment on both axes.

                  #121824
                  mechman48
                  Participant
                    @mechman48

                    As mentioned in previous post; I made a larger knurled grip to fit over the friction collar on the top slide as I could not get a grip on it to set 'zero' due to 'chubby finger' syndrome. I was going to make it a shrink fit but couldn't quite get the dimensions right for hot water expansion method & had no hotplate in the w/shop so I made it a press fit.

                    1. Original as supplied with machine:

                    2013-02-10 comp.slide mod (1).jpg

                    2.Manufactured new knurled collar

                    2013-02-10 comp.slide mod  (2).jpg

                    3. Press fitted to handwheel over original collar.

                    2013-02-10 comp.slide mod  (3).jpg

                    4. Reassembled to top(compound) slide

                    2013-02-10 comp.slide mod (4).jpg

                    Obviously the OD can be made to suit your own dimensions but I made this to look cosmetically in keeping with the topslide scale & I can now easily grip to set zero.

                    Cheers

                    George

                    #121827
                    Gone Away
                    Participant
                      @goneaway

                      Nice job George!

                      There are some very reasonably priced heat-shrink guns around that make a useful workshop addition for small (and not so small) heat shrinking jobs. (As well as heat-shrinking of course).

                      Edited By Sid Herbage on 07/06/2013 21:24:58

                      #121906
                      mechman48
                      Participant
                        @mechman48

                        Thanks for the reminder Sid, I have a heat gun somewhere in my shed that I used for paint stripping some wood a while back..never dawned on me at the time embarrassed.. just goes to show the old grey matter is not as quick as it used to be, you know what I mean.." now where did I put so 'n' so, what did I do with….! even better.. now why did I come in here! thinking.

                        G.

                        #121921
                        Mark P.
                        Participant
                          @markp

                          Just for the sake of interest what oil do you put in your WM250 gearbox?

                          Mark P.

                          #122303
                          Clive B
                          Participant
                            @cliveb55652

                            I have a question with respect to power feeds on the wm-16. Warco haven't had any in stock for a long, long time. I see that Toolco (in the UK) offer something that looks very similar, has anyone attemped to fit one to a Wm-16? Alternatively I am minded to try adapting the type of power feed that fits on the Warco Major mill/drill (or Aximnster ZX series). Has anyone any experience in doing this and is it straightforward?

                            Clive

                            #122360
                            mechman48
                            Participant
                              @mechman48

                              Looking at the Warco catalogue their power feed..item 3205.16, looks almost identical to Toolcos PF1 apart from the on/off switch on the Toolco item, so I don't see any reason why it shouldn't fit. The other difference is I was quoted £280 for the Warco item at the Harrogate exhib' as opposed to Toolco's, advertised at £240 on their website.. but toolco's won't be in stock until Aug'.

                              George

                              #122362
                              Gone Away
                              Participant
                                @goneaway

                                Can't directly answer you question, Clive, but over here (Canada) I bought the Grizzly power-feed for their WM16- lookalike on the basis that it looked, in the catalog, like another WM-16-lookalike I had from BusyBee locally and it fitted just fine. It looks like the Toolco one.

                                There's not much to the interface actually. It's mounted to two empty threaded holes on the left end of the table – which you should have and the drive couples to leadscrew by removing the handle and dial on that side.

                                As I mentioned before in this and another thread, if you happen to stall the cutter under power feed it can be a bit problematic since the machine will stop but the feed will continue.

                                Edited By Sid Herbage on 15/06/2013 17:34:05

                                #122513
                                Rik Shaw
                                Participant
                                  @rikshaw

                                  My new imperial WARCO WM250 V-F arrived 3.00PM to keep my metric WM16 mill company. Had men coming to do the lift at 5.00pm so sweated buckets cracking the case open, removing all the bits. Had to remove the chuck guard to temporarily fit the sheet metal splash guard as that part of the machine is up agin' the shed wall and I needed it fitted to measure up.

                                  Measured up all the hole centres and drilled the bench. With five minutes to spare I finally got the chuck off. That was one fiddly job and designing a tool (ratchet?) to make it easier will be a priority.

                                  At 5.05 was informed that the heavy mob could not now do the job till the morrow. Cream crackered I most definitely was!

                                  It's time like this I find myself reaching for a cold bottle of stumbling juice (or two) and s*d what the vicar thinks! smile d

                                  Rik

                                  #122519
                                  Ed Duffner
                                  Participant
                                    @edduffner79357

                                    I was doing a cut on the WM16 today and all of a sudden the spindle stopped but the motor kept going with a slight grinding sound. I switched off immediately as I've read about some of the folks on the forum who have stripped the plastic gears on their machines and though the worst. I was lucky though, all that had happened was the gear change knob had rotated out of position and was kind of in the neutral position but still rubbing the edge of the teeth. Once in gear all was ok.

                                    I also wanted to mention that I've added some self adhesvie sound proofing sponge(foam) to the inside of the motor cover as I sometimes get a bad screaching sound when some of the resonant frequencies caused by milling are passed into the cover. The sponge is made by AKASA and is usually meant for sound proofing computer cases. It does the job very well.

                                    Ed.

                                    #122543
                                    Thor 🇳🇴
                                    Participant
                                      @thor

                                      Hi Ed,

                                      first time I have heard that the gear change knob has jumped out of position. On my slightly large milling machine there is a spring loaded ball that holds the knob in Hi or Lo position. Never experienced any movement of that knob on my machine. Your sound proofing sounds interesting.

                                      Thor

                                      #122552
                                      Ian Parkin
                                      Participant
                                        @ianparkin39383

                                        I have a RDG version of this mill

                                        after I had only had for about a month the gear stripped upon investigation the gear change mech had its detent drilled in the wrong position so the gears were only partially in mesh( about a 1/4 in mesh)

                                        Made a new detent plate and problem solved..


                                        I fitted a seig power drive to my mill on the x axis and a parvelux geared motor to the z axis its transformed the machine heres a couple of pics of the power feed

                                        The coupling fits where the handwheel was so it has a bore of 12mm for the plain keyed area then a 8mm thread to pull it on then a grub screw to hold it tight ( that indexed so it goes down the keyway)

                                        the other end has a 10mm hole with another coupling to fit to the tongue coming out of the motor unit this means that just undoing the grubscrew there the motor unit could be taken out of action.

                                        However since doing it I've not need to move manually…its possible to overrun the motor and gearbox.

                                        The on off switch on the power unit was on the variable speed pot so I brought the wires out to a large switch on top so now the speed stays set constant and just use the top mounted switch and the reverse/forward switch. I didnt bother mounting the limit switch as I dont tend to leave the machine whilst running.

                                        Whilst using the quick advance button the whole machine vibrated massively it took me quite a while to realise to remove the hand grip knob out of the other ends hand wheel ( DOH !!! )

                                        I did wonder about guarding the coupling area to stop rags /sleeves getting caught but decided not to

                                        Edited By Ian Parkin on 18/06/2013 09:24:37

                                        #122556
                                        SteveW
                                        Participant
                                          @stevew54046

                                          Ifound the Arc Euro flanged nuts a help on the wm250 lathe chuck. Dispense with the washers (so long as the washer police aren't looking) and it makes it much easier. I did find this a pain but with experience it gets much better.

                                          Why is it that I always need the 'other' chuck no matter how carefully I plan?frown

                                          Steve W

                                          #122557
                                          SteveW
                                          Participant
                                            @stevew54046

                                            My WM250 chuck guard would not stay up. Possibly stop/shear pin damaged by a small boy.. I bent up some 4mm perspex to fit. It will also stop anything rolling from the headstock into the chuck. Seemed a better idea than dismantling and probing deeper! Steve W

                                            chuck guard

                                            #122558
                                            mechman48
                                            Participant
                                              @mechman48

                                              Rik'

                                              Congrats' on getting your lathe, a couple of pics of your set up would be nice.

                                              George

                                              #122594
                                              Rik Shaw
                                              Participant
                                                @rikshaw

                                                Thanks George – Just locked up the "tardis" and opened the bar – cheers.

                                                It took three of us to heft it up onto the bench and another fifteen minutes getting the mounting bolts lined up. If I had to do the job again I would make things much easier by gluing the chip pan to the bench before offering the lathe up. Have spent the last three hours trying to get a distorted – alright, bent – splash back fitted. It involved a mallet, a junior hacksaw and a lot of bad language. The last thing I did before locking up was to undo the face plate packing – I never expected it to be so big! I can think of a lot of possibilities using that beauty.

                                                Got the WARCO manual along with a printed out version of the Grizzly G0752 (looks similar) on my desk and will read through both shortly. The Grizzly version has already come in handy as it reminded me to apply sealant between the lathe feet and the chip/drip tray.

                                                Had a word with Michael in the service department and he confirms that their suds pump works OK with cutting oil so that's the route I am going down – pity WARCO are out of stock as theirs is just £120 with free delivery, will have to look elsewhere.

                                                Ordered a QCTP with an assortment of extra tool holders and that will be my first turning job as the bore in the block is to small to fit on the boss on the lathe. WARCO charge £50 for opening it up, I declined their service and will do it myself . That'll be fifty quid saved and the four way tool post the lathe came fitted with can go on a popular auction site and get another bit of "cashback".

                                                Will post pics and a movie within next few days but for now I'm having a busy (but very pleasurable) time getting "stuff" ship shape and Bristol.

                                                Tomorrow it's cleaning down, lubricating and running in as prescribed by GRIZZLY and I daresay there will be a degree of drooling going on as well smile p

                                                Rik

                                                #122619
                                                1
                                                Participant
                                                  @1

                                                  Rik

                                                  I have a suds tank, pump and pipery sold by Axminster, which they still do for £95.00. I bought a NVR switch from them at the same time which makes it safer and easier to use.

                                                  Jim

                                                  #122658
                                                  Sub Mandrel
                                                  Participant
                                                    @submandrel

                                                    > four way tool post the lathe came fitted with can go on a popular auction site and get another bit of "cashback".

                                                    You never know when it may come in handy – less overhang, when you need to hget a sideways mounted tool round a really large diameter, or something (like a knurling or spherical turning tool) that's just too cumbersome to mount in a QCTP holder.

                                                    Neil

                                                    #122659
                                                    JasonB
                                                    Moderator
                                                      @jasonb

                                                      As Neil says keep the existing 4-way as they do come in handy for holding larger tools than than my Dickson.

                                                      Depending on what toolpost you have bought it may be hardened so not such an easy job to bore out, I did the opposite on my 280 and machined down the boss on the cross slide which is just CI.

                                                    Viewing 25 posts - 51 through 75 (of 375 total)
                                                    • Please log in to reply to this topic. Registering is free and easy using the links on the menu at the top of this page.

                                                    Advert

                                                    Latest Replies

                                                    Viewing 25 topics - 1 through 25 (of 25 total)
                                                    Viewing 25 topics - 1 through 25 (of 25 total)

                                                    View full reply list.

                                                    Advert

                                                    Newsletter Sign-up