Todays update from Bodgers Lodge

Advert

Todays update from Bodgers Lodge

Home Forums Workshop Techniques Todays update from Bodgers Lodge

Viewing 25 posts - 251 through 275 (of 341 total)
  • Author
    Posts
  • #221255
    Peter Krogh
    Participant
      @peterkrogh76576

      I love your posts John! Keep 'em coming…

      Pete

      Advert
      #221257
      Hopper
      Participant
        @hopper

        Nice work once again! What did they ever do before they had you to pull them out of the fertilizer?

        #221291
        Neil Wyatt
        Moderator
          @neilwyatt

          from the look of the old shaft, I reckon you've been stirring your coffee with it.

          #221314
          mechman48
          Participant
            @mechman48

            Nice job. Did your welding not damage the rotor in any way, alter the magnetism etc. just curious as not into electrickery at that level ?

            George.

            #221315
            John Stevenson 1
            Participant
              @johnstevenson1

              Neil, No way I use titanium tea spoons wink


              I would have loved to keep the old shaft and mount it on the wall but they asked for it back to show the customer.

              Now waiting to see if they cancel the new motor job and just have the standby rewound sad

              If they do I will be the proud owner of a lump of steel 10" diameter and 4 1/2" thick that was destined for a new end plate – paid for of course. wink


              {EDIT}


              George,

              There is no magnetism in a rotor, it's made up of iron laminations with cast alloy in between that acts as the winding. You can get these absolutely glowing and not cause any problems.

              There needs to be a magnetic path for the induced current from the stator and one thing you cannot do is replace the whole shaft with a 300 series non magnetic stainless shaft thru the rotor. If you do it just runs at low speed and gets hot in a very short time.

              Stainless shafts have to be either stubbed or turned down and coated with stainless weld and turned back to size again.


              Majority of pumps shafts that are not plain steel are stubbed.

              Edited By John Stevenson on 16/01/2016 12:24:27

              #221317
              Circlip
              Participant
                @circlip

                'Spose you realize just how much you're screwing up the Chineze economy? They are closing motor manufacturing factories left right and Thursdays thanks to your bodging? angry


                Regards Ian.

                  "Drill and ream a 50mm hole" is that dia. or depth?  What's shaft diameter?


                Edited By Circlip on 16/01/2016 12:36:15

                Edited By Circlip on 16/01/2016 12:36:33

                #221321
                John Stevenson 1
                Participant
                  @johnstevenson1

                  Sorry, bragging rights, it should read 40mm diameter. Hole goes up the spout 120mm or 5" for support.

                  Shaft then descends to 38 where the seal fits, then 35 where the impellers fit.

                  #221339
                  Harry Wilkes
                  Participant
                    @harrywilkes58467

                    John your photos of the pump shaft takes me back I spent 27 years in the metal finishing trade so sights like that were not uncommon, nice work !

                    H

                    #221363
                    mechman48
                    Participant
                      @mechman48

                      Thanks for the info' on the electrickery aspect John; must put that into the old memory banks, if I can remember what & where they are… dont know

                      George.

                      #232876
                      Allan B
                      Participant
                        @allanb

                        Had some time to kill so I have just read this thread from start to end 😀

                        got to say some very interesting ways of working around a problem, looking forward to reading more

                        #232878
                        JimmieS
                        Participant
                          @jimmies

                          Any more insights into processes unknown to we of little knowledge from the master of ingenuity?

                          Jim

                          #232885
                          John Stevenson 1
                          Participant
                            @johnstevenson1

                            A lot of my stuff is repetition, worn shafts and housings etc and keep showing these would wear thin after a bit.

                            I try to select jobs that either [a] have a bit of interest in them or [b] can be scaled down or at least the process can be scaled down to suit the home shop.

                            I'm also often on a tight time scale and by the time I realise it would have made a good post is already gone out of the door.

                            Off and on as a filler job I'm making a new dynamo end for a Riley ? car. It's a vertical dynamo bevel driven and has a coupling on the top end that drives the camshaft. I think it was a common design pre war ?

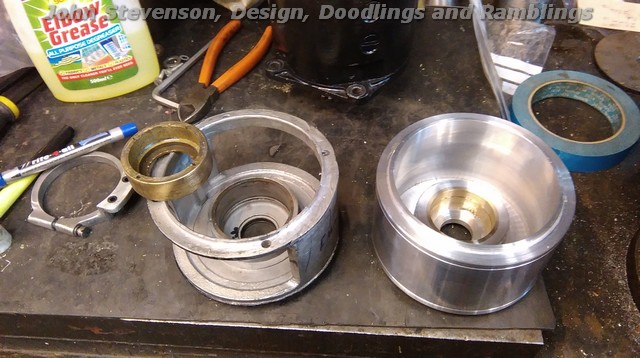
                            The alloy cap on the end of the dynamo has seen better days. It's been broken and welded at least three tines where it bolts on and the thinner section and the internal boos that hold the brush get on the outside and the bearing inside has been bored out again at least three times then cross drilled and grub screwed but eventually this has all cracked.

                            Got a lump of alloy 4 1/2" diameter and 3 1/2" long and so far bored it out internally trepanned the boss and bored for a bearing and that's as far as it has got.

                            Next job is to machine the two windows out where the brush gear is assembled and adjusted and drill the 4 mounting holes, hopefully Monday but I was only thinking today that this might make a useful addition the the 'Lodge work flow ?

                            #232894
                            MW
                            Participant
                              @mw27036

                              "I'm also often on a tight time scale and by the time I realise it would have made a good post is already gone out of the door."

                              Not only this but i find you can't really document and do your machine work both at the same time, it's really hard to do a step by step because you just wanna get on with it. I know the feeling.

                              Michael W

                              #232914
                              Russell Eberhardt
                              Participant
                                @russelleberhardt48058
                                Posted by John Stevenson on 01/04/2016 23:55:04:Off and on as a filler job I'm making a new dynamo end for a Riley ? car. It's a vertical dynamo bevel driven and has a coupling on the top end that drives the camshaft. I think it was a common design pre war ?

                                Yes, the early OHC Morris Minor I used to own and the MG Midget derived from it had the same arrangement. A common problem was oil leaking from the head running down into the dynamo!

                                Russell

                                #232930
                                Russell Eberhardt
                                Participant
                                  @russelleberhardt48058

                                  Come to think of it, I don't remember a Riley with that arrangement. What model was it John?

                                  Russell.

                                  #232940
                                  Andy Holdaway
                                  Participant
                                    @andyholdaway

                                    I'm pretty sure the c1934 OHC Riley 9 had the same arrangement. It's been a while, but I used to 'look after' a hillclimb riley with that engine.

                                    Edit: Like this:

                                    1935-riley-9.jpg

                                    although this wasn't belt driven.

                                    Andy

                                    Edited By Andrew Holdaway on 02/04/2016 12:52:29

                                    #233348
                                    John Stevenson 1
                                    Participant
                                      @johnstevenson1

                                      OK got some pics of the dynamo jobbie.

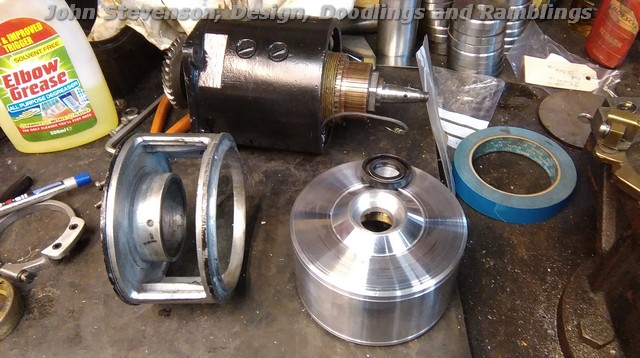
                                      Old housing on the left. It's been bored and a bronze insert fitted to hold the bearing and then later when this has spun it's been sleeved with a lump of cast but it's all come loose again and cracked to boot.

                                      The bit with the 4 mounting holes was been welded about 3 times and is nowhere near flat. So the bit on the right is where I got to on Friday night. Basically bored and trepanned out. The internal boss has the brush gear clamped round it and the bearing housing has already been sleeved in bronze as I'm not happing with bearings direct into alloy.

                                      Back of the new one with housing to take an oil seal to stop it filling up with oil.

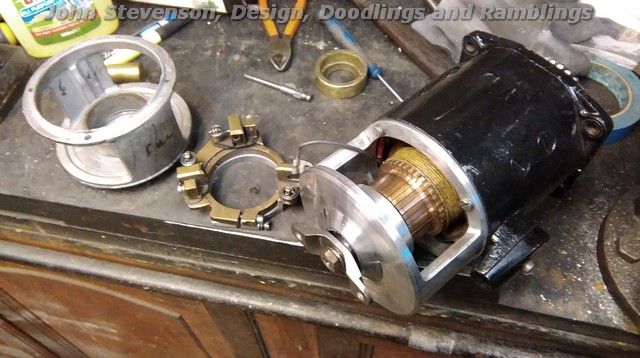
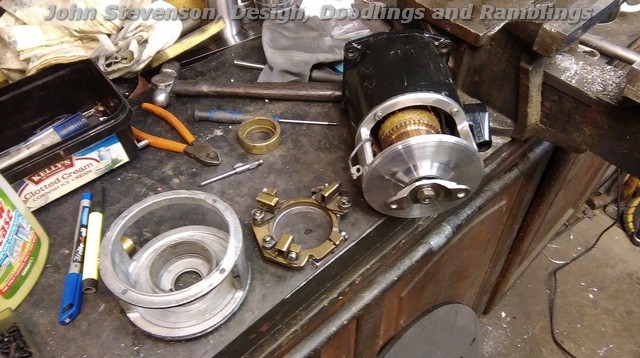
                                      So today threw it in the vise on the mill and poked two windows into it and left as much on as possible to give strength.

                                      Dummy assembly run to make sure everything lines up. No drawings are sketches were done, main sizes were taken off the old one and fits were taken directly off the dynamo.

                                      That's it for tonight in fact I'll probably throw it all back in the box and let the owner assemble it all.

                                      So better material than the original, thicker where possible to give strength, oil seal fitted and bearing retained better than the original.

                                      Better go feed the hound……………………..

                                      #233351
                                      Michael Gilligan
                                      Participant
                                        @michaelgilligan61133
                                        Posted by John Stevenson on 04/04/2016 22:24:28:

                                        … the bearing housing has already been sleeved in bronze as I'm not happing with bearings direct into alloy.

                                        .

                                        Nice work, John

                                        Just one question: Why don't you like bearings direct into alloy?

                                        … Corrosion; Expansion; Strength; or what?

                                        MichaelG.

                                        #233361
                                        John Stevenson 1
                                        Participant
                                          @johnstevenson1

                                          Too soft Michael.

                                          Something like this dynamo is going to spend the rest of it's life being pulled to pieces, it's just the nature of the beast given it's age and owners like to mess with them.

                                          Wouldn't take long for the bearing to come loose. you only have to look what's happened in its history.

                                          #233382
                                          Russell Eberhardt
                                          Participant
                                            @russelleberhardt48058

                                            Lovely job John.

                                            #233396
                                            Ian S C
                                            Participant
                                              @iansc

                                              The only thing wrong with that is that in 70/80 years time someone is going to have that bit, and have to build the rest of the motor etc to get it up and running again, then again, maybe you just take a photo, push a button, and out comes a new motor. Good job done JS.

                                              Ian S C

                                              #233397
                                              JimmieS
                                              Participant
                                                @jimmies

                                                Thanks John, great to see another job being processed. Make me feel even less useful!

                                                #233412
                                                JasonB
                                                Moderator
                                                  @jasonb

                                                  John you say there is a risk of the bearing comming loose but what is to stop the bronze insert comming loose like on the original bodge?

                                                  Or are you able to knock the insert in with a bigger 'ammer than you would use to knock the bearing in with?

                                                  J

                                                  PS any more work done on the Pink Peril or is that all up and ruinning to Deb's delight

                                                  #249356
                                                  John Stevenson 1
                                                  Participant
                                                    @johnstevenson1

                                                    OK been a while, house move has gotten in the way and TBH I get a lot of repetition jobs that aren't exactly repetition but they look so similar.

                                                    However this job looked interesting enough to show.

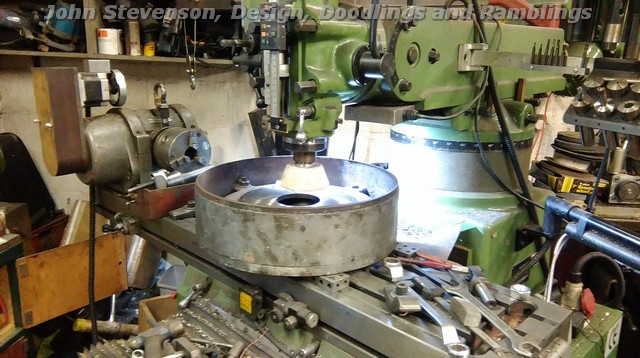
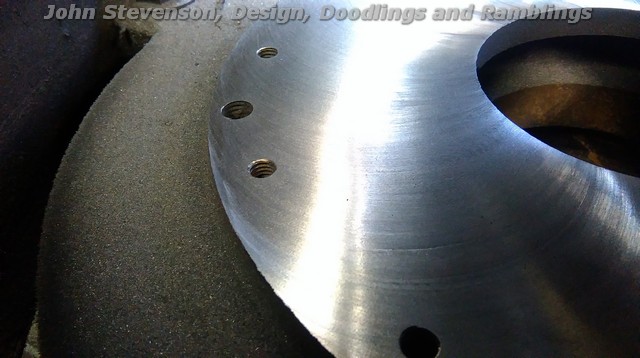
                                                    Large end housing off a brake motor, probably 15" in diameter, too big for the lathe and too big for the surface grinder but the bit I want to repair, the brake surface is inside the lipped walls.

                                                    So bung it on the Bligeport, pack it up and clamp it down and stick a cupped wheel onto a spare arbor.

                                                    Touch it onto the work and manually wind the table round in a circle and keep putting a bit of cut on.

                                                    Not shown in the pic but there were plenty of wet oiled rags and also had the vacuum running.

                                                    Came out quite well considering the crudeness of the operation.

                                                    Took longer to set up and mount the wheel than actually face the brake surface.

                                                    #249364
                                                    Speedy Builder5
                                                    Participant
                                                      @speedybuilder5

                                                      Good to see you back on-line again. I always look forward to following your posts. I shows us all that there are many ways around a problem. What sort of speed did you run the spindle at ?
                                                      BobH

                                                    Viewing 25 posts - 251 through 275 (of 341 total)
                                                    • Please log in to reply to this topic. Registering is free and easy using the links on the menu at the top of this page.

                                                    Advert

                                                    Latest Replies

                                                    Home Forums Workshop Techniques Topics

                                                    Viewing 25 topics - 1 through 25 (of 25 total)
                                                    Viewing 25 topics - 1 through 25 (of 25 total)

                                                    View full reply list.

                                                    Advert

                                                    Newsletter Sign-up