The Workshop Progress Thread (2017)

Advert

The Workshop Progress Thread (2017)

Home Forums Work In Progress and completed items The Workshop Progress Thread (2017)

Viewing 25 posts - 76 through 100 (of 356 total)
  • Author
    Posts
  • #284878
    SillyOldDuffer
    Moderator
      @sillyoldduffer
      Posted by Michael Gilligan on 18/02/2017 14:17:22:

      Posted by Brian Hutchings on 18/02/2017 13:19:10:

      My 1858 Burrell Boydell engine is coming along. …

      .

      That's looking lovely, Brian

      MichaelG.

      +1 from me too. I wish I could produce such good looking work!

      Advert
      #284905
      Iain Downs
      Participant
        @iaindowns78295

        An unusually productive day today.

        I've stripped my lathe down and have been Wyattising it

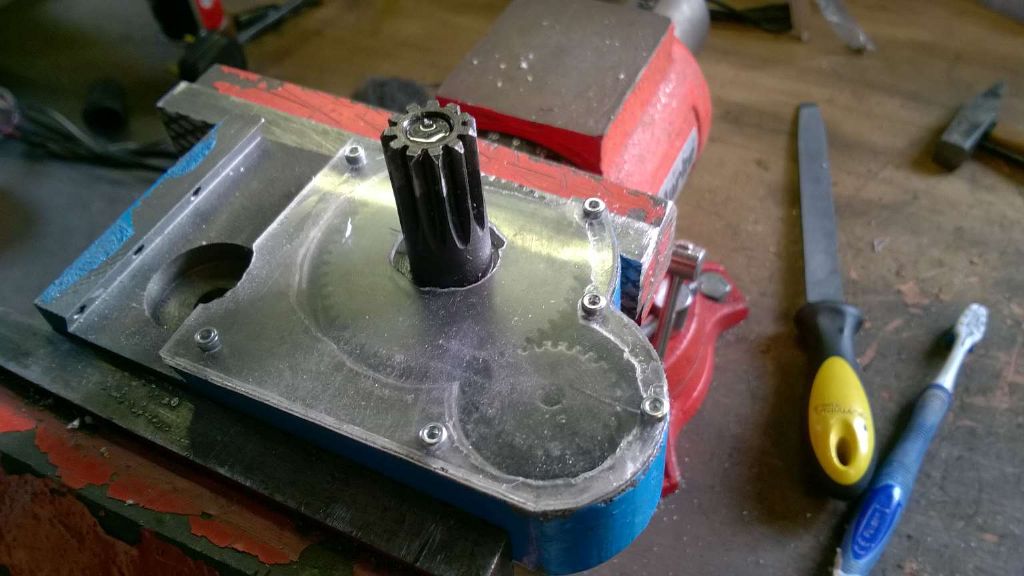
        gear cover.jpg

        This fairly nasty piece of work is to keep swarf out ot the saddle gears. In my defence, I broad my fretsaw blade after doing the outside and can't find the 10 I know I have somewhere. The inside was done with a dremel hence the erratic nature (I know – bad workman and so on).

        The next thing on the lathe is to replace the spindle which I probably mucked up when removing it to replace the gears in my first act of machine destruction.

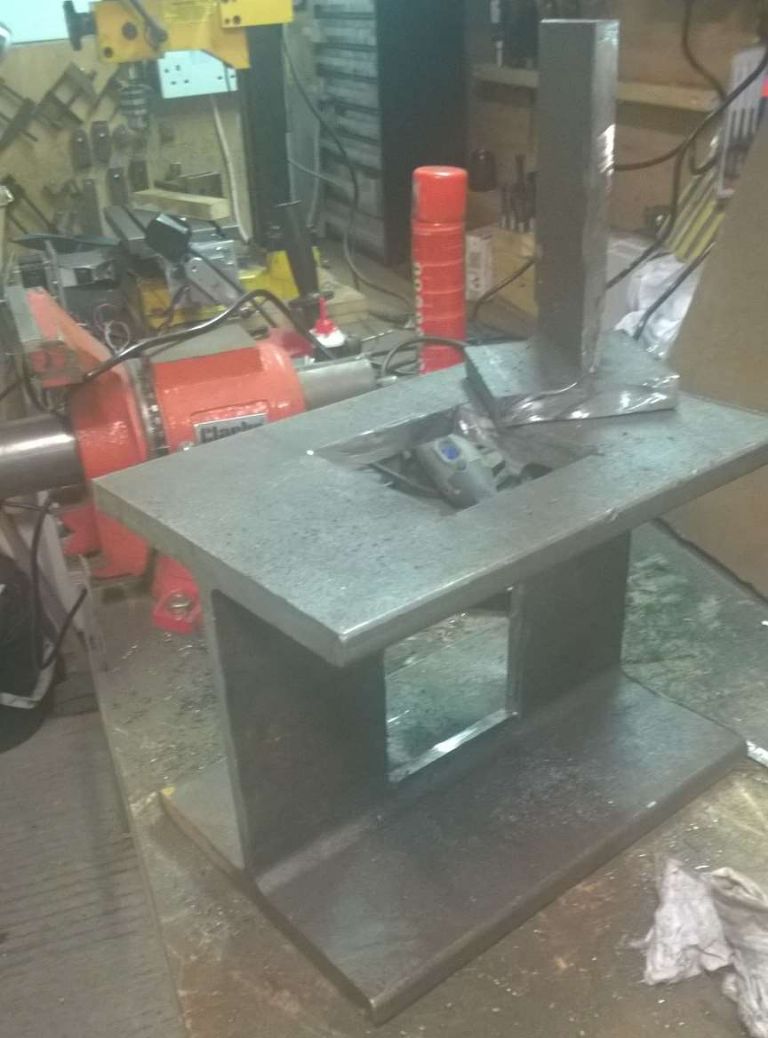
        To do that I'm making a press. A bit of 12 inch girder from the scrapyard is the starting point. Chop out some of the middle…

        press cut out.jpg

        A strikingly challenging task which has consumed 2 angle grinders half a dozen milling cutters, a hacksaw blade, a considerable amount of time and a very large amount of bad language.

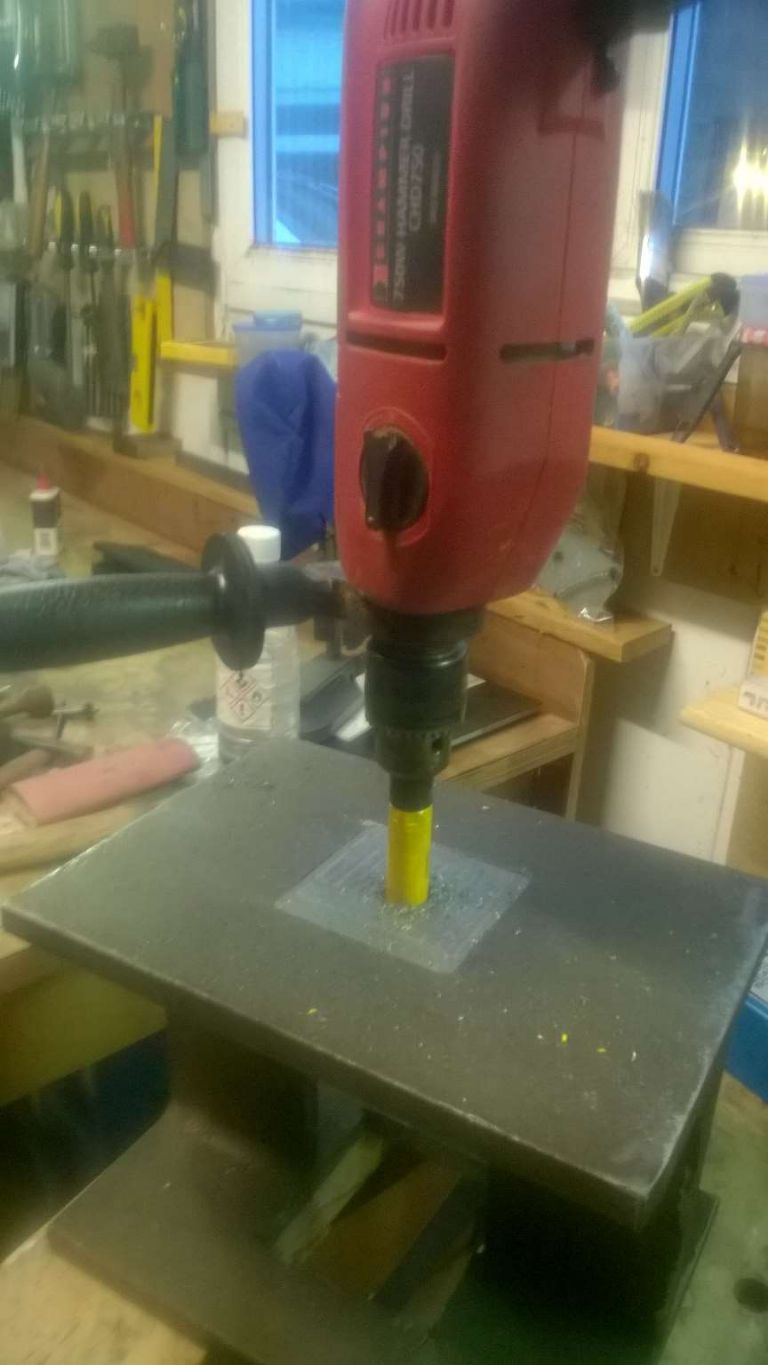
        Today I was boring out the hole in the top with a core drill. The girder *just* fits under my mill, so I was able to mill a flat on the top, but no way will it get a chuck there. and I'd burn out it's little motor.

        press core drill.jpg

        This worked much better than I expected, though it took 20 minutes or so. I'd managed to get a 10mm hole through with a milling cutter, so I made an 10mm/ .25 adapter for the arbor which work quite well (which is what I've been waiting for to get the lathe back together).

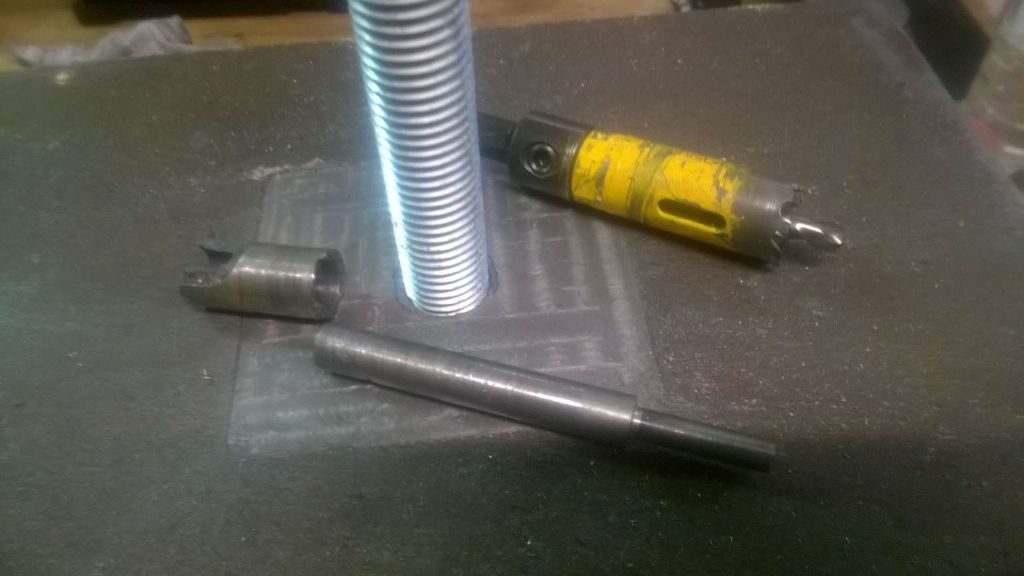
        press parts part 1.jpg

        core drill top right, core on the left and the adapter (the drill bit wasn't in of course) at the bottom.

        I did try and cut an M20 rod on my lathe, but this was not a success, so I invested in one made by a professional.

        I've got another scrapyard steel block which I will mill out to take an M20 nut and bolt it into the recess. Hey pressto! (sorry).

        Iain

        #284908
        Muzzer
        Participant
          @muzzer
          Posted by HOWARDT on 18/02/2017 15:33:12:

          Telescopic spring leadscrew guards come wired fully closed. Put it on the lead screw and assemble completely then release the wire and fit the ends into or over there location.

          so your first job is to slide it over something, a broom handle and collapse it to wire it up, plastic cable ties may be risky on the sharp edges.

          Thanks Howard, I guessed that was how they came. So I will focus on getting the genie back in the bottle before letting it loose in situ. I have some giant Tyraps and the edges aren't actually very sharp.

          The other side is slightly messed up from when I pulled it back to examine the radial bearing (floating, no thrust) at the far end of the ballscrew. I have a feeling that won't be entirely straightforward either.

          Murray

          #284909
          Neil Wyatt
          Moderator
            @neilwyatt

            Wow, lots of great things happening – well done folks!

            Neil

            #284920
            charadam
            Participant
              @charadam

              Muzzer,

              How about Jubilee clips to compress the end?

              #284924
              John Hinkley
              Participant
                @johnhinkley26699

                Muzzer,

                Re: your spring cover dilemma. If you put a rod in your lathe (assuming you have one!) "floating" in the chuck and passing through the spindle to provide lateral support to the spring, slide the uncompressed spring onto it and the secure the other end in a tailstock chuck. Use the tailstock to compress the spring to its limit and tie off with strong wire. Wind the tailstock barrel back in and move the tailstock up to where you left off. Secure the tailstock and repeat the procedure until the spring is sufficiently compressed to go over the mill leadscrew. Would that work? You might even be able to firmly attach one end of the spring to the lathe chuck to impart a bit of windy-uppy action at the same time, should it be needed.

                I think that's how I'd at least try to do it. Mind you, I'd make sure I used some hefty wire to secure it once compressed. One of those going twang at the wrong time could do some serious damage to you or the surroundings, or both.

                Good luck!

                John

                #285031
                Gray62
                Participant
                  @gray62

                  Finally finished the Dynamic Tool post grinder I got for Christmas. There are still a few bits to do like finishing off the internal grinding spindles and the guard for the cup wheel but the basic machine and the all important wheel dresser attachment are done. A quick test today on some hardened silver steel shows promising results. Still need to decide what colour to paint the logo on the belt guard.

                  complete grinder.jpg

                  I was planning to write this build up but due to a failed memory card in the camera I am missing several important pictures so that has been put on the back burner for now, crying

                  Edited By Graeme W on 19/02/2017 16:42:07

                  #285035
                  Neil Wyatt
                  Moderator
                    @neilwyatt

                    Graeme, there are recovery utilities on the web for dodgy cards.

                    You may also find the card is readable if their is a slot on your desktop or laptop.

                    Neil

                    #285042
                    JasonB
                    Moderator
                      @jasonb

                      I only picked up the aluminium for the base plate of the Horizontal steam engine yesterday but once I had enough holes in that decided to give the engine a try.

                      I'm still waiting for the flywheel casting so used a Unimat 3 chuck to add a bit of rotating mass, valve rod guide is not in place and there are no piston rings, gland packing or gaskets yet but seemed to run OK .

                      Time for a lick of paintsmiley

                      #285045
                      Neil Wyatt
                      Moderator
                        @neilwyatt

                        > I'm still waiting for the flywheel casting so used a Unimat 3 chuck to add a bit of rotating mass

                        Well that's a new one on me…

                        Nice one Jason,

                        Neil

                        #285049
                        Gray62
                        Participant
                          @gray62
                          Posted by Neil Wyatt on 19/02/2017 16:51:00:

                          Graeme, there are recovery utilities on the web for dodgy cards.

                          You may also find the card is readable if their is a slot on your desktop or laptop.

                          Neil

                          Yep, already tried both options, so far no joy but not given up yet laugh I have some images that I took on the iphone, might have to 'mock up' some of the operations to show how things are done.

                          #285081
                          Nick Wheeler
                          Participant
                            @nickwheeler

                            Finally got around to making a milling/drilling attachment for the lathe. I didn't want this to be a big complicated project, nor did I have any suitable motors or other bits in the junk pile.

                            I did keep the mini-lathe vertical slide when I bought a bigger machine, and it seemed sensible to have a collet spindle. So, I bought an ER11 spindle motor, and adjustable power supply, mount and collet set off Ebay for about £80.

                            This replicates the mini-lathe slide mount, and can be positioned anywhere along the cross-slide:

                            verticalslidemount[1].jpg

                            Slide in position, although it does need more support along its front edge:

                            verticalslidefitted[1].jpg

                            The extra holes allow the spindle to be fitted along the lathe axis:

                            millingmotor[1].jpg

                            or across it:

                            millingmotor2[1].jpg

                            The slide tilts and the mount rotates, so all sorts of weird angles could be created. 

                            And a quick and dirty test piece using a 6mm ball cutter and indexing the chuck jaws by eye:

                            makingtestpiece[1].jpg


                            Used with a headstock dividing attachment(my next job: one of the stepper motor types) this will allow easy cutting of the clock wheels that were the real reason for making this, keyways, milling squares and hexes, fluting and drilling on a PCD without having to move the workpiece to the mill.

                            Edited By Nicholas Wheeler 1 on 19/02/2017 22:41:45

                            #285084
                            Muzzer
                            Participant
                              @muzzer
                              Posted by John Hinkley on 18/02/2017 19:25:45:

                              Muzzer,

                              Re: your spring cover dilemma. If you put a rod in your lathe (assuming you have one!)

                              I guess that's part of the problem – I have a lathe here but its VFD, chucks etc are on the other side of the Pennines for now, so it won't be working for a while. In fact most of my tools are there, so I'm having to make do with a small subset. However, we plan to hire a van and recover them this coming weekend. The other part of the problem is that I will then be in China for 3 weeks travelling the length of the country. So this particular genie will be out of its bottle for a few weeks yet.

                              At least I've ordered a couple of SKF replacement bearings. Not cheap but this is possibly not the time for a Chinese ebay special.

                              Murray

                              #285164
                              Muzzer
                              Participant
                                @muzzer

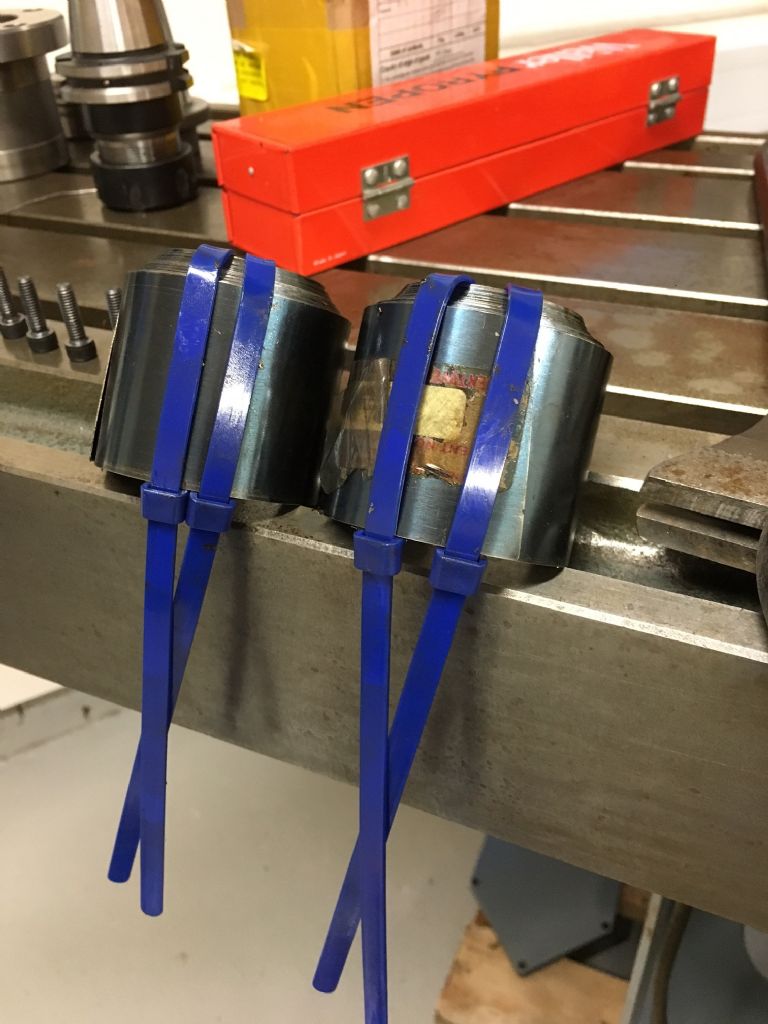
                                Well in the end it was really rather simple. I took a couple of cable ties (an extra one for safety) and formed a loop around the ribbon at the large end. Then simply kept sliding the tie around the base, each turn pulling another loop of the coil into the base. Finally after 20 turns or so, the whole thing was completely compressed again. Genie back in bottle, no need to stick a broomstick up its jacksie.

                                The whole thing took less than a minute and there didn't seem to be any risk of getting cut or bopped by it. Actually very little compressive force required. So I removed the other one and repeated the trick. Now I have both ready to go back on. Slide them over the ballscrew, release the cable tie and Bob's your auntie.

                                They look a bit like metal swallows without heads. Or is it just me?

                                Murray

                                Back in the bottle

                                #285179
                                Anonymous
                                  Posted by Muzzer on 20/02/2017 18:10:30:

                                  The whole thing took less than a minute and there didn't seem to be any risk of getting cut or bopped by it. Actually very little compressive force required. So I removed the other one and repeated the trick. Now I have both ready to go back on. Slide them over the ballscrew, release the cable tie and Bob's your auntie.

                                  That's a result! But a bit disappointing there wasn't at least one jack-in-the-box moment.

                                  Andrew

                                  #285185
                                  John Hinkley
                                  Participant
                                    @johnhinkley26699

                                    Well done, Muzzer – although disappointingly simple. I'll lend you my nut-cracking sledgehammer!

                                    John

                                    #285191
                                    Muzzer
                                    Participant
                                      @muzzer

                                      To get the other one back on will require the brief removal of the radial ball bearing at the far end of the ballscrew – the coiled up spring won't fit over it. Naturally it is held on with a circlip so tomorrow I will need to pick up some circlip pliers. I see Toolstation do a set for £4, although for some reason they call them snap ring pliers – very American. I know I have several in Harrogate of course….

                                      Murray

                                      #285240
                                      Ian S C
                                      Participant
                                        @iansc

                                        Open them a bit too much, and you find out why "snap ring".

                                        Ian S C

                                        #285277
                                        JasonB
                                        Moderator
                                          @jasonb

                                          I heard that one of our members has just taken delivery of a hefty casting set so keep your eyes out for a new build thread starting soon, just what the forum needs a bit more swarf productionsmile

                                          J

                                          #285297
                                          Jim Nic
                                          Participant
                                            @jimnic

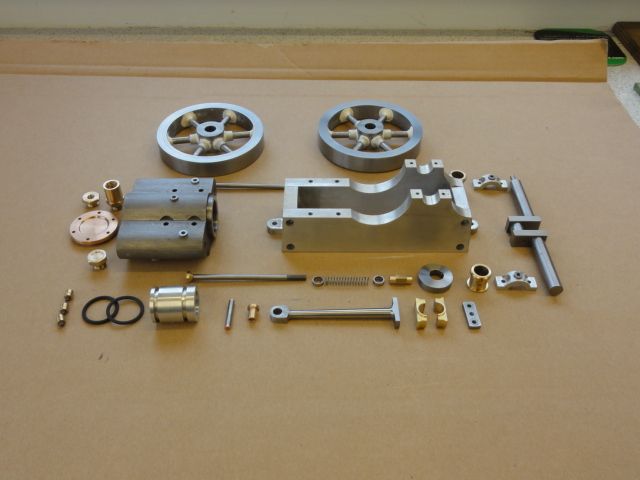
                                            Today I finished making the parts for the Jowitt poppit valve engine drawn by Jason B. I’ve made few changes from Jason’s build log, mainly in materials to suit what was to hand and fabricated flywheels rather than use castings, but it’s taken a while longer than Jason did.

                                            All (all??) I have to do now is get it running and paint it up.

                                            jowitt parts 2.jpg

                                            #285300
                                            JasonB
                                            Moderator
                                              @jasonb

                                              Looks like a very good job so far.

                                              #285392
                                              Benny Avelin
                                              Participant
                                                @bennyavelin86238

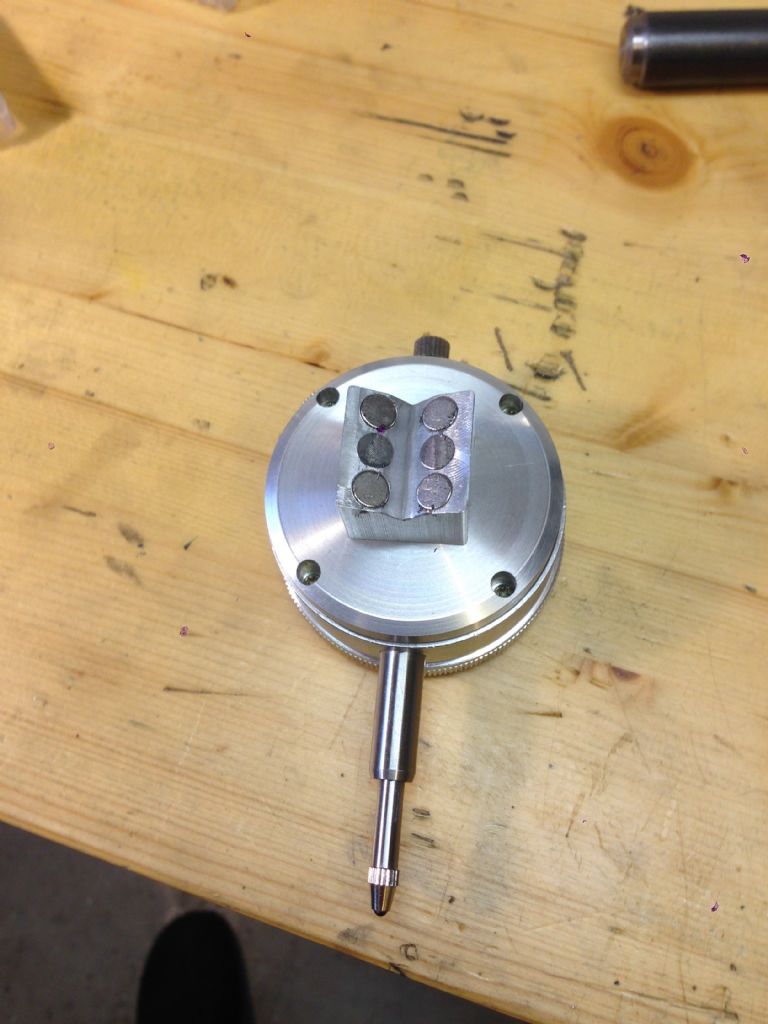
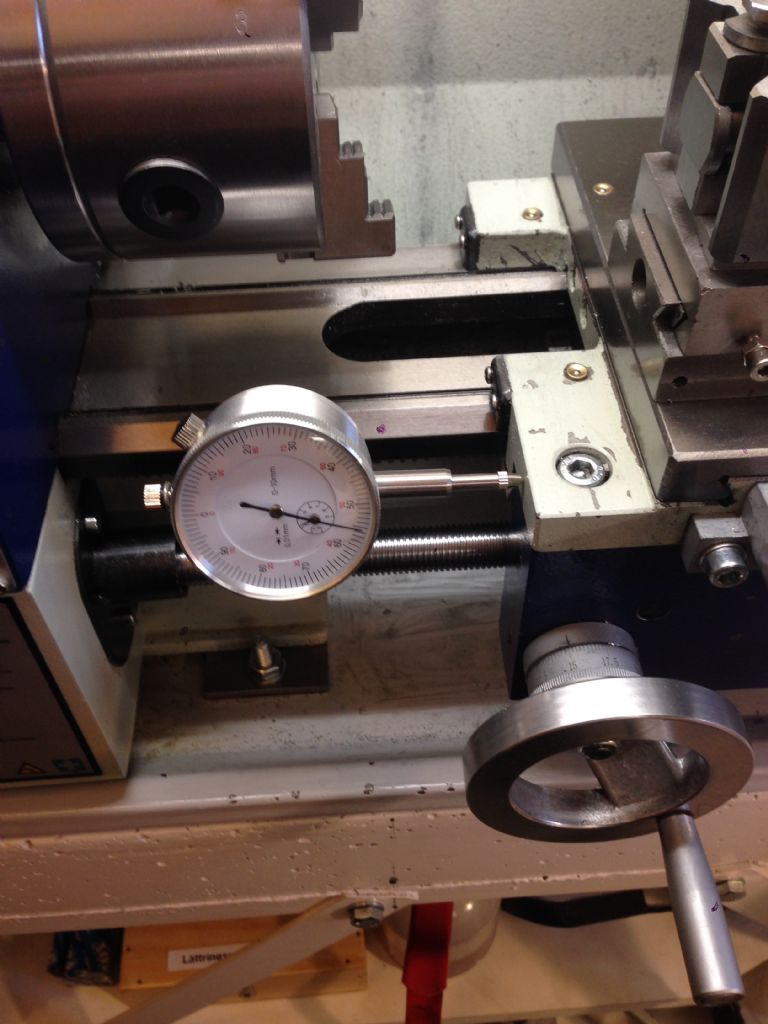
                                                I have finished this magnetic backside for a cheap indicator I had bought a long while ago. Works like a charm both for my mill and my lathe.

                                                img_2912.jpg

                                                img_2913.jpg

                                                Edited By John Stevenson on 22/02/2017 15:45:05

                                                #285546
                                                Bob Rodgerson
                                                Participant
                                                  @bobrodgerson97362

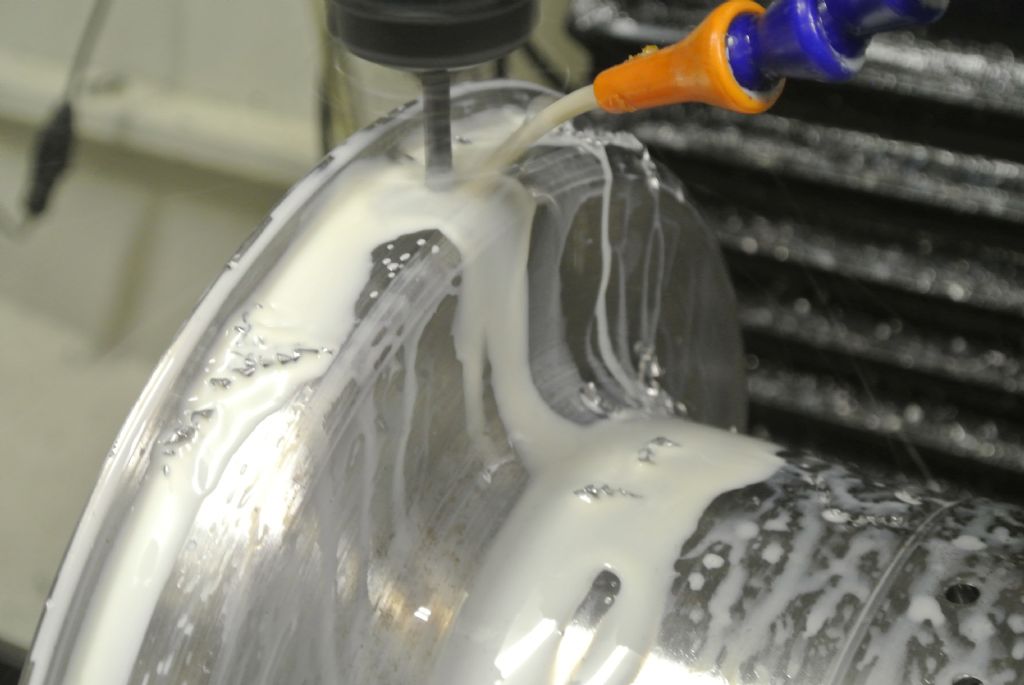
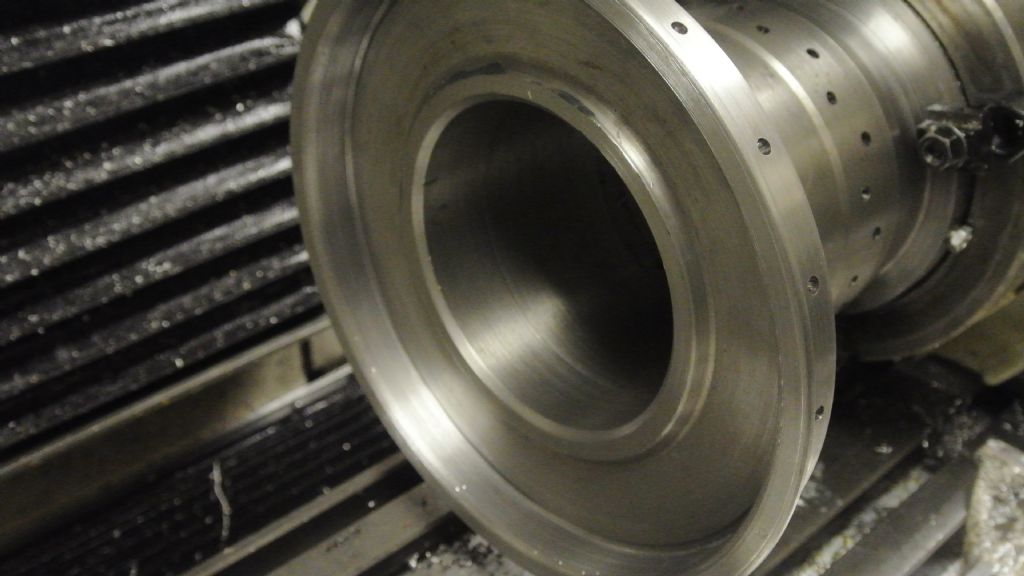
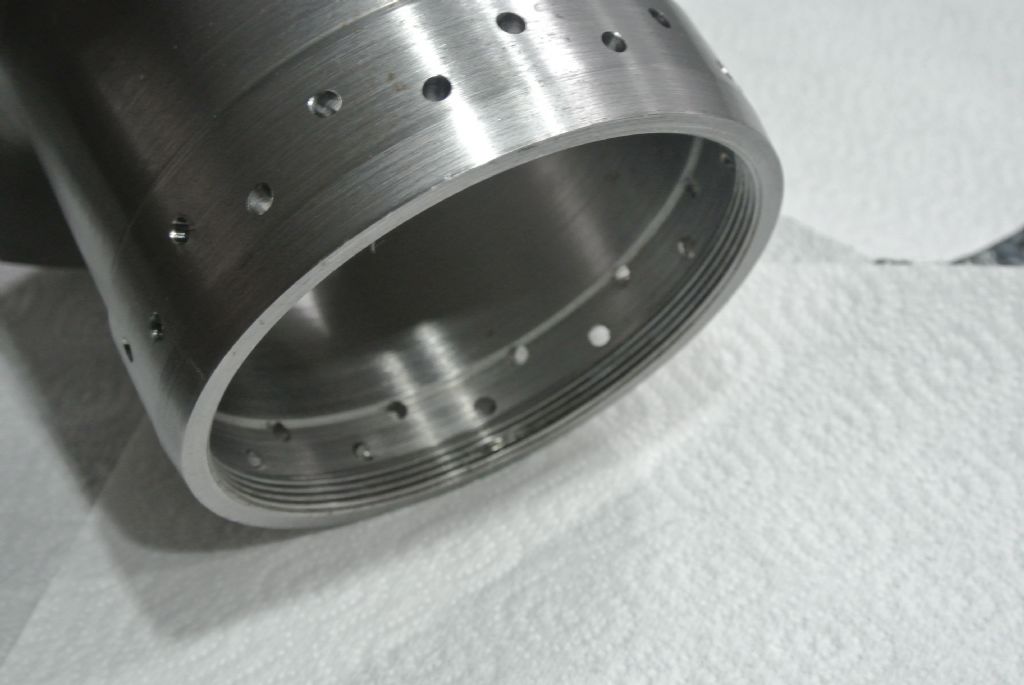
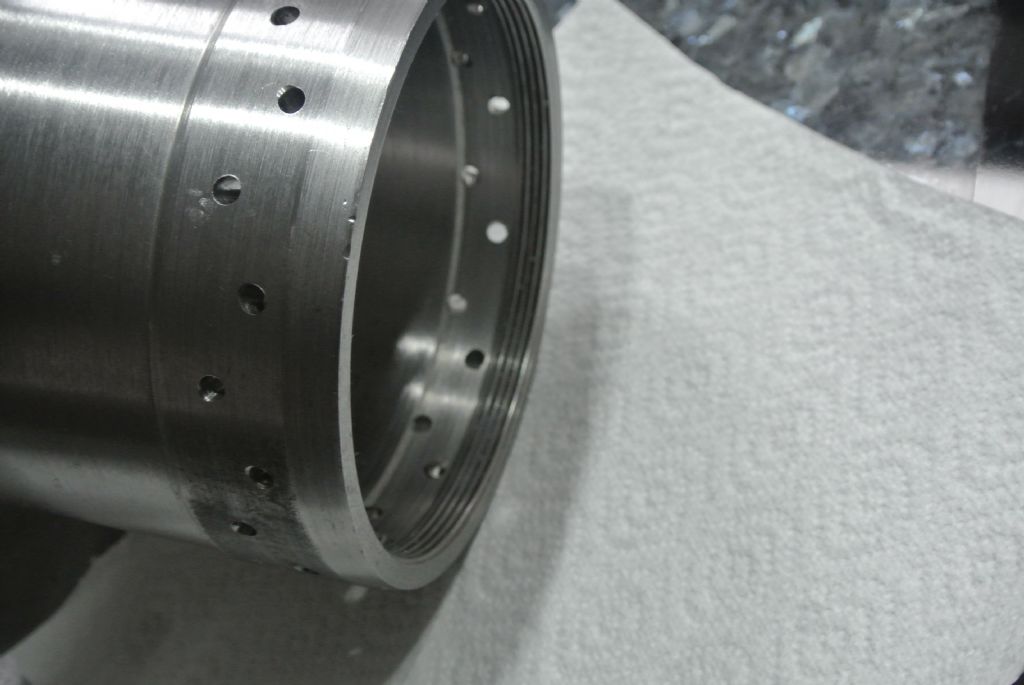
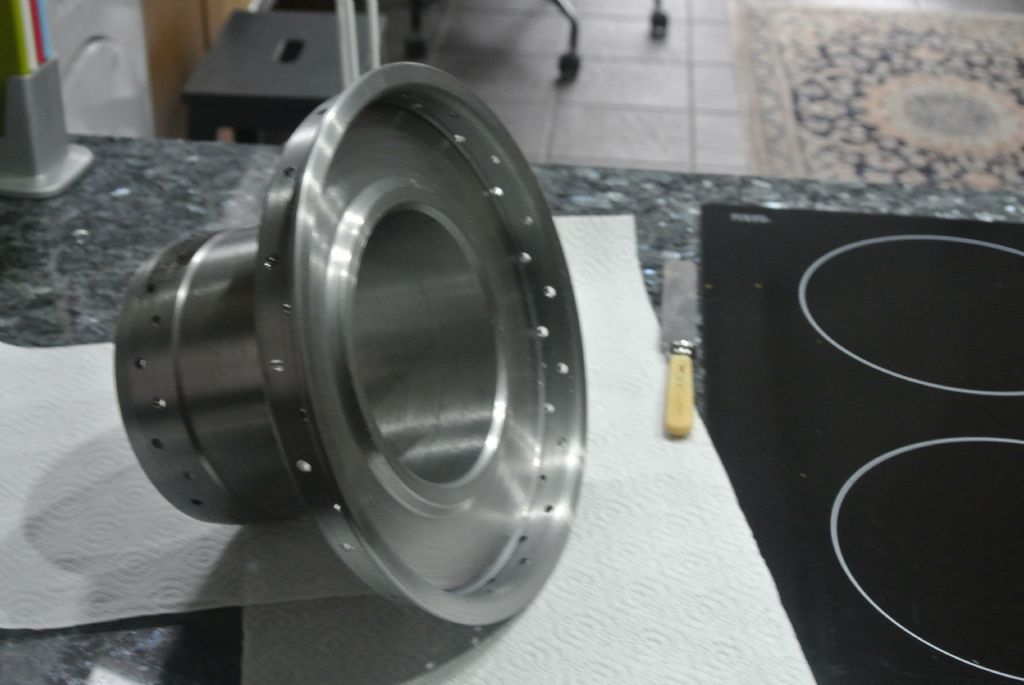
                                                  Today I finally got one of the batch of Wire Wheel Hubs I am drilling for somebody done after recovering from a nasty CNC crash. This was caused by me making a Freudian slip when I entered a Z value in my g-code as 48 instead of 84. I could see that the spindle was going to hit the work if I didn't stop it but I had the camera ready to take a picture and by the time I put it down it was too late.

                                                  The spindle contacted the work, snapped the drill, rotated the threaded hub anti clockwise and while it was doing this it pushed the adjustable angle plate out of alignment and ground the ER collet nut up a bit. The hub seized on the thread and took a lot of effort to get it off the faceplate fixture. I had to take the fixture off the rotary table, put it in the lathe 4 jaw chuck, fit the three jaw chuck on the small diameter and using metal bars and a 3foot long cheater bar on the end of one of them work the hub free. Much to my amazement there was relatively little damage to the threads on the fixture or the job and I was able to dress this with the Dremel. The outer diameter of the hub was badly marked and I had to re-machine this to get rid of the damage but I don't think this is critical so all in all a good recovery.

                                                  The job is not as straight forward as it looks because the spokes are drilled at an angle through the small end so the two rows of holes at that end are drilled separately with the angle plate set at 14 degrees then 13 degrees respectively. They are also drilled with an offset from the centre line. Getting the angles sorted out and drawing the hub was the biggest part of the job. I still have to countersink the holes which I will do as a separate programme but at least the main bit works.dsc_4078.jpg

                                                  dsc_4088.jpg

                                                  dsc_4094.jpg

                                                  dsc_4093.jpg

                                                  dsc_4092.jpg

                                                  Edited By Bob Rodgerson on 23/02/2017 11:05:36

                                                  Edited By Bob Rodgerson on 23/02/2017 11:14:50

                                                  #285548
                                                  Anonymous
                                                    Posted by Bob Rodgerson on 23/02/2017 11:03:03:

                                                    Today I finally got one of the batch of Wire Wheel Hubs I am drilling for somebody done after recovering from a nasty CNC crash. This was caused by me making a Freudian slip when I entered a Z value in my g-code as 48 instead of 84. I could see that the spindle was going to hit the work if I didn't stop it but I had the camera ready to take a picture and by the time I put it down it was too late.

                                                    The time between tool to metal contact and hitting the E-stop is the shortest period known to man; and is always positive. crying 2

                                                    Hooray for CNC I say. thumbs up

                                                    Andrew

                                                    #285556
                                                    daveb
                                                    Participant
                                                      @daveb17630
                                                      Posted by Andrew Johnston on 23/02/2017 11:36:35:

                                                      Posted by Bob Rodgerson on 23/02/2017 11:03:03:.The time between tool to metal contact and hitting the E-stop is the shortest period known to man; and is always positive. crying 2Hooray for CNC I say. thumbs upAndrew
                                                      The shortest period known to man is that between the traffic light changing to green and the driver behind sounding his horn. Dave
                                                    Viewing 25 posts - 76 through 100 (of 356 total)
                                                    • Please log in to reply to this topic. Registering is free and easy using the links on the menu at the top of this page.

                                                    Advert

                                                    Latest Replies

                                                    Viewing 25 topics - 1 through 25 (of 25 total)
                                                    Viewing 25 topics - 1 through 25 (of 25 total)

                                                    View full reply list.

                                                    Advert

                                                    Newsletter Sign-up