The Workshop Progress Thread (2017)

Advert

The Workshop Progress Thread (2017)

Home Forums Work In Progress and completed items The Workshop Progress Thread (2017)

Viewing 25 posts - 326 through 350 (of 356 total)
  • Author
    Posts
  • #321246
    Jon Cameron
    Participant
      @joncameron26580

      Hi Sean thanks, it's taken me over 6months before I've taken my first cut. It was sat in the shed for 3. Then I bought a bench set up for it, and even then it just sat. I've been working at it for 3months, and been told off too when i do daft stuff like nearly crack the head stock. (Now has a layer of drinks cans made up to take up the space thats left in the headstock casting, bearing clamp).

      Advert
      #325814
      Iain Downs
      Participant
        @iaindowns78295

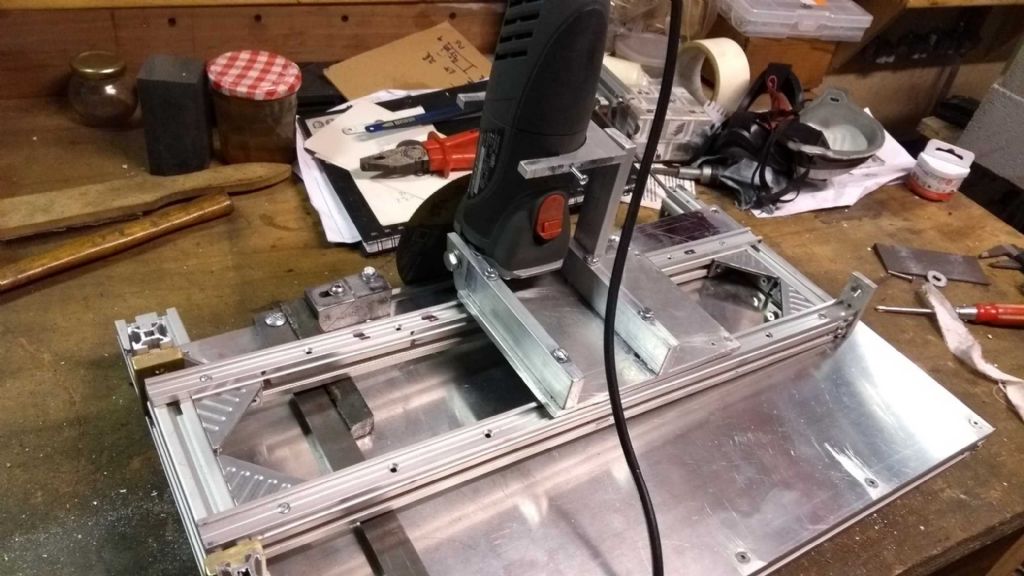
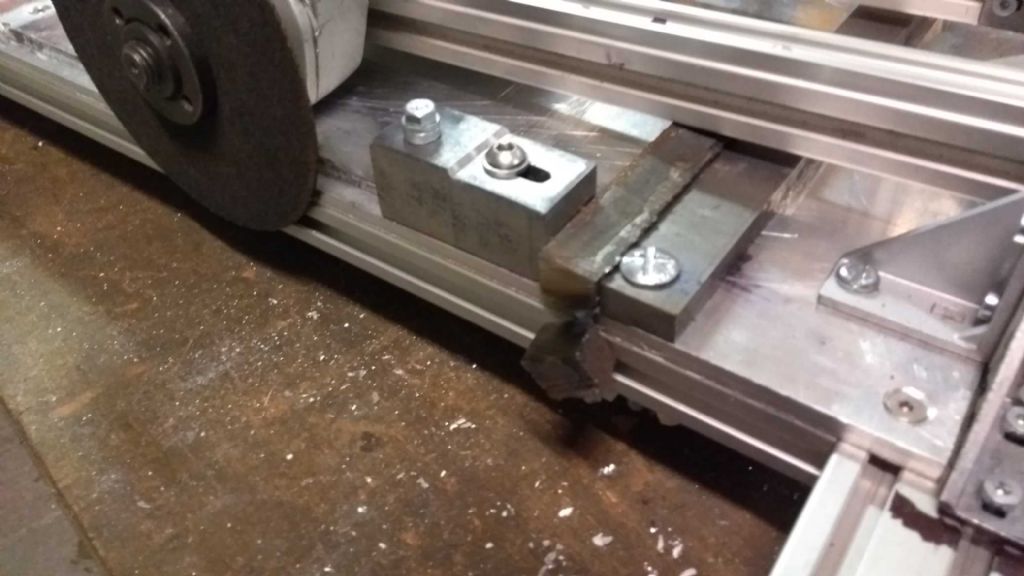
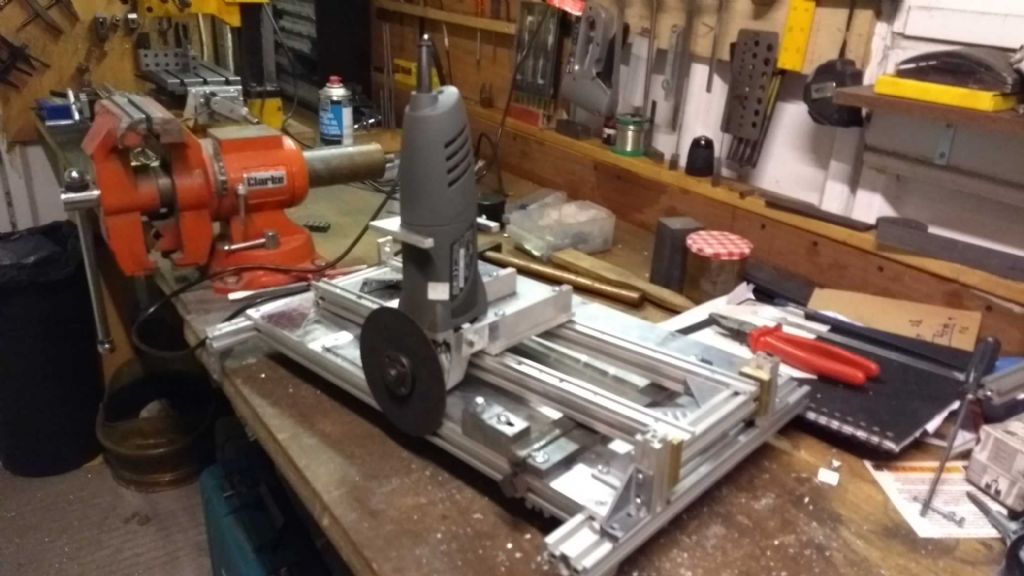
        Today I finished putting together my chop grinder. Made from rexroth (grown up meccano), some (nasty) aluminum plate I had lying around and an angle grinder.

        chopgrinder1.jpg

        chopgrinder2.jpg

        chopgrinder3.jpg

        You'll see my first cut in picture 2. I think I need to make a handle to hold onto the grinder with, but it seems to work!

        In the interests of feeling pleased with myself I didn't venture into any more challenging cuts (my immediate target is a piece of 50mm steel bar – but I'll work up to that) in case it all fell apart.

        Oh – despite appearances it's not intended to cut any foot wide plate, it's just that that's the size of the ally I had.

        Iain

        #325830
        David Taylor
        Participant
          @davidtaylor63402

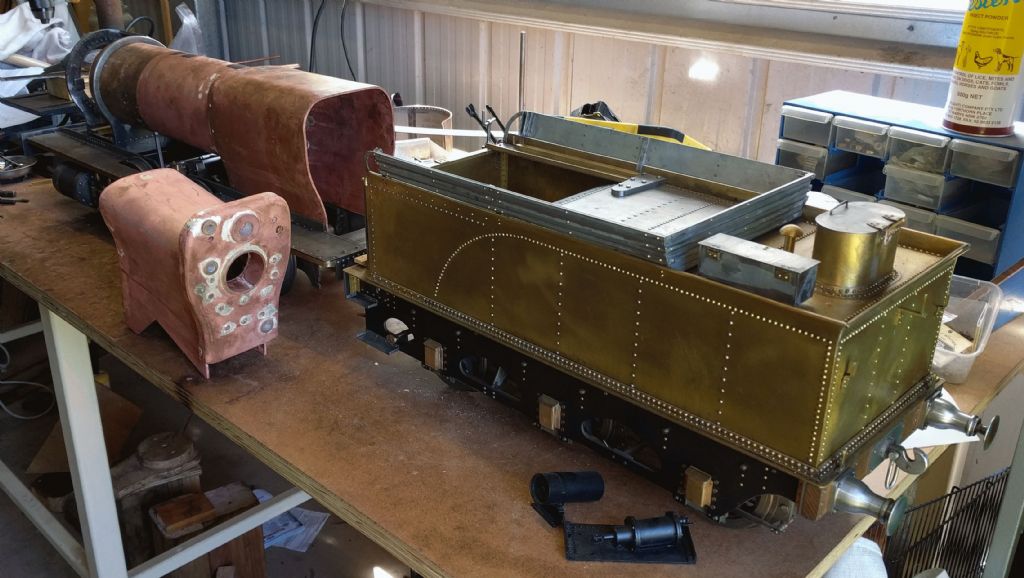
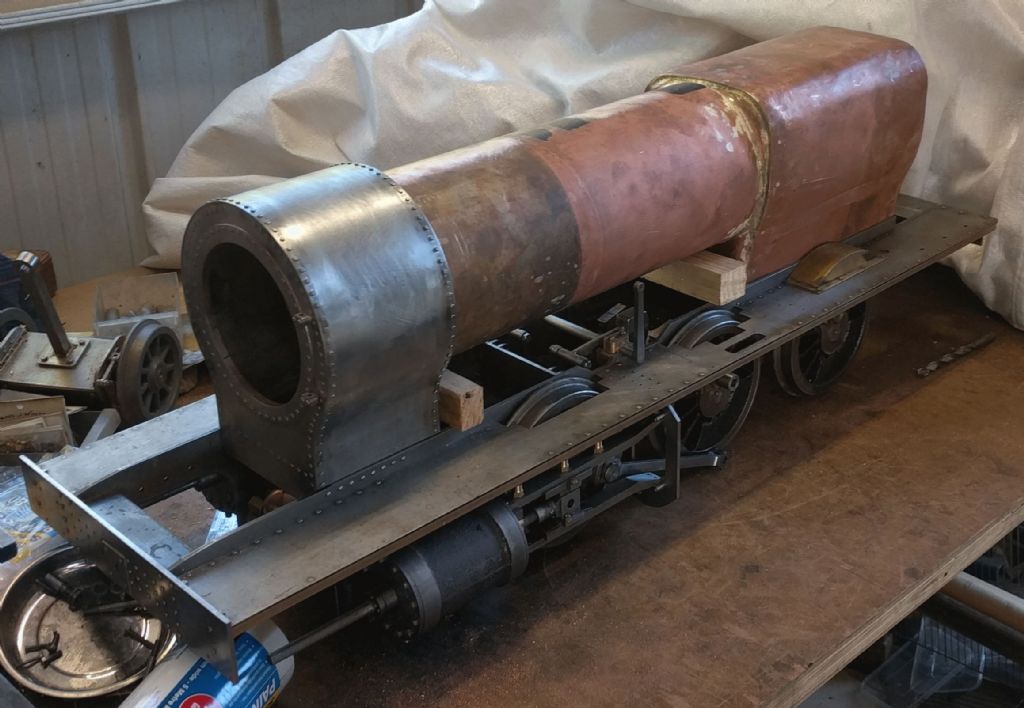
          I'm plugging away on a 5" gauge NSW 24 class mogul. I got it running on air earlier this year so have been working on the boiler. I decided to get the smokebox to the point it can be used to help level the boiler barrel.

          A friend tack welded the wrapper on for me.

          Regards, David.

          x2.jpg

          x3.jpg

          x4.jpg

          #327688
          Jim Nic
          Participant
            @jimnic

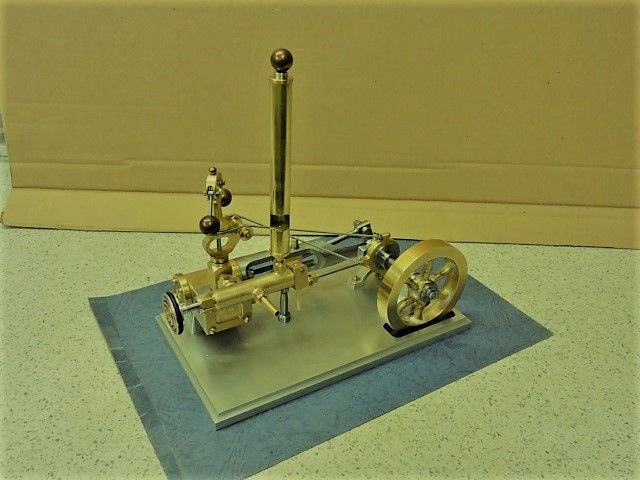
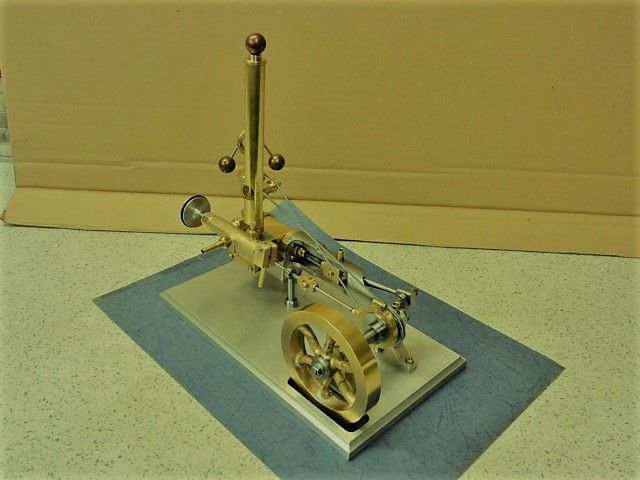
            After much wailing and gnashing of teeth I have completed the steam manifold and governor parts for the Popcorn engine.final trial assembly 3.jpg

            final trial assembly 4.jpg

            I even managed to get the Swanee whistle to work but I was not wrong when I thought this aspect of the engine would be tricky. The lower section of the governor took 3 goes to get right and the top another 3 before I decided to accept what I had; the manifold was going well until I foolishly held it in the vice after silver soldering the connections which softened the brass and crushed the threaded end crying 2 .

            Anyway, all it needs now is painting, polishing and getting running again then its on with the next project.

            Jim

            #327849
            mechman48
            Participant
              @mechman48

              Jim.
              ​Looking good. Haven't spent any time on my vertical cross lately, spent a lot of time, & money, on redoing the bungalow, painting walls & ceilings, new carpets throughout, new furniture. Must get back to sanity & get back into man cave, but Xmas is fast approaching so…?

              George.

              #327948
              JasonB
              Moderator
                @jasonb

                It's been a while since I posted here but I have not been Idle and have done quite a bit on the 1/3rd scale VJ Monitor as I need to get some more parts drawn up for the Otto and Ruston before they can progress further, this is the state of play at the moment.

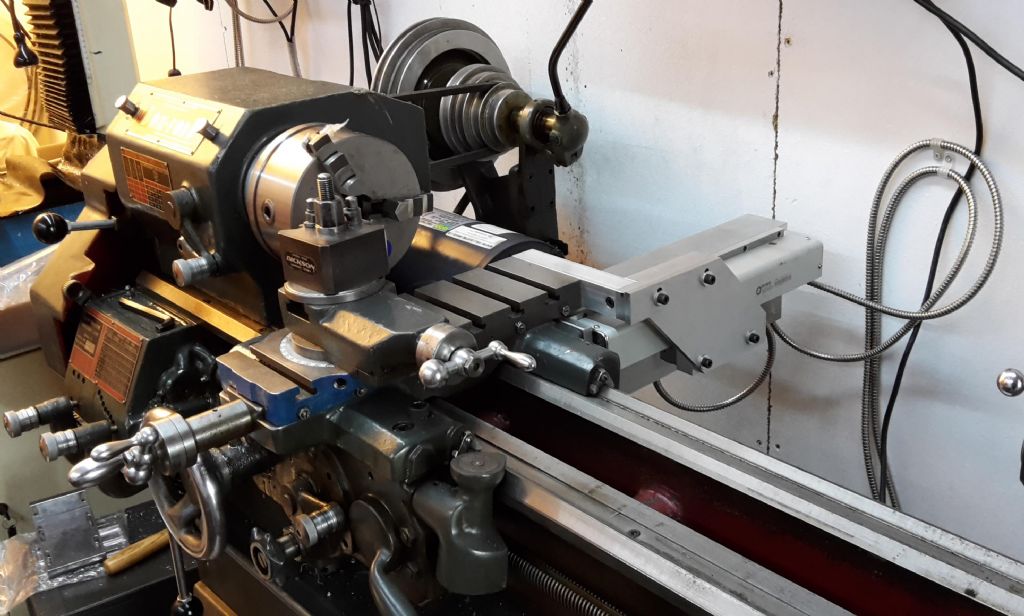
                This weekend I have been working on the hopper which also incorporates the inlet valve seat and a tapered socket that the exhaust valve seating fits into, not too hard you may think but this has to be turned with the work off ctr by 1.25" and the inlet valve seat is a long way from the toolpost if things are not going to crash.

                Section of hopper

                Main cylinder was not too hard to do except chuck jaws were not really long enough to be safe

                So I made use of the 3/8" BSP hole to take a stud and made a plate to fit the back of the 4-jaw

                The same hole was then used to hold the casting onto a metal plate that could be clamped to the faceplate so the tapers could be machined. The male part was done prior to this and the topslide not disturbed, cut on the back side running in reverse using a boring bar.

                After that the smaller 11/32" cavity was done and the 45deg vale seat taper turned which needed the extended tool holder to keep the work away from the topslide

                Finally the valve guide was drilled 3.0mm and reamed 1/8" and I was rather pleased that the hole came out just about spot on in the middle of the cast guide

                Finally a video of one of the early cuts on the larger taper – bit uneven feed due to doing it one handed. It does come into focusblush


                Edited By JasonB on 19/11/2017 16:30:58

                #327957
                Mark Dickinson
                Participant
                  @markdickinson21936

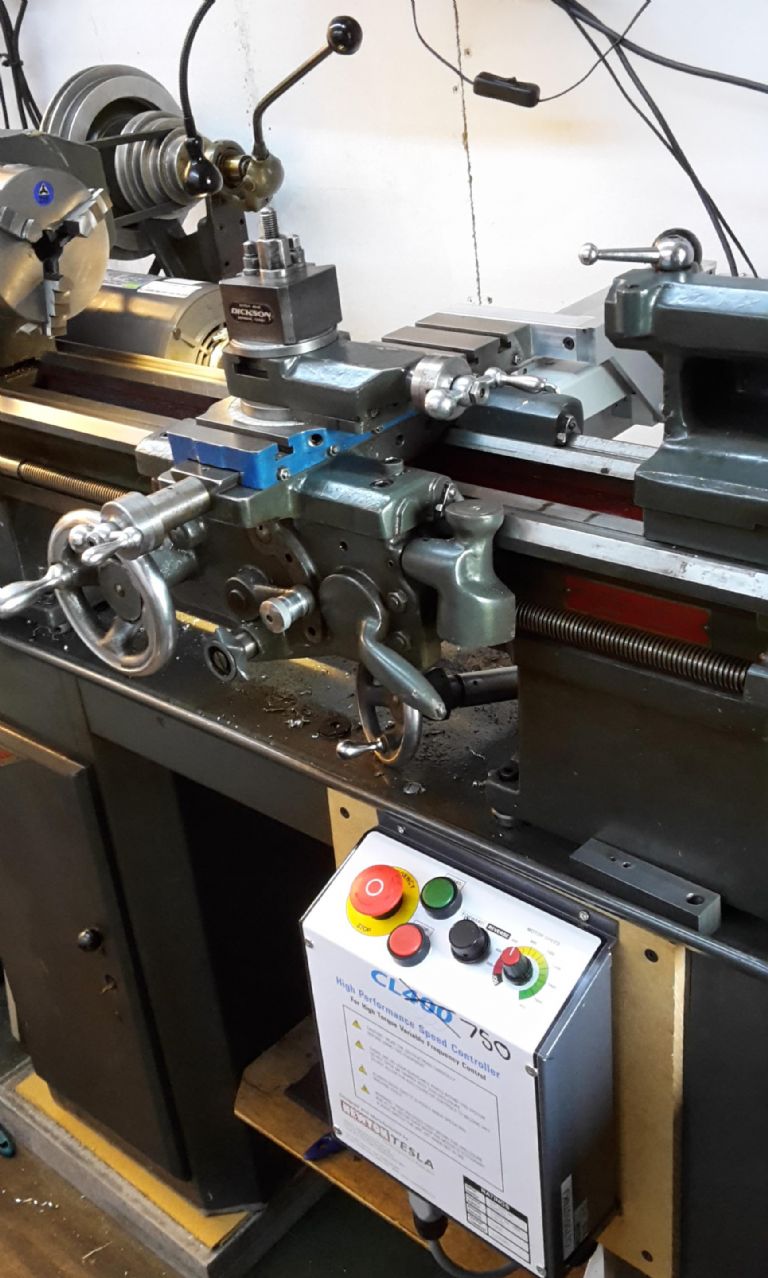
                  Finally finished fitting DRO and 3 phase motor to my Boxford. My it's very quiet now when it's running

                  . Just need to tidy the wires up .

                  20171119_144448_1511111514251.jpg20171119_132721_1511111514677.jpg

                  #327964
                  MW
                  Participant
                    @mw27036
                    Posted by Mark Dickinson on 19/11/2017 17:27:55:

                    Finally finished fitting DRO and 3 phase motor to my Boxford. My it's very quiet now when it's running

                    . Just need to tidy the wires up .

                    20171119_144448_1511111514251.jpg

                    That's one seriously sweet lathe.

                    Michael W

                    #328114
                    duncan webster 1
                    Participant
                      @duncanwebster1

                      Today I wanted a quick hit, something I could achieve in a couple of hours. The depth stop on my drilling machine is like many others a bit of threaded bar with 2 locknuts which you have to screw up and down to set the drilling depth. Not exactly convenient. I've replaced the threaded bar with a bit of 1/2" bright, and made up a clamp like the ones you have on DTI stands only scaled up. Result! I will find a ball handle someday, but it works perfectly well with a brass wingnut so no hurry. The only issue was screwcutting 1/2" BSF on my metric lathe, but that's another story.

                      img_3014 (small).jpg

                      Edited By duncan webster on 20/11/2017 16:26:51

                      #328127
                      Brian H
                      Participant
                        @brianh50089
                        Posted by duncan webster on 20/11/2017 16:26:08:

                        Today I wanted a quick hit, something I could achieve in a couple of hours. The depth stop on my drilling machine is like many others a bit of threaded bar with 2 locknuts which you have to screw up and down to set the drilling depth. Not exactly convenient. I've replaced the threaded bar with a bit of 1/2" bright, and made up a clamp like the ones you have on DTI stands only scaled up. Result! I will find a ball handle someday, but it works perfectly well with a brass wingnut so no hurry. The only issue was screwcutting 1/2" BSF on my metric lathe, but that's another story.

                        img_3014 (small).jpg

                        Edited By duncan webster on 20/11/2017 16:26:51

                        Excellent idea, why didn't I think of it?

                        Now going out to modify my mill/drill.

                        Just had a thought, when I was working, some jigs had a thumbnut with a clearance hole at an angle to the thread. This meant that you could back the nut off, tilt it and it would then slide up and down to place it in position and then tilt it so that it then acted as a normal nut.

                        Has anyone else come across these?

                        Brian

                        #328135
                        Michael Gilligan
                        Participant
                          @michaelgilligan61133

                          Posted by Brian Hutchings on 20/11/2017 18:06:57:

                          Just had a thought, when I was working, some jigs had a thumbnut with a clearance hole at an angle to the thread. This meant that you could back the nut off, tilt it and it would then slide up and down to place it in position and then tilt it so that it then acted as a normal nut.

                          Has anyone else come across these?

                          Brian

                          .

                          Yes, Brian … excellent devices

                          Several varieties available from WDS **LINK**

                          http://www.wdsltd.co.uk/product/3347/quick-action-thumb-nut-steel-imperial-bsw-wds-669/

                          MichaelG.

                          #328142
                          Muzzer
                          Participant
                            @muzzer

                            Those are pretty neat, never seen them before. I suppose they would be pretty easy to make – just run a clearance-sized slot drill through a std nut at an angle (15 – 20 degrees?). Might be forced to have a go some day….

                            Murray

                            #328146
                            ChrisH
                            Participant
                              @chrish

                              Duncan – really like that idea, think I will do likewise. Simples!

                              Chris

                              #330224
                              JasonB
                              Moderator
                                @jasonb

                                Last Saturday I picked up a cylinder casting for a 1/2 scale Robinson X-Type "Chippy" engine from Graham Corry of Alyn Foundry Fame. It was a "reject" that he had kept hold of from the days when he was selling casting sets so I was keen to see if it was going to be usable before I invested time in making the other parts of the engine from scratch.

                                Well all I can say is this "reject" is better than some castings I have paid full price for! One small pocket on the top that can easily be filled and a very small void where I have yet to mill the exhaust passage which should see it disappear. As an Idea to size the flat base is 5.25" long.

                                #330338
                                mechman48
                                Participant
                                  @mechman48
                                  Posted by mechman48 on 18/11/2017 21:49:42:

                                  Jim.
                                  ​Looking good. Haven't spent any time on my vertical cross lately, spent a lot of time, & money, on redoing the bungalow, painting walls & ceilings, new carpets throughout, new furniture. Must get back to sanity & get back into man cave, but Xmas is fast approaching so…?

                                  George.

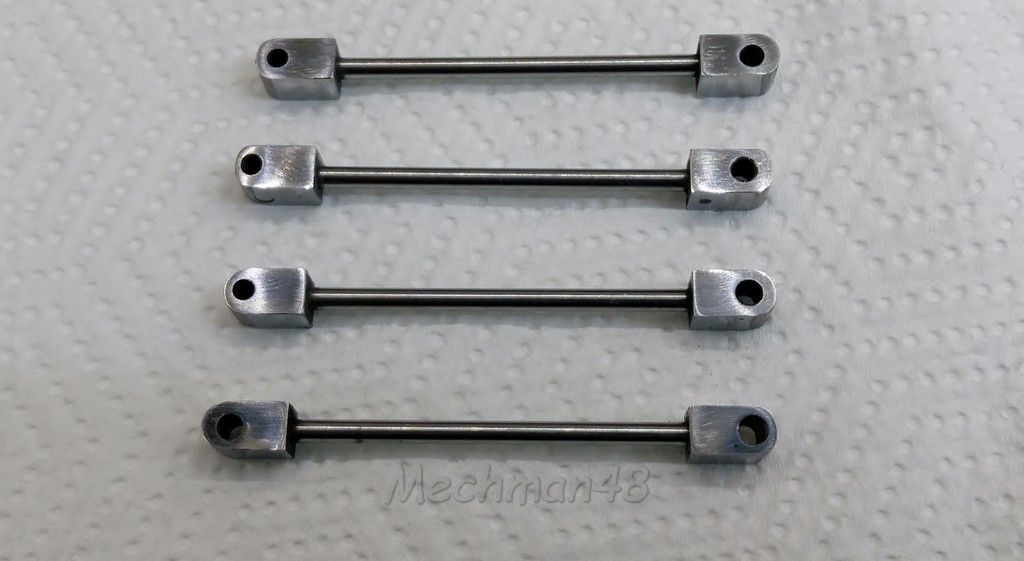
                                  ​Finally got back into my man cave, after a decorating break of 8 weeks or so, finished making up the cross arms & ends for my Vertical cross engine, just need a bit more polishing up & another bit done…

                                  24. vscross arms.jpg

                                  ​George.

                                  #330348
                                  Jim Nic
                                  Participant
                                    @jimnic

                                    George

                                    Your photo looks like one of those optical illusions where you know that all the items are the same length but the picture makes them look different wink

                                    Did you silver solder them?

                                    Jim

                                    #330357
                                    SillyOldDuffer
                                    Moderator
                                      @sillyoldduffer

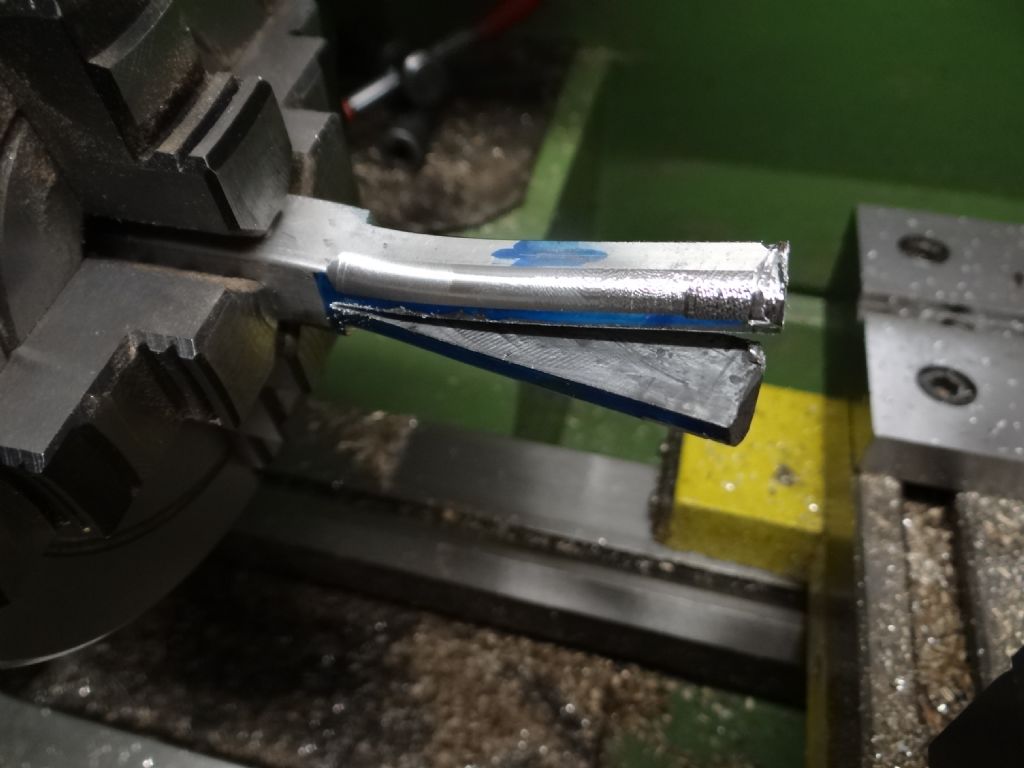
                                      This is what happens when a silly old duffer tries to turn a slotted ½" square aluminium rod down to 6mm diameter. I should have expected trouble with this horrible interrupted cut but things have been going well for me recently.

                                      dsc04972.jpg

                                      It doesn't jump out from the photo but in addition to the obvious damage the whole square rod is bent by about 10° at the jaws.

                                      This cock-up is the result of a powered 0.5mm deep cut at 2200 rpm with a small ArcEuroTrade carbide insert (the sharp silver type for non-ferrous metals). I noticed the far end of the rod cutting rough due to slight chatter and was wondering what to do about it next time round. Bang – too late! Despite the spectacular bending resulting from the dig in the insert survived. I thought the sharp tip at least would be gone but it's OK.

                                      Lessons learned:

                                      • cut the slot AFTER turning the rod.
                                      • don't dither if something complains whilst cutting.
                                      • carbide is tougher than Aluminium.
                                      • Eek! that could have been a finger.

                                      Dave

                                      #330362
                                      Jim Nic
                                      Participant
                                        @jimnic

                                        Dave

                                        I'm sure most of us have "been there, done that" in some form or another, I know I have. The only thing is that I felt so stupid for not forseeing what was inevitable that I kept it to myself. Thanks for showing your "lesson".

                                        Jim

                                        #330421
                                        mechman48
                                        Participant
                                          @mechman48
                                          Posted by Jim Nic on 03/12/2017 16:39:22:

                                          George

                                          Your photo looks like one of those optical illusions where you know that all the items are the same length but the picture makes them look different wink

                                          Did you silver solder them?

                                          Jim

                                          Hi Jim, IIRC it's called parallax error; no I didn't solder them, the rods were a push fit into the ends & Loctited in which should be tight enough for a air operated display model.

                                          ​George.

                                          #330424
                                          Martin Kyte
                                          Participant
                                            @martinkyte99762

                                            No one sees what you chuck under the bench. (Unless of course you post a picture)

                                            regards Martin

                                            #330432
                                            SillyOldDuffer
                                            Moderator
                                              @sillyoldduffer
                                              Posted by Jim Nic on 03/12/2017 18:34:54:

                                              Dave

                                              I'm sure most of us have "been there, done that" in some form or another, I know I have. The only thing is that I felt so stupid for not forseeing what was inevitable that I kept it to myself. Thanks for showing your "lesson".

                                              Jim

                                              Hi Jim,

                                              My brother-in-law is an excellent photographer. It's something of an illusion – he achieves quality by secretly destroying any photo that's less than perfect. In practice that's almost all of them! Is he a failure or a success?

                                              When I first started with a lathe in my garage I didn't know what quite what to expect. Judging by what you see at shows, in magazines and on the web, everyone else effortlessly does impressive work. Actually there's a lot to learn! Mistakes are inevitable and are probably far more common than most people admit. Especially if you're self-taught.

                                              I don't want to mislead anybody about my metalworking skills. I'm in the hobby for fun, utility and learning rather than a desire to impress. So I'm happy to share my blunders – errors are very educational. And the fact that they happen is all part of the game.

                                              Perhaps the forum needs a new topic devoted to errors and mistakes. It could be called 'What's the Clown Done Now?' 🙂

                                              Dave

                                              #330455
                                              Jim Nic
                                              Participant
                                                @jimnic

                                                George

                                                I'm sure your cross arms will be fine, mine are and I used Loctite.

                                                Jim

                                                #330930
                                                duncan webster 1
                                                Participant
                                                  @duncanwebster1

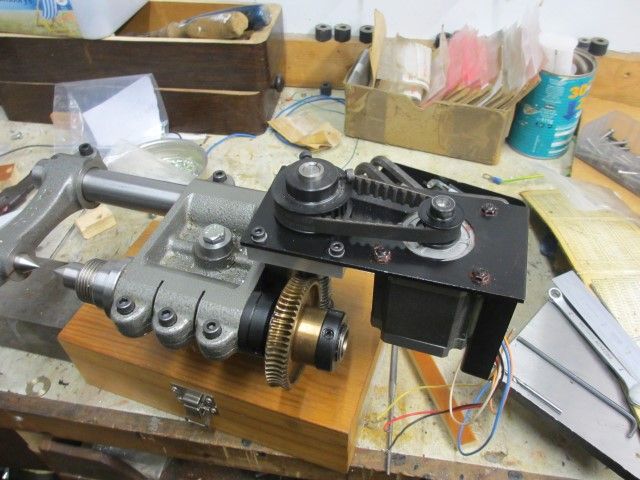
                                                  Finished the mechanics of my CNC Myford dividing head. Pinched the design from John Haine who kindly sent his drawings, and will be pinching the elctronics design off Silly Old Duffer, but some other jobs to knock off firts.img_3023 (small).jpg

                                                  #331456
                                                  JasonB
                                                  Moderator
                                                    @jasonb

                                                    I had a delivery from Ringwood metals in the week which includes a 1.0m length of 35mm bar to make a between ctrs boring bar for doing the Otto Langen cylinder so this afternoon I cut it down to 675,, and reduced one end so I can hold it in a 3/4" MT3 collet which will give me the most room between spindle nose and live ctr. This also happened to be about the most I could face off as the carrage and topslide would not move any further to the right.

                                                    #332038
                                                    Jim Nic
                                                    Participant
                                                      @jimnic

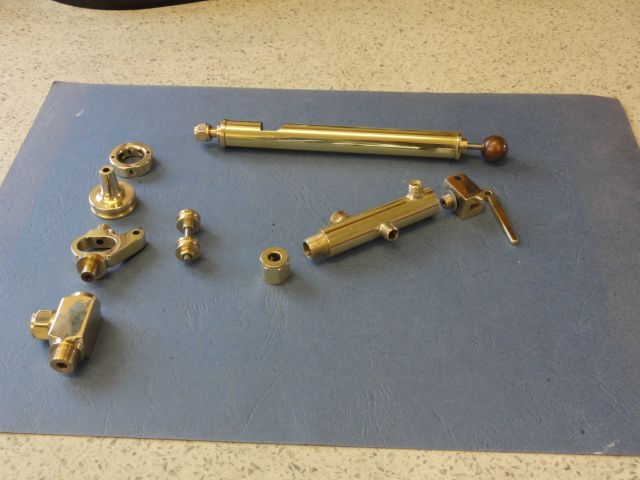
                                                      After a short break while life got in the way of workshop time it was on with Popcorn.

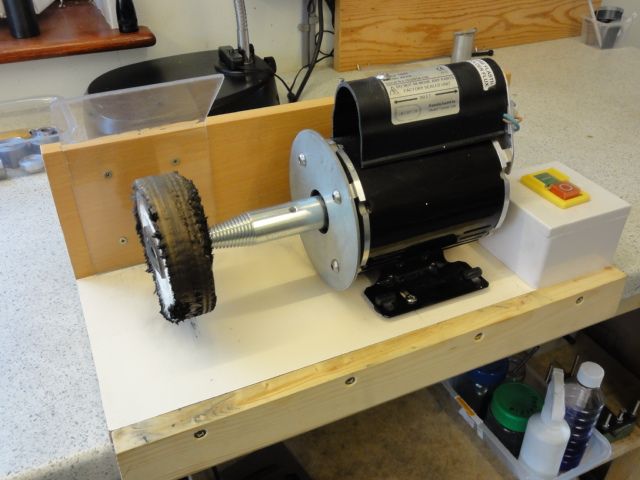
                                                      Having completed the parts of the engine I broke it down for painting and looked at the amount of brassware I had decided needed to be polished up. My conclusion was that I needed a buffing wheel! As luck would have it during my "life break" I aquired a domestic Stuart Turner shower pump with a faulty, vastly overcomplicated, switching module but with a very smooth motor. Said motor looked to be just the thing to power a buffing wheel and after a bit of bodging and the addition of a pigtail and buffing wheel and an NVR switch it turned out to be so.

                                                      buffing wheel.jpg

                                                      Just some of the shiny bits

                                                      shiny bits.jpg

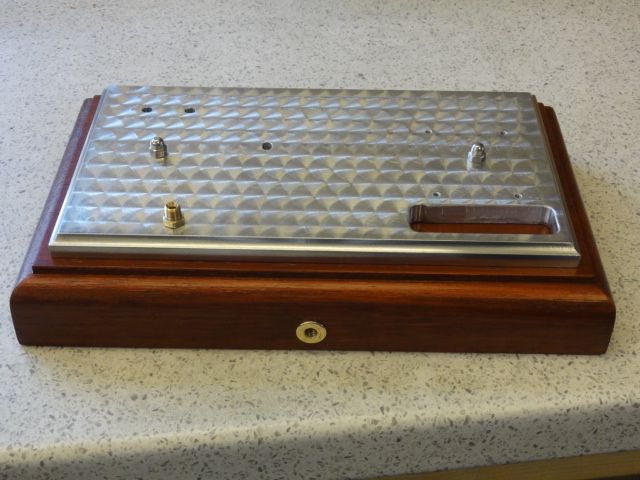
                                                      Whilst wood butchering for the Buffer I also made the plinth. My first attempt at engine turning on the base looks OK as long as you stand well back, which I recommend when viewing my efforts.

                                                      base & plinth 1.jpg

                                                      Jim

                                                    Viewing 25 posts - 326 through 350 (of 356 total)
                                                    • Please log in to reply to this topic. Registering is free and easy using the links on the menu at the top of this page.

                                                    Advert

                                                    Latest Replies

                                                    Viewing 25 topics - 1 through 25 (of 25 total)
                                                    Viewing 25 topics - 1 through 25 (of 25 total)

                                                    View full reply list.

                                                    Advert

                                                    Newsletter Sign-up