The Workshop Progress Thread (2016)

Advert

The Workshop Progress Thread (2016)

Home Forums Work In Progress and completed items The Workshop Progress Thread (2016)

Viewing 25 posts - 426 through 450 (of 457 total)
  • Author
    Posts
  • #269828
    JasonB
    Moderator
      @jasonb

      Made a start on the Root And Vandervoort cart by sawing off and machining some 3" and 4" dia ERW tube

      A bit of 40×40 angle and some offcuts of 1" bar were chosen to make the rear axle brackets from

      And machined up

      Then finally silver soldered together

      Edited By JasonB on 04/12/2016 15:20:03

      Advert
      #269832
      Michael Gilligan
      Participant
        @michaelgilligan61133

        Magic as ever, Jason yes

        MichaelG.

        #269849
        MW
        Participant
          @mw27036

          Looking at all those bits of material makes me wonder where you get them from, Jason? I haven't used any particular brand really and have an "anywhere and everywhere" approach.

          Metal from ebay, plastics from the net and 95A shore hard PU rubber from china/H.K, ( no where other than the States seems to throw up on my searches for that more locally, and I wasn't too keen on the steep charges for the privilege of buying from there. )

          ​I wonder to myself if I'm missing an opportunity to build up a loyalty to a particular supplier and get some good deals and better quality steel? – Maybe I'm going haywire but I had some silver steel once that wouldn't take to hardening and some HSS that seems to burn out at relatively slow speeds.

          On a great tangent of part two of the sermon…!

          Being a regular poster on here I've come to learn that looking on here can sometimes be two diverging experiences. I kind of liken it to an aquarium.

          On the one hand you've got a lot of lovely posting with great pictures and I really revel in looking at what other people have, (it's a bit of strange attraction to take enjoyment in things that are not your own). That's like looking at the tank with a lot of colourful fish in it.

          Sometimes it might be posting an opinion you aren't too sure about and then it's like dipping your finger into the piranha tank, stirring the waters and hoping you come out with your finger still in one piece!

          So what I draw from all that is one of them is a great personal experience and the other is a bit of a hair raiser. So the only way I can make this a better environment is to keep adding to what we have and sharing in it, the workshop and metal work, together.

          This will mean overcoming my photo aversion, it's too easy to get caught up in what you fear you'll be judged for but then i'm sure i'd be actually pleasantly surprised!

          Michael W

          #269853
          Neil Wyatt
          Moderator
            @neilwyatt
            Posted by JasonB on 04/12/2016 15:19:16:

            Made a start on the Root And Vandervoort cart by sawing off and machining some 3" and 4" dia ERW tube

            A bit of 40×40 angle and some offcuts of 1" bar were chosen to make the rear axle brackets from

            And machined up

            Then finally silver soldered together

            Edited By JasonB on 04/12/2016 15:20:03

            You should do an article for MEW Jason. you have a knack for visualising ways of fabricating parts as convincing fabrications

            #269864
            JasonB
            Moderator
              @jasonb

              Thanks Michael G, I'll see what I can wave my wand at next.

              Neil, it's just a case of looking at the original and thinking how the pattern maker would have gone about making it then rather than wood stick a few bits of metal together instead. This is what I'm loosly basing it on.

              Front bolster will be next

              As for writing it up for MEW that would never do, just think of all the complaints you will get if you start showing model making rather than toolssmile p

              Michael W. For most of my ME material such a sfree machining steel, brass, bronze and the odd bit of Aluminium I tend to use either College Engineering or EKP Supplies, occasionally M-Machine. For the bigger bits of steel, tube, bar and angle I quite often use BEJ Engineering who have an e-bay shop. These steels suite teh use but the ERW tube is not the nicest stuff to machine and the black bar can take a bit of work to get a good finish on it but it won't move when you cut into it like bright bar does.

              This is the black bar that those couple of blocks came from

              and the usefull bit made this

              #270935
              Andrew Hutchinson
              Participant
                @andrewhutchinson12802

                I finished up some boiler fittings for a 4mm Flying Scotsman. They're acrylic; the dome in two pieces and the stack in three, glued up with methlene chloride. No reason the stack couldn't have been done in two pieces either but I was making it up as I went along. One of the gang from Tuesday night slides (choo choo pics) made a CPR Royal Hudson out of wood for Grandson No.1 and now Grandson No.2 wants what the other has. Enter the scotsman.

                Flying Scotsman dome and chimney DSC_5345

                I was given one of those proto:file drawings and did up some coordinates. The bases were flycut and then milled with a ball cutter (round burr in this case) while mounted on a special arbor being cam'd in and out via a follower. My device is a relative of the one seen on Nick Baine's M.E. site. As made the arbor and follower were for N scale and were pretty unsuitable for the 4mm job. Second time round I opted for a bigger arbor and a matching follower. Having done the job I was reminded of why I don't work often in acrylic – it's impossible to see- even under magnification! And I cracked a few bases for good measure. Owing to the shape, .018" was as thin as I was able to go on the base of the rim before the inevitable PING/CRUNCH.

                Cheers,

                Andrew Hutchinson


                Edited By Andrew Hutchinson on 10/12/2016 04:54:14

                Edited By Andrew Hutchinson on 10/12/2016 04:55:03

                #271228
                JasonB
                Moderator
                  @jasonb

                  Got the front Bolster for the R&V cart made as well as the axle fork. Probably would have had the axle done too but spent yesterday at the Traction engine Group and got to have a look and feel of Andrew J's gears etc, very nice they were too.

                  #271238
                  Neil Wyatt
                  Moderator
                    @neilwyatt
                    Posted by JasonB on 04/12/2016 17:52:58:

                    As for writing it up for MEW that would never do, just think of all the complaints you will get if you start showing model making rather than toolssmile p

                    I can do techniques so bits of models are fair game!

                    Neil

                    #271305
                    Bob Rodgerson
                    Participant
                      @bobrodgerson97362

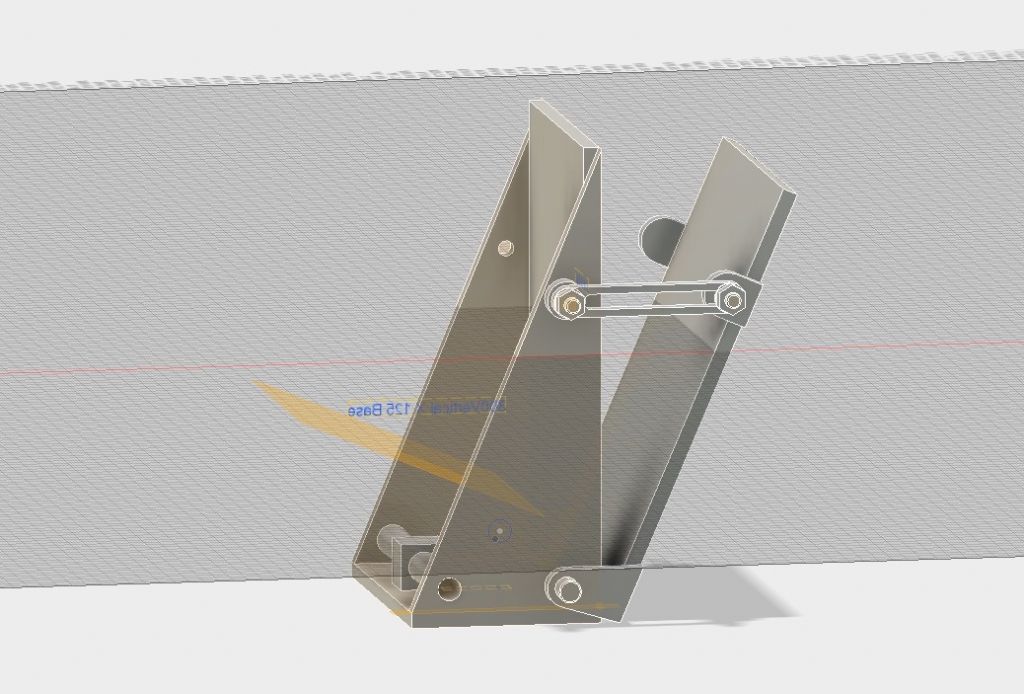
                      When I bought my Tormach Mill a few years ago I bought a plain 8" Rotary Table 4th Axis. At that time I don't think they had a tilting axis table available and even if they did I probably wouldn't have bought one. At the time there was no mention of them not being suitable for use with an ATC (Auto Tool Changer) but I noticed they do say this no., However, because when mounted vertically there is little clearance below tools held in the ATC Tormach came up with the Super Spacer.

                      This table is different from a standard table in that the Stepper motor is mounted in such a way that it can be mounted at the right hand end of the mill table, the old plain 8" rotary cannot be mounted vertically at the left hand end of the table because the stepper motor sticks out in the Y axis direction and fouls with the control panel and column.

                      I have a job that will require me to mount the rotary table at the right hand of the table with table tilted at an angle of 98 degrees so I have come up with this design that should allow me to mount the table in any position from about 60 – 120 degrees. I have also made it so that by fitting the long leg of the mount flat on the table, taking the tilting table part of the mount off, turning it round and fitting it to the other side of the mount using the other hinge holes I should be able to get the table set to any angle from 30 degrees below horizontal to 45 degrees or more above horizontal or more depending on the length of both link arms.

                      image 11-12-2016 at 22.51.jpg

                      I will be getting the welding kit out tomorrow after visiting my metal merchants.

                      #271411
                      Anonymous
                        Posted by JasonB on 11/12/2016 17:14:42:
                        ……Probably would have had the axle done too but spent yesterday at the Traction engine Group and got to have a look and feel of Andrew J's gears etc, very nice they were too.

                        Phew, I'm relieved they passed muster. It's always a bit nerve-wracking exposing ones wares to the scrutiny of the experts. smile o

                        Andrew

                        #271436
                        JasonB
                        Moderator
                          @jasonb

                          Just as well I did not say that I also looked at and handled your large nutswink 2

                          #271590
                          Anonymous
                            Posted by JasonB on 12/12/2016 20:59:28:

                            Just as well I did not say that I also looked at and handled your large nutswink 2

                            And you were by no means the only one. embarrassed

                            Andrew

                            #271796
                            Chris Barry
                            Participant
                              @chrisbarry

                              New motor and inverter for my Harrison 140 was delivered today from transwave, motor is now fitted and wired to the inverter, just need another gland for the mains supply and i should have a working lathe again, nice Christmas present to myself.

                              Chris

                              #271849
                              JasonB
                              Moderator
                                @jasonb

                                The laser cut wheel "spokes" arrived today so I can get on with milling them to a "+" section and solder them into the rims.

                                Good service from Lasermaster, I placed order Monday Lunchtime and they arrived mid afternoon todaythumbs up

                                #271926
                                Roger Head
                                Participant
                                  @rogerhead16992
                                  Posted by JasonB on 14/12/2016 20:09:38:

                                  The laser cut wheel "spokes" arrived today ….

                                  Isn't that cheating, Jason? I thought you fabricated everything, even if it means s/soldering every last damn spoke onto a hub. smiley

                                  Truly, I am amazed at your never-ending output. yes

                                  Roger

                                  #271936
                                  JasonB
                                  Moderator
                                    @jasonb

                                    This Root & Vandervoort is and engine I am finishing off for someone else so that plays a part in the amount of work put into it. It would have been a bit cheaper to buy sheet sheet and cut them out even allowing for cutter wear but there is also time to be factored into that, If I were charging a realistic rate then they would be 4-5 times what the laser cut ones cost.

                                    This design does not lend itself to separate spokes as they are cast wheels rather than cast hubs with cast or screw in spokes. I have done them that way before and will also be doing it again soon.

                                    I could have made a pattern and got them cast but as the + section shape of the spokes is 6mm x 6mm with a 2mm wall thickness chances of not getting a good flow of metal along the spokes would be high.

                                    #272452
                                    JasonB
                                    Moderator
                                      @jasonb

                                      I turned the R&V front axle from a bit of 9/16" bar @10" long on Wednesday evening, last night I roughed out the centre and end brackets and today started out by soldering all those bits together. It was then just a bit of shaping of the central section to finish.

                                      Also made the pivot pin & washer as well as bending up the handle form a couple of foot of 3/16" bar.

                                      J

                                      #272614
                                      Bodger Brian
                                      Participant
                                        @bodgerbrian

                                        Determined that the new location my for man-cave/workshop would start with the principle of 'a place for everything & everything in it's place', I didn't want all of my lathe & mill accessories just chucked willy-nilly into a cupboard or drawer. I dug out some heavy duty drawer slides from my 'might-come-in-useful-one-day' pile and made up up a couple of sliding shelves and fitted them to my lathe & mill bench.

                                        My original intention was to fit the shelves with polystyrene sheet & cut out shapes for everything to sit in. However, I quickly realised that the polystyrene didn't cut cleanly & easily breaks up into small balls, so I might change it for some sort of foam. On the other hand, I found that the heavier items sit on top & don't move when the drawer is opened or closed, unless it's done rather violently, and the lighter items can be held in place by pressing them into the polystyrene and creating a shallow impression.

                                        imgp2254.jpg

                                        imgp2255.jpg

                                        imgp2257.jpg

                                        Brian

                                        #272615
                                        Anonymous

                                          Brian: Good grief, that's smarter and tidier than my house. Let alone the workshop!

                                          Andrew

                                          #272624
                                          Bazyle
                                          Participant
                                            @bazyle

                                            Brian, have a look at Corex sort of plastic equivalent of corrugated cardboard. Cuts well and can be 'found' in estate agent and political signs.

                                            #272625
                                            Bodger Brian
                                            Participant
                                              @bodgerbrian
                                              Posted by Andrew Johnston on 18/12/2016 20:14:31:

                                              Brian: Good grief, that's smarter and tidier than my house. Let alone the workshop!

                                              Ah, but you can't see the pile of c**p piled up on the bench on the other side of the room! wink

                                              Brian

                                              #272906
                                              Bob Rodgerson
                                              Participant
                                                @bobrodgerson97362
                                                Yesterday I finished my angle plate/fixture for mounting the rotary table 4th axis at an angle to the Milltable.
                                                #272907
                                                Bob Rodgerson
                                                Participant
                                                  @bobrodgerson97362

                                                  I Don't think the video has been added to my posting so here it is just in case.

                                                  Edited By Bob Rodgerson on 20/12/2016 09:03:53

                                                  <iframe width="450" height="253" src="https://www.youtube.com/embed/38_vgIcgmno&quot; frameborder="


                                                  Edited By Bob Rodgerson on 20/12/2016 09:12:27

                                                  #273006
                                                  Bob Rodgerson
                                                  Participant
                                                    @bobrodgerson97362

                                                    Ah, At last I got it to work. I did as instructed re reducing the video size to 450 but it didn't work, however on a hunch I tried it a smaller size and it seems to have done the trick.

                                                    Here it is again My adjustable mount for the 4th Axis

                                                    Edited By Bob Rodgerson on 20/12/2016 17:30:28

                                                    #273469
                                                    JasonB
                                                    Moderator
                                                      @jasonb

                                                      I milled out the spokes for the R&V cart wheels last Sunday and tidied them up in the week.

                                                      Then having finished for the holidays by about 1.00pm got a bit of time in the shop and soldered up the smaller front wheels

                                                      After a soak in acid the hubs were faced back to length and bored out to final size which ensures the wheel runs true, still have the D pins to make as the split ones are only temporary as is the socket grub screw.

                                                      No more in the workshop tonight, I have to go and clean off my plastering tools as there is a cake to icecheeky

                                                    Viewing 25 posts - 426 through 450 (of 457 total)
                                                    • Please log in to reply to this topic. Registering is free and easy using the links on the menu at the top of this page.

                                                    Advert

                                                    Latest Replies

                                                    Viewing 25 topics - 1 through 25 (of 25 total)
                                                    Viewing 25 topics - 1 through 25 (of 25 total)

                                                    View full reply list.

                                                    Advert

                                                    Newsletter Sign-up