The Workshop Progress Thread (2016)

Advert

The Workshop Progress Thread (2016)

Home Forums Work In Progress and completed items The Workshop Progress Thread (2016)

Viewing 25 posts - 326 through 350 (of 457 total)
  • Author
    Posts
  • #249930
    Andrew Hutchinson
    Participant
      @andrewhutchinson12802

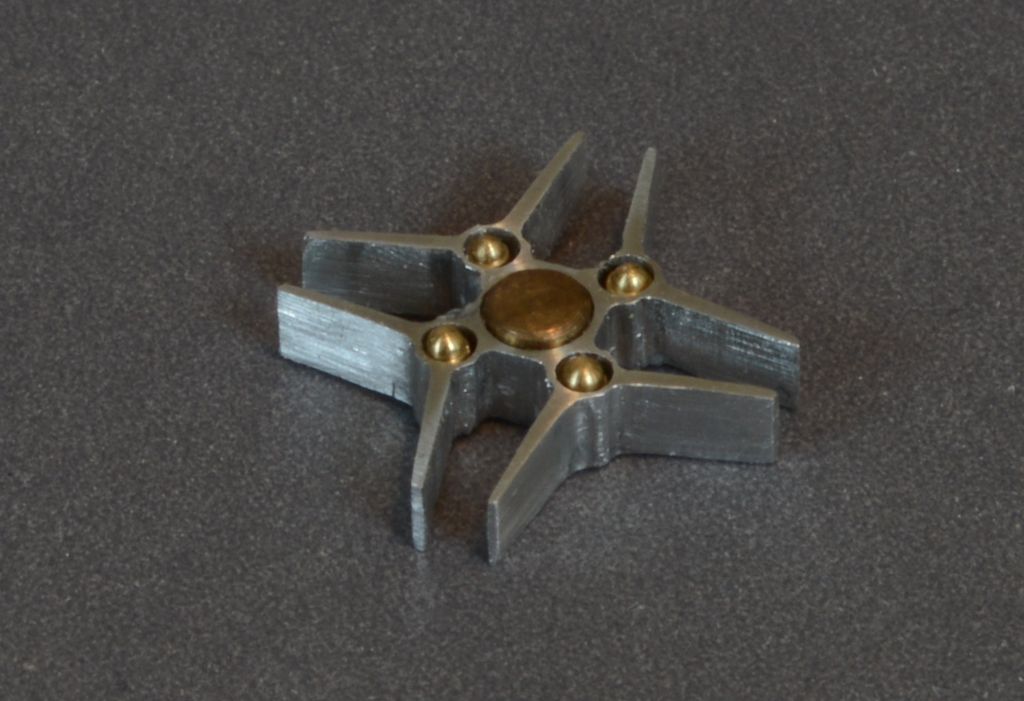
      I made a new set of nuts for the Harrier wheel. Here they are dropped into the centre:

      dsc_4867 crop.jpg

      A form tool for the domed top nuts was made out of W-1 drill rod but I didn't swivel the vise 30 or 45 degrees and so I ended up having to changed the turning sequence as the tool holder fouled the work holding collet. Nothing about the nuts is very small but I had trouble holding them in an older hardened 8mm collet to turn down the shanks. Eventually I changed the diameter of the part that was supposed to be hex section to fit a new unhardened collet and got better results. I also lengthened the bit to clamp from that same diameter out to.025" from .020" and I suspect that made a difference as well. I turned the shanks down a couple thou under that of the holes and now they float around a bit to much. Have to be careful gluing them in. You can still see the dog leg on the left h and spoke of each pair where I drilled them 1 to 2 thou out of position.  Part is off to the caster next to see if it is good enough for what he has in mind.


      After the last couple of jobs I think that a good indexable turret  of the Meek/GHT variety and a depth stop for the WW/8mm drawbars would be pretty handy. Not sure how the latter will work as those types of collets draw the work in a fair bit  for their size but I'd like to try the idea out none the less.

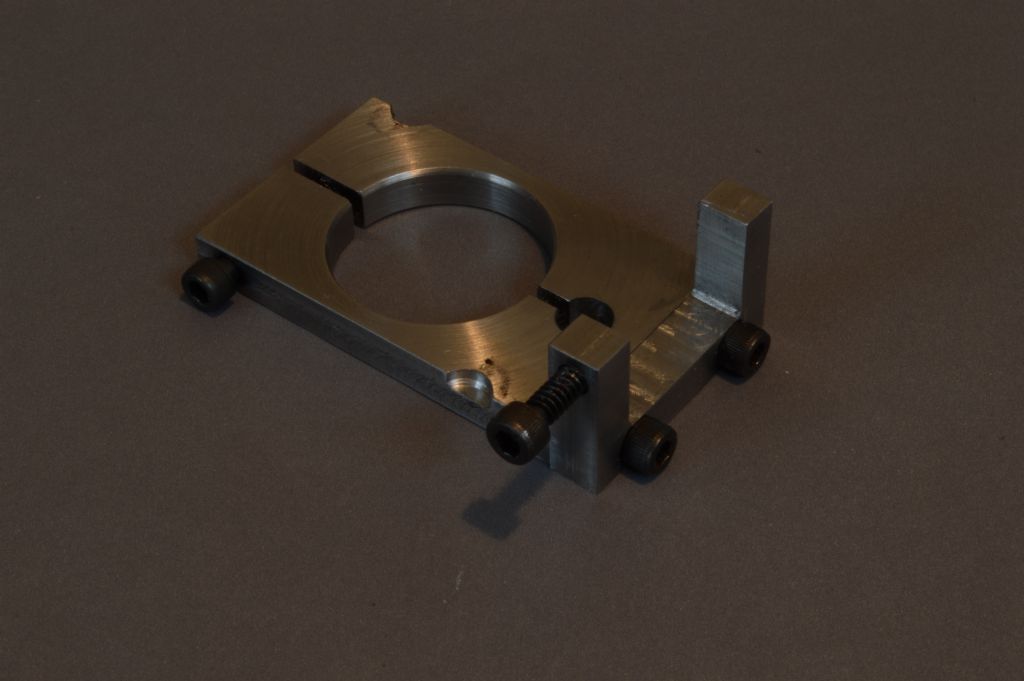
      I've included a pic of a Sherline mill spindle lock below. It is not very pretty but it does the job on the mill at least. I found out that this sort of thing is too thick  to fit on the lathe with the four jaw mounted as that chuck as a protrusion around the rim. Guess I'll be sticking with change gear detent for the time being when using the lathe.

      dsc_4873.jpg

      Cheers,

      Andrew H

      Edited By Andrew Hutchinson on 08/08/2016 19:29:41

      Edited By Andrew Hutchinson on 08/08/2016 19:30:51

      Advert
      #250744
      JasonB
      Moderator
        @jasonb

        Well The carb "casting" for the lightweight that I soldered up last week did not scrub up too bad. Got a lick of paint onto it and made the last couple of fittings. Thats about it for this engine, don't think I will try and run it until after MEX to keep the paint nice.

        #250756
        NJH
        Participant
          @njh

          Beautiful work Jason (as usual!) I'm not too sure about the colour though…….?

          Norman

          #250757
          Ken Bevan
          Participant
            @kenbevan42381

            Absolutely superb, Jason, Well Done!

            #250787
            mechman48
            Participant
              @mechman48

              What a super job Jason; I assume the paint was sprayed on,was it thinned, in what ratio 2.1…?

              George.

              #250788
              Anonymous

                At least I didn't have my name taken in vain this week; I suppose that's progress of a sort. disgust

                Andrew

                #250791
                JasonB
                Moderator
                  @jasonb

                  Shake the can and press the nozzel.

                  Base is U-Pol Acid 8 etch primer, followed by a Fiat Yellow and topped off with Clear Gloss fuelproof Lacquer all from Halfords.

                  The yellow is a bit warmer than in the photos, I need to take some better ones rather than just quickies in te workshop

                  #250810
                  Nicholas Farr
                  Participant
                    @nicholasfarr14254

                    Hi Jason, I like the colour and think it looks very contrasting, I'm sure it looks just as good with an eyeball. Nice work as always.

                    Regards Nick

                    #251751
                    JasonB
                    Moderator
                      @jasonb

                      I got enough bits done to give the little Jowitt Jnr a test run on air. Still a few cosmetic bits to be done including plugging the two steam passage holes hence the bits of maskinmg tape. Think I must make another large engine as these little ones are over and done with too soon!

                      J

                      #251756
                      Iain Downs
                      Participant
                        @iaindowns78295

                        So, this weekend I finally re-assembled my CMD10 micro mill after a few months of fumbling attempts to tune it up.

                        I've spent about 60 hours scraping the ways.(and not the table ways at that), which amounts to around one hour per square centimetre. I reckon I've spent 40 of those hours making it worse, but I'm not sure which hours were making it worse and which improving!

                        I've sanded the dovetails. Now before I get surprised gasps from the professionals (and amateurs), this was under the recommendation of Ketan. I had a mate make up a 55 degree wedge in wood (I've no woodworking tools of any precision) and used that to attempt to true up the dovetails with a bit of 120 wet and dry.

                        I actually think that this was the most productive thing I've done – and by far the quickest!. I've also re-drilled the jib screws up by .1/.2 mm as the jib strip was only just touching the bottom of the table. The Y axis seems better, though more on that later.

                        I've also tried to straighten the jibs and attempted to lap them a bit flatter. I don't think I've managed it as well as I could.

                        Is the work finished? No. But I was really bored and felt I out to try and make something!

                        Actually, the mill is producing somewhat better results. My crop circles (see my other post in beginners questions) are much diminished and I've had a go with a fly cutter which has produced mainly decent results (at an estimated 2.5 inch diameter, 300 rpm and .1mm / sec – not practical without my CNC conversion! DOC about .2mm – much more than that and the motor will stall).

                        The Y axis still sticks a bit but much less so. towards the limit of it's travel there's a lot of flex, but if I tighten up the jib screws it locks up slightly further in. Similarly the X movement has some rough spots particularly near the ends.

                        The tramming is still by a few though and the table is still higher at the back by about .1 mm. The fly cutter may come into it's own here!

                        expect my next attempt will involve making a proper 55 degree wedge in cast iron and having another go at the dovetails which I think are the main offenders. Possibly also making new jibs or trying to lap the existing ones a bit more.

                        Bizarrely, I've quite enjoyed this and am seriously considering attempting a Whitworth plate. Though I should really make something first or Madam will wonder what I'm doing out there.

                        Iain

                        #251779
                        Fatgadgi
                        Participant
                          @fatgadgi

                          Hi Iain

                          I know you warned against onlookers gasping, but I have to add my gasp to the thought of sanding the ways with sandpaper and a wooden (or any) former.

                          Good grief. Gasp !!

                          (But I'm very pleased it's working out for you)

                          (Ketan ….. hope this is not required for all your machines devil)

                          Cheers – Will

                          #251794
                          Peter Krogh
                          Participant
                            @peterkrogh76576

                            Yes, the purists are agast at the use of a wood 'straight edge'. But let me share this; I needed to straighten out the tight and loose places in the X and Y of my little mill. I embarked upon making a cast iron 60* x 14" scraping master so I could do the job 'properly'.

                            Well, as usually happens around here I needed to use the mill NOW for a few simple jobs. A search of the wood stash yielded a piece of hard maple which I promptly turned into the required shape. Some sandpaper on the granite allowed me to make the needed two surfaces of the maple very straight followed by (!!) spot blueing and local sanding with 320 paper. The maple showed less than a half thou spotted on the granite.

                            Wrapped with some silicon carbide paper I used this block to sand away 90% of the tight and loose problem. And it was very fast. The next day I checked the block with the granite again and the block hadn't moved.

                            So I'll say that the use of a wood master, carefully made, can do a huge portion of slide way correction.

                            Or aluminum, or……

                            Pete

                            #251797
                            duncan webster 1
                            Participant
                              @duncanwebster1
                              Posted by JasonB on 21/08/2016 17:25:07:

                              I got enough bits done to give the little Jowitt Jnr a test run on air. Still a few cosmetic bits to be done including plugging the two steam passage holes hence the bits of maskinmg tape. Think I must make another large engine as these little ones are over and done with too soon!

                              J

                              Lovely, another project for the bucket list!

                              #251801
                              Speedy Builder5
                              Participant
                                @speedybuilder5

                                Jason, Nice model and runs so smooth – well balanced. Well done. Just need to see some steam on it now.
                                BobH

                                #252081
                                John Hinkley
                                Participant
                                  @johnhinkley26699

                                  Workshop progress of a sort, I suppose.

                                  Measure twice – cut once. Isn't that what we're always told? Well. . . . . .

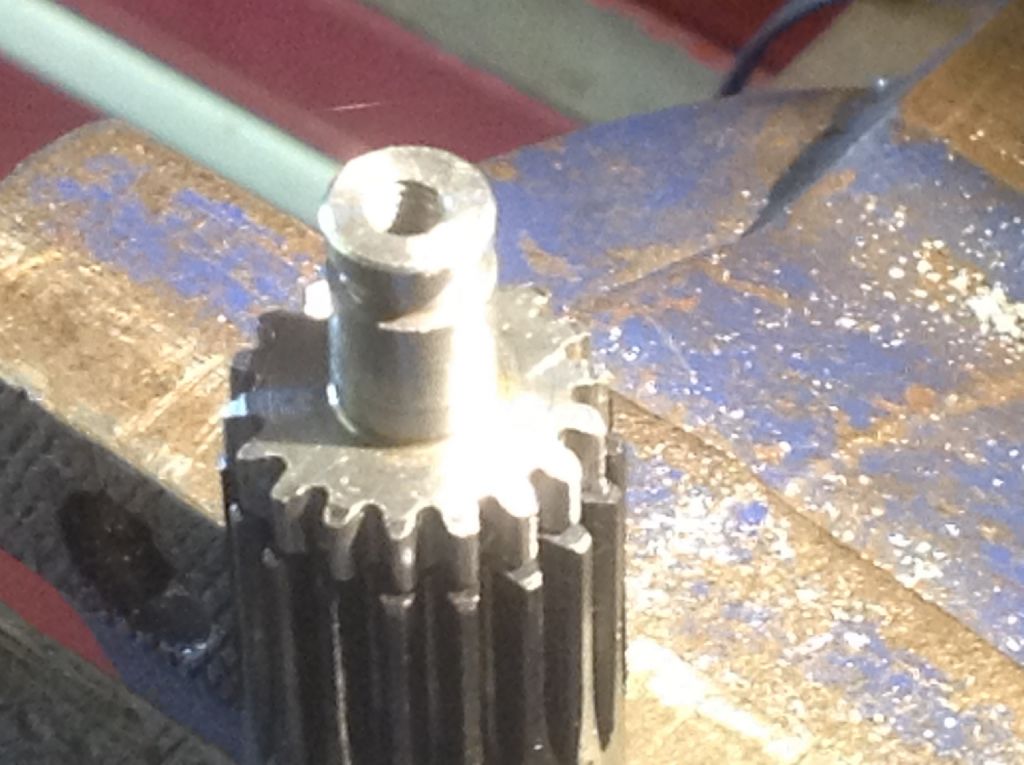
                                  I have been trying to work out why the auto feed on my home brew boring/facing head keeps jamming. After a lot of head-scratching, I decided that my gear cutting was at fault and cut some new 12-tooth gears as accurately as I could. Having fitted them, still the darned thing jammed! A brief stay in hospital for a couple of stents to be fitted and rest afterwards allowed me the opportunity to bite the bullet and order two 12-tooth gears and an 18-tooth gear from HPC. Duly fettled the 12-tooth gears and they meshed perfectly, as you would expect. As the feed screw gear is formed as part of the feed screw, I tried to get away with using my effort. It was better, but still there was jamming of the gear train. More head-scratching (by this time I had quite a sore head ). When I held the new gear up to the old one, you could hear the penny drop from miles away. I'd turned the O.D. of the gear too small resulting in a hybrid form that was never going to mesh properly with anything. See below:

                                  Measure twice-cut once

                                  For scale, the HPC gear, below, is 20mm diameter. I'll have to turn my gear effort down and stick a slice of HPC gear on with Loctite 638 and hope it holds.

                                  Like they said – measure twice (or more times ) and cut once. You live and learn.

                                  John

                                  Edited By John Hinkley on 24/08/2016 13:17:55

                                  #252087
                                  NJH
                                  Participant
                                    @njh

                                    John

                                    "Measure twice and cut once" – and there I was thinking that was an advertising ploy by the makers of rulers !

                                    (Not really but I am afflicted with a lifelong tendency to seek out the ridiculous – it has got me into trouble at times but there doesn't appear to be a cure.)

                                    Norman

                                    #252100
                                    mechman48
                                    Participant
                                      @mechman48

                                      Wasn't satisfied with the painting attempt on my S10V… crap, so scrape it all off, gave it a rub down as best as I could & used some spray can colouring paint this time… let's see what it dries like dont know.

                                      George.

                                      #252929
                                      JasonB
                                      Moderator
                                        @jasonb

                                        Put some paint onto the Jowitt Jnr and machined up a little bit of yew to stand it on.

                                        Although it is half size it actually seems a lot smaller no doubt due to it being 1/8th the volume of the larger engine.

                                        I did make a couple of alterations on this small one.

                                        – The frame was cut from a single piece of aluminium rather than making it up from 4 bits.
                                        – I used 4 fixings on the cylinder cover rather than six which meant I could use M1.6 studs rather than M1.2
                                        – Oil grooves rather than piston rings
                                        – Most of the oil cups were omitted and I just used a CSK oil holes
                                        – Made up flywheels rather than castings

                                        Also cut up some metal for the next project, mostly 5mm plate and flat bar with a bit of 1/4" thrown in. Pickled the black bar to get rid of the scale.

                                        Can you tell what it is yet?

                                        J

                                        #252933
                                        Anonymous
                                          Posted by JasonB on 29/08/2016 20:02:11:

                                          Can you tell what it is yet?

                                          No, but I expect you'll have finished it by next weekend, so I can wait that long to find out. wink 2

                                          Andrew

                                          #252966
                                          Andrew Hutchinson
                                          Participant
                                            @andrewhutchinson12802

                                            Jason B – what did you use to pickle the black bar?

                                            Cheers,

                                            Andrew Hutchinson

                                            #252970
                                            JasonB
                                            Moderator
                                              @jasonb

                                              Brick cleaner, scale drops off after about 1/2, rinse and give a quick spray of WD40.

                                              Can't take credit for the method John S posted it first and he can't be wrongsmile p

                                              #253048
                                              Ian S C
                                              Participant
                                                @iansc

                                                Citric acid will also do the job, just leave it till the next day. You can also do it electroliticly with washing soda.

                                                Ian S C

                                                #253145
                                                Andrew Hutchinson
                                                Participant
                                                  @andrewhutchinson12802

                                                  Jason and Ian,

                                                  Thanks for your info. I remember Mr. Stevenson's post and was quite interested at the time , but haven't gotten around to it yet. I've used citric acid to strip rust from some items on an old P&W mill and it worked pretty good. Dulls a fair bit on items that should be shiny but removes the rust which was the important part. I tripped over a bottled the other day so at least I know where it is. Best give it a shot while I have it to hand.

                                                  Thanks again,

                                                  Andrew Hutchinson

                                                  #254106
                                                  JasonB
                                                  Moderator
                                                    @jasonb

                                                    Got a bit done on the next scratch built engine project by making a start on the main frame and the sides of what will be the water hopper.

                                                    I thought I would give Andrew a chance to catch up so did not go into the workshop today, instead I gave the Scooby a blast upto Oxford M40 services and back. While sitting in the carpark a chap pulled up next to me and insisted on loading some scrap metal that he had into my boot. Looks like it may be useful.

                                                    5/16 scale Root & vandervoort vertical part made.

                                                    5/16 scale Root & Vandervoort horizontal part made

                                                    Castings for a 1/2 scale Fairbanks Morse No1A "Eclipse"

                                                    Castings for 1/4 scale Perkins, I could be talked into parting with these, PM me if interested.

                                                    Should keep me out of mischief for a week or twowink 2

                                                    #254107
                                                    martin perman 1
                                                    Participant
                                                      @martinperman1

                                                      Jason,

                                                      I have a friend who rally's a full size Eclipse, full size they are a small engine, If you need any detail pictures I'm sure I could assist you.

                                                      Martin P

                                                    Viewing 25 posts - 326 through 350 (of 457 total)
                                                    • Please log in to reply to this topic. Registering is free and easy using the links on the menu at the top of this page.

                                                    Advert

                                                    Latest Replies

                                                    Viewing 25 topics - 1 through 25 (of 25 total)
                                                    Viewing 25 topics - 1 through 25 (of 25 total)

                                                    View full reply list.

                                                    Advert

                                                    Newsletter Sign-up