Tailstock height

Advert

Tailstock height

Home Forums Beginners questions Tailstock height

Viewing 25 posts - 1 through 25 (of 49 total)
  • Author
    Posts
  • #227845
    Iain Downs
    Participant
      @iaindowns78295

      So I've got my tailstock adjuster working and it's a great deal easier to get some kind of alignment. things still move around by a thou or so when I tighten up, but I can deal with that with just a little bit more patience.

      However, whilst testing the alignment (with a dial test indicator in the chuck and indicating the tailstock barrel). I got what seemed a particularly high vertical error.

      If I zeroed the dial test indicator and the top of the rotation, the bottom of the rotation appeared to be about 1 mm higher than it should if the tailstock was centred. Which I think means that the tailstock centre is .5 mm or so higher than the headstock centre.

      I've read that 5 thou or so is normal (.125 mm), but this seemed excessive.

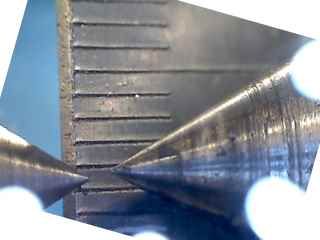
      Doubting my figures I took the following pictures with a USB microscope – I had to rotate it in the computer to make it easier to measure.

      centres height aligned.jpg

      The rule behind is in 1mm increments and measuring the relative heights I get the tailstock centre to be .6mm above the headstock one.

      In some ways this doesn't surprise me since, even when I have the tailstock aligned quite well horizontally, there is a noticeable wander at first when a centre drill is used and there is some scraping (on what appeared to be the top of the hole) when it is withdrawn.

      First of all – does this make sense from a measurement perspective – it seems to hang together, but I could be missing something.

      Next, should I worry? I've mentioned the centre drill not apparently centering. If I apply some Pythagoras, .6mm out in height on an 8mm bar should only create a 0.025 (one thou) diameter error between the tailstock and headstock (less for larger diameters). I dream of such accuracy! Of course it all adds up . Having this much vertical error also makes it a little harder to see the horizontal error.

      And finally, what should I do? the obvious thing to do is to mill off 0.5 (or so) of the tailstock to bring them level (or with the tailstock just a little higher).

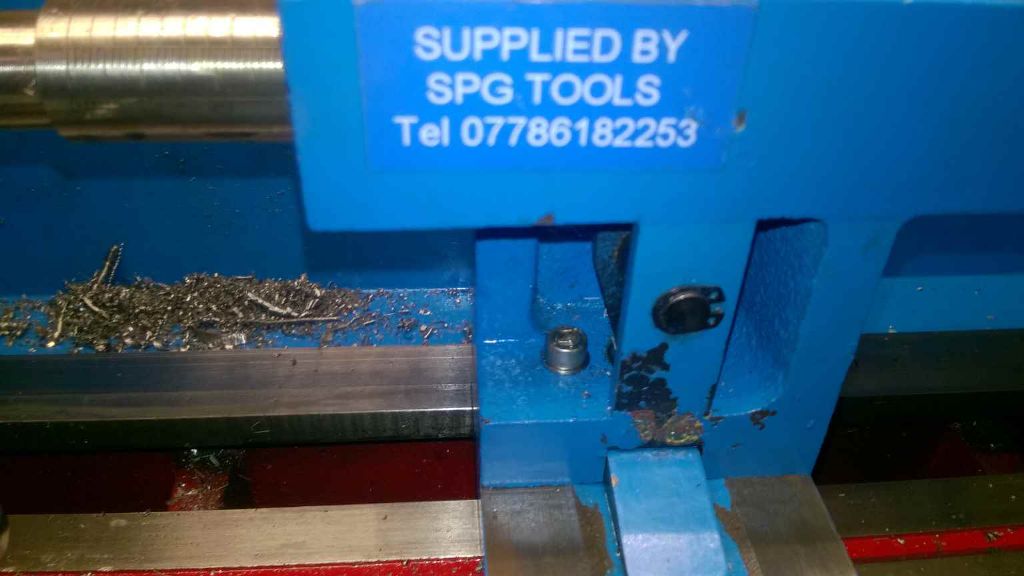
      I would mill the top surface of the base (as seen in the photo below) which should be relatively safe, though I may need to take a little of the channel that sits on it too, I would imagine that the base is available as a spare if I mess it up.

      tailstock front.jpg

      Looking forward to your usual helpful responses!

      Iain

      Advert
      #8029
      Iain Downs
      Participant
        @iaindowns78295
        #227847
        Martin Connelly
        Participant
          @martinconnelly55370

          Does the height difference change if the tailstock barrel is extended out or retracted? Change like that would indicate that the tailstock was not parallel to the bed and that there may be some swarf or other debris stopping it from seating correctly. I would be wary of milling the tailstock, too easy to go too far. Less aggressive material removal may be slower but safer.

          Martin

          #227848
          Michael Gilligan
          Participant
            @michaelgilligan61133

            Iain,

            Nicely documented.

            To answer your question: Yes, I think you should worry.

            BUT; before you start modifying the tailstock, please check that the headstock spindle is correctly aligned with the bed.

            If all's well with the headstock alignment, then check the tailstock details for paint and burrs. … Many of these mis-alignments are down to poor assembly, and your 'fitting' may [with luck] only be a matter of tidying things up.

            MichaelG.

            #227854
            Iain Downs
            Participant
              @iaindowns78295

              Michael – The headstock is out by about 10 thou over a 200mm (measured at 10mm and 210mm) range from the chuck. This is based on measurements using 'Rollie's Dad's Method'.

              True this wasn't measured at the same time as the tailstock but I hope that it's not shifted too far.

              That would amount to maybe 3 thou (.075 mm) over the distance the dial test indicator was measuring – quite a long way short of the error..

              The tailstock is recently re-assembled after I built the tailstock adjuster. I did take care to clean paint off and make sure there was no swarf. Also the centre drill wandering and appearing to scrape has been there for a while.

              Martin. I'm happy to look at alternative methods of material removal, but I have no real idea what I could do. sanding or scraping would take a long time and both would be subject to challenges in regaining a flat, parallel surface.

              The barrel is quite level, certainly within 1 thou over the distance it is extended (about 75mm). It's relatively hard to be more exact as the engravings move the dial indicator around quite a bit.

              I extended the barrel to where it would be holding a centre so that I could reduce the effect of angular error.

              Iain

              #227870
              Martin Connelly
              Participant
                @martinconnelly55370

                I think you should check contact surfaces with some engineer's blue. A small high spot of 0.3mm may be doubled to 0.6mm at the point of the centre if it causes any angular error in the tailstock. These are not unreasonable amounts of material to remove with a file. Use of blue will let you see where there are high spots where material should be removed to maintain flatness. For this small error a milling operation may be a bit of "sledgehammer to crack a nut".

                Martin

                #227875
                Speedy Builder5
                Participant
                  @speedybuilder5

                  What do SPG say about it ?

                  #227883
                  Lambton
                  Participant
                    @lambton

                    Martin,

                    A few suggestions that you may have tried already;

                    Check that the center in the head stock is running true using your DTI. Possible problems scored headstock socket/centre or center point not concentric with the Morse taper. Do the same for the tail stock.

                    Try putting a soft center in the head stock and trimming it up with the top slide set over to produce the correct angle then re test the tail stock alignment. This procedure is standard engineering practice before turning between centers.

                    With your DTI in the chuck test the tailstock empty socket a few mms down inside the bore.

                    Only start to remove metal from the T/S casings as a very last resort.

                    The problem may be inherent with the way the lathe was made and assembled in the Far East where standards of accuracy may be seen as secondary to price. This is why Myford and Boxford lathes cost far more than budget priced imports.

                    #227907
                    Ajohnw
                    Participant
                      @ajohnw51620

                      There was some one on here a while ago who had a similar problem so lapped away at the base of the tailstock and later found that the alignment was out further away from the head stock suggesting something else was wrong as well.

                      With all respect to Rollies Dad I feel people should take the trouble to make a between centre test bar before modifying the lathe especially in respect to the tailstock. Or buy one but that is likely to have a morse taper on one end.

                      Personally I always find out what's what with a lathe by turning first then go further if that indicates that there are problems. That way there is less likely hood of fixing the wrong thing.

                      John

                      #227914
                      Michael Gilligan
                      Participant
                        @michaelgilligan61133
                        Posted by Ajohnw on 02/03/2016 11:50:04:

                        There was some one on here a while ago who had a similar problem so lapped away at the base of the tailstock and later found that the alignment was out further away from the head stock suggesting something else was wrong as well.

                        .

                        I think this is the one

                        Definitely worth reviewing.

                        MichaelG.

                        #227942
                        Nigel McBurney 1
                        Participant
                          @nigelmcburney1

                          some years ago a hobby shop owner asked me to check the tailstock of a new English ,expensive wood turning lathe.It was out vertically by exactly half a mm,it was brand new a no burrs paint etc, It was operator finger trouble or programming error when made on a cnc machine,If a new lathe has an error then return it as unfit for purpose.

                          #227953
                          John Fielding
                          Participant
                            @johnfielding34086

                            I had a similar problem with the tailstock of my old Myford Super 7 lathe. The apparent height of the spindle varied from day to day. Finally discovered that the two halves of the tailstock didn't have the clamping bolt to pull them tightly together and it would ride up higher when you pushed the tailstock along the bed. When this happened a tiny piece of swarf would get in between the two faces and hold it up. Solved the problem by drilling for an extra clamp bolt to pull the two parts into contact!

                            #227993
                            Iain Downs
                            Participant
                              @iaindowns78295

                              So much help!

                              Martin, I have some blue and some scrapers and will take a look.

                              Speedy Builder 5. SPG are normally helpful, but simon is out of the country on business. I'm likely not to do anything drastic (milling the tailstock) till I've had a chance to talk to him. But I was too impatient and wanted the Forum's views!

                              Lambton – I've already turned the headstock centre down a tad – it was out. And I've marked exactly the angle it should go in to be repeatable. I'm getting comparable measures from visually inspecting the centre alignment and from a DTI in the headstock.

                              AJohnW – I do have a test bar I made which is reasonably accurate (thanks, mainly to Neil for advice on that) and I can try and confirm or otherwise with that.

                              AJohnW and Michael. Thanks for the Link. I've read and will need to digest the 5 pages of commentary!

                              IT's likely that I won't get any more play time until the weekend but will feed back then.

                              Iain

                              #227995
                              duncan webster 1
                              Participant
                                @duncanwebster1

                                Nothing wrong with Rollie's Dad's method, in fact I've advocated it here before now. However it won't do anything about tailstock alignment, for that you need a parallel bar with a centre in each end. The centre doesn't have to be in the middle of the bar (it's easier if it is), just adapt Rollie's dad's method as appropriate. The only time you'd vere need a test bar with MT on it is to check the centre in the spindle is concentric

                                #228008
                                Ex contributor
                                Participant
                                  @mgnbuk

                                  The only time you'd vere need a test bar with MT on it is to check the centre in the spindle is concentric

                                  And to check the headstock & tailstock alignment with the bed.

                                  Leastways that is what we used when rebuilding CNC machine tools at my last employment.

                                  Nigel B.

                                  #228012
                                  Ajohnw
                                  Participant
                                    @ajohnw51620

                                    A test bar can also stand a chance of detecting a warped bed. Running a DTI across the top in several places. Only problem then is that if the top is out the side can't be checked so easily.

                                    The same test can be done with it in the socket on the spindle too if it has a morse taper end.

                                    Running dti's around the inside of a morse socket sucks – it can give a decent reading and still be well out of alignment.

                                    John

                                    #228098
                                    stephen.
                                    Participant
                                      @stephen

                                      Does anyone know the correct amount that a myford tailstock should be higher by? Im'e thinking of myfords original spec tolerances.

                                      regards

                                      Stephen

                                      #228105
                                      duncan webster 1
                                      Participant
                                        @duncanwebster1

                                        NigelB and AjohnW, you can do both these tests without a test bar using the Rollie's Dad method and a simple parallel bar with a centre each end. Of course if I were rebuilding machine tools for a living I'd get a proper test bar, makes it easier, but not for a one off.

                                        #228107
                                        Lambton
                                        Participant
                                          @lambton

                                          John,

                                          "Running dti's around the inside of a morse socket sucks – it can give a decent reading and still be well out of alignment."

                                          Can you please explain your reasoning on this /

                                          Stephen,

                                          A Myford tailstock should not be "higher" than the head stock to my understanding. Why do you think it should be?

                                          Eric

                                          #228110
                                          Ajohnw
                                          Participant
                                            @ajohnw51620

                                            I have seen spec's of other makes with things like -0 +0.05mm. Boxford use that as well – high at the tailstock end over 380mm centres (15&quot checking all along.

                                            The same test with the bar in the spindle socket is 0.025 max top and side over 300mm but they usually achieve half of that and on the other measurement but there are only a few test sheets about.

                                            I haven't bothered correcting my Boxford but on a Raglan I used a morse taper reamer rather than try to lap tiny amounts off the base of the tailstock. Just making sure that the top part of the tailstock was correctly and cleanly fitted to the base. THIS IS NOT A GOOD IDEA IF THE BED IS OUT. It's only of use if the max error is just a low few thou's either or both ways.

                                            John

                                            #228114
                                            Ajohnw
                                            Participant
                                              @ajohnw51620

                                              The reason I think it sucks is that the axis of the spindle maybe pointing up or down or sideways or some combination of directions. That may cause tiny fluctuations of the needle on the dti all on it's own. The axis of the socket in the tail stock being slightly out would as well. Say that was 1 thou – the end of a 10" long drill will be out a lot more than that. Even if the dti shows equal side to side and only a difference up and down it still doesn't mean much.

                                              It's a bit like the run out claim made on headstocks that started in Germany years ago on Chinese lathes – so many microns. It doesn't say anything about what the readings would be at the end of a 300mm test bar.

                                              I should add that the standard way of setting a tailstock on axis is to turn something and adjust according to the results.

                                              John

                                              Edited By Ajohnw on 03/03/2016 18:18:50

                                              #228116
                                              Iain Downs
                                              Participant
                                                @iaindowns78295

                                                Er, ar,well. Looks like there's some knowledge in them wise heads!

                                                I snuck out for 10 minutes to try and check the height with the test bar I made.

                                                That showed the tailstock was 0.23 mm higher than the headstock – 9 thou which is more or less what I understand is normal for a lathe of this type (5 to 10 thou is what I've read in other posts).

                                                The measurement is repeatable if I reverse the test bar and there is negligible deviation when rotating the spindle (carefully).

                                                This is much less than the measurement against the barrel indicated – apparently you can have better aligment with bad results when checking against the barrel, John…

                                                What's a bit confusing is that the lathe is in the same state as when I took the pictures at the weekend. The tail stock barrel is exactly as far out and I've made no adjustments. It's hard to convince myself that the picture is 0.25mm . So unless the bed is moving uphill it's hard to explain. And I'm not even sure that makes sense.

                                                When I have a bit more time I shall try and measure the horizontal error. I have a rather large and clunk dial indicator which is very difficult to set up on my little lathe.

                                                Slightly puzzled.

                                                Iain

                                                #228141
                                                Michael Gilligan
                                                Participant
                                                  @michaelgilligan61133
                                                  Posted by Iain Downs on 03/03/2016 18:22:49:

                                                  It's hard to convince myself that the picture is 0.25mm

                                                  Slightly puzzled.

                                                  Iain

                                                  .

                                                  Iain,

                                                  It was an excellent idea to use your USB microscope to illustrate the problem … but I think there are some inevitable optical effects in this image, which will make measurements difficult.

                                                  I am happy to discuss this, either by PM, or in the thread [depending whether you consider it relevant to the main discussion].

                                                  MichaelG.

                                                  #228150
                                                  Clive Hartland
                                                  Participant
                                                    @clivehartland94829

                                                    It can be Parallax, the focus of the image plane is quite critical to evade it.

                                                    Clive

                                                    #228151
                                                    Speedy Builder5
                                                    Participant
                                                      @speedybuilder5

                                                      I suppose the MT in the tailstock is true – on my Boxford , the centre can be off centre with just a little bit of swarf up the MT hole.
                                                      BobH

                                                    Viewing 25 posts - 1 through 25 (of 49 total)
                                                    • Please log in to reply to this topic. Registering is free and easy using the links on the menu at the top of this page.

                                                    Advert

                                                    Latest Replies

                                                    Home Forums Beginners questions Topics

                                                    Viewing 25 topics - 1 through 25 (of 25 total)
                                                    Viewing 25 topics - 1 through 25 (of 25 total)

                                                    View full reply list.

                                                    Advert

                                                    Newsletter Sign-up