Tailstock alignment of an ML7

Advert

Tailstock alignment of an ML7

Home Forums General Questions Tailstock alignment of an ML7

Viewing 15 posts - 1 through 15 (of 15 total)
  • Author
    Posts
  • #463628
    Bruce Stephenson
    Participant
      @brucestephenson14065

      s-l640.jpgHi All,

      Be gentle with me here! I am new to lathe issues and have only schoolboy experience and a dollop of common sense (I hope! Ha ha).

      I have just got to the end of a comprehensive refurb of my old Myford ML7 which I purchased a few years ago to find it was so badly worn it was virtually unusable past the most basic of work. The bed was badly worn (you couldnt set the carriage to take up the slack at the head-stock then get full travel of the bed) the bearings had so play in them, it sounded like a dull buzz saw whenever there was any appreciable load on the cutting tool and parting off, well things really got loud!

      Anyways, hindsight is a wonderful thing and now looking back I would have been better off junking the thing and buying an existing better set up with what I had learnt! But yep, I went the hard route (but learning loads along the way) and as this is starting to get long really quick, let me get to the point…

      As I have had the headstock cradle off and re-scrapped the bearings, I now am at the stage where I need to ensure I have correct alignment. Watching the various videos etc, I am looking at MT2 test bar to set up the alignment of the headstock. Trouble is, the MT2 test bars are pretty expensive for a one-off measurement. I have also watched the videos on taking out the twist on the bed as well.

      During my hours of googling, I came across a double taper bar for setting up the alignment of the tailstock to the headstock for WOOD lathes. Being a double taper I wondered why this same system wouldnt work on a ML-7? It just seems an incredibly easy way in which to ensure that the two correctly align to each other once tailstock is set? They are also reasonably priced too.

      Your thoughts?

      B

      Advert
      #27271
      Bruce Stephenson
      Participant
        @brucestephenson14065
        #463636
        David George 1
        Participant
          @davidgeorge1

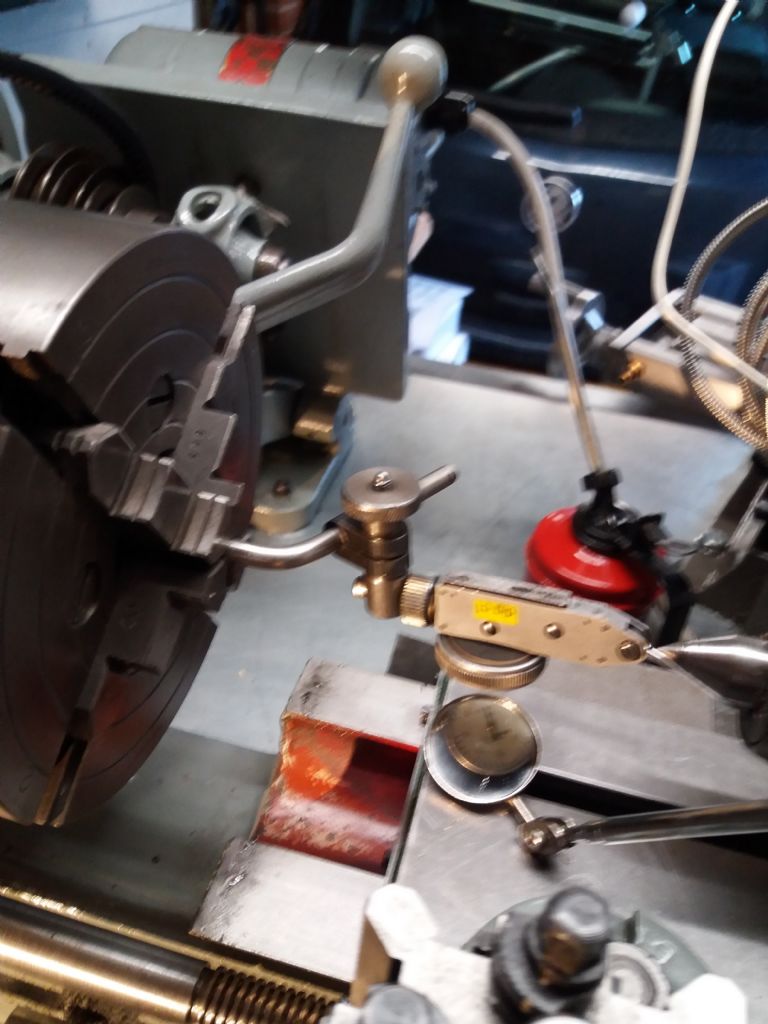
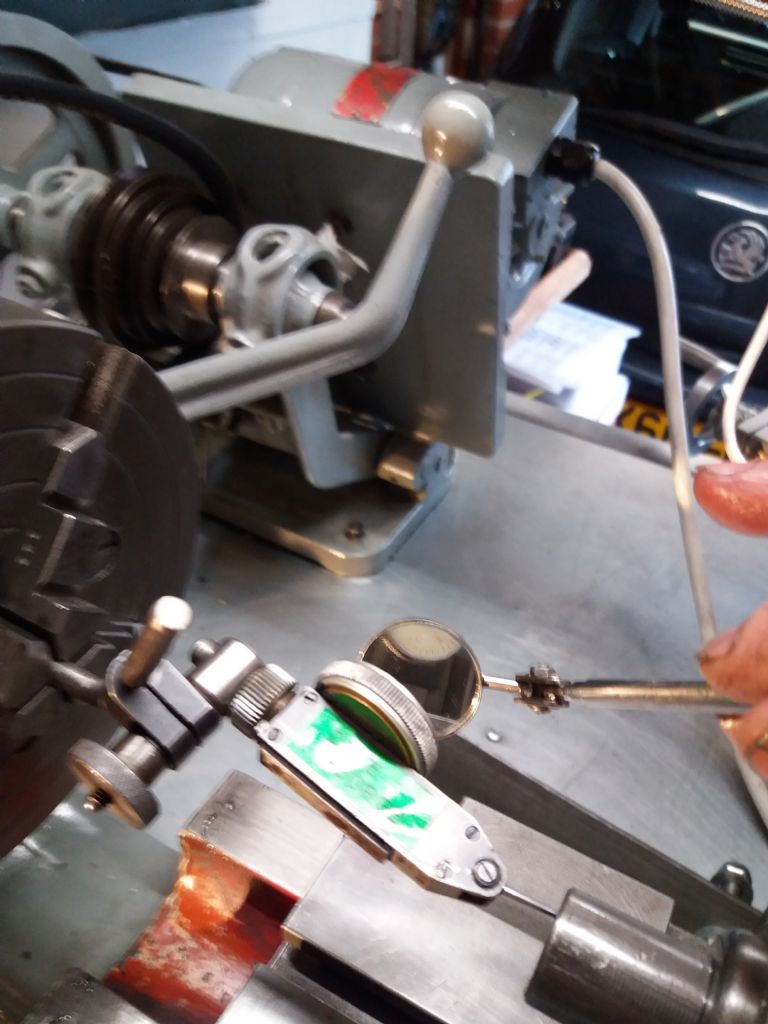
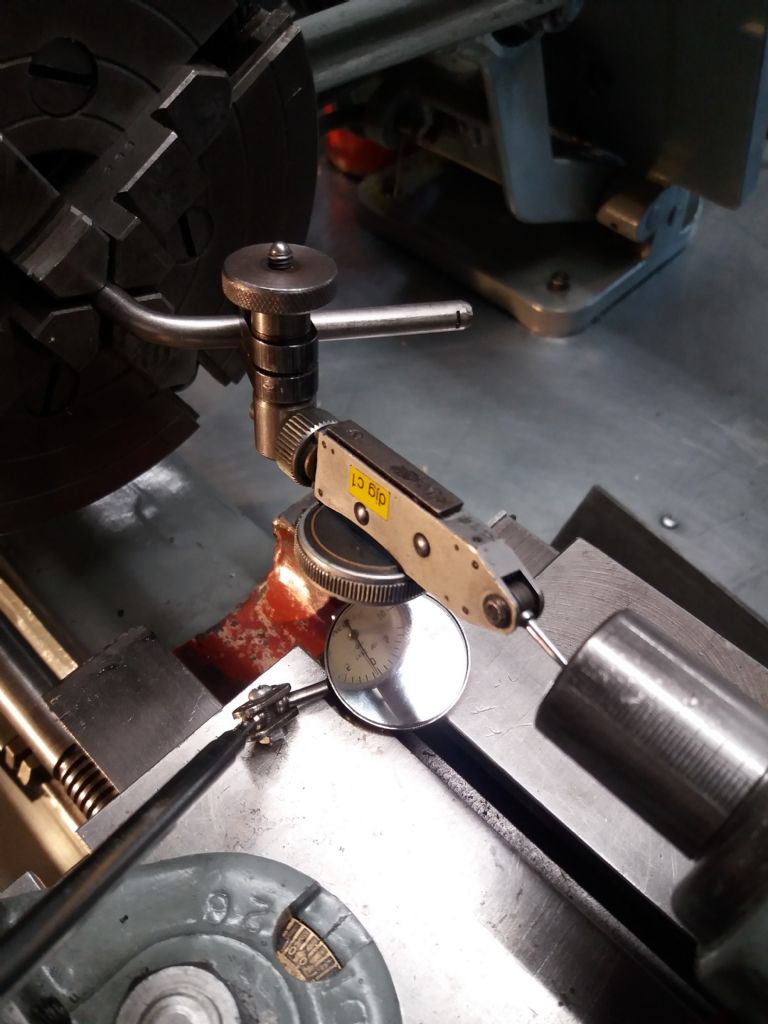
          Hi Bruce you don't have to have a bar to check the alignment of the tail stock. I have a short length of silver steel with a bend in and mount that in the main chuck. I put the dial indicator on to that and as you rotate the chuck with the indicator in contact you can see any out of alignment.

          clock centre 3.jpg

          clock taper 3.jpg

          clock taper 2.jpg

          I hope this helps. I had previously set the main spindle to cut parallel by checking a piece of 20 mm silver steel 12 inch long, held in the chuck, clocking it with the carriage and further cutting a piece of steel parallel.

          David

          #463639
          OldMetaller
          Participant
            @oldmetaller

            That is ingenious.

            John.

            #463649
            Bruce Stephenson
            Participant
              @brucestephenson14065

              Hi David,

              Clever idea! Got any more bright ideas for setting up the headstock? Plan is to buy a MT2 bar and flog it off afterwards as I will probably not need it again?

              B

              #463690
              Hopper
              Participant
                @hopper

                No need for a test bar at all. With these old lathes with dodgy internal tapers and bent headstock spindles and god knows what, you can't trust them.

                Set the headstock by turning a test piece 4" long and 1" diameter held in the chuck with no tailstock centre. Adjust your headstock alignment until the test piece is parallel after taking a light cut.

                Then to align the tailstock, turn a test piece between centres and adjust the tailstock until the test piece is turned parallel with a light cut.

                Then use the money saved on the test bar to buy beer.

                See Model Engineers Workshop mag over the past 12 months for a series of articles with details on refurbing an ML7 including doing all final alignments. Look for articles by one Pete Barker in the index.

                #463739
                old mart
                Participant
                  @oldmart

                  A proper test bar is more useful as it not only has a MT2 to get the tailstock aligned in more than one axis, but the headstock to tailstock between centres. You would not be able to buy much beer for the price of one of these, and it will last longer.

                  **LINK**

                  #463749
                  Howard Lewis
                  Participant
                    @howardlewis46836

                    If you have a four jaw chuck a steady,and a sensitive DTI (finger clock for preference ) you can make your own beteen centres alignment bar from apiece of silver steel, or ground stock.

                    Silver steel, is 13 " long, so as long as you are confident of it being round, proceed. If you think that is lobed,when it is gripped in the chuck, centred and supported by the steady, you can run a tool lightly along it to mark it, so that you always measure at the same point on the circumference.

                    Grip the bar in the chuck, and centre it as accurately as possible, close to the chuck

                    Set up the steady, close to the chuck

                    Move steady to the end of the bar.

                    Cente drill.

                    Change bar end for end, and repeat centering (hopefully, the steady should not require resetting.

                    Move steady to end of bar

                    Centre Drill.

                    Remove steady.

                    You should now have a bar which held between centres can be used to align Tailstock with Headstock.

                    If the DTI is mounted on the Saddle, at centre height and Zeroed, at the Headstock end, the misalignnment will become apparent.

                    Adjust Tailstock using the screws until, the DTI reads Zero at both ends of the bar.

                    The Tailstock should now be aligned in the horizontal plane.

                    If you have doubts about vertical alignment, you should grip ma razor blade, or 6" rule between centres

                    If it stands up vertical, the centres bare in alignment.

                    If you want to be sure of the centres, trim them up before starting alignment, by off setting the Top Slide by 30 degrees and taking skims until the centre cleans up all over.

                    Hope that this helps the unsure without insulting the experienced!

                    Howard

                    #463760
                    old mart
                    Participant
                      @oldmart

                      How would you check that the tailstock quill is in line with the headstock? I'm referring to the alignment of the Morse taper, not the barrel.

                      Edited By old mart on 10/04/2020 16:55:35

                      #463790
                      Enough!
                      Participant
                        @enough
                        Posted by old mart on 10/04/2020 16:53:31:

                        How would you check that the tailstock quill is in line with the headstock? I'm referring to the alignment of the Morse taper, not the barrel.

                        Bruce's question to answer of course but I had visions of inserting one taper into the headstock, then loosening everything in sight on the tailstock, ramming it onto the other taper then tightening everything up.

                        #463793
                        not done it yet
                        Participant
                          @notdoneityet
                          Posted by old mart on 10/04/2020 16:53:31:

                          How would you check that the tailstock quill is in line with the headstock? I'm referring to the alignment of the Morse taper, not the barrel.

                          Edited By old mart on 10/04/2020 16:55:35

                          Do checks with the tailstock quill fully retracted and fully extended? Perhaps not really at the extreme extension.

                          #463898
                          Bruce Stephenson
                          Participant
                            @brucestephenson14065

                            Cheers Hopper,

                            Thinking about it more deeply, where I am getting in knots is that twist in the bed and alignment were/are 2 different things. Not having done this before, it made sense to me that you needed to align the headstock first with a test bar, then remove any twist in the bed by taking a cut and mic’ing each end. (I realise I can also do it entirely with the dial indicator and test bar without the need for cutting a bit of mild steel bar as well).

                            Of course reading your post and thinking about it deeper, it comes down to how you adjust things and assumptions. Thing is, having changed the bed (still using my ORIGINAL headstock cradle), the method I watched on a video was by adjusting the bed riser nuts and didn’t touch upon the set-screws on the headstock which are likely to be way out as I exercised them to make sure they were relatively free (without headstock in place) and then backed off before fitting my original headstock to the new bed during the refurb. So if it’s way out on the cut, I may need to bring it back a bit with the headstock set screws first (with the headstock mounting Allen-head screws loose of course), before trying to do it all on the feet? My original thoughts were to get it parallel to the bed using my dial indicator and a parallel test bar in horizontal plane, then take any twist out by turning and mic’ing. But for rough alignment, I guess if I took a straight bit of stock 25mm steel bar (relatively speaking!) in the chuck and ran the dial indicator along the horizontal plane over the length of the bar, I could get a reasonably good idea of alignment with the bed before starting to turn and measure using the feet nuts for adjustment of bed twist. That’s the bit that has got me wondering, just how I primarily adjust things? Of course the challenge is not to get too bogged down in detail and keep it relatively simple in how I approach the issue I guess.

                            As for my original question, the double taper bar, once the headstock was correctly set up, that’s when I was thinking it may have been a quick neat way of achieving a satisfactory check of alignment of the tail stock in more than one direction all at once? What I couldn’t work out was why they are advertised as for woodworking lathes and not something that could be applied for metal lathes as well? (Posts here however have convinced me otherwise in terms of even more outlay and alternative ways of achieving the same thing).

                            #463899
                            Bruce Stephenson
                            Participant
                              @brucestephenson14065

                              Thanks Howard, but I have only the most basic of set ups with this lathes, no accessories what so ever…. Thank you for your informative post anyway.

                              B

                              #463900
                              Hopper
                              Participant
                                @hopper

                                OK so now we have moved from simple tailstock alignment to complete alignment of a freshly rebuilt machine.

                                You really should get that series of articles in MEW as it walks you through the process. (Well one way of doing the process!)

                                Has the bed been reground, or is it a used bed with a few thou of wear along it?

                                The problem I have with using a test bar is that spindle tapers over the years can become distorted and hold the bar a bit cockeyed. But you could use it to get initial alignment, followed by a turning test as described.

                                But headstock alignment and bed twisting are parts of the same thing, ie aligning the headstock spindle with the bed ways.

                                So in your case, having changed the bed — I believe? — you will need to start from scratch. First thing to do would be to bolt the lathe down to a solid bench in its "natural" position. That is, tighten down the two base bolts at the headstock end. Then use a feeler gauge to see if one of the tailstock end mounting pads has a gap under it. If there is a gap, cut a shim to fill it. Then tighten down the two bolts at the tailstock end.

                                To make sure you are not distorting the bed in this process, before starting, hold a 12" length or similar of 1" round bar in the chuck. Stick a dial indictator on the far end, with magnetic base direct on the lathe bed. The indicator should be set to measure movement in the horizontal plane, ie laid down sideways. The needle on the indicator should not move during tightening up the bolts. If it does, you need a shim under the foot that causes movement when bolted down. If your lathe has the Myford raising blocks with the adjustable mounting nuts, simply screw the nuts up to kiss the base of the and tighten down the top nuts to secure, while watching the dial indicator.

                                So now you have the bed sitting in its "natural" position. The purists (who will surely arrive at the gate shortly with pitchforks and torches) would use an expensive precision level to check both ends of the bed are at the same reading to ensure there is no twist in it. But if your bed has a few thou of wear on the top surfaces the super sensitive level's reading will be thrown out anyhow. Plus the top surface is not critical in getting a Myford to turn true. That is the vertical surface that the guide on the carriage runs against. And it can be worn differently again from the top surface. Plus it is simply overkill.

                                So, with the bed in its "natural" position, you can then do the headstock alignment using the jacking screws to get the headstock set straight in relation to the bed ways. You can do this with a tapered test bar if you trust the spindle's internal taper, or there are several just as good methods using your piece of 12" x 1" plain round bright mild steel bar. One way is to set it in the four jaw chuck and get the chuck end running true. If you only have a three jaw, do the best you can. It's not super critical at this stage. Then measure runout on the far end and set the high point at the 12 o'clock position. You can now mount dial indicator in the toolpost with the horizontal plunger set against the side of the bar . Run the carriage back and forth and observe dial indicator. Adjust headstock screws — and add shims if needed, or scrape some metal off — to get a zero to zero reading from one end of bar to the other.

                                Another was using a plain piece of steel bar is the infamous "Rollie's Dad's lathe alignment" method. You can google that. But it's just a more complex way of doing the above. But it works well and many people love it.

                                THEN you can do the final adjustment by taking a test cut over a 4" to 6" length of 1" bar held in the chuck and measure it for taper. Adjust the tailstock end mounting feet to get a perfect 0-0 reading on a normal .001" resolution mike. Or within a visual couple of tenths of a thou anyway. It does not take much adjustment of the feet to make a difference of a few thou on that taper. The last few tenths can be achieved by tightening down the bolt or nut without removing shim or moving the adjuster below it. Play with it and you will soon see.

                                Re the double ended taper from a wood lathe for setting tailstock: metal lathe tailstocks are often made to sit a few thou higher than the spindle to allow for wear so might not work. Or it might work. But you still need to do a between centres turning test as the final proof. An easier way is to mount a centre in the tailstock and turn a 60 degree point on a piece of bar held in the lathe chuck. Bring the points together and observe the alignment. A thin steel rule nipped between the two points will sit cockeyed if alignment is out. Correct alignment is when rule sits dead square to lathe axis in both horizontal and vertical planes.

                                So once you have got it all perfect, the next time it rains and the concrete slab floor your lathe bench is mounted to floats around in the sodden ground a bit, it could be anywhere. Or if the sun shines and the temperature changes.

                                So in future if you are doing a super precision job, especially of a longer length, do a test cut first and adjust your lathe to suit if required.

                                Edited By Hopper on 11/04/2020 03:47:23

                                Edited By Hopper on 11/04/2020 04:09:24

                                #463942
                                Bruce Stephenson
                                Participant
                                  @brucestephenson14065

                                  So in your case, having changed the bed — I believe? — you will need to start from scratch.

                                  Yes, correct. I managed to get a near perfect bed that has extremely little wear from a guy that breaks lathes and sells the parts on. It has virtually no wear, with no tell-tale grooves scratches on it and mic's out pretty accurately (and only reason as to why I decided to rebuild mine). It was a pity that I didnt get the rest of the lathe as well but a lot of it was gone, despite being about 20 years older than my abused baby.

                                  Well as I said, I am a beginner in playing around with lathes to this degree but enjoy the challenge. The thing is to LEARN along the way. My final goal is to have a good, reliable little lathe that will see me out, set up to do fairly basic work around the garage. My main work will probably center around my glider restoration projects, which apart from main-pins (which I would try and tackle anyway), most of the work is so basic, you guys would just laugh judging by some of the amazing stuff you guys turn out! I come to this forum because I dont think you will get better advice anywhere than seasoned model enthusiasts who know the Myford inside out.

                                  As for MEW, I dont subscribe to the mag as it is not my core interest (not at the moment anyway!). My passion is anything that flies, especially gliders.

                                  I have checked out Rollie's Dad's lathe alignment as well.

                                  Thanks for the well written and detailed posts. They are a great help and very much appreciated.

                                  B

                                Viewing 15 posts - 1 through 15 (of 15 total)
                                • Please log in to reply to this topic. Registering is free and easy using the links on the menu at the top of this page.

                                Advert

                                Latest Replies

                                Home Forums General Questions Topics

                                Viewing 25 topics - 1 through 25 (of 25 total)
                                Viewing 25 topics - 1 through 25 (of 25 total)

                                View full reply list.

                                Advert

                                Newsletter Sign-up