Stuart ‘Victoria’ : a beginners tale..

Advert

Stuart ‘Victoria’ : a beginners tale..

Home Forums Work In Progress and completed items Stuart ‘Victoria’ : a beginners tale..

Viewing 25 posts - 126 through 150 (of 432 total)
  • Author
    Posts
  • #131053
    GarryC
    Participant
      @garryc

      Day 27.

      Fixing the Front Cylinder Cover.

      Did this the same way as the Rear Cover. I failed to realise early enough the importance of getting the two bracket holes (the longer studs) parallel with the port face and have now made it more difficult I think to make the brackets to fit ensuring the port face is horizontal…. again it seems foolish now to have missed that, Rear Cover as well of course…

      91. test fitting the front cylinder cover .jpg

      The two lower holes I think needed to be countersunk as they will be behind (and out of sight) the Cylinder Support Bracket.

      92. front cylinder cover with countersunk screws.jpg

      Same with the Rear Cylinder Cover.

      93. rear cylinder cover with countersunk screws.jpg

      The Cylinder so far.

      94. the cylinder so far.jpg

      Regards

      Allan.

      Advert
      #131087
      Steve Withnell
      Participant
        @stevewithnell34426

        On my Victoria, I took a light skim off both sides of the steam chest to tidy up. My steam chest is made of two standard steam chest castings.

        p1000339.jpg

        Ive a feeling I cleaned up the steam chest ends by skimming in the lathe.

        Steve

        #131208
        mechman48
        Participant
          @mechman48

          Allan

          Super work so far; when parting off the eliptical bar, did it not give you a whacking intermittant cut on the parting tool until you got to full diameter, what RPM where you running at, I gather you were using a indexible insert parting tool (type?),&, what feed were you using (autofeed / manual)? curious to know for future ref.

          George

          Edited By mechman48 on 01/10/2013 19:40:43

          #131282
          GarryC
          Participant
            @garryc

            Hi George

            Thanks for the kind words. Just before starting 'Victoria' I purchased a Glanze Parting Tool and it has been brilliant. Previous attempts at parting off had almost always involved stopping and winding out to increase the width of cut and sometimes the whole thing binding, although a lot due to bad technique on my part no doubt. Using the Glanze tool has been totally different, I simply slow down to about 300 – 350 RPM and feed slowly manually (I'm sure someone on here will advise if this is not a correct approach – it has worked great for me so far..), I have not yet had even a slight hint of binding. The eliptical bar was as smooth as Parting a round bar, all the way through – I can't recommend it enough. It cost about £50 but its well worth it I think. The one I purchased here – http://www.glanze.co.uk/acatalog/Starter_Sets_of_Clamp_Type_Parting_Tools.html I ordered a few more spare blades with it..

            Are you just starting out in Model Engineering like me?

            Cheers

            Allan.

            #131449
            mechman48
            Participant
              @mechman48

              Hi Allan

              See my profile summary; drop me a pm if you want to chat more.

              George

              #131951
              GarryC
              Participant
                @garryc

                Day 28.

                The Cylinder Support Brackets (1).

                Been struggling with these and am still only about half way through – I made things more difficult by my own earlier inaccuracies and not enough time spent understanding how things fit together….

                The Angle Iron supplied for the 2 Brackets.

                95. angle iron supplied for the cylinder bracket.jpg

                The Cylinder Support Bracket Drawing.

                96. cylinder support bracket drawing.jpg

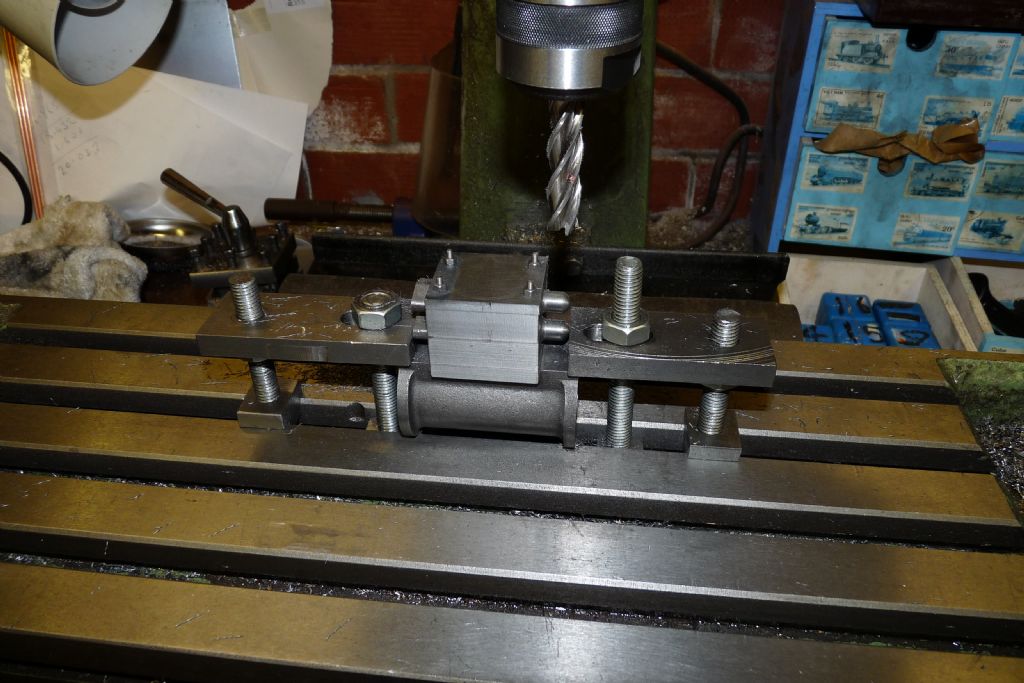
                Milling the Cylinder Support Brackets to length.

                97. milling the cylinder brackets to length..jpg

                Drilling the fixing holes.

                98. drilling the cylinder brackets fixing holes.jpg

                Test fitting the Cylinder Support Brackets to the base.

                99. test fitting the cylinder bracket to the base.jpg

                Test fitting the Cylinder between the brackets. I had to take a light skim off each bracket to get to fit.

                100. testing the cylinder brackets for cylinder length.jpg

                Had to measure the holes individually to get square etc – a result of earlier errors with the Cylinder Cover stud holes.

                101. measuring for the cylinder fixing holes.jpg

                Setting up the Rotary Table to centre – my first play with this..

                102. centering the rotary table.jpg

                Milling the Cylinder Support Bracket.

                103. milling the cylinder bracket.jpg

                The brackets so far. The ugly front pieces will disappear. They don't look pretty but they do fit and hold the Cylinder Square – just need to take a slight skim off the Front Cylinder Cover to decrease the diameter of the area around the gland boss, the rear fits around the Cylinder Cover nicely. It all would have so much more straight forward if I had understood the drawing better when doing the Cylinder and Covers..

                104. the cylinder brackets so far.jpg

                Regards

                Allan.

                #131986
                mechman48
                Participant
                  @mechman48

                  Hi Allan

                  Are you sure you use your milling machine… it looks cleaner than a surgeons sterilised pre op kit… or straight out of the box surprise, just kidding; never the less very nice work thumbs up

                  Cheers

                  George

                  #132047
                  GarryC
                  Participant
                    @garryc

                    Cheers George.

                    Day 29.

                    The Cylinder Support Brackets (2).

                    A bit more time spent milling and the brackets at least look a little better. I have found this to be the most difficult thing to get right so far – not helped by my earlier mistakes of course. The end result not very good but passable (for me anyway), at least I'm still on track and know where I went wrong which is the main thing on this 1st project..

                    Decided not to remove as much metal as the drawing suggests due to the previous errors probably weakening the brackets..

                    105. finished cylinder support bracket.jpg

                    Test fitting the front bracket, had to skim a small taper in the bottom of both brackets to get the cylinder to sit all square (did both at the same time). Hopefully that will not notice too much..

                    '106. test fitting the front cylinder support bracket 1.jpg

                    The Brackets from another angle.

                    107. the cylinder support brackets 2.jpg

                    The rear bracket..

                    108. the rear cylinder cover.jpg

                    Regards

                    Allan.

                    #132478
                    GarryC
                    Participant
                      @garryc

                      Day 30.

                      The Upper Guide Bars.

                      These very similar and done in the same way as the Lower Guide Bars but needing a bit more work..

                      Upper Guide Bars Drawing.

                      115. upper guide bar drawing.jpg

                      Milling the Taper on the Upper Guide Bars.

                      109. milling the upper guide bar taper.jpg

                      The Upper Guide Bars Completed 1.

                      110. completed upper guide bars (1).jpg

                      The Upper Guide Bars Completed 2.

                      111. completed upper guide bars (2).jpg

                      The Upper Guide Bars Completed 3.112. completed upper guide bars (3).jpg

                      Test Fitting the Upper Guide Bars to Base Studs 1.

                      113. test fitting upper guide bars to base studs (1).jpg

                      Test Fitting the Upper Guide Bars to Base Studs 2.

                      114. test fitting upper guide bars to base studs (2).jpg

                      Regards

                      Allan.

                      #132519
                      simondavies3
                      Participant
                        @simondavies3

                        Allan,

                        if you were to rework your support brackets, I would turn them up the other way such that the only bit that you machined was the vertical part of the angle. That way you would not machine the other half of the angle in the process, significantly weakening it as you noted.

                        My other comment is that I would suggest laying the angle down and clamping it to the mill table on top of a spacer of scrap aluminium or even wood when machining the ends using the sides of the end mill. This means the setup is far stiffer rather than the angle standing up waving in the breeze and you can machine in the angled sides at the same time rather than later.

                        Very impressed with your work and your speed of progress. My first machine was a Unimat3 which I used to build a ST double 10 but this probably took 6 months to complete, you seem to be running and learning at a remarkable pace.

                        #132522
                        GaryM
                        Participant
                          @garym

                          Hi Allan,

                          I've been following your build log from the beginning. It has a lot of similarities to the S50 I'm building although the Victoria is larger and more complex. You are dealing with many of the same problems I am, so the comments and suggestions are proving useful. Thanks for sharing it with us.

                          Gary

                          #132546
                          GarryC
                          Participant
                            @garryc

                            Simon

                            Thanks Simon, I did get into trouble with the Cylinder Support Brackets not only with the hole alignment but also with the size of the radius trying to make it fit the incorrectly turned Cylinder Covers. It has taught me to place much more importance on taking the time to understand the drawing as a whole and not just as separate pieces.

                            The end result fortunately is perhaps not as bad as the photos suggest – and all the little errors on this first project will serve as reminders to approach those things differently on future ones..

                            I hope to upgrade particularly my Lathe in the future and maybe look at a Myford or similar, but the SIEG SC4 is going to have to suffice for the next couple of projects I think.

                            Gary

                            Thanks for the feedback, its nice to know someone has been following from the beginning. We seem to have followed similar paths. The Simple Oscillating Engine you completed looks the same as the one I did, I have to say you made a much better job of yours though, very nice. I thought about trying the S50 but opted for Victoria because it was a bit larger – my eyesight is not quite what it was and thought I would find the larger size easier.

                            I get as just much from the learning process as the actual work and seem and try to learn something new everytime I'm in the workshop, its all very very basic stuff at the moment, especially to most folk on here I'm sure but non the less interesting for it to me e.g. yesterday doing the guide bars – most of the work up until now has been with the castings or in brass but the Guide Bars were in Mild Steel, the first attempt at drilling and my drill seemed to not want to know, the material seemed just too hard or so I thought and couldn't make it out for a while, I had similar problems with the Lower Guide Bars but had just about managed. A slight extra tightening of the clamps holding the workpiece and the drill went through it like butter, they were already tight just not tight enough apparently – I was amazed! Maybe it's as they say – simple things to simple…

                            John

                            Thats interesting thanks. I don't have a boiler at the moment, haven't thought that far ahead yet. I hope I get the chance to try somethings 'large' scale in the future after upgrading some of my equipment though.

                            Sorry I've been waffling on a bit..

                            Cheers

                            Allan.

                            #132601
                            JasonB
                            Moderator
                              @jasonb

                              Thats an interesting theory John as virtually all steam engines such as locos and traction engines all have the regulator on the inlet side as do stationary engines with governors have the inlet controlled by the governor. Have we all been doing it wrong?

                              Maybe it worked on the pump as the liquid is being sucked by the piston which is powered rather than the gas/liquid pushing against the piston to make it move?

                              J

                              Edited By JasonB on 14/10/2013 07:33:21

                              #132611
                              GaryM
                              Participant
                                @garym

                                Maybe it's like trying to ride a bike slowly (as in mountain biking). If you apply the brakes when pedalling it is easier to ride very slowly. It sounds odd, but it works. Although, that is more like putting a brake on the flywheel.

                                Gary

                                #132646
                                Sub Mandrel
                                Participant
                                  @submandrel

                                  Throttling the exhaust on a loco will screw up the efficiency, which is why it isn't done. Two reasons – with regulator wide open you notch up the valves to control speed, getting more expansive working= better efficiency.

                                  Other reason is thermodynamics. throttling a steam supply increases the temperature of the steam. regulator can introduce a small amount of superheat this way.

                                  Theoretical efficiency is limited by difference in temperature difference across the system so regulator after makes less efficient by increasing temperature of exhaust.

                                  Not an issue in something like a pneumatic drill.

                                  Neil

                                  #132761
                                  GarryC
                                  Participant
                                    @garryc

                                    Day 31.

                                    The Guide Bar Supports.

                                    I used these to experiment a little with trying to get a decent finish. Up until now I was getting an ok finish by slowing to about 150 – 200rpm (the feed rate auto adjusts to the speed and is not adjustable). The Lathe starts at about 100rpm but I had thought that would be too slow to cut, but not so, dropping to 100rpm upgraded the finish from a clean and bright but rough to the touch finish to something approaching smooth and shiny – thought I would be unable to get that with such a small Lathe so a nice surprise..

                                    The Lower Guide Bar Support Drawing.

                                    116. lower guide bar support drawing.jpg

                                    The Upper Guide Bar Support Drawing

                                    117. upper guide bar support drawing.jpg

                                    Drilling the Lower Guide Bar Supports.

                                    118. drilling the guide bar supports.jpg

                                    The Lathe Tool I normally use on the right but I used the one on the left to do the Upper Guide Bar Supports.

                                    119. lathe tools used for guide bar supports.jpg

                                    Drilling the Upper Guide Bar Supports.

                                    120. drilling the upper guide bar supports.jpg

                                    Parting Off one of the Lower Guide Bar Supports.

                                    121. parting off the guide bar supports.jpg

                                    Test fitting the Guide Bar Supports.

                                    122. test fitting the guide bar supports.jpg

                                    Regards

                                    Allan.

                                    #132898
                                    simondavies3
                                    Participant
                                      @simondavies3

                                      Allan,

                                      some (hopefully helpful) criticism:

                                      My immediate thought when I saw your photos was " wow, that's a long way out of the chuck, must be a long support". The later shots of parting off confirmed that you really were working a loooooong way from the chuck.

                                      I am sure that others here will be able to comment further but personally I would have the material sticking out of the chuck by about 1/8", 3mm max from the point where you expect to part it off. This will give you significantly more support, allow deeper cuts to be made and improve the surface finish. Additionally, it should improve your parting off experience – I have visions of that part digging in during parting, bending, digging in further and eventually snapping or breaking something…

                                      So I would have 3/8" plus the width of the parting off tool, plus any tooling clearance to the chuck, plus a 'comfort zone' clearance to he chuck jaws = 5/8" maximum from the chuck jaws to the end of the material to be machined. 

                                      Hope that helps,

                                      Simon

                                      Edited By Simon0362 on 17/10/2013 12:56:13

                                      #132917
                                      GarryC
                                      Participant
                                        @garryc

                                        Hi Simon

                                        Thanks, criticism is very welcome. You are correct of course. I had tried to clean up the bar with a very slight slow cut right down its length – then thought not to mark the nice finish in the chuck jaws and left the whole bar hanging out of the chuck, with no support…. I can see it was a wrong approach now.

                                        Something I will watch out not to do in the future, thanks again.

                                        Cheers.

                                        Allan

                                        #133193
                                        GarryC
                                        Participant
                                          @garryc

                                          Day 32.

                                          The Lever Bridge.

                                          This was the first time I had tried side milling. The bar was firstly faced off to length in the Lathe and a base milled flat to measure from. The central hole was marked and set to run true in the Lathe, the small diameter hole was drilled all the way through the bar and then opened out half way to the large diameter at the same setting. I then marked and drilled the fixing holes. The slots were milled and then the rounded tops. The first 'section' of side milling the tops I got wrong by trying to work out the measurements exactly using the mill scales but the second I simply set so the cutter just clipped the corners and then decreased the radius each cut and the result was much better and looked ok, at least to my eye – learning again.. The overall end result again far from perfect but again ok to me for this first project as I hope to have found a method to work with in the future for the simple 'rounding off' of corners..

                                          The Lever Bridge Drawing, sorry bit out of focus.

                                          123. the bridge drawing.jpg

                                          The Supplied Bridge Bar Faced Off to Length.

                                          124. bridge bar faced off to length.jpg

                                          Setting the Central Hole to Run True.

                                          125. setting the bridge central hole to run true.jpg

                                          Starting to Mill the Bridge.

                                          126. starting to mill the bridge.jpg

                                          The 'Square' Milling done.

                                          127. the bridge so far.jpg

                                          The Setup for Side Milling the Rounded Tops.

                                          128. the setup for side milling the bridge tops.jpg

                                          Test fitting the Bridge.

                                          129. test fitting the bridge.jpg

                                          Regards.

                                          Allan.

                                          #133196
                                          JasonB
                                          Moderator
                                            @jasonb

                                            Looks fine from here.

                                            #133205
                                            Geoff~
                                            Participant
                                              @geoff46085

                                              Allan,

                                              Very interesting thread. What lathe and mill do you use?

                                              Geoff~

                                              Edited By Geoff Prince on 20/10/2013 21:24:58

                                              #133206
                                              roy entwistle
                                              Participant
                                                @royentwistle24699

                                                Allan I think you will find that it should be up at the other end of the slide bars

                                                Just a thought and can I ask do you never use hand tools like files ?

                                                Roy

                                                #133238
                                                GarryC
                                                Participant
                                                  @garryc

                                                  Thanks Jason.

                                                  Thanks Roy – oops!

                                                  The Bridge in the right place.

                                                  130. the bridge in the right place..jpg

                                                  In case anyone may be interested in the overall drawing.

                                                  131. the overall diagram.jpg

                                                  Thanks Geoff.

                                                  The SIEG SC4 Lathe from Axminster Tools.

                                                  132. the sieg sc4 lathe.jpg

                                                  The Champion 16V Mill from Chester Tools.

                                                  133. the champion 16v mill.jpg

                                                  I have nothing but praise for both equipment (and Companies) – anyone thinking of buying either don't be put off by my results they are capable of much better thats for sure.

                                                  Hope to progress to some 'old british' types in the future…..

                                                  Regards

                                                  Allan.

                                                  #133239
                                                  GarryC
                                                  Participant
                                                    @garryc

                                                    Sorry Roy – in answer to your question – I'm a hopeless case when it comes to files and filing and never happy with the end result, so I tend to avoid whenever I can..

                                                    Cheers.

                                                    Allan.

                                                    #133247
                                                    Geoff~
                                                    Participant
                                                      @geoff46085

                                                      Allan,

                                                      Many thanks for the pictures. Have sent you a PM.

                                                      Geoff~

                                                    Viewing 25 posts - 126 through 150 (of 432 total)
                                                    • Please log in to reply to this topic. Registering is free and easy using the links on the menu at the top of this page.

                                                    Advert

                                                    Latest Replies

                                                    Viewing 25 topics - 1 through 25 (of 25 total)
                                                    Viewing 25 topics - 1 through 25 (of 25 total)

                                                    View full reply list.

                                                    Advert

                                                    Newsletter Sign-up