Stuart 10V Build Log – Complete Beginner…

Advert

Stuart 10V Build Log – Complete Beginner…

Home Forums Work In Progress and completed items Stuart 10V Build Log – Complete Beginner…

Viewing 25 posts - 101 through 125 (of 385 total)
  • Author
    Posts
  • #477331
    Dr_GMJN
    Participant
      @dr_gmjn

      OK, I'll ponder the chamfers a bit more while I get the holes drilled and the the bores reamed.

      Jumping ahead a bit: the standard.

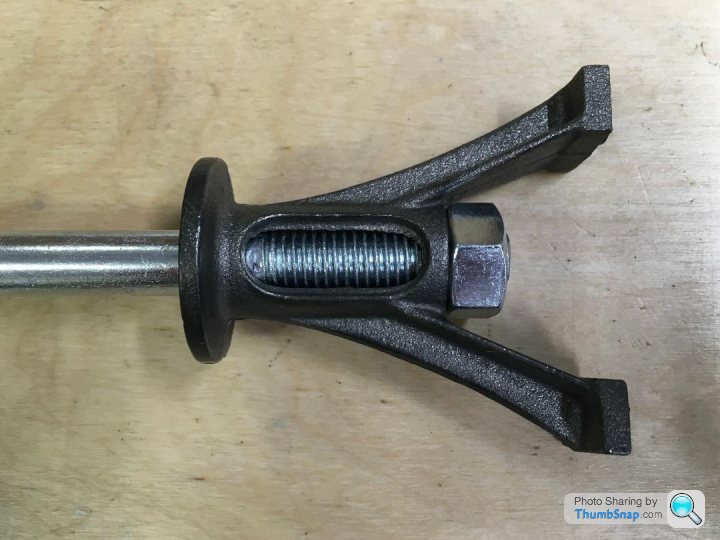
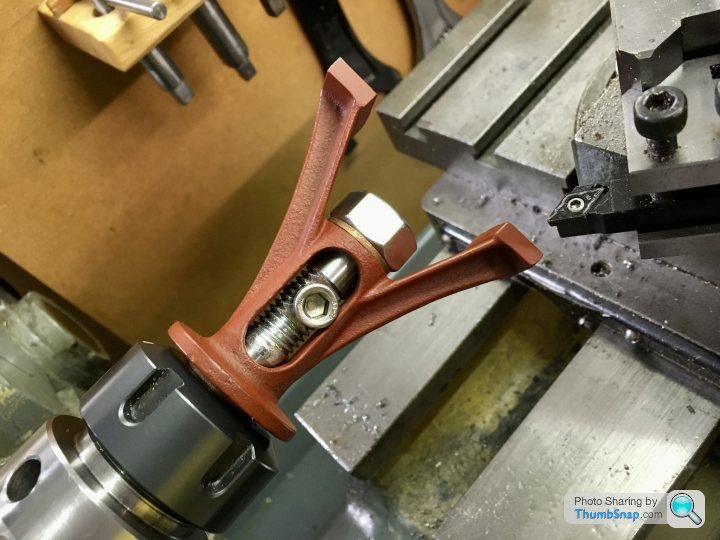
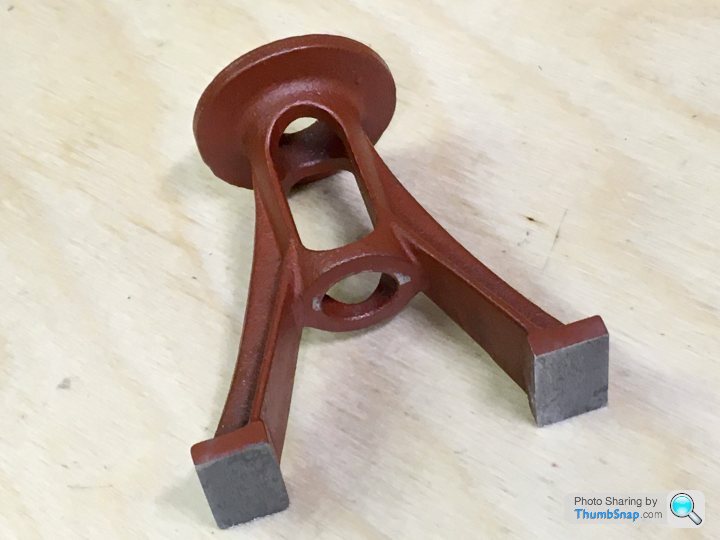
      I've seen a couple of builds use a bolt to get a best-fit through the cast central hole, which makes sense to me becaue you use that setup to machine the feet flat:

      I will probably cross-drill the bolt in the region of the oval cut-out, and knock a pin through to stop it rotating on the shank.

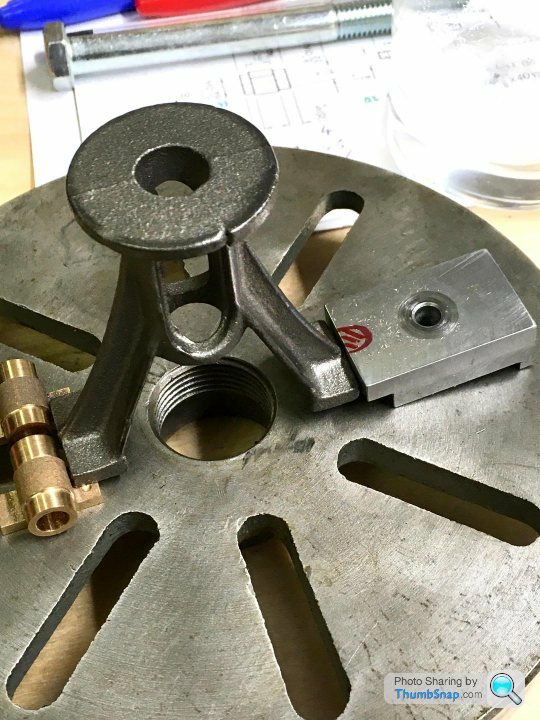
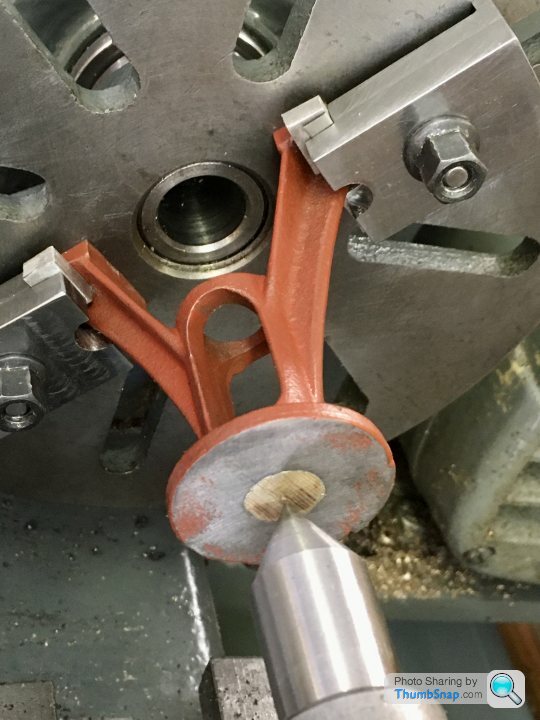
      But then I want to turn the piece around and turn the bore, the cylinder face and the rim. The logical way seems to use a faceplate, I could even modify my existing vice clamps to secure it:

      Question is, how do I center it accurately?

      I thought about mounting it to a rectangular plate and mounting in a 4-jaw chuck, and centering it using the DTI on the protruding bolt shank, used as a temporary mandrel. I've seen online where the standard bore was machined offset from the casting axis , and even though in practical terms it might be OK, I really want to avoid that.

      Any suggestions welcome!

      Advert
      #477339
      Dr_GMJN
      Participant
        @dr_gmjn

        One other question on the standard while I'm at it:

        I don't have a rotary table yet, but I'll need to drill the cylinder mounting holes.

        If I can get the center of the bore and zero my DROs on it, would it be accurate enough to use X&Y co-ordinates obtained from Autocad/Creo/Fusion/whatever I can remember how to use on the day, to get the holes on the correct PCD, and expect them to match the cylinder and upper and lower covers?

        #477363
        JasonB
        Moderator
          @jasonb

          If you have afully functioning DRO then just use the PCD function. If simple scales with just a readout then co-ordinates will be fine, if you have a Zeuz book that gives simple formula to get various PCDs and a 6hole can even be done in your head as it's just equilateral triangles.

          The Standard I would hold in the 4 jaw to turn the feet and use a long length of studding right through the spindle to retain it or better still make a plug for the bottom and use tailstock ctr, if just holding on a bolt then also drill the end and use tailstock support.

          Usual way to set the top running true was to drive a lump of wood into the end, file flush and then strike say four arcs in from the edge and eyeball the ctr from where they meet, you can then set the ctr to run true by gently tapping the part into position with the fixings nipped up.

          #477383
          Dr_GMJN
          Participant
            @dr_gmjn
            Posted by JasonB on 04/06/2020 07:09:34:

            If you have afully functioning DRO then just use the PCD function. If simple scales with just a readout then co-ordinates will be fine, if you have a Zeuz book that gives simple formula to get various PCDs and a 6hole can even be done in your head as it's just equilateral triangles.

            The Standard I would hold in the 4 jaw to turn the feet and use a long length of studding right through the spindle to retain it or better still make a plug for the bottom and use tailstock ctr, if just holding on a bolt then also drill the end and use tailstock support.

            Usual way to set the top running true was to drive a lump of wood into the end, file flush and then strike say four arcs in from the edge and eyeball the ctr from where they meet, you can then set the ctr to run true by gently tapping the part into position with the fixings nipped up.

            Thanks Jason, It's 5 holes on the PCD. The DROs are from individual x, y & z scales I fitted a few weeks ago (the cheap ones). They read to 0.01mm. I have no idea about accuracy or repeatabiity though.

            I'd totally forgotten about the Zeus book – I got one at uni and never looked at it since. I think I'll use the formula in there, just so I didn't waste my money back in 1990.

            #477413
            Martin Connelly
            Participant
              @martinconnelly55370

              The Zeus books are a bit of an anachronism nowadays. I have two, the older one has log tables, sin, cos and tan tables. The later one has tan tables and lists of numerical and CNC control codes. I still use them as a useful reference but some of their function has been superseded by modern technology. The drilling of holes on a PCD is an example. To get the coordinates of a hole on a PCD from an angle and the PCD they are the PCD x cos(angle) and PCD x sin(angle). With the availability of calculators with trig functions (we are talking here of stand alone calculators and those on computers and mobile phones) to calculate these X and Y coordinates the use of the Zeus books has reduced. Before calculators the machinist had to do the calculations using the tables for sin and cos to get these values then get the values for coordinates by multiplication using the log tables.

              We seem to have a system for rotary tables (PCD and angle) and a system for XY tables with DROs (X and Y coordinates). Older drawings are based on the former system. Newer ones drawn with cad can cater for both.

              As drawings created with CAD can be used to just put the dimensions from the centre of a PCD (or any other datum) straight onto the drawing. If you have access to CAD then often a quick drawing with dimensions calculated by the CAD program is quicker than doing a lot of calculations yourself.

              Martin C

              #477436
              JasonB
              Moderator
                @jasonb

                Or if you don't want to spend half an hour trying to remember your CAD program there are plenty of simple calculators on line that will give the co-ordinates.

                #477451
                Dr_GMJN
                Participant
                  @dr_gmjn

                  I calculated them from the Zeus book, and confirmed them with Autocad. Only took 15 minutes and they both correlate.

                  Thanks.

                  #477560
                  Dr_GMJN
                  Participant
                    @dr_gmjn

                    Moved on to the standard – I’ll do all the base drilling at the same time.

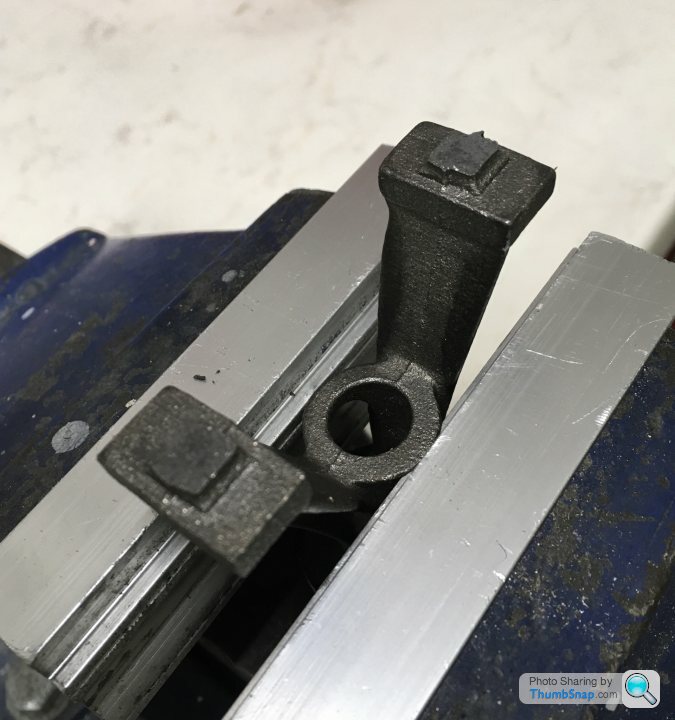
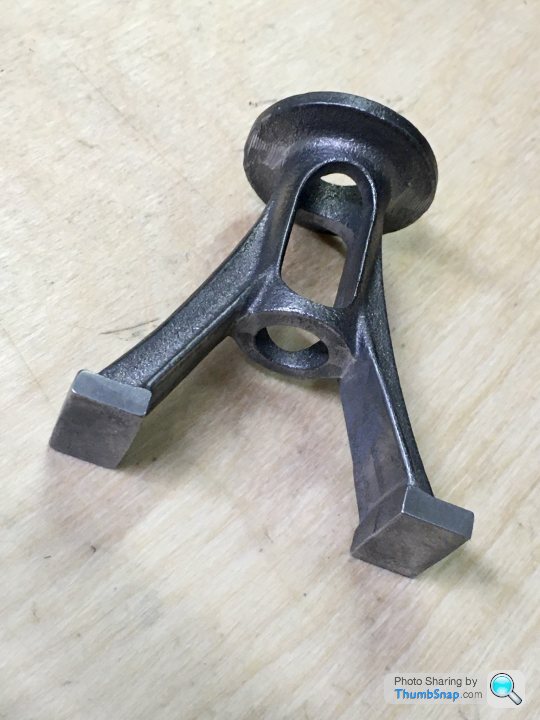
                    First job- clean up the castings with files:

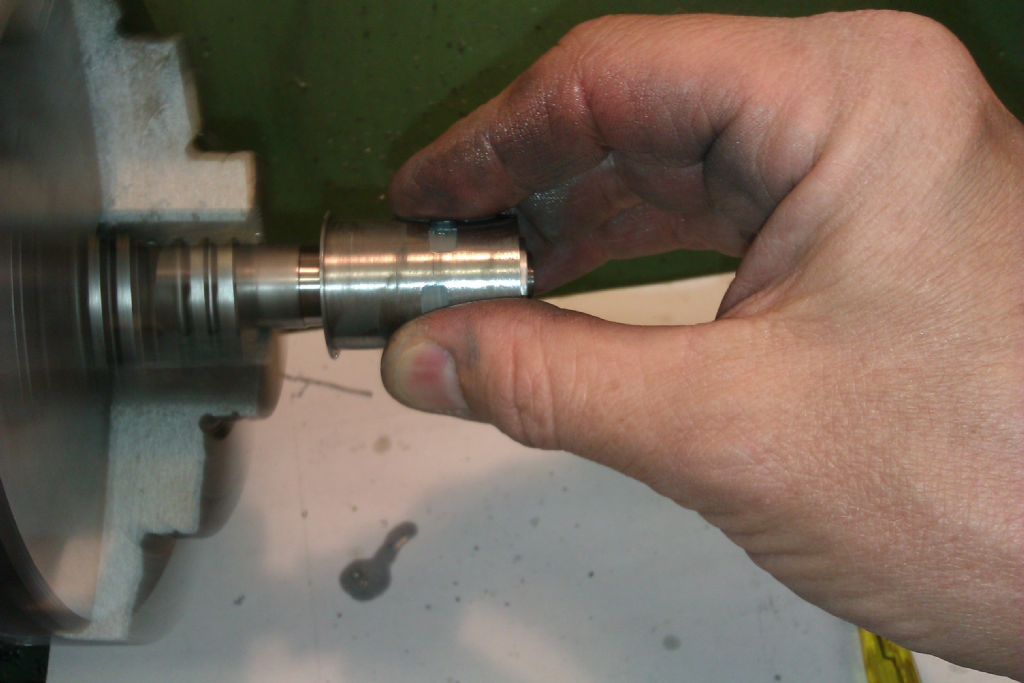
                    I made a mandrel from a cut down bolt, cross-drilled for a drive screw:

                    I wrapped some shim steel just to take up the bit of play, and copper washers to protect the collet and casting:

                    I should have let the bolt protrude more so I had room for a tail support, but in practice it machined easily:

                    I might have to machine some more off the feet, because when I marked the specified height with a scriber, it seemed too far down the upper flange. If I machine down to that, getting the thickness right won’t be possible:

                    Then again by the time I’m done cleaning the top face up, getting the specified thickness will be very close I think. I’m wondering whether to just leave the feet, clean up the underside of the flange and see where I am. Maybe live with the overall height being a millimetre or so too much. Not sure – seems like a bit of a bodge.

                    Question about the machined bore for the slider – and for the main cylinder for that matter: I'm thinking to machine them to a 'close enough' dimension to the drawing, concentrating on surface finish rather than absolute accuracy, and then make the piston/slider to suit whatever bore diameter I end up with. I could machine small amounts off the piston/slider until I get a good fit – checking by repeatedly machining and test fitting in the bored parts. Is this OK or totally bad practice? I doubt I could machine the parts in isolation to a dimension and get them to fit, so I don't think I've got much choice. There are no tolerances on the drawings anyway, and even it there were, I doubt I could hit them!

                    Thanks.

                    #477591
                    JasonB
                    Moderator
                      @jasonb

                      Aim for nominal size but a bit either way won't matter as the finish is more important then make the rest to suit.

                      #477640
                      TiddlerTad
                      Participant
                        @tiddlertad

                        Hi – I made a 10V last year and produced a series of YouTube videos. Some of my machining methods might not be the best, but it runs as sweet as a nut. I also added a reversing mechanism which definitely makes the engine more interesting.

                        The link to my video series is here

                        They might be of interest. Good luck with the build.

                        Cheers. Andrew

                        #477642
                        Dr_GMJN
                        Participant
                          @dr_gmjn
                          Posted by Andrew Whale 1 on 05/06/2020 10:29:08:

                          Hi – I made a 10V last year and produced a series of YouTube videos. Some of my machining methods might not be the best, but it runs as sweet as a nut. I also added a reversing mechanism which definitely makes the engine more interesting.

                          The link to my video series is here

                          They might be of interest. Good luck with the build.

                          Cheers. Andrew

                          Thanks Andrew! – It's Garth here: I've contacted you a couple of times when I was looking at the SX2P, and more recently when setting it up. I pretty much followed your lead on adding the DRO scales, making the vice clamps, and using the bolt method for machining the standard. Your videos were my "go-to" references when planning this build, and with the additional help of forum members here I'm making steady (but slow) progress. Cheers!

                          #477737
                          Dr_GMJN
                          Participant
                            @dr_gmjn

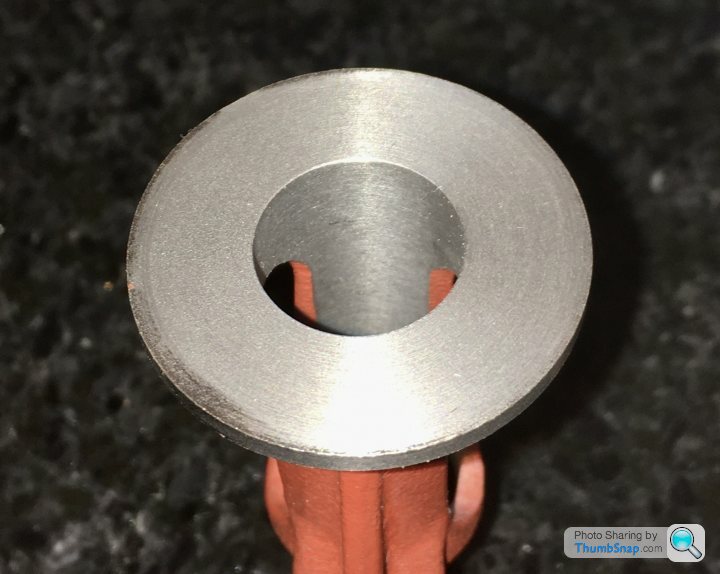
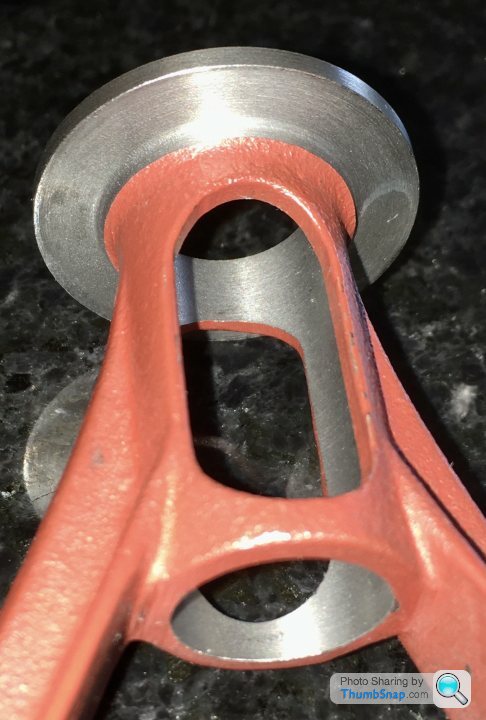
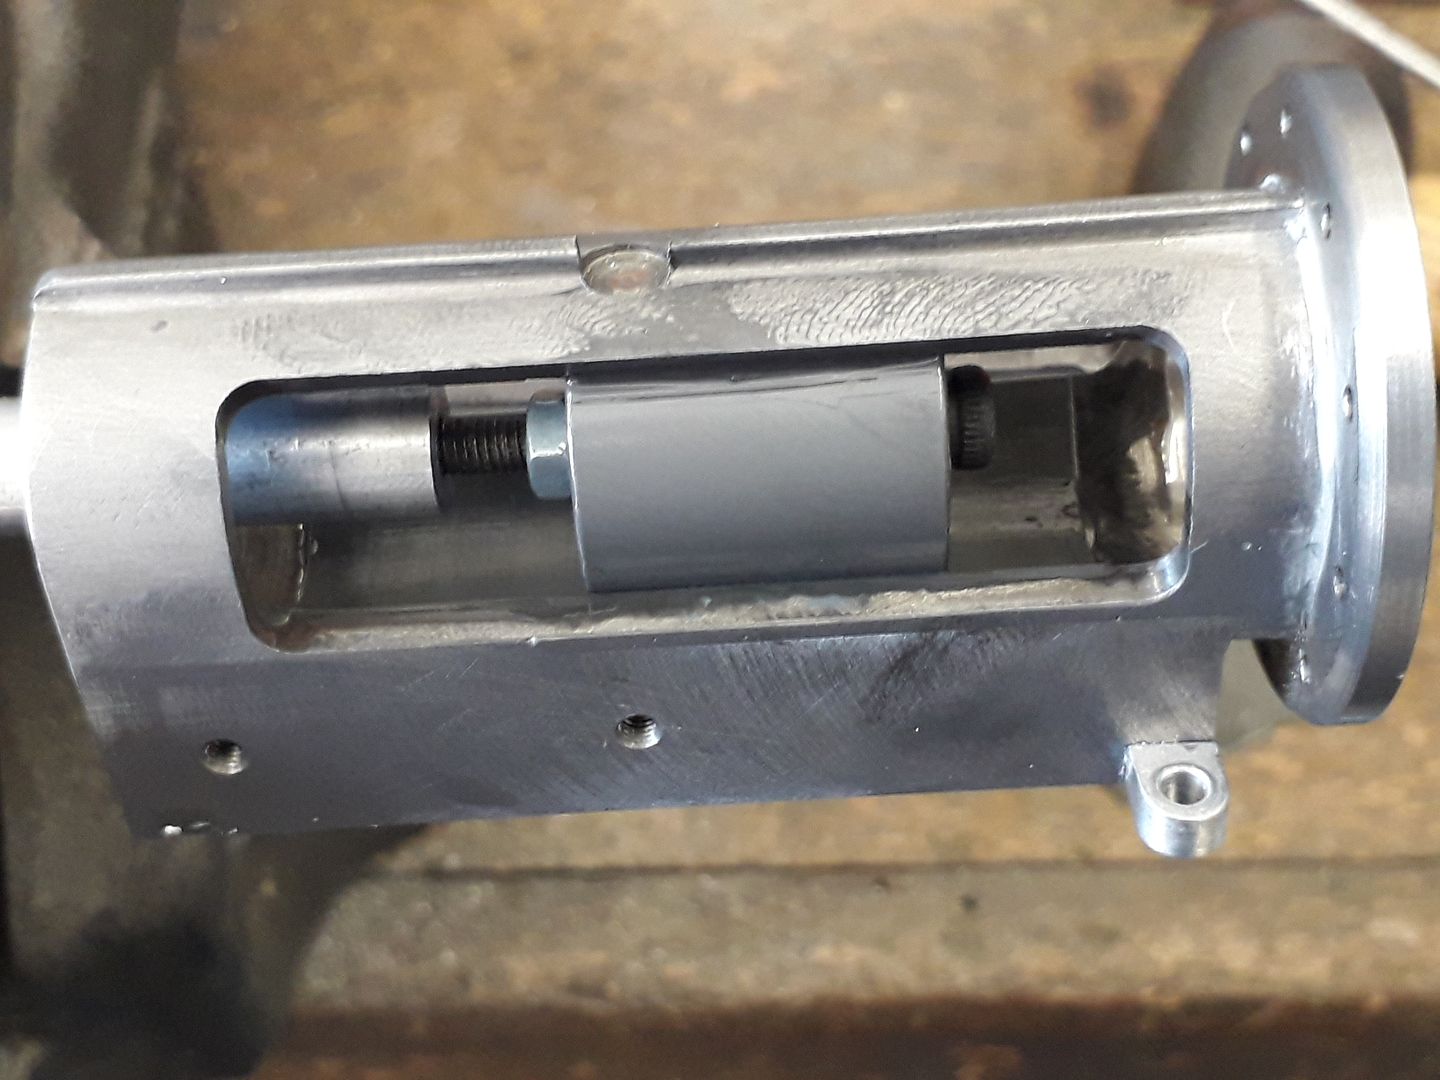
                            I took a bit more off the feet, and then prepared the casting for fitting to the faceplate by hammering a dowel plug Into the end (as suggested), and marking the centre using callipers. I modded my vice clamps and used them to secure. It was easy to align everything to a centre in the tailstock:

                            Then used right and left handed tools to machine the top, edge and bottom surfaces. I had some resistance around the o/d of the top plate, presumably due to chill hardening of the casting again:

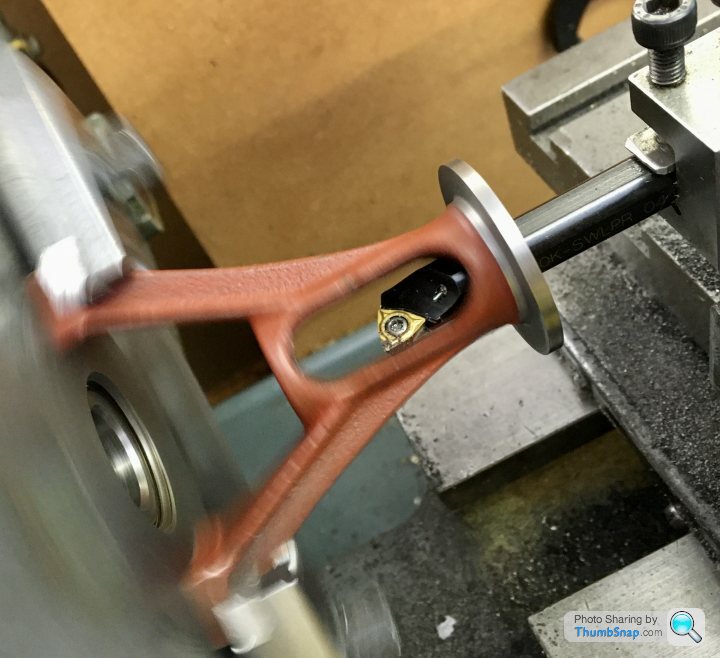
                            Then on to the bore, using the same setup to keep everything square. Used my large Sandvik boring bar, and a new insert. Tore through it no problem:

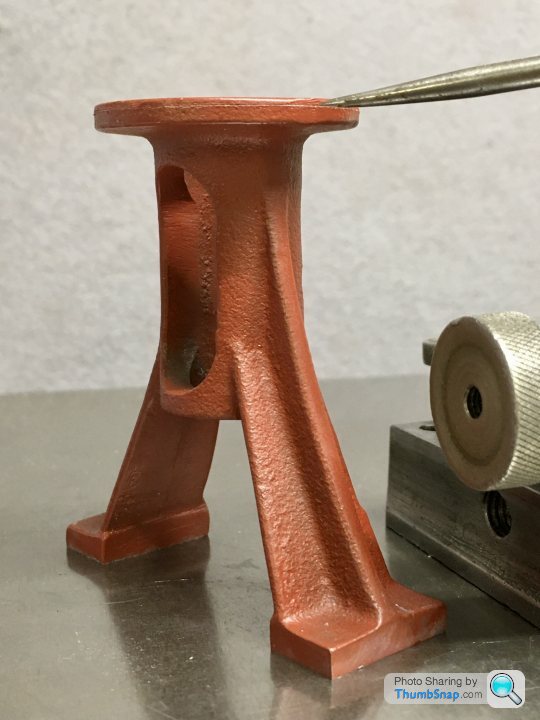
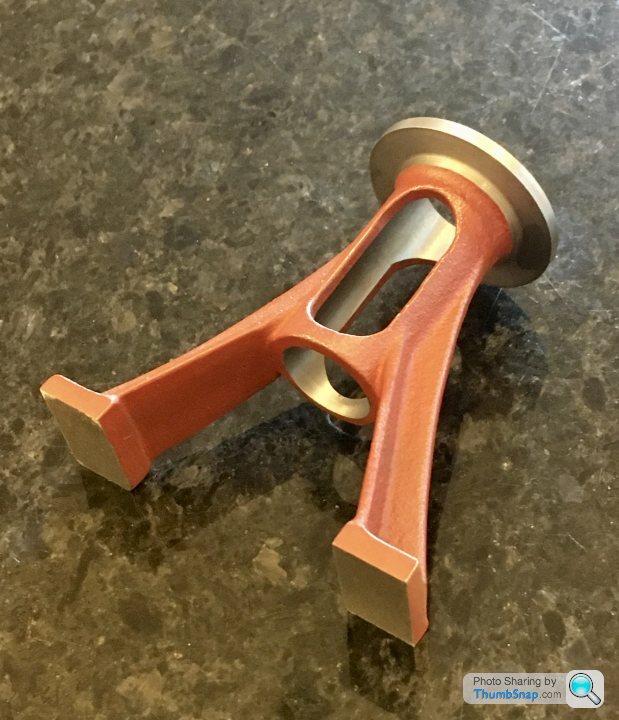
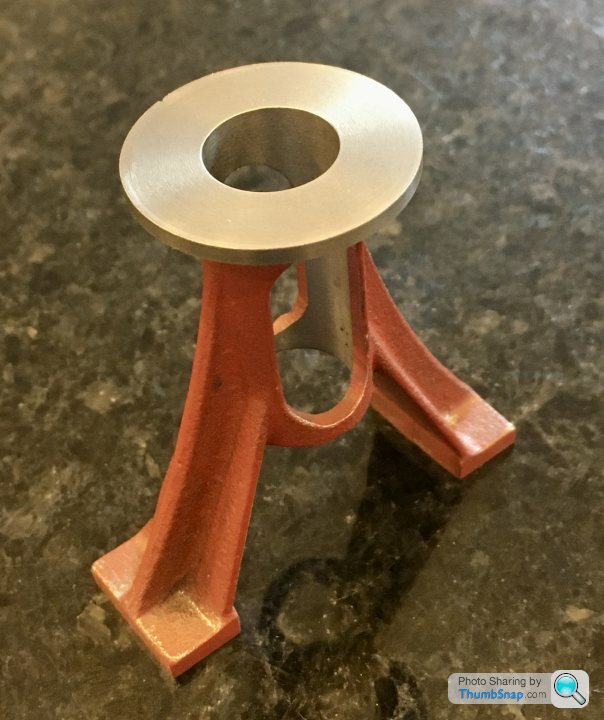
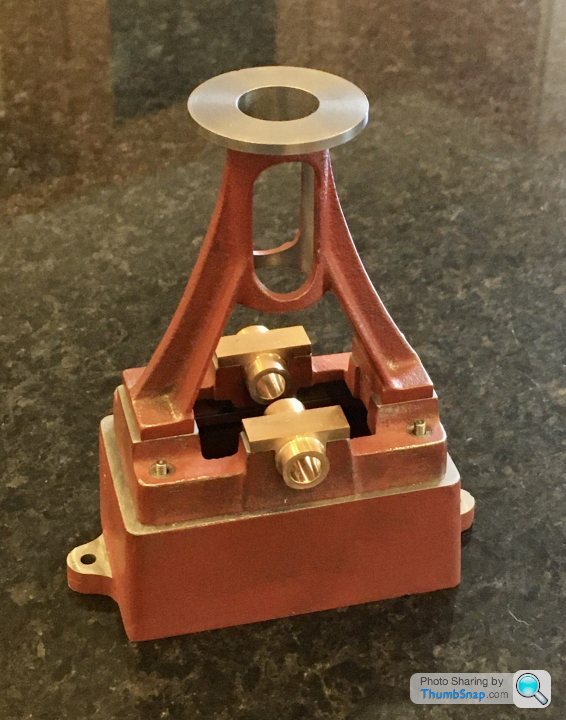
                            So that was that:

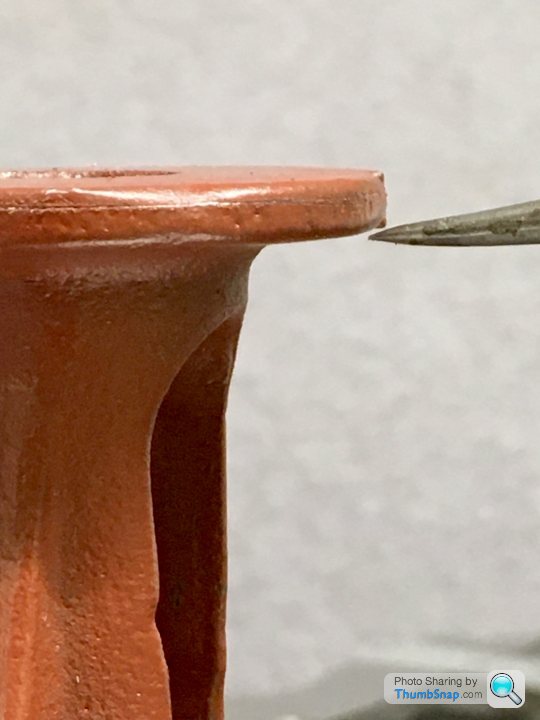
                            When all’s said and done, according to the drawings, overall height is about 0.025” too tall, bore diameter about 0.002” too big. Flange diameter and thickness pretty much spot on. I think I maybe should have gone further in with the flange underside machining because the nuts are going to be very close to the cast side. It was difficult to judge, but not the end of the world to correct if it’s an issue. There is a slight flaw in the flange edge that wouldn’t clean up, but it’s not too bad.

                            First time I’ve used a faceplate, so fairly pleased with the result.

                            Quick question: before machining the slider to suit the bore, do I need to do any other finishing of the bore? It's a nice finish as far as I'm concerned, but it will still have machining marks in it.

                            Thanks all!

                            #477740
                            Mark Gould 1
                            Participant
                              @markgould1

                              Loving your progress Garth, you seem to be doing everything right! Quick question though, how do you get all of your photos to be oriented correctly? I have the occasional one that turns out rotated when I upload it to my album. Sorry to hijack this lovely build thread with a question.

                              Mark

                              #477747
                              JasonB
                              Moderator
                                @jasonb

                                It would not hurt to lap the trunk guide, this will give a smoother surface and also help remove any taper if present. Simple way would be to turn a piece of hardwood to a good fit in the trunk guild, charge it with some oil and 600g silicon carbide powder and work the standard up an down it with the lap slowly rotating.

                                When it comes to the cross head that can also be lapped into the trunk guide with some 1000g for the best fit.

                                These are cylinders being lapped, aluminium lap in this case

                                Firefly121

                                And the embryo cross head of my latest engine being lapped into the trunk guide

                                #477760
                                Dr_GMJN
                                Participant
                                  @dr_gmjn
                                  Posted by Mark Gould 1 on 05/06/2020 18:01:32:

                                  Loving your progress Garth, you seem to be doing everything right! Quick question though, how do you get all of your photos to be oriented correctly? I have the occasional one that turns out rotated when I upload it to my album. Sorry to hijack this lovely build thread with a question.

                                  Mark

                                  Mark, no problem. I post an abbreviated build log on another (not engineering) model forum, and upload the images there. I copy and paste here. Never had an issue so far. Cheers!

                                  #477761
                                  Dr_GMJN
                                  Participant
                                    @dr_gmjn
                                    Posted by JasonB on 05/06/2020 18:23:19:

                                    It would not hurt to lap the trunk guide, this will give a smoother surface and also help remove any taper if present. Simple way would be to turn a piece of hardwood to a good fit in the trunk guild, charge it with some oil and 600g silicon carbide powder and work the standard up an down it with the lap slowly rotating.

                                    When it comes to the cross head that can also be lapped into the trunk guide with some 1000g for the best fit.

                                    These are cylinders being lapped, aluminium lap in this case

                                    Firefly121

                                    And the embryo cross head of my latest engine being lapped into the trunk guide

                                    Thanks Jason. Any rules of thumb for length of the lap eg 1.5x diameter or something? By lapping, how are we avoiding or even reducing taper? Just picking up more on smaller internal diameters? Thanks.

                                    #477770
                                    JasonB
                                    Moderator
                                      @jasonb

                                      If making a simple wooden lap then it can be made as long as the trunk guide or even a bit more a sit's cheap enough. If metal then yes something like 1.5 x D would be a minimum. That trunk guide I showed above at 22mm dia was done with a length of copper water pipe about twice it's length.

                                      The theory is that the lap is parallel and does the cutting so it will remove high spots and/or the smaller diameter parts of the hole. very good thread on lapping over on MEM forum here though mostly about expanding laps.

                                      #477774
                                      Dr_GMJN
                                      Participant
                                        @dr_gmjn

                                        Ok, but if I’m turning the wood on the same lathe I’m machining the part, why would it be any more parallel than the part?

                                        #477775
                                        JasonB
                                        Moderator
                                          @jasonb

                                          Bores have a habit of tapering even on lathes that will turn a parallel OD.

                                          #477816
                                          Dr_GMJN
                                          Participant
                                            @dr_gmjn
                                            Posted by JasonB on 05/06/2020 20:17:20:

                                            Bores have a habit of tapering even on lathes that will turn a parallel OD.

                                            OK.

                                            I guess the real test starts when I have to machine one part to fit into another…

                                            I think I might get on with the cylinder, covers and valve box – get all the cast parts fitted together to give myself some more practice, then start on the moving parts.

                                            #477818
                                            Dr_GMJN
                                            Participant
                                              @dr_gmjn
                                              Posted by Dr_GMJN on 05/06/2020 22:53:07:

                                              Posted by JasonB on 05/06/2020 20:17:20:

                                              Bores have a habit of tapering even on lathes that will turn a parallel OD.

                                              OK.

                                              I guess the real test starts when I have to machine one part to fit into another…

                                              I think I might get on with the cylinder, covers and valve box – get all the cast parts fitted together to give myself some more practice, then start on the moving parts.

                                              I have noticed that once I've made a cut, going back over at the same depth setting cuts again, and again, and again. I guess it's gradually knocking off the peaks of the surface. I can't think it's much to do with thermal expansion at the speeds I'm using, or deflection at the depths I'm using. It's strange to see.

                                              Once a bore is machined to size, is a 'finishing cut' defined as another at the same depth setting (as per above), or is it a final very thin cut to the final size?

                                              Thanks.

                                              #477834
                                              JasonB
                                              Moderator
                                                @jasonb

                                                That would be called a "spring pass" as it takes out any flex or spring in the tool without putting on any more cut..

                                                You will find that the insert you are using is nor really sharp and would be better with a decent depth final cut so it will get pushed off more than a really sharp HSS tool or even a **GT insert, the interupted cut due to the slots in the side of your part won't help either. Depending on the job I will quite often do the last couple of passes with a HSS tool having taken the rest out with CCMT. in iron, bronze and brass I'm more likely to just use CCGT.

                                                #478476
                                                Dr_GMJN
                                                Participant
                                                  @dr_gmjn

                                                  Thanks for that.

                                                  I've come to a bit of a halt while I wait for some materials to make mandrels etc., and I'm going to add some power to my mill x-feed.

                                                  I need some tooling too for the 10V – any advice on slitting saws for the conrod bearing and valve eccentric rod?

                                                  Thanks.

                                                  #478486
                                                  Jon Cameron
                                                  Participant
                                                    @joncameron26580

                                                    Hi,

                                                    The bearings could be cut with a hacksaw, then clamped in the mill vice to clean up the mating faces before soft soldering together for drilling and boring then again with a mandrel to turn the OD.

                                                    I haven't the plans in front of me but if you are refering to the slot at the end of the conrod this can be done clamped in the milling vice and using a slot cutting milling bit to cut the slot. Drill the hole to bolt together first and gain correct distance, centre to centre then do the finish profiling. As you've found already it may be best to go slightly under size on the milling cutter so you can finish to correct dimensions.

                                                    Slitting saws are another tool that will cut oversize and tend to wobble even on a very accurate mandrel, so you will possibly get more control and precision by hand. But there you have two options, the choice is yours.

                                                    Regards

                                                    Jon

                                                    #478502
                                                    JasonB
                                                    Moderator
                                                      @jasonb

                                                      I can't remember how much Stuarts allow for the cut but a saw about 1mm thick would be a reasonable middle of the road thickness – not too thin that it wanders excessively and not too thick that it loads the machine or removes too much metal. Don't get one with too many teeth as fine ones can clog and then start to wander something like 80mm dia and 30-35 teeth would be OK. This will do for both the big end and the half cut in the eccentric strap.

                                                      I also like to give the sawn surfaces a skim with a flycutter if there is enough material to allow for it.

                                                    Viewing 25 posts - 101 through 125 (of 385 total)
                                                    • Please log in to reply to this topic. Registering is free and easy using the links on the menu at the top of this page.

                                                    Advert

                                                    Latest Replies

                                                    Viewing 25 topics - 1 through 25 (of 25 total)
                                                    Viewing 25 topics - 1 through 25 (of 25 total)

                                                    View full reply list.

                                                    Advert

                                                    Newsletter Sign-up