Stepper Motor Controls

Advert

Stepper Motor Controls

Home Forums Electronics in the Workshop Stepper Motor Controls

Viewing 25 posts - 1 through 25 (of 37 total)
  • Author
    Posts
  • #396310
    ChrisH
    Participant
      @chrish

      Electronics is one avenue I haven't been down for 40 + years, so stepper motors and their electronic control has passed me by. However, I now see a need to know some more about that latter subject as I can see an opportunity to employ a stepper motor drive.

      I have been looking on the internet for information on stepper motor control but either what I have seen asks more questions than it answers or, more usually, the authors seem to be writing in another language!

      So, can anybody suggest an idiots guide to stepper motor control, along the lines of "idiot to expert in no time at all", written in plain English to be readily understandable to someone without a degree in electronics and electronic control and a lifetime's experience in the subject.  And I mean idiot!

      All suggestions will be gratefully appreciated! Thank you.

      Chris


      Edited By ChrisH on 14/02/2019 19:46:22

      Advert
      #32003
      ChrisH
      Participant
        @chrish
        #396312
        Emgee
        Participant
          @emgee

          Chris, depends a lot on the power you need from the stepper but for light loads similar to the recent rotary table conversion you can drive with an Arduino, plug on display, stepper driver and power supply.

          Read the conversion article for all the info needed.

          Emgee

          #396313
          John Rudd
          Participant
            @johnrudd16576

            Chris do a search on the net for Jones on stepper motor control. He is a well respected author on the subject…

            #396315
            Ian McVickers
            Participant
              @ianmcvickers56553

              Chris, what are you intending to do with the stepper motor? This will have an impact on what type of control you need.

              #396333
              ChrisH
              Participant
                @chrish

                Emgee – is that the article in MEW 249?

                John – is that Douglas W Jones , Uni of Iowa? Have just found that on t'net, some reading to do there! Thanks.

                Ian – first job would be to 'automate' a shaper cross feed from manual.

                Chris

                #396335
                Emgee
                Participant
                  @emgee

                  Hi Chris, not sure about the actual MEW number but it was an article followed up on this forum, perhaps Michael G can find it, the name Ward is in my mind.

                  Your'e right about the Jones article, but it is very comprehensive !!

                  Emgee

                  #396337
                  David George 1
                  Participant
                    @davidgeorge1

                    Hi Chris I was in the same position as you about powering my z axis mod and tried a DC motor and speed controller but found at low speed no power and came across CNC 4you talked to them at exhibition bought parts from them and there us a telephone line to call if you have problems. Cnc4you.co.uk is the web site call them and you can talk to them about options and there are all the wiring diagrams to download on line. I am not connected to them at all just satisfied with their help.

                    David

                    #396339
                    Emgee
                    Participant
                      @emgee

                      Chris, here is a link to HMEM forum with a good deal of Arduino info

                      **LINK**

                      I found cnc4u prices pretty high for a 1 off job, Arduino method is adequate for what you need to do, unless you are well heeled and not thrifty like me !!

                      Emgee

                      #396346
                      dcosta
                      Participant
                        @dcosta

                        Hello ChrisH,

                        I started building a system for lead screw control for my lathe but I have by now stopped its development.
                        The materials used and the point where the building is is as follows:
                        Motor: NEMA23 (double axle and long purchased at Arceurotrade)
                        Driver: tb6560 (around £10 in Amazon)
                        Controller: Arduino Mega (may be Arduino Uno)
                        Motor Power Supply: 24Volts, 6.5Amperes
                        Power supply for Arduino: 5Volts, 1.5Amperes

                        All connections are made (they are temporary) and the program on the Arduino already controls the motor.
                        I have tested the system with the engine running (without load) for many hours and it does not even heat up.

                        If you want I can make a very simple drawing of the connection diagram.

                        Regards
                        Dias Costa

                        #396350
                        Garth
                        Participant
                          @garth

                          Hi ChrisH,

                          Here is a Utube link,

                          There are more of this type search around a picture is worth etc.

                          #396351
                          JasonB
                          Moderator
                            @jasonb
                            Posted by ChrisH on 14/02/2019 22:10:39:

                            Ian – first job would be to 'automate' a shaper cross feed from manual.

                            MEW 278 should have something to interest you Chris, about to drop.

                            #396359
                            John Haine
                            Participant
                              @johnhaine32865

                              If you're doing a shaper, looking at Joseph Noci's posts here may be enlightening too.

                              #396360
                              I.M. OUTAHERE
                              Participant
                                @i-m-outahere

                                You can make a simple unit with an old windscreen wiper motor as they usually have the intermittent wipe set up as an internal switch . you simply hook into that circuit and use a switch that is activated by the ram of your shaper . the older type windscreen wiper motors have an internal circuit that makes the motor do one revolution once activated but the newer units are controlled by the cars computer .

                                Feed rate is not adjustable though so you are stuck with what you set it up with in regards to drive ratios etc so if you set it up for 0.020 cross feed using drive ratios that is what you are stuck with as each time the motor is triggered it does one turn .

                                Next option is use an arduino to send pulses to a stepper driver but you will need to learn how to code and understand how steppers work – not hard but i cant judge your electronics ability . what you need is very similar to the code for the stepper drive rotary table but modify the code to suit , there is an equation in there that tells the micro how many pulses to output after reading the input from the keypad . i think your biggest problem is that you are searching for CNC equipment or the like to do this but it can be done much more simply .

                                There are many youtube videos on using stepper motors for various things so maybe you can gain some info from them and it doesn't matter how small the motor is in the video as the only thing that changes is the size of the motor and the driver needed to drive it as long as the driver can handle the logic level of the arduino which depending on which board you use will be either 5 volts or 3.3 volts .

                                looks like a few post were made while i was writing this , Joseph Noci is the man you need to talk to !


                                Edited By XD 351 on 15/02/2019 08:30:50

                                #396374
                                David George 1
                                Participant
                                  @davidgeorge1

                                  Have a look at Joseph Noci 1 posts particularly the shaper that returned – in NC style 10/08/2017 it's absolutely fabulous what he has done to the Alba2NS shaper.

                                  David

                                  Edited By David George 1 on 15/02/2019 09:25:42

                                  #396384
                                  ChrisH
                                  Participant
                                    @chrish

                                    Many thanks to all for your replies – given me a lot of read and look at and some good pointers.

                                    Dias – am sending you a pm.

                                    I must be cracking up. Searched for threads on stepper motor controllers and found nothing, never thought to just do a search on stepper motors, did that this morning and a huge list appeared. Little grey cells certainly underperforming at the moment. Now even more to read! All it needs now is for the info to go in and be understood, hopefully, well it will be a first start anyway.

                                    Chris

                                    #396392
                                    donkey
                                    Participant
                                      @donkey

                                      Hi Dias

                                      I would like a copy of your connection diagram as I am also a bit of an old duffer with electronics but love to play.

                                      I have the motor, power supply and the 6560 controller and am ready to roll although I am very slow so in the next few month. Lol

                                      brian

                                      #396393
                                      SillyOldDuffer
                                      Moderator
                                        @sillyoldduffer
                                        Posted by ChrisH on 14/02/2019 19:44:40:

                                        Electronics is one avenue I haven't been down for 40 + years, so stepper motors and their electronic control has passed me by. However, I now see a need to know some more about that latter subject as I can see an opportunity to employ a stepper motor drive.

                                        I have been looking on the internet for information on stepper motor control but either what I have seen asks more questions than it answers or, more usually, the authors seem to be writing in another language!

                                        So, can anybody suggest an idiots guide to stepper motor control, along the lines of "idiot to expert in no time at all", written in plain English to be readily understandable to someone without a degree in electronics and electronic control and a lifetime's experience in the subject. And I mean idiot!

                                        All suggestions will be gratefully appreciated! Thank you.

                                        Chris


                                        Edited By ChrisH on 14/02/2019 19:46:22

                                        Do you want to understand how they work, or just enough to use them? The former is difficult, the second a good deal easier. The same is true of most types of electric motor – not many on the forum could give you a detailed explanation of how AC motors actually work. Much more common is people who've learned enough to wire them up. I know this because I'm one of them.

                                        A basic stepper motor has two windings. The motor isn't fed ordinary DC or ordinary AC. It works by applying particular sequences of DC pulses to both windings.

                                        The motor doesn't turn smoothly, it steps. It can do one of three things per pulse-combination;

                                        • step one notch forward, or
                                        • one notch backwards, or
                                        • lock in the current position.

                                        The number of pulses needed to make a single revolution vary, but 200 steps is common. However, another feature is that by manipulating the pulses fed to the motor, it is possible to move and hold the motor in small steps between the natural steps. A 200 step motor can be manipulated to take up to 6400 micro-steps per revolution.

                                        The motors have good turning power and the spindle can be moved fairly accurately to any angular position. RPM is rather low compared with other motors.

                                        It is not necessary for the user to understand the nature of the pulses, or how they are generated. This is done with a box full of rather complicated electronics like this:


                                        stepunit.jpg

                                        End of Part One

                                        Dave


                                        Edited By SillyOldDuffer on 15/02/2019 11:56:04

                                        #396394
                                        SillyOldDuffer
                                        Moderator
                                          @sillyoldduffer

                                          Part Two:

                                          Although intimidating at first sight, taken one at a time, the controller is rather simple to use. The DC Power Input and motor are connected here, in the red box:

                                          stepmotorconns.jpg

                                          This particular controller works with between 9 and 40V. Check your motor's specifications for it's upper limit but generally stepper motors will run 'better' fed a high voltage rather than a low one. But they work across a wide voltage range – it's the current that matters. For the same reason it's 'better' to use a crude unregulated DC power supply than a fancy regulated unit; regulated power supplies tend not to perform well driving pulsed loads. However, I didn't understand that when I built my rotary table and it works perfectly well with a cheap 12vdc regulated LED power supply.

                                          If you whack a lot of volts into the motor there's a risk of of heating it due to exceeding its power limit (again see spec for the maximum current a particular motor will take.). To avoid damage the controller provides switches (marked SW1 to SW6) that can be set to limit the maximum current delivered to the motor. Given an unknown motor, you can start with the lowest setting and move up the range until the motor works properly, ie turns without losing steps.


                                          stepcurrent.jpg

                                          The number of micro-steps needed for the motor to do a full revolution motor is set in the same way. The ends of the switches can just be seen in the red box at top of photo. The number of micro-steps is a compromise that depends on the application. Generally it is set to the lowest number of steps needed to achieve the required step accuracy. No point in simply going for the maximum number of steps, because there is no such thing as a free lunch. At high micro-step settings the motor is more likely to lose steps under load and the rpm is lower.

                                          stepsteps.jpg

                                          Finally the control connections. These occur in pairs working in the opposite sense to suit the electronics used to control the controller.  By convention these can either signal 'ON' by putting 5V on a connection, or signal ON by grounding a connection that has 5V on it already.

                                          ENA is enable. The controller won't power the motor unless this is ON.

                                          DIR is direction. When ON, pulses are generated to turn the motor clockwise, when OFF the motor turns anticlockwise.

                                          PUL is Pulse aka Step. Each pulse applied to this input moves the motor one micro-step.

                                          ENA and DIR can both be set with ordinary on/off switches but PUL requires a stream of pulses. These could be generated with a simple chip like the NE555 and a speed pot.  More likely something sophisticated like an Arduino or PIC micro-controller would be used. They can be programmed with whatever the user wants to do. For example, an Arduino could calculate the number of pulses needed to rotate the motor by an angle input by the user, then enable the motor, set direction, issue the right number of step pulses, and then dis-enable the motor. By keeping count of pulses and direction changes the micro-controller always knows where the motor is. A more sophisticated controller could translate G-Code to drive several stepper motors on a CNC machine. Controllers can be bought ready made in various shades of complexity.

                                          What could possibly go wrong is another question!

                                          Dave

                                          Edited By SillyOldDuffer on 15/02/2019 12:03:46

                                          #396395
                                          Andy Carruthers
                                          Participant
                                            @andycarruthers33275

                                            Perfect Dave

                                            Now all we need is Parts 3 to 99+, Arduino wiring and code break down

                                            #396565
                                            ChrisH
                                            Participant
                                              @chrish

                                              Jason – I await MEW 279 dropping through the letter box!

                                              Dave (S O D) – many thanks for your last two posts – the explanations and photos were both illuminating and informative.

                                              You are quite correct in splitting the knowledge requirement into either understanding how they work or how to make it work; I'm firmly with you in the second camp. What I really need to to know is: what bits do I need, how do I connect them all together, and how do I get it to do what I want it to do in each specific application.

                                              Understanding how it works helps obviously in getting it to work properly but it is not essential, a prime example is the number of people who can drive cars without a clue as to what is actually going on.

                                              Now I am also with Andy on this one too, in pursuance of putting it all together "Now all we need is Parts 3 to 99+, Arduino wiring and code break down" !! Look forward to future posts from you on this, hopefully???

                                              Chris

                                              #396699
                                              SillyOldDuffer
                                              Moderator
                                                @sillyoldduffer
                                                Posted by ChrisH on 16/02/2019 14:19:24:

                                                … Jason – I await MEW 279 dropping through the letter box!

                                                Dave (S O D) – … Look forward to future posts from you on this, hopefully???
                                                 

                                                Next is wiring the black box to a controller and power.

                                                To power the motor, I used a cheap ebay/amazon PSU as sold to drive LEDs. Not ideal for stepper motors but easy to get:

                                                psu.jpg

                                                These are available in various voltages and power outputs. Get one with watts to suit your motor. I used a 12v PSU on my table; although it's fine a 24V supply would have been better.

                                                Next wiring an ArduinoUno as a controller. It's job is to ENAble the driver, set DIRection, and PULse the motor, ie tell it to step. Though this can be done with conventional electronics, it's more flexible with a small computer like an Arduino. But swapping conventional electronics for a computer means learning how to program the computer.

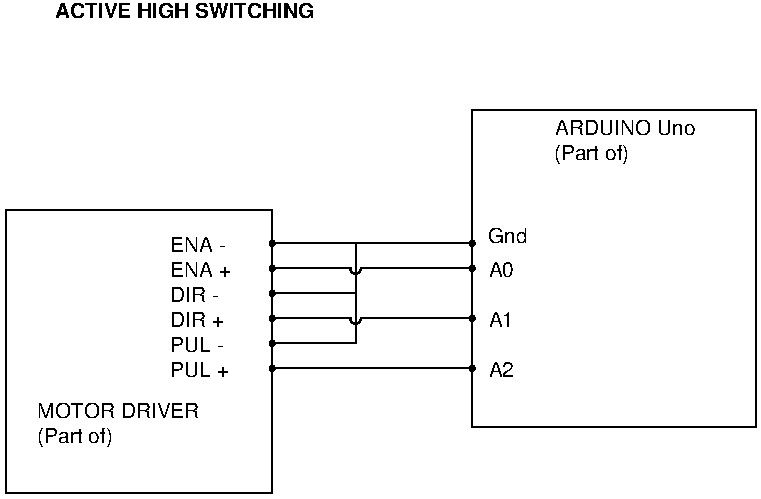
                                                Wiring the black box driver to an Arduino is simple, this shows signal HIGH = ON, LOW = OFF:

                                                driver_ardu.jpg

                                                ENA-, DIR-, PUL- all connect to GND on the Arduino, leaving + signals doing the controlling. ENA+. DIR+, and PUL+ are each wired to an Arduino input-output pin. There are 20 of these, some with special characteristics. Pins A0 to A5 (red box below) have extra analogue capabilities, but this circuit uses them in bog-standard ON/OFF mode.

                                                unoaports.jpg

                                                Connections to a UNO are made by plugging breadboard jumper leads or pin headers into the sockets. Headers need soldering. If soldering is preferred go Nano, they're cheaper.

                                                When an Arduino is plugged into a PC, it's powered by the PC. However, you might not want to power it that way in a workshop. Instead either plug the Arduino into a USB telephone charger, or buy a wallwart in the range 7 to 12vdc to plug into the black socket top left. 7.5Vdc preferred.

                                                walwart.jpg

                                                Next post: programming.

                                                Dave

                                                Edited By SillyOldDuffer on 17/02/2019 11:36:27

                                                #396703
                                                OuBallie
                                                Participant
                                                  @ouballie

                                                  It was interesting seeing the results when trying all combinations of settings on the 'driver' unit when I first ventured into stepper motor control.

                                                  Geoff – Still learning.

                                                  #396759
                                                  SillyOldDuffer
                                                  Moderator
                                                    @sillyoldduffer

                                                    Before leaping into programming, it might help to explain what an Arduino is. It's a family of small electronics boards containing a microcontroller plus the wherewithal to: power it; manage a serial connection to a Personal Computer; and allow a program to be installed. It comes with hardware and software designed to simplify using the microcontroller. There are a number of different Arduino models, the Uno is the work horse of the family and easiest to experiment with.

                                                    A microcontroller is a tiny computer designed to interface with other electronics. They don't do general purpose computing like a PC. Typically a microcontroller is kept so simple it doesn't have an operating system and it only runs one program dedicated to a single purpose. The program starts when the machine is turned on, and it stops only when switched off. They are idea for monitoring sensors, including internal timers, and controlling the electronics used to manage lights, motors, valves, servos, heaters or whatever. The inputs might include a simple keyboard, or just a few switches, and the outputs might include a simple display, or perhaps just a few LEDS.

                                                    A microcontroller program runs in a permanent loop, allowing forever the logic: 'if an INPUT then calculate an OUTPUT'. Within the loop it's possible to read inputs, detect events, store information, perform arithmetic and logical operations, make comparisons, and write outputs. The program is a list of instructions followed one after the other, except there are instructions that can, optionally, cause the computer to jump to elsewhere in a sequence.

                                                    Consider a problem like a traffic light controller at a 4-way junction. There are specific rules to be followed rigorously: only one signal may be green at a time, never two or more together! To keep traffic moving each road must get a green signal in turn, and the green signal must stay on for a useful length of time. To warn slow-reacting drivers lights go from red to green via a short amber, and – because they need time to stop – lights change from green to red after a longer amber period. A simple system might give each road an equal amount of green time, but a real world controller would more likely adjust go time depending on the proportional number of cars waiting on each road. To do this, the microcontroller has to keep count of cars detected by sensors, and recalculate green time as necessary. In the event of a fault, the system should restart automatically, starting with all roads at red. All this is getting a little complicated, especially if the system has to allow for filter lanes, or another nearby signal controlled junction, or has a manual override, or is only activated during heavy traffic, or reports traffic density to a control centre, or is sometimes managed remotely, or detects headlamps at night so cars aren't stopped unnecessarily.

                                                    Quite a design challenge, but most of this can be done expensively with relays and mechanical timers. Later, semi-conductors and integrated circuits provided cheaper and more reliable equivalent circuitry. Today, a £5 microcontroller can do all this and more, though it has to be said that designing fail-safe control systems like traffic signals or fly-by-wire aircraft is not simple!

                                                    The extra power of microcontrollers can be used to improve all manner of mechanical systems. For example, a car engine's timing, fuel quantity, and fuel mix can all be changed depending on air and engine temperatures, knock detection, engine load, humidity, air pressure and exhaust content. At the press of a button the driver can optimise for fuel economy or performance – rather than needing a mechanic to retune the engine in a garage, a microcontroller can do it in motion.

                                                    Microcontrollers can be programmed to manage almost any electro-mechanical machine, and programs can be upgraded to fix bugs or add new features without having to rewire anything.

                                                    The microcontroller used by the Arduino Uno isn't particularly powerful, but it has 20 pins that can used for input or output and enough oomph to manage a wide range of basic and not so basic control requirements.

                                                    In the case of a stepper motor, turning the motor is easy. The pin connected to ENA+ is declared an OUTPUT, and set HIGH. This tells the black box to obey pulses. Then the pin connected to DIR+ is declared an OUTPUT and set to HIGH or LOW depending on the required direction. The controller adjusts it's output to turn the motor either clockwise or anticlockwise. Finally the pin connected to PUL+ is declared an OUTPUT and sent a sequence of HIGH LOW HIGH LOW HIGH LOW signals. Each HIGH  steps the motor once. With this hard coded in the program the motor would run in one direction forever.

                                                    Mostly though the user wants to stop and start the motor on command, and decide which direction it turns, and determine how many steps the motor will take, and the rpm. And perhaps automatically stopping the motor if it hits an end stop. Achieving this involves declaring other pins as INPUTS, connecting switches, and then writing code to detect if a switch is ON or OFF.

                                                    Hope that makes sense!

                                                    Dave


                                                    Edited By SillyOldDuffer on 17/02/2019 19:23:21

                                                    #396784
                                                    ChrisH
                                                    Participant
                                                      @chrish

                                                      Dave – all making sense, thanks you, a light is beginning to show at the end of the tunnel.!

                                                      Thanks you also for taking the time to write such lengthy explanations, and add the photos and links, I know none of it is a quick "five minute" job; your labours are most appreciated.

                                                      Chris

                                                    Viewing 25 posts - 1 through 25 (of 37 total)
                                                    • Please log in to reply to this topic. Registering is free and easy using the links on the menu at the top of this page.

                                                    Advert

                                                    Latest Replies

                                                    Viewing 25 topics - 1 through 25 (of 25 total)
                                                    Viewing 25 topics - 1 through 25 (of 25 total)

                                                    View full reply list.

                                                    Advert

                                                    Newsletter Sign-up