Sieg SX2.7L tramming advice?

Advert

Sieg SX2.7L tramming advice?

Home Forums Manual machine tools Sieg SX2.7L tramming advice?

Viewing 25 posts - 1 through 25 (of 30 total)
  • Author
    Posts
  • #642980
    Gordon B
    Participant
      @gordonb

      I've recently acquired a Sieg SX2.7L clone, which I believe was built in 2019. The first job I ended up needing it for was fly cutting, with a large diameter (approx 13cm / 5&quot. I noticed that the cutter was taking more material on the trailing edge; which I understand would indicate the machine is slightly out of tram.

      I first checked the spindle runout with a DTI touching an MT3 ER collet mounted in the spindle (see image below). This showed 0.004mm of runout, so I'm assuming this is not of concern.

      01.jpg

      Next I clocked the spindle across the length of table. Two indicators approx 150mm (6&quot apart, set to 0 when facing away from me.

      02.jpg

      Turning the spindle 180 degrees shows around 0.015mm of deviation. As the left side of the table is low, right side high; I assume this means the column is tilted slightly to the right.

      03.jpg

      I then took the same measurement across the width of table. That appears to show that the front of the table is high and the rear is low (by approx 0.06mm to 0.08mm). I assume this means the column is also tilted forward.

      05.jpg

      However, I next swept a rod in the spindle along a DTI by raising the mill head up the column. As the head rose, the DTI reading dropped (rod moving away from the DTI) by 0.1mm over a distance of about 43mm of vertical travel.

      06.jpg

      If I understand correctly, if just the column were out of square this reading would not change (see below for a very out of square column, with the head moving up, but the rod-to-DTI distance remaining constant).

      07.jpg

      However, it would change if the head were nodded forward on the column; e.g. for a very out of square head, with the rod-to-DTI distance increasing as the head moves up the column.

      08.jpg

      I repeated this test with the DTI to the side of the rod, and it showed essentially no change when the head was raised up the column; so I assume this means the head is not tilted left/right, and the 0.015mm deviation across the length of the table must be down to the column alignment.

      Assuming I'm taking the above measurements correctly (do tell me if I'm not), it looks as though the main/first issue is the nod on the head. How do I (can I?) correct the head nod on this machine?

      BTW for all tests so far the spindle has been fully raised; I'll check it once the head/column looks OK.

      Advert
      #14820
      Gordon B
      Participant
        @gordonb
        #642992
        JasonB
        Moderator
          @jasonb

          Look at the head taper gib for a start if you feel it is the head nodding on the column, make sure both screws are in contact with the gib strip ends

          Out of interest have to clocked the end of that rod to see if it is running true that far out of the collet chuck?


          Edited By JasonB on 28/04/2023 20:51:56

          #642996
          Gordon B
          Participant
            @gordonb

            Good point – I haven't checked if that gib needs snugging up. I'll look at it in the morning; many thanks.

            That rod isn't actually running particularly true, but it was clearer for the photos. I ended up taking measurements on the rod for the tool that holds the two clocks; which is much closer to true. I did also repeat the measurements after rotating the spindle by 180 degrees; which I assume would have reversed the error if it were actually down to the rod being bent?

            #643102
            Gordon B
            Participant
              @gordonb

              Jason – I think tightening the gib has helped. I removed the gib screw for the vertical axis and confirmed that the head does make contact with the gib wedge. I then tightened it until I can just feel a little drag when raising and lowering the head on the column.

              With a DTI mounted on the table and a rod in the spindle I raised and lowered the head again. Rotating the spindle 180 degrees and repeating measurement was pretty consistent; so I assume the rod is straight. That gave me a reading of just under 0.08mm over 100mm of column travel. My earlier measurement of 0.1mm over 43mm would equate to 0.23mm over 100mm; so it's certainly improved.

              If I read the inspection record for the mill correctly, it claims 0.10mm over 100mm; so I'm within the claimed spec. Whether that's "good enough" for a home mill I've no idea.

              Putting the DTI on the spindle then sweeping it around the table indicates the front to back height discrepancy is under 0.01mm over a sweep diameter of 130mm. Given that the inspection record claims 0.03mm over 100mm I can't complain.

              From that same test I appear to now have about 0.03mm discrepancy (over the same 130mm diameter) from the left to the right. Again that's within the claimed spec (0.03mm over 100mm), but I might risk torqueing the column bolts to see if I can reduce it a bit, then I'll check the spindle squareness.

              Overall though, I guess that's starting to look acceptable for a budget home mill. I don't really know what is "good" for this class of machine. Is there a general rule of thumb for how well trammed a machine needs to be to achieve a good fly cut finish (for a certain diameter of fly cutter sweep)?

              #643106
              JasonB
              Moderator
                @jasonb

                You were probably swinging a cutter that is quite a bit larger than a 2.7 is meant for which will have magnified any errors. With these machines it is always a juggling act to get the three things exact – tram of spindle around table – head movement and quill movement. Add in the fact it will probably change a bit depending on what axis are locked and the loading on the machine means you are unlikely to get all three spot on.

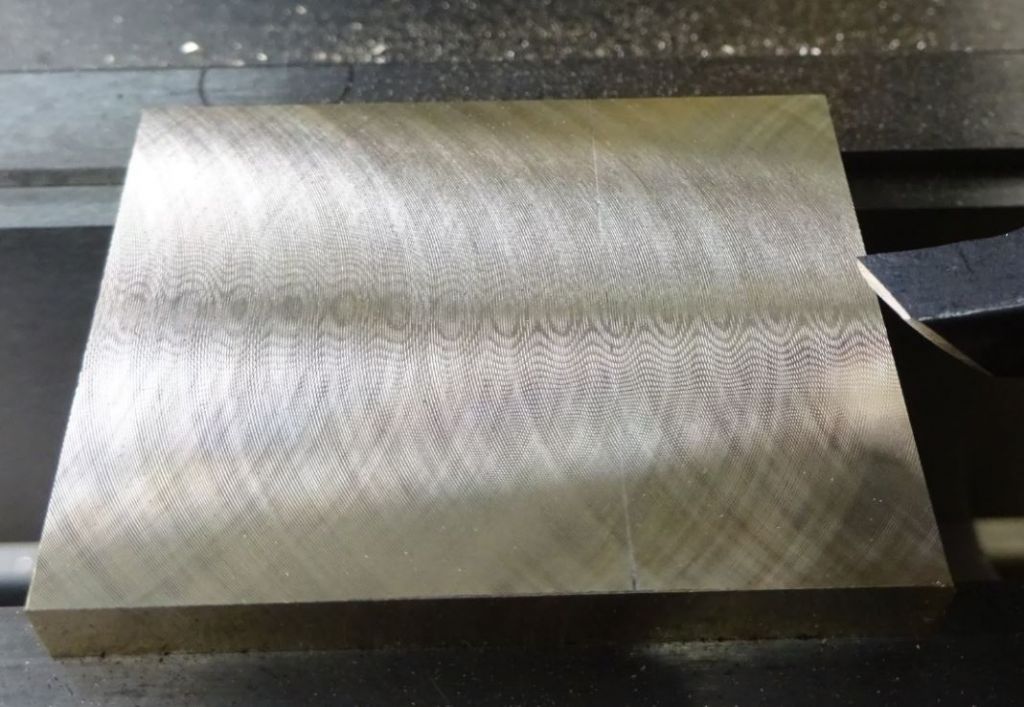
                Main thing for good flycutting is how the spindle is when you swing the dti around the table, get it good and you end up with a hologram effect but some prefer a slight lean to one side that just gives arc shaped cutter marks

                flycut.jpg

                You say gib screw, there is a second one that should bear against the opposite end, if it does not you can find the gib moves up and down as the head is raised and lowered making it tighter as it is raised and looser when lowered so make sure that is snugged up too

                #643146
                Gordon B
                Participant
                  @gordonb

                  Definitely was a big fly cutting diameter; around 130mm total.

                  I was going to say that I couldn't see a second gib screw, but checking the manual the parts diagram indicates there is one present – but I think it's hidden under a plate on the bottom of the head, so I'll take a look tomorrow.

                  You're right about locking an axis having an effect; I swept a DTI around the table with and without the vertical axis locked, and it measurably causes the head to twist slightly. However, just moderately locking the axis results in a pretty good reading; around 0.01mm over 130mm across the length of the table, and 0.006mm across the width. I'll take that.

                  I tried to check the spindle for squareness but I'm not sure that my cheap 123 blocks are that square. Regardless, the worst I saw was under 0.03mm of deviation over the 70mm spindle stroke. Again if I read the inspection report correctly that's within the claimed tolerance so I can't complain.

                  #643161
                  JasonB
                  Moderator
                    @jasonb

                    Yes the bellows to plate will need it's two small screws undoing so it can be slid down the column to access the bottom gib adjuster.

                    #643201
                    not done it yet
                    Participant
                      @notdoneityet

                      Any out-of-tram will result in a curved surface finish, to some extent. JB’s hologram finish is the ideal.

                      Pillar-tilt should be cheched when the head is locked to the column, too?

                      #643214
                      JasonB
                      Moderator
                        @jasonb

                        I've always wondered why the Myford fans say a concave surface when facing is desirable bit not on a milled surfacedevil

                        #643220
                        mgnbuk
                        Participant
                          @mgnbuk

                          I've always wondered why the Myford fans say a concave surface when facing is desirable bit not on a milled surface

                          Why single out "Myford fans" Jason ? sad

                          Surely it is normal accepted practice for all lathes (irrespective of maker) to face on the silgtly concave side of dead flat ?

                          Nigel B.

                          #643224
                          JasonB
                          Moderator
                            @jasonb

                            It is the only lathe that I have heard it mentioned about on this forum, hence why I mentioned it

                            But still the question of why is it OK on a faced part but seen as undesirable on a milled one?

                            #643244
                            old mart
                            Participant
                              @oldmart

                              As already mentioned, the gibs have some affect and it might be useful to check any differences made when locking the movements. The double testing at 180 degrees should give identical results even if the tramming device is not perfectly straight. With a shorter tramming spindle you could repeat the tests with the head lower.

                              Edited By old mart on 30/04/2023 16:10:46

                              #643254
                              DiogenesII
                              Participant
                                @diogenesii
                                Posted by JasonB on 30/04/2023 13:33:07:

                                It is the only lathe that I have heard it mentioned about on this forum, hence why I mentioned it

                                But still the question of why is it OK on a faced part but seen as undesirable on a milled one?

                                ..probably explains why Myford put a swivel on the bottom of their milling slide…

                                #643269
                                Robert Butler
                                Participant
                                  @robertbutler92161

                                  Jason, I've read somewhere it is to avoid a component which sits on a flat surface from rocking. I also recall that the amount was miniscule and definately with reference to Myford only.

                                  Robert Butler

                                  #643276
                                  Martin Connelly
                                  Participant
                                    @martinconnelly55370

                                    Had a look through this thread for the first time today. Couldn't see any mention of this. It is not usual to put a round rod in the mill and move it up and down as any out of tram will result in the DTI giving unpredictable readings as it moves around the curved surface. As a result I advise you do what is more usual. Put the DTI in the spindle and move it over a vertical plane surface (angle plate or 123 blocks for example) on the mill table. Rotate the vertical surface 180° and repeat in case the surface is not perfectly vertical. Average out the two readings unless they are the same.

                                    Martin C

                                    #643277
                                    JasonB
                                    Moderator
                                      @jasonb

                                      Yes I understand it is to stop things rocking so why desirable to not have a turned item rock but seems undesirable for milled surfaces not to rock?

                                      #643303
                                      Gordon B
                                      Participant
                                        @gordonb
                                        Posted by JasonB on 30/04/2023 06:53:51:

                                        Yes the bellows to plate will need it's two small screws undoing so it can be slid down the column to access the bottom gib adjuster.

                                        Got it – thanks. Fiddly to get to. It's slightly disconcerting that if I remove that bottom screw and then wind the top screw in (so it pushes the wedge gib a long way down) I can still raise and lower the column. I would have expected that at some point it would have locked the column movement?

                                        I've put it back together, albeit with the wedge gib a little lower than it was before. I'm still seeing around 0.08mm deviation with 100mm vertical column travel though. Tomorrow I'll try Martin Connelly's advice of running a DTI against a vertical surface; though I don't know that my 123 blocks are particularly square.

                                        I spent a bit more time today sweeping a DTI over the table and gently tightening and loosening the 4 column head bolts. Mostly I just ended up chasing my tail, and ended up with worse results than what I had yesterday indecision

                                        #643305
                                        old mart
                                        Participant
                                          @oldmart

                                          You should set the gibs so that the movement is slightly restricted but not tight throughout the full travel. The blocks can be checked against each other sitting on the mill bed, if they are not square you will see a gap when they are one way round. Keep bringing them together and with a decent steel rule or straight edge you can also check the lengths, by using a torch looking for any light showing. I bought a pair of 246 blocks which caused problems until I chanced to see a gap at the top when the bottoms were sitting together on the surface plate. They were reground for free, but now they are square, but slightly different sizes. As they improved for free, I did not say anything and knowing them now I can compensate.

                                          #643529
                                          Gordon B
                                          Participant
                                            @gordonb
                                            Posted by old mart on 30/04/2023 21:26:49:

                                            You should set the gibs so that the movement is slightly restricted but not tight throughout the full travel. The blocks can be checked against each other sitting on the mill bed, if they are not square you will see a gap when they are one way round. Keep bringing them together and with a decent steel rule or straight edge you can also check the lengths, by using a torch looking for any light showing. I bought a pair of 246 blocks which caused problems until I chanced to see a gap at the top when the bottoms were sitting together on the surface plate. They were reground for free, but now they are square, but slightly different sizes. As they improved for free, I did not say anything and knowing them now I can compensate.

                                            Gibs; yes, that's what I would have thought would happen (I've not had a machine with tapered gibs before). However, even if I remove the bottom gib screw and wind the top screw way down (I assume massively overtightening the gib) the column still moves with no noticeable extra drag. Seems a bit odd.

                                            I'll check the 123 blocks for squareness when I next get into the garage.

                                            #643542
                                            JasonB
                                            Moderator
                                              @jasonb

                                              I have heard of another where the gib was loose, I think I'm right in saying the spare gib strips are longer and can be trimmed to fit by cutting a bit off the bottom if they go in a long way.

                                              #645375
                                              Gordon B
                                              Participant
                                                @gordonb

                                                Lots on recently so I've only just got back to looking at the mill. Following Martin's advice, I put a 123 block on the table and ran an indicator down the side by lowering and raising the whole head on the column (i.e. not extending the spindle).

                                                09.jpg

                                                After running the indicator with block to the right of the spindle, I rotated the spindle 180 degrees, and also rotated the block around so that I was running on exactly the same surface (but with the block obviously now to the left of the spindle). I got a pretty repeatable 0.1mm change over 100mm of vertical movement; where the dial indicator is moving to the left as the head drops – I take that to mean the column is tilted slightly to the right (clockwise if looking from the front of the mill).

                                                Trying to improve it by changing the torque on the bolts holding the column to the mill base seems to be a bit hit and miss (either no change or too much change). If anyone has advice for doing this on the SX2.7 I'd be grateful.

                                                #645383
                                                Gordon B
                                                Participant
                                                  @gordonb

                                                  Maybe partly answering my own question; from a bit of searching it seems that the technique is to tighten all four bolts holding the column (perhaps using a torque wrench for repeatability) take measurements, loosen the bolts to insert shims, tighten it back down again and repeat until happy/bored/insanity sets in.

                                                  I've also seen suggestions of drilling and tapping holes next to the bolt holes (for grub screws) and using grub screws for adjustment instead of shims. Sounds like an interesting idea but then I guess you don't have as much surface contact between the column foot and the mill base.

                                                  #645397
                                                  Lofty
                                                  Participant
                                                    @lofty83899

                                                    My experience on a X2.7 is like you say hit and miss but you do learn from your misses and you narrow then alterations down to a point whers it is close enough.
                                                    Mine ended up by: leaving the 2 lefthand bolts dogged down, and sliding cut up feeler gauges on the righthand side, then dog down the righthand bolts,
                                                    Not sure if you have a torque wrench with an open ended spanner, I thighten down dog tight.
                                                    0.14mm shimed righthand back.
                                                    0.04mm RH front
                                                    spindle tram 0.01mm x left to right over 200mm
                                                    and 0.01mm y front to back over 110mm
                                                    Allow a day or two.
                                                    Think everything is made of rubber and moves about
                                                    and never give up.
                                                    Also adjust your gibs before you start mine was 0.31mm x and 0.2mm y
                                                    after adjust it dropped the x to 0.21mm.

                                                    good luck

                                                    Lofty

                                                    #645408
                                                    JasonB
                                                    Moderator
                                                      @jasonb

                                                      over 100mm of movement of the head I get 0.02 in X (sideways)and 0.04 in Y (nod) adjusted with bits of feeler gauge.

                                                      Tramming spindle to table less than 0.01mm over 140mm circle

                                                    Viewing 25 posts - 1 through 25 (of 30 total)
                                                    • Please log in to reply to this topic. Registering is free and easy using the links on the menu at the top of this page.

                                                    Advert

                                                    Latest Replies

                                                    Home Forums Manual machine tools Topics

                                                    Viewing 25 topics - 1 through 25 (of 25 total)
                                                    Viewing 25 topics - 1 through 25 (of 25 total)

                                                    View full reply list.

                                                    Advert

                                                    Newsletter Sign-up