Rob Roy Build/ Rally

Advert

Rob Roy Build/ Rally

Home Forums Locomotives Rob Roy Build/ Rally

Viewing 25 posts - 1 through 25 (of 54 total)
  • Author
    Posts
  • #461894
    Phil H1
    Participant
      @philh196021

      My guess is that the Rob Roy rally due to take place in late June this year is off the cards?

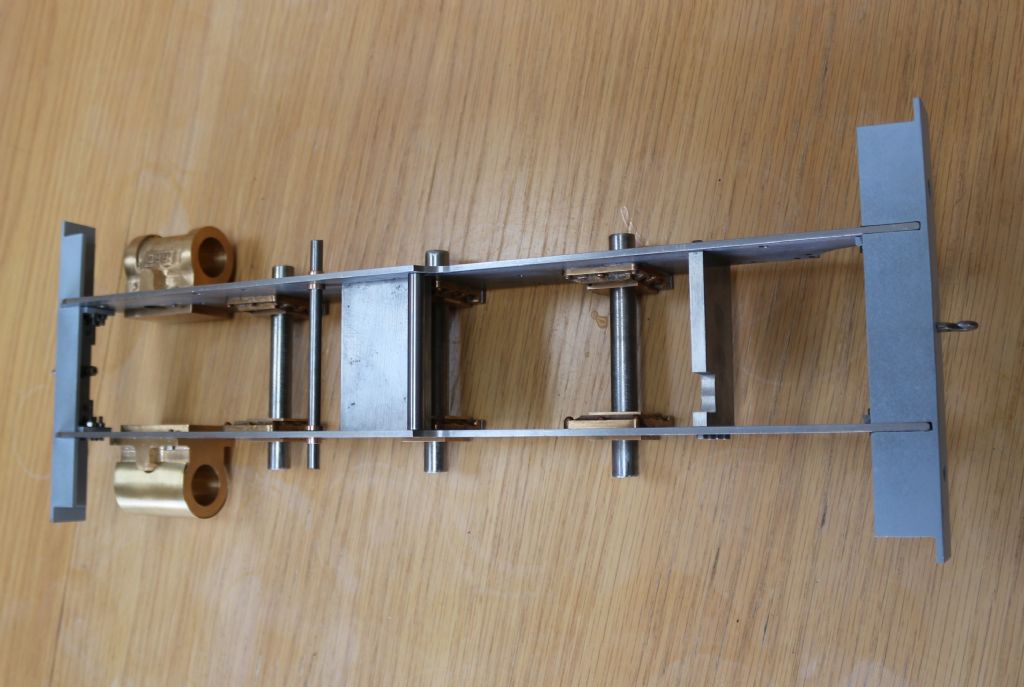
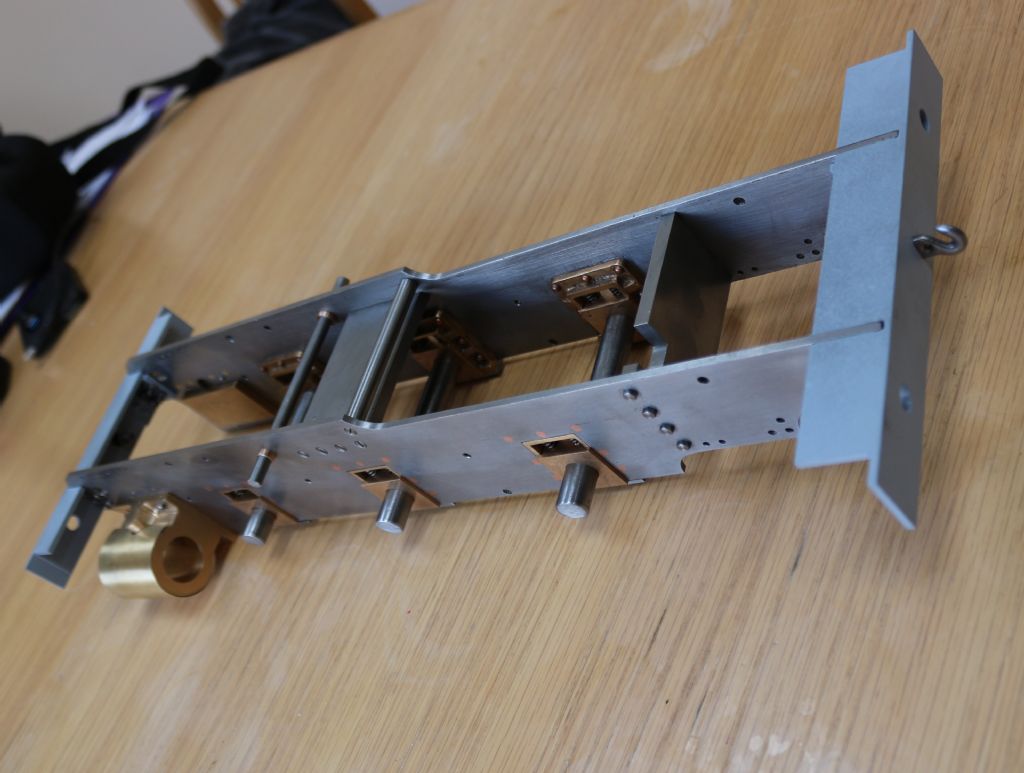
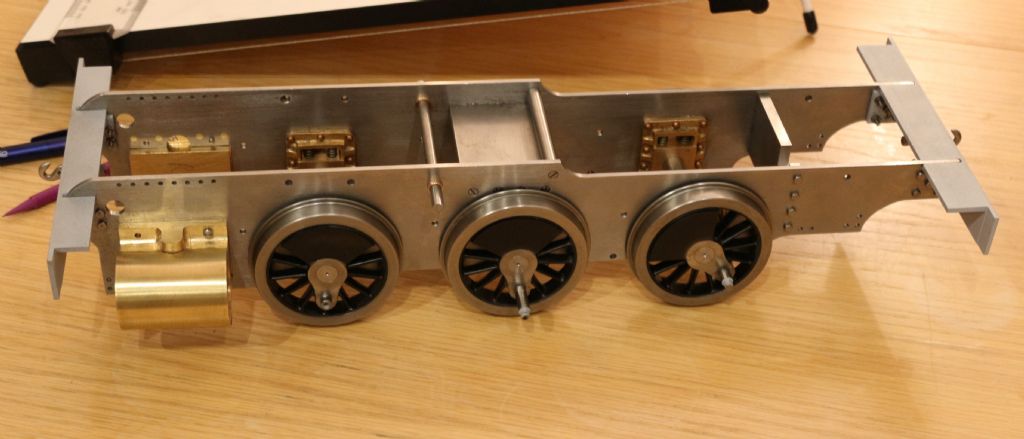
      I was going to attend with my part built effort so here is where I am up to on 2nd April 2020.

      I have also machined the wheels and few other parts of the cylinder set. My aim is to get the chassis at least rolling by the end of June but lets see how that goes.

      Phil H

      Side view

      Top view

      Angled view

      Advert
      #1918
      Phil H1
      Participant
        @philh196021
        #461928
        Bazyle
        Participant
          @bazyle

          Hi Phil, I don't know if you have been involved in previous threads on the Rob Roy but as you are keen on getting on without the chance to get to the rally are you fully aware of the clearance problems involved with the valve gear when made to drawing?

          #461934
          Phil H1
          Participant
            @philh196021

            Bazyle,

            Thanks for the reminder. I was aware of it and I have left as much meat on the cylinders (flange face to port face) as possible. Unfortunately, I had already machined the steam chests a long time ago so I will have to see whether the meat I have left on the cylinders will be adequate. If it isn't, I will go with the offset valve cross head.

            I will also make another round stretcher close to the bottom of the cylinders and I like the idea of introducing steam to the cylinders/ steam chest at the front face of the steam chest.

            I have seen a list of other possible mods including a mod to the blast pipe and some sort of rear axle/ axlebox cover etc. However, reminders would be great – please.

            The ones that hurt the most are the modifications to the boiler because I built it in the 1980s to the old drawings complete with threaded longitudinal stay bushes and a screwed top water gauge fitting (ouch). Various people have suggested that I can salvage it but looking at it in a different way… I have done it once – so I can do it again. I still have all the flanging plates that I hacked out of 1/4" steel – oh and I will build it in line with my local club involved this time – once this virus thingy has cleared..

            Phil H

            #462020
            Rex Hanman
            Participant
              @rexhanman57403

              Hi Phil H1,

              I was the instigator and organiser of the previous Rob Roy rallies in Andover but as you probably know the 2020 gathering was due to take place at the Bromsgrove club.

              I have contacted them and been advised that the decision has now been made to postpone this year's meeting until the provisional date of Sunday 13th. September. This is of course subject to change due to factors beyond control.

              I will try to keep you updated. Meanwhile press on with that loco build!

              Rex

              Edit: Forgot to mention that my cylinders had enough extra meat on them that I didn't need to offset the valve crossheads….good luck!

              Edited By Rex Hanman on 03/04/2020 10:17:11

              #462102
              Phil H1
              Participant
                @philh196021

                Thanks Rex,

                I will press on and who knows, maybe I will get my bag of bits to Bromsgrove in September.

                I am currently machining the axles to fit the wheel bores at the moment.

                I will take a measurement of the cylinder port faces later to see if I am lucky enough.

                Phil H

                #482656
                Phil H1
                Participant
                  @philh196021

                  I believe the original date for the 2020 Rob Roy rally was today? I would have tried to be there but I am unfortunately still at the rolling chassis stage – so not much to show.

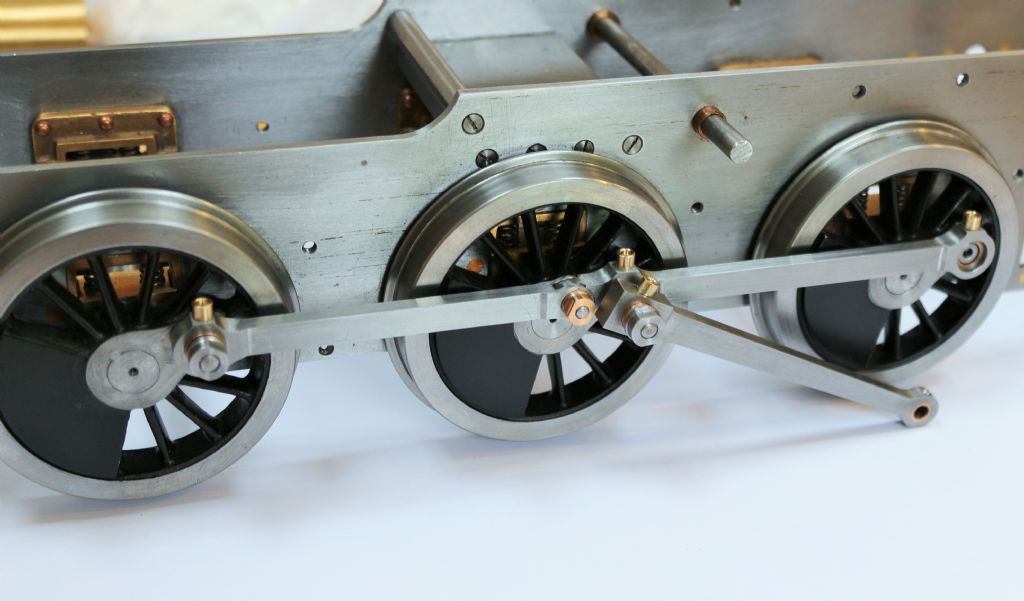
                  The good news is that there is enough meat on the cylinders to avoid the offset valve crosshead and I have managed to quarter the wheels using a fixture made from bits of scrap metal. So my engine currently looks a bit like this;

                  rob roy rolling chassis.jpg

                  #482831
                  Dave Wootton
                  Participant
                    @davewootton

                    looks like a lovely job Phil, much better than mine built years ago, now in need of a major overhaul and repaint, but it's been great fun running it and wearing it out!

                    I had great difficulty setting the Stevensons valve gear on mine, partly due to inexperience and a little bad advice, however I found the late Don Ashtons book on stevensons gear and using his simple design of jig for setting the eccentrics, and eccentric rod lengths all was well. I wasted months of trial and error before i got the book, I didn't do any redesigning just assembled it using the jigs and his clear instructions on valve setting. I'm sure as you've already fitted the eccentrics and quartered the wheels that the jig could be adapted to set the eccentrics in situ without having to remove the wheels.

                    Incorporating these into the engine as you build it will save time and heartache.Having said that there seem to be lots of Rob Roys built to the instructions that run very well. It may be that I'm particularly dim . at one point I got the chassis running reasonably backwards but poorly forwards, unfortunately you can't turn the boiler round as the firebox fouls the steam chests so i had to sort it out!

                    A guard over the rear axleboxes would be a very good idea as the rear ones on mine are very worn due to ash getting in the bearings. I also changed the height of the blastpipe slightly I can't remember the details but I used the taper gauge method and it did steam slightly better.

                    Keep up the good work!

                    Dave

                    #482843
                    Rex Hanman
                    Participant
                      @rexhanman57403
                      Posted by Phil H1 on 28/06/2020 10:21:11:

                      I believe the original date for the 2020 Rob Roy rally was today? I would have tried to be there but I am unfortunately still at the rolling chassis stage – so not much to show.

                      rob roy rolling chassis.jpg

                      Hi Phil, Part built and rolling chassis Rob Roys are just as welcome at the ralliies as finished ones.

                      The situation regarding the virus is constantly changing so at this moment I can't confirm the September 13th date. Hopefully it will be able go ahead as planned. I will contact the Bromsgrove club in due course and confirm their decision.

                      Your chssis is looking great, keep up the good work!

                      Rex

                      #482851
                      Phil H1
                      Participant
                        @philh196021

                        Dave,

                        Your valve gear issue…… did any of the basic valve gear parts need to be modified or did you simply struggle to get the as designed parts to work properly? I am aware of a blast pipe issue. Is it something about increasing its height slightly? If so, do you know by how much?

                        I was made aware of the rear axlebox issue some time ago so I have made 'split' rear axleboxes on my engine. I will take a picture. I will also try to arrange a cover – somehow. Do you know if others have made a cover and how?

                        Rex, yes thanks keep me updated. My chassis looks ok but I feel that I have made about 3 Roy Roy chassis so far. One shown in the pictures above and about 2 others for the scrap bin.

                        Phil H

                        #482860
                        Dave Wootton
                        Participant
                          @davewootton

                          Hi Phil

                          i didn't have to modify anything from the drawings, everything is as the original plans, and once the valve gear was set properly it ran very well. My difficulty came with the setting, altering one thing slightly seemed to alter something else, and i was going round in circles for ages getting nowhere. The book ( which I think is still available from Camden) just has some simple jigs for setting things up, once reassembled I couldn't believe how easy it was to set. once forward gear was set the reverse seemed to look after itself. The eccentrics for each cylinder are pinned together in the jig at the correct angles, and the eccentric rods held in another jig for rivetting to the eccentric straps, ensuring they are identical. I also think reading the booklet made me more careful in making sure everything was as correct to drawing as possible, the book is full of maths if you wanted to design or improve the gear, but I made no attempt to improve or change it and it worked fine.

                          I'm sure I raised the blastpipe slightly, a fellow club member helped me using two card gauges, following an article in Model Engineer by I think Harold Barton, probably sometime in the mid 1980's, i'm sure someone on the forum will remember better than I, one taper is to the chimney top, another to the petticoat pipe, but I can't remember the angles.

                          There is a nifty cover for the rear axle in Martin Evans Boxhill design that would keep the ash away, I think I saw it on Station road Steams archive pages on a part built chassis, there are a few the same on there so I assume it's on the drawings.

                          I intend to rebuild my loco at some time, the cab and bunker were severely damaged when it rolled off a traverser some years ago,I have pangs of guilt everytime I see it, I've built other loco's but R-R is definitely my favorite, you can lift it on your own!

                          Dave

                          Dave

                          #497052
                          Phil H1
                          Participant
                            @philh196021

                            Dave,

                            Thanks for the tips. I have found some online information from Don Ashton. I will definitely study it before diving into the valve gear.

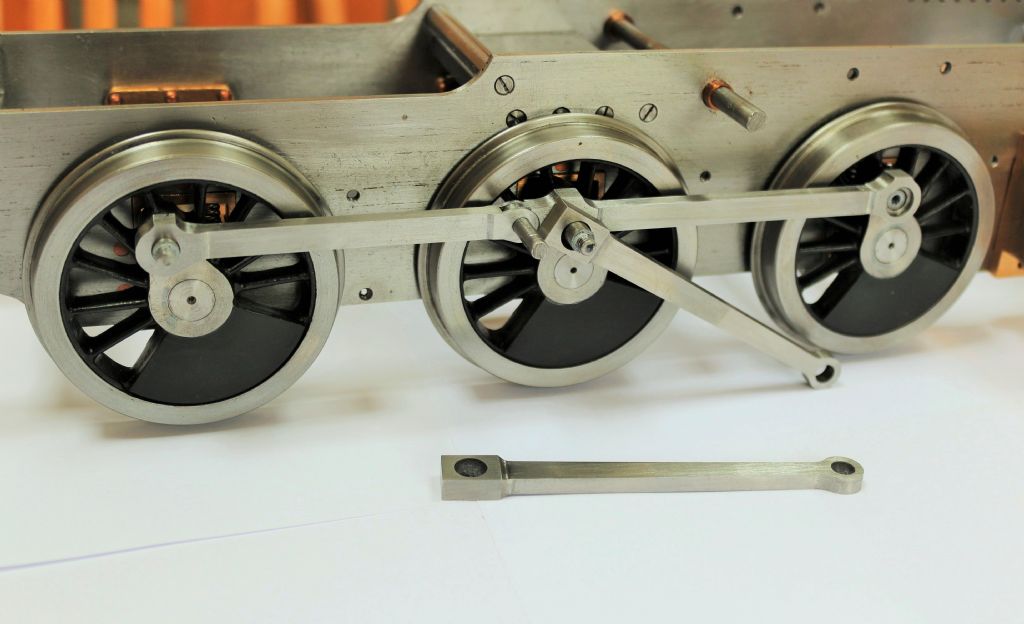
                            Next issue….As you can see, I am ready to make the bearings and intermediate coupling rod pin. The intermediate pin is turned from rod with a 45 degree (90 degree included angle) head to fit a countersink in the back of the rear section of the coupling rod. I will add a short section of 4BA thread at the front of the pin for a brass washer and 4BA nut. I am assuming that I need to machine the pin so that the washer and nut tighten up to a shoulder on the pin rather than 'pinching' the coupling rod. The same will happen on the trailing crankpin and driving pins. Is that the right approach and if it is – how much clearance – a couple of thou or should it be more?

                            Also, I was planning to fit plain hexagon nuts. Would round nuts with flats be closer to the real thing? I don't have any 2BA and 4BA nuts anyway, so turning a few round ones would not be an issue.

                            img_8059.jpg

                            #497067
                            Baz
                            Participant
                              @baz89810

                              Phil H1 when you make your bushes make sure they protrude by about ten thou, this will stop the rods rubbing on the face of the wheel. Round nuts with a couple of flats will look much better than hex head nuts.

                              #497077
                              Phil H1
                              Participant
                                @philh196021

                                Baz, thanks – nice tip regarding the slightly long bush – I will do that.

                                What about the other end – the nut end. How much clearance between the round nut and the coupling rod. The wheels can 'float' side to side. Do the coupling rods need to float also and if so about how much?

                                Phil H

                                #497211
                                Dave Wootton
                                Participant
                                  @davewootton

                                  Phil

                                  Chassis looking really good, lovely job on the coupling and connecting rods. i was chatting with another Rob Roy builder the other day and he mentioned that there is an improved ashpan design by David Machin, not seen it or come across it, but it might be worth a look before you reach that stage. David Machin is a very clever engineer so I imagine it would be a worthwhile modification.

                                  Keep up the good work, a pleasure to see it.

                                  Dave

                                  #497231
                                  Phil H1
                                  Participant
                                    @philh196021

                                    Dave, thanks.

                                    Believe it or not I have just taken delivery of some laser cut parts that include the David Machin, stainless steel ashpan. I haven't studied the ashpan but do you have any idea how it is an improvement. Does it get the fire working better or prevent the spread of ash – or maybe both?

                                    Some might suggest that laser parts are cheating. Everything so far is traditional build but if I carried on using the traditional methods, I reckon I would be complete by about the year 2100.

                                    Phil H

                                    #497248
                                    Baz
                                    Participant
                                      @baz89810

                                      Phil, allow about ten thou slack between nut and rod, the wheels have to move sideways and up and down, front and rear coupling rod bushes should also be a bit slack, LBSC mentions this in a lot of his articles, not sure what Evans said on the matter but I think you should make them about.255 to fit a. 250 crankpin, the centre bush should be a nice running fit, this will enable wheelsets to move independently of each other. I am sure the experts will be along in a minute telling you I am wrong but it works for me.

                                      #497261
                                      Phil H1
                                      Participant
                                        @philh196021

                                        Thanks Baz,

                                        I've got about 0.005" extra length on the intermediate pin/ nut. but the tongue and slot is quite snug. I was going to allow about 0.005" on the coupling rods but I will now go for 0.010" as you suggest and about 0.010" extra at the back of the coupling rod to prevent rubbing the rods to the wheel hub. I might also double check the wheel hub run-out again to make sure.

                                        Mr Evans did mention a snug fit on the driver crankpin and mentions the need for movement on the leading and trailing pins but doesn't suggest an actual clearance.

                                        I did a few geometry sums and as you say, they must need at least 0.003" before metal to metal contact is made between the pins and bearings and that assumes that the quartering is perfect – so I think you might well be right at 0.005".

                                        I will wait a while before cutting metal just in case somebody comes with a 'yeah but'.

                                        Thanks again,

                                        Phil H

                                        #497268
                                        Baz
                                        Participant
                                          @baz89810

                                          Phil tongue and slot should be ok if it is snug, easier to make it snug in the beginning and ease it if it needs, best way to tell if it’s ok is to take the chassis down the club track, put a weight on it, housebrick might do and give it a push round the track, start off gently.

                                          #497278
                                          Phil H1
                                          Participant
                                            @philh196021

                                            Yes – a good plan. It wont freely roll without coupling rods yet i.e., the wheel bearings are slightly tight. It will roll freely if I put weight onto it though. The coupling rods without bearings are tight but tight all the way round the rotation.

                                            I think I was lucky with the wheel centres which probably helps. With the wheels and axleboxes fitted, I measured across the axles with a big micrometer (M&W – lovely thing), there was no difference from one side to the other – not even a fraction of 0.001"

                                            I like the house brick idea.

                                            #497296
                                            Dave Wootton
                                            Participant
                                              @davewootton

                                              Hi Phil

                                              I'm not sure of the differences in the ashpan, wether it's to improve steaming or to keep ash out of the axleboxes, my engine steams ok, but the smokebox and ashpan do need clearing out if I run it for long periods, that might be because I used small anthracite which is very ashy, but does burn well. It does the same in my Simplex which will run for a couple of hours and then clog up, but me bums gone numb by then anyway!

                                              Life's too short not to use laser cut parts, I'm building Don Youngs Aspinall 0-6-0 and ordered everything that Malcolm at Model Engineers Laser can supply, saves so much time.

                                              Hopefully someone on the forum will know the reason for the ashpan re-design.

                                              Dave

                                              #497417
                                              Phil H1
                                              Participant
                                                @philh196021

                                                I need to beg forgiveness from the late Martin Evans. I hadn't read the section on coupling rod clearance properly.

                                                He says the driving bush should be a good fit to give smooth running but the leading and trailing bushes should be opened out with a letter F drill. Letter F is 0.257".

                                                Phil H

                                                #500517
                                                Phil H1
                                                Participant
                                                  @philh196021

                                                  I have pinned the wheels and completed the coupling and connecting rods. I just need to buy a couple of 4BA countersunk screws for the leading crankpins.

                                                  I think I will do a bit of work on the brakes before doing more work on chapter 3.

                                                  Phil H

                                                  chapter 2 complete.jpg

                                                  #507238
                                                  Phil H1
                                                  Participant
                                                    @philh196021

                                                    The cylinder/ steam chest studs are 6BA and 3mm rod looks about the right size for 6BA but most suppliers only have 3/32" or 1/8" in mild steel. I do have some 3mm brass. So – is brass no use for this application and or have I overlooked a ME supplier who does 3mm mild steel?

                                                    Phil H

                                                    #507261
                                                    Baz
                                                    Participant
                                                      @baz89810

                                                      Phil why not use 6BA studding, it is available from EKP Supplies.

                                                    Viewing 25 posts - 1 through 25 (of 54 total)
                                                    • Please log in to reply to this topic. Registering is free and easy using the links on the menu at the top of this page.

                                                    Advert

                                                    Latest Replies

                                                    Home Forums Locomotives Topics

                                                    Viewing 25 topics - 1 through 25 (of 25 total)
                                                    Viewing 25 topics - 1 through 25 (of 25 total)

                                                    View full reply list.

                                                    Advert

                                                    Newsletter Sign-up