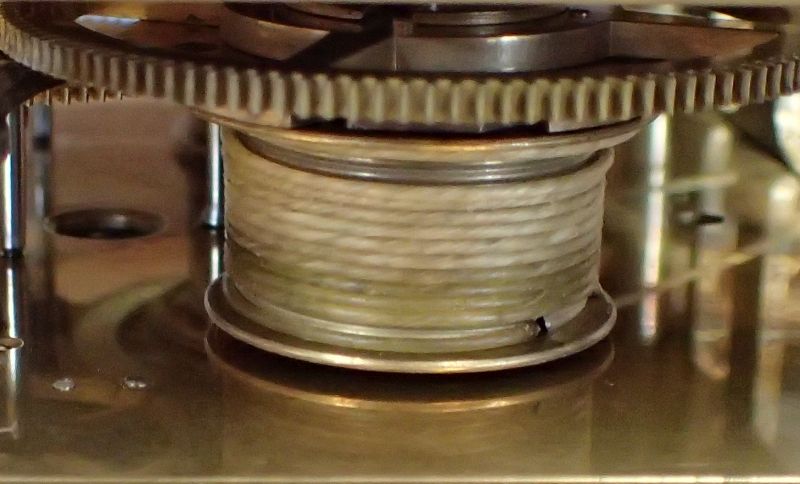
Re-cording a Vienna Regulator

Advert

Re-cording a Vienna Regulator

Home Forums Clocks and Scientific Instruments Re-cording a Vienna Regulator

Viewing 9 posts - 1 through 9 (of 9 total)
  • Author
    Posts
  • #608559
    Tim Stevens
    Participant
      @timstevens64731

      Grandma's clock has finally gone clonk – one of the driving cords has failed. I need advice from someone more familiar with the details, please.

      The clock is, I guess, a mid-range version from about 1900-1910, not a 'proper' regulator – but I has kept good time. I have detached the pendulum and the remaining weight, and removed the movement from the wooden case. The movement is fairly simple, but the scroll-drums are not that easy to get to. It would help to know whether it would help to remove the hands, dial, etc or should this job be possible without extra dismantling?

      How is the cord end normally attached to the drum? I can see a hole about 3mm dia, but this is not where the other cord is attached, rather it goes through a much smaller hole hard against the flange. So, I cut the new cord end square, poke through the small hole until I can find the end again, tie a knot in it and pull – is that right?
      I guess that once the end is attached within the drum, the cord should be wound on using the winding key while keeping a modest tension on the cord. Or is it better to leave the loop of cord dangling free until the movement is back in the case, add the weight, and then wind it back on in the normal way?

      And finally – what else do I need to know to avoid further problems?

      Many thanks – Tim

      Edited By Tim Stevens on 06/08/2022 15:38:35

      Advert
      #3977
      Tim Stevens
      Participant
        @timstevens64731

        Advice before I dive in … please

        #608563
        bernard towers
        Participant
          @bernardtowers37738

          Sounds like a good time to give it a birthday service and reoil. You say cord I presume you mean material cord. You have more choices these days in types of material to use, why not go for phosphur bronze , fit and forget.

          #608569
          John Haine
          Participant
            @johnhaine32865
            #608571
            Tim Stevens
            Participant
              @timstevens64731

              Thanks John, I have the cord, its the How that I seek, not the What with.

              Regards, Tim

              #608577
              Peter Cook 6
              Participant
                @petercook6

                Possibly! On my Vienna's the barrels do not have a second hole, so the only way to record them is to disassemble the movement, disassemble the great wheel from the barrel and then poke the new cord through the small hole, tie a big knot and pull tight then put it all back together again.

                vienna barrel.jpg

                If you can get at the inside of the barrel through the 3mm hole, then you may be able to tie the knot and pull it inside. A "leader" of soft thin wire which is easier to manoeuvre and bend to capture through the 3mm hole may help. Measure the length of the original cord and tie a loop at the other end to hang on the hook on the baseplate.

                Once reinstalled in the case wind about half the cord onto the barrel while keeping some light tension on it, thread on the pulley, hook the other end in place and add the weight. Then wind up the rest.

                If you fully wind the cord onto the barrel before hooking the other end up, it all gets difficult under and behind the dial. Half way gives you room to work.

                I would change both (and if you can strip down and service the clock) while you are at it – once one has gone, you will be doing it again soon for the other.

                Removing the dial and hands probably won't help unless the front plate has holes in them through which you can reach the barrels. Most Vienna's don't. Just be careful how you lay the movement down to work on it. I use a plastic bowl about the same size as the dial to make sure that it's not resting on the hands.


                Typo

                Edited By Peter Cook 6 on 06/08/2022 18:44:30

                #608585
                Tim Stevens
                Participant
                  @timstevens64731

                  Thanks, PC6. I still hope to avoid disassembly, but you might be right. The small hole for the cord looks rather small to get a loop of wire and double-cord through. But I live in hope. No church tomorrow, then, play with clock.

                  Cheers, Tim

                  #608586
                  Peter Cook 6
                  Participant
                    @petercook6
                    Posted by Tim Stevens on 06/08/2022 20:42:03:

                    The small hole for the cord looks rather small to get a loop of wire and double-cord through.

                    Fine wire, pushed through the cord (a needle to make the initial hole) should be smaller than the cord.

                    #608644
                    old mart
                    Participant
                      @oldmart

                      About 50 years ago, the catgut in our grandfather clock failed with old age and I replaced both the clock and the chimes cord with that white string that butchers used to tie up joints.

                    Viewing 9 posts - 1 through 9 (of 9 total)
                    • Please log in to reply to this topic. Registering is free and easy using the links on the menu at the top of this page.

                    Advert

                    Latest Replies

                    Viewing 25 topics - 1 through 25 (of 25 total)
                    Viewing 25 topics - 1 through 25 (of 25 total)

                    View full reply list.

                    Advert

                    Newsletter Sign-up