Prusa i3 Build

Advert

Prusa i3 Build

Home Forums 3D Printers and 3D Printing Prusa i3 Build

Viewing 25 posts - 26 through 50 (of 115 total)
  • Author
    Posts
  • #294172
    Russell Eberhardt
    Participant
      @russelleberhardt48058

      I found that the glass plate at 55 C, cleaned with acetone before each print worked fine with PLA but when I tried a big ABS print I couldn't get it to stick no matter what method I tried – hairspray, "ABS juice", pva. Then I tried BuildTak. It's a bit expensive but works well and is durable.

      Russell

      Advert
      #294182
      Zebethyal
      Participant
        @zebethyal

        I have also heard good things about BuildTak, but not tried it myself.

        I do not currently print with ABS, but I believe the bed needs to be around 110C for that to stick well.

        #294224
        Neil Wyatt
        Moderator
          @neilwyatt

          Doing rather well on a very hi-res 'Benchy' but it came loose when nearly at the roof – too low with the bed temp, I think

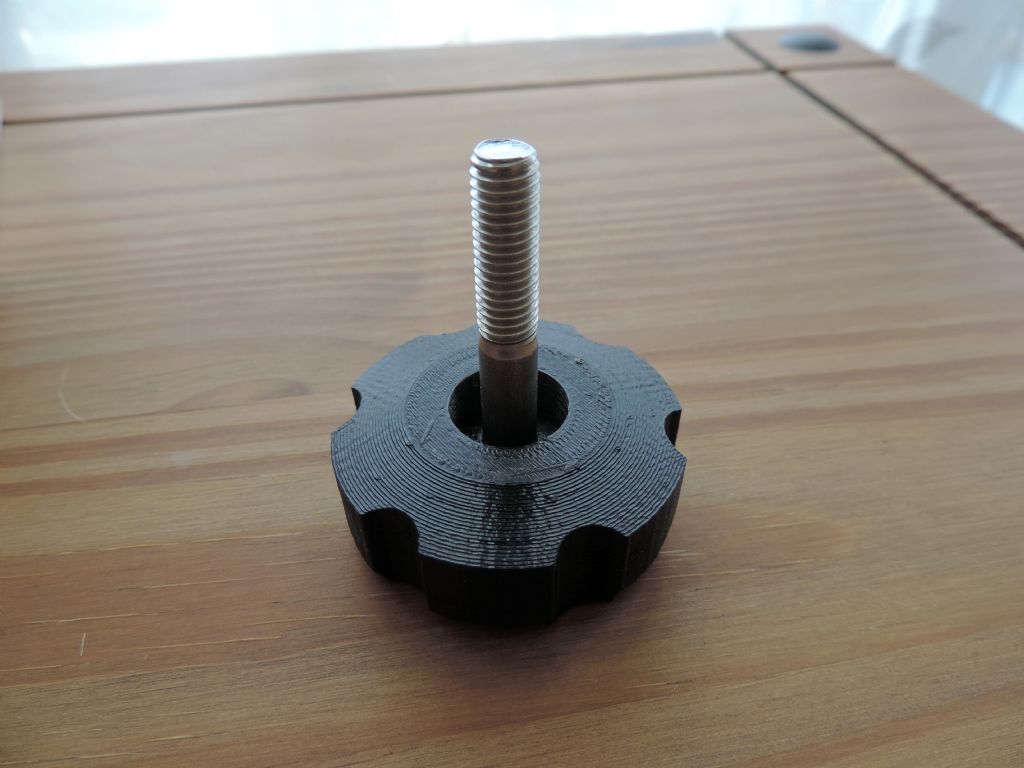
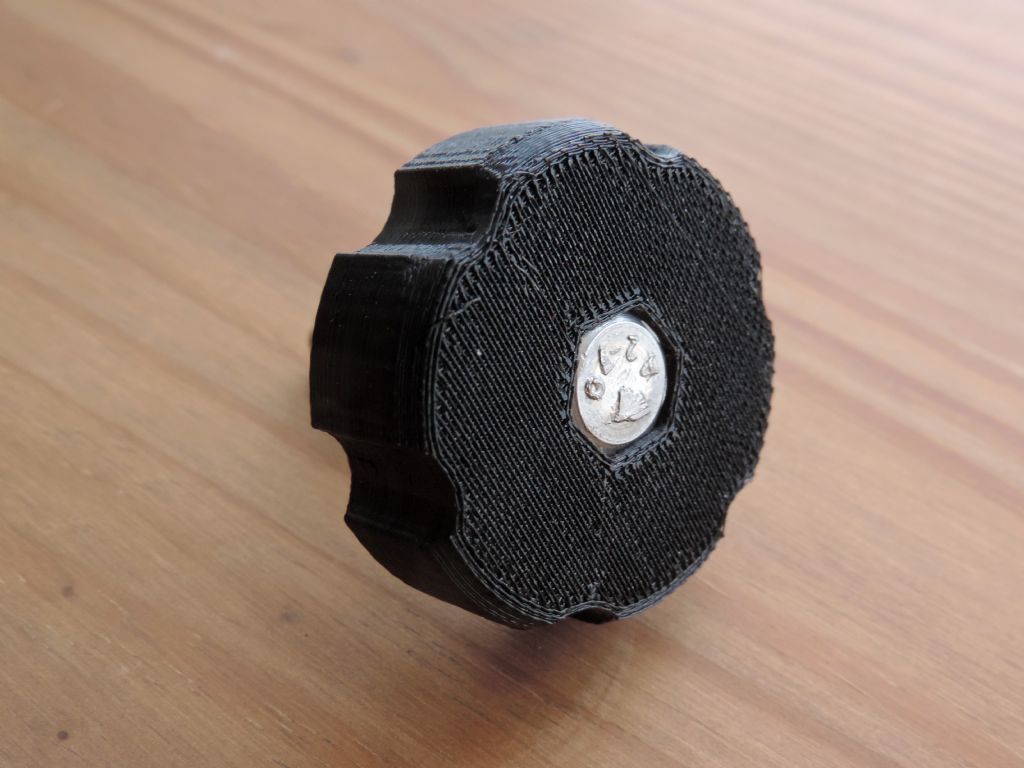
          Currently printing a 2" diameter knob to fit an M8 machine screw.

          #294227
          Chris Baetens
          Participant
            @chrisbaetens16442

            ABS, the most difficult filament to print. That is one of the reasons I don't work with it.

            #294240
            Neil Wyatt
            Moderator
              @neilwyatt

              Well that turned out even better than I hoped!

              knob 1.jpg


              knob 2.jpg

              Oversize by about .25mm in X and Y, probably largely due to filament ooze, thickness would be dead on 19mm, except I couldn't get the brim (extra 0.4mm) to peel off!

              Edited By Neil Wyatt on 20/04/2017 14:11:26

              #294546
              Dave Smith the 16th
              Participant
                @davesmiththe16th

                I set my bed to 60 degrees for PLA, but i have a glass plate on top of the bed (4mm thick) so its probably a touch cooler.

                Try a pritt stick on the bed surface, on mine the bed heats then the the nozzle heats, i dont like them to both heat from cold. When the nozzle gets to 180 degrees i give the print area a quick rub with the pritt stick so its nice and sticky. Print temperature is 215 degrees.

                I also find some PLA's print better than others. Down to the brands or the colours? Not sure yet.

                I tend to print a raft also. This helps, not had a PLA part curl or peel off the bed siince.


                Edited By Dave Smith the 16th on 23/04/2017 01:53:26

                #294557
                Chris Baetens
                Participant
                  @chrisbaetens16442

                  Hi,

                  To avoid (PLA)warping I always clean the glass surface with glass-cleaner, afterward I rinse with hot water. I NEVER dry the glass-surface with a cloth because there always some leftovers from soap or softener in the cloth or towel from the washing process. If you do dry with a cloth you will smear these soap-leftover on the glass-surface. These leftover will prevent parts from sticking to the glass while printing. You will at least end up with warped parts. Don't believe..?.Well, dry the glass-surface with a cloth and hold it against a strong light or the sun and at a certain angle you will clearly see the soap or softener leftovers on the surface, you will even see the direction you did wipe the glass.

                  Drying the surface after cleaning and rinsing is done with a piece of clean paper towel (used in the kitchen). That is(should be) absolutely free of any residue. While drying with a piece of paper towel you will even hear a squeaking sound indicating that the surface is perfectly clean.
                  PLA parts will stick absolutely perfect. In fact they stick so good I have to wait until the glass is completely cold to remove them. After the glass is cooled they pop of by themselves. But I do not wait to print the next part, I switch glass-plates.
                  Using this technique the lower surfaces of my printed parts are always absolutely flat, free of warping and also very glossy. (Using black PLA it's almost like a mirror.)
                  Printing other filament like XT or nGen I use the same technique and add a very thin spray of 3DLack on the glass-surface, works just perfect.

                  I do not print ABS at all.

                  #294558
                  Chris Baetens
                  Participant
                    @chrisbaetens16442

                    Oops..

                    Forget to mention, I always print at 65°/215° with a E3D and always use parts cooling.

                    #294628
                    Neil Wyatt
                    Moderator
                      @neilwyatt

                      I'm using 75/210 at the moment, but that's with an aluminium backed mirror as top plate.

                      I've used the 50% PVA and just done the first refresh. A print has just ended and the four parts are clearly stuck fast, but they seem to come free easily enough when cooled.

                      This will be interesting, one of the parts is an adaptor to replace the prism in a finder scope (I prefer a straight through scope) with a 0.85mm pitch thread at each end. It does appear to have printed, but will it work?

                      Neil

                      #294636
                      MW
                      Participant
                        @mw27036

                        I'm watching this one because I've been looking at the i3 prusa and turning green. So I've heard a lot of people complain about the instructions but at the entry level of the market I could nearly expect that.

                        It's a whopping great bit cheaper than the Velleman 3d kit printer, and has a heated bed. I'm tossing up between taking a gamble and possibly a bit of work or a kit produced by a trusted maker of electronics.

                        Michael W

                        #294655
                        Neil Wyatt
                        Moderator
                          @neilwyatt

                          Consider the kit I bought. I'm getting results the equal of what the Dremel produced. Those knobs were actually for a job I have just completed (client comment 'you like your 3D printing, don't you?&#39

                          The 0.85mm pitch thread actually printed, but was not fine enough to engage as I printed it 'dead on size'. I have enlarged it by 3% (just under 1mm) which may be a bit too much.

                          I like the heated bed.

                          It does look a bit heath robinson with the wires everywhere and the re-wiring of the PSU, but I'm going to make a dedicated cabinet for it to stand on/in which will tidy things up.

                          I printed a long hook that fits on top of the frame and to the spiral wrap around all the print head wires. This keeps them well above the hot bed and away from any tangling risks.

                          Two things so far, first it is very fussy about bed levelling. This is something you have to learn, but it does get easier (and progressively less necessary). The quality fo your first layer is a better indicator of a well-levelled bed tahn any amount of paper under the nozzle! It helped a lot when I rounded the end of the levelling stop screw AND put some PTFE tape on it to stop it slipping.

                          I have an old 'ARTS' model of an Americas Cup yacht, that had a lot of rather flashy chrome accessories glued on it – winches, hatches, windows etc. I want a simple R/C yacht for next time I visit my dad, so I have just knocked up replacements for all these bits and they will look OK from a distance. I had already printed all the mast furniture on the Dremel. It really is 'rapid prototyping' – you can design something and have it printed inside an hour, if it is small.

                          It seems to be very fussy about SD cards – it refuses to recognise one card I have and sometimes doesn't recognise the one that come with it. I suspect that my SD socket is a tad over-sensitive to vibration as after a bit of a jerk (caused by me trying to get dangling PLA off a moving nozzle) it lost communication with the card.

                          A few tunes ups I want, the main one is to make it lay down a strip of PLA along the front of the bed (like the Dremel) rather than dropping a loose pile at 0,0. That way I can spot if the height is wrong before too much happens.

                          #294664
                          Neil Wyatt
                          Moderator
                            @neilwyatt

                            Well the thread now works perfectly, except I made my 'extension tube' about 8mm too long, so I have to reprint it shorter.

                            #294677
                            Enough!
                            Participant
                              @enough
                              Posted by Neil Wyatt on 23/04/2017 21:14:28:

                              Two things so far, first it is very fussy about bed levelling. This is something you have to learn, but it does get easier (and progressively less necessary). The quality fo your first layer is a better indicator of a well-levelled bed tahn any amount of paper under the nozzle!

                              I think most printers are (fussy about bed-levelling). I know my DaVinci is. It comes with a fancy routine built into the firmware for levelling. Never managed to get that to work and judging from the comments on a DaVinci forum, not many others did either.

                              Someone published a method on the forum using bits of paper as feelers. It kind of worked but was very dependent on individual "feel". Also, the paper was like a wet noodle which didn't help. I got hold of some Starrett thickness gauges (like large feeler gauges) in various sizes and treated it like any other gap measurement in the shop. Determined the clearance that worked for me and is repeatable.

                              #294702
                              Neil Wyatt
                              Moderator
                                @neilwyatt
                                Posted by Bandersnatch on 24/04/2017 01:02:52:

                                Someone published a method on the forum using bits of paper as feelers. It kind of worked but was very dependent on individual "feel". Also, the paper was like a wet noodle which didn't help. I got hold of some Starrett thickness gauges (like large feeler gauges) in various sizes and treated it like any other gap measurement in the shop. Determined the clearance that worked for me and is repeatable.

                                Funnily enough, I was thinking of using a feeler gauge.

                                It was harder to set the initial gap than to level the bed afterwards because of the loose fit of the stop screw, I think i've sorted that.

                                I did a 23-gram print last night, a finder scope holder. I went to bed at 12:00 leaving it to cool down because it was fixed solid. This morning it had come free on its own.

                                #294707
                                Zebethyal
                                Participant
                                  @zebethyal

                                  As previously mentioned I use kapton tape cleaned with acetone on a sheet of glass on top of my heated bed, I also have some foil backed insulating material under the bed to reflect back heat from underneath.

                                  I print PLA with the bed at 55C and the nozzle at 195C, sometimes 200C for the first layer. I only use a raft if the item has proven difficult to print without one, and only use a fan to cool the filament from about 10 layers up if there are likely to be overhangs that need it to prevent them curling up. Most items need to be prised off the bed with some force as they are stuck fast even when cold.

                                  For initial height setting prior to each print, I use a piece of paper and adjust until the paper just catches on the nozzle, I repeat this in a number of places around the bed for levelling. I do this with the bed hot as the bed may warp as it heats up and push the glass high somewhere unexpected. 3 point mounting is much easier to adjust than 4 point for the bed.

                                  For my Mini Kossel when that is complete, I am looking to use a 10mm thick disc of sanded acrylic for the bed with no heat, this will be a PLA only printer and means I can use one of my many small laptop power supplies to run it..

                                  #294722
                                  MW
                                  Participant
                                    @mw27036

                                    Thanks for the feedback on this thread, it certainly helps me consider what's involved with getting a printer.

                                    Call me a chicken but i'm veering over towards saving my pennies for a velleman over the i3, I realized both are heated, which is of course, vital for avoiding thermal shock on the surface if you're melting ABS at much higher temperatures than PLA requires.

                                    I would say the aluminium frame construction of the velleman is a plus for me, but the cost point is also much higher as a result.

                                    The prusa looks like a lot for the money you pay, and if I was really struggling for cash then it would be the one I would choose, however, the lack of clarity in the manual makes me feel as though a European designed one would lead me towards a risk averse outcome, and i'm not to keen or good at having to think on my feet!

                                    I'm glad to hear and see that the quality of the parts produced doesn't suffer, even when the prusa is miles cheaper than the dremel ready-made.

                                    It's also great having a knowledge of lathes and mills behind this for obvious reasons, you can engineer solutions to problems that a computing purist may not wish or be able to delve into.

                                    And i'm sure if theres any problems on the surface finish you can always take a skimming cut on the machines?yes


                                    Edited By Michael-w on 24/04/2017 10:50:04

                                    #294732
                                    PETER ROACH
                                    Participant
                                      @peterroach92938

                                      I have a Huxley and a home built Prusa both circa 2012-13. I have only ever used Kapton tape with both and whilst in the early days used to change it, the current tape has been on several years. So still on first reel of tape. I use Acetone to clean the beds, in the form of Boots or Tesco ( no connection) nail polish remover. Used PLA and ABS in various forms on the Prusa and yield improved with use of a full 10mm brim to no failures. Was going to upgrade to glass, but the brim technique seems to do the trick. However having two plates would make sense if you wanted to continuously run a machine.

                                      For levelling have just run a single layer and measured when cooled and adjusted to suit.

                                      The quality and "alloying" of the filament will make a considerable difference to the performance. The colouring pigment and flow modifiers will yield different properties just as carbon and other additives do for steel. So may be worth trying different sources/brands.

                                      #294734
                                      Ian S C
                                      Participant
                                        @iansc

                                        You have to be careful with nail polish remover, it often has oil added to help prevent the nails being damaged by the acetone.

                                        Ian S C

                                        #294737
                                        PETER ROACH
                                        Participant
                                          @peterroach92938
                                          Posted by Ian S C on 24/04/2017 11:33:19:

                                          You have to be careful with nail polish remover, it often has oil added to help prevent the nails being damaged by the acetone.

                                          Ian S C

                                          Yes read the label, the "cheaper" removers seem to be neater without the oils. Probably the conditioners got more additives.

                                          I keep meaning to bulk buy acetone and use most of it with some mineral oil as WD40 substitute.

                                          #294743
                                          Bazyle
                                          Participant
                                            @bazyle

                                            Re levelling. As engineers is there a reason you don't use a DTI, in some specially printed holder perhaps, to measure the variations?

                                            Several people are mentioning they have a Prusa with or without heated bed etc but I see a huge number of mfrs on the web with an equally wide range of prices so perhaps more specific details would be appropriate when mentioning a factor that would be mfr dependent.

                                            #294745
                                            Neil Wyatt
                                            Moderator
                                              @neilwyatt
                                              Posted by Bazyle on 24/04/2017 12:32:54:

                                              Re levelling. As engineers is there a reason you don't use a DTI, in some specially printed holder perhaps, to measure the variations?

                                              I was thinking of doing that. But unless it is a permanent fitting you still need to set the initial gap.

                                              The problem is any permanently fitted probe mustn't extend below the nozzle, which is why you can get inductive sensors to do the job.

                                              Neil

                                              #294749
                                              PETER ROACH
                                              Participant
                                                @peterroach92938

                                                Some beds are sprung mounted? so if using a DTI you may be measuring to a deflected point, rather than the operating position. If you extrude material and measure you are measuring the real situation.

                                                Have to explain please, further why a inductive mounted sensor, which would not extend beyond nozzle would not work?

                                                #294752
                                                Neil Wyatt
                                                Moderator
                                                  @neilwyatt

                                                  Even the sprung beds are rigid enough for a DTI, they have to hold level with the weight of a print on top.

                                                  I was saying inductive sensors will do the job. Marlin firmware has auto levelling code that can be enabled.

                                                  Neil

                                                  #294767
                                                  NJH
                                                  Participant
                                                    @njh

                                                    This makes me feel very old! – what will you use it for when it is made?

                                                    Norman

                                                    #294770
                                                    Enough!
                                                    Participant
                                                      @enough
                                                      Posted by NJH on 24/04/2017 18:17:54:

                                                      This makes me feel very old! – what will you use it for when it is made?

                                                      I got into computers with the Altair – mid 70's. The most common question I got at the time was "yes, but what can you use it for?"

                                                      At the time just the fun was enough to satisfy. The uses came along later. The first really useful program I found was a mortgage amortization program that let you do "what-if" scenarios. It was a complete eye-opener, let me pay off my house mortgage in 6 years and saved me more money than every computer I've had since.

                                                    Viewing 25 posts - 26 through 50 (of 115 total)
                                                    • Please log in to reply to this topic. Registering is free and easy using the links on the menu at the top of this page.

                                                    Advert

                                                    Latest Replies

                                                    Viewing 25 topics - 1 through 25 (of 25 total)
                                                    Viewing 25 topics - 1 through 25 (of 25 total)

                                                    View full reply list.

                                                    Advert

                                                    Newsletter Sign-up