PG Optical dividing head

Advert

PG Optical dividing head

Home Forums Manual machine tools PG Optical dividing head

Viewing 25 posts - 1 through 25 (of 47 total)
  • Author
    Posts
  • #552487
    William S
    Participant
      @williams

      Hello All

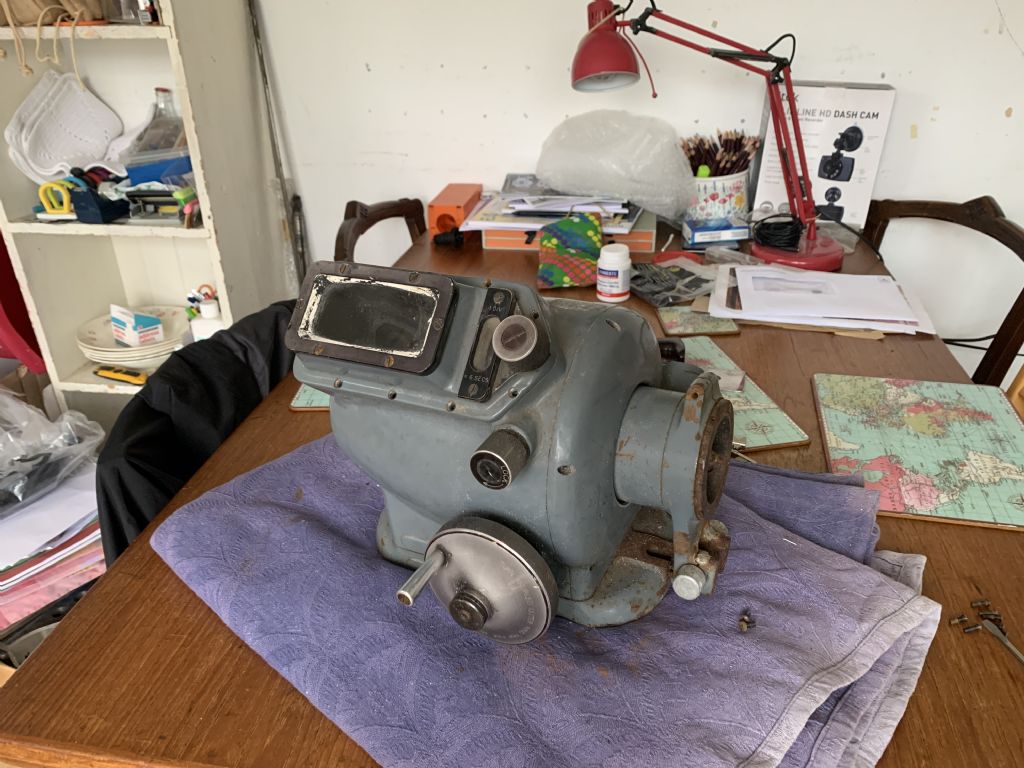
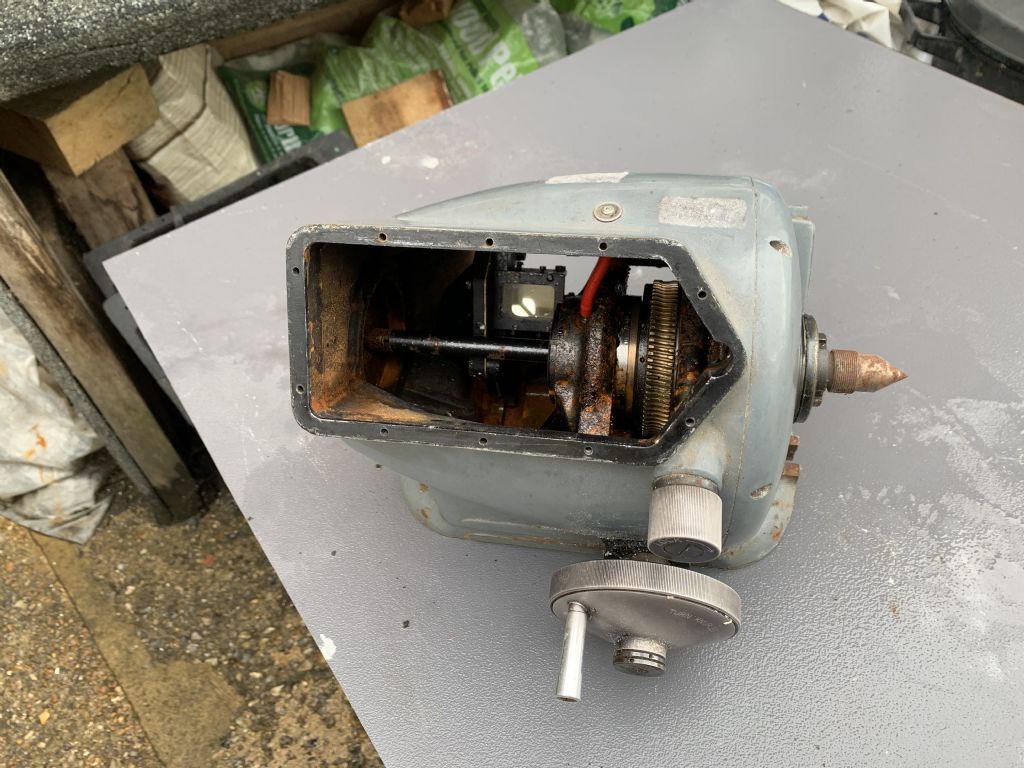
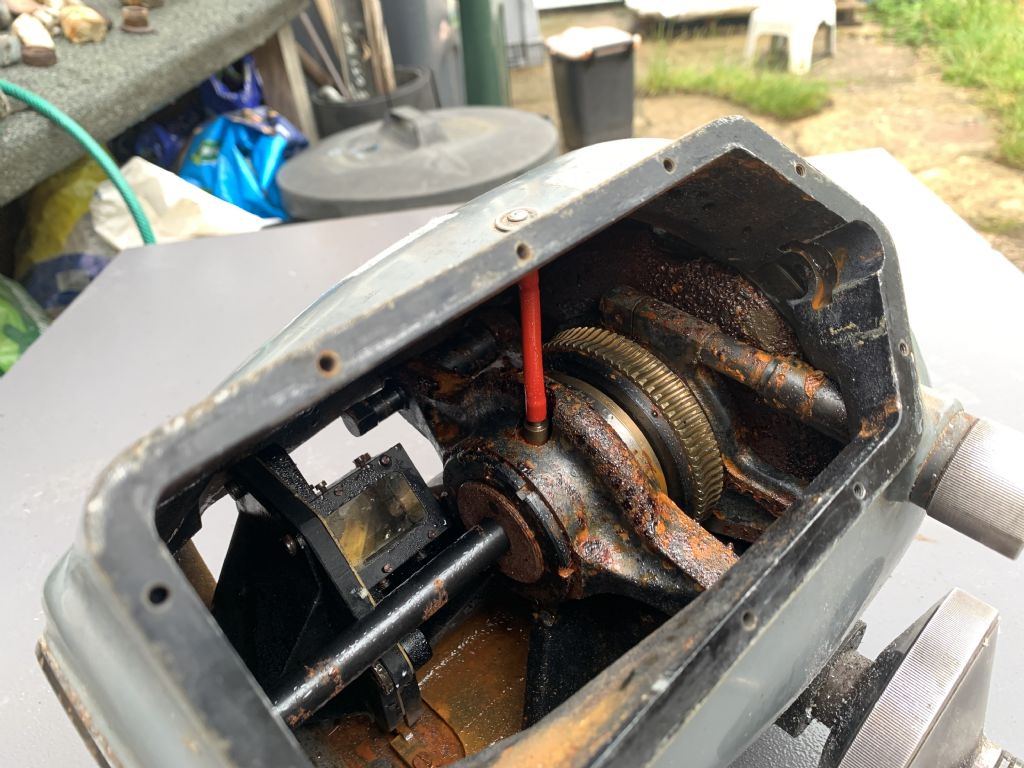
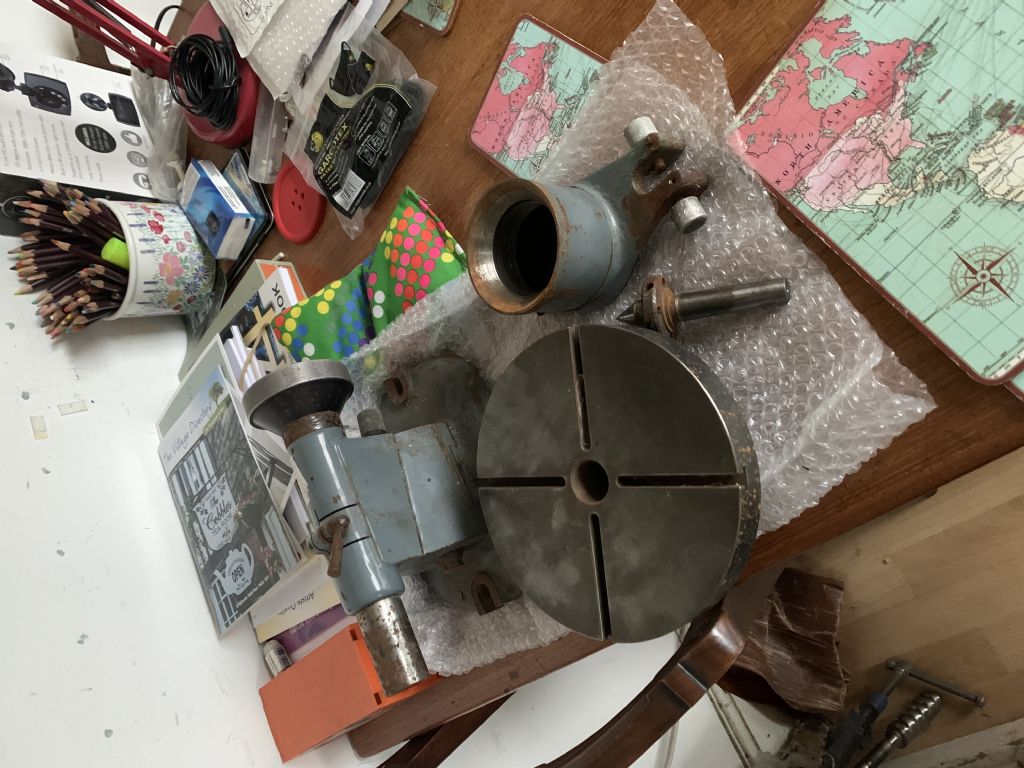
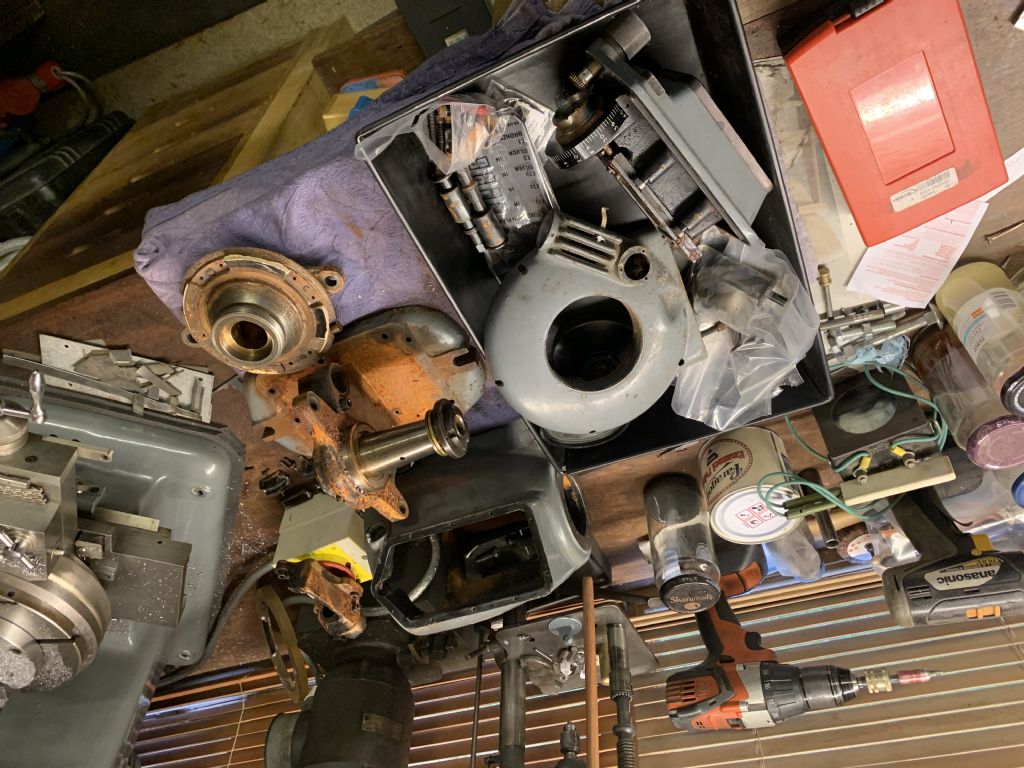
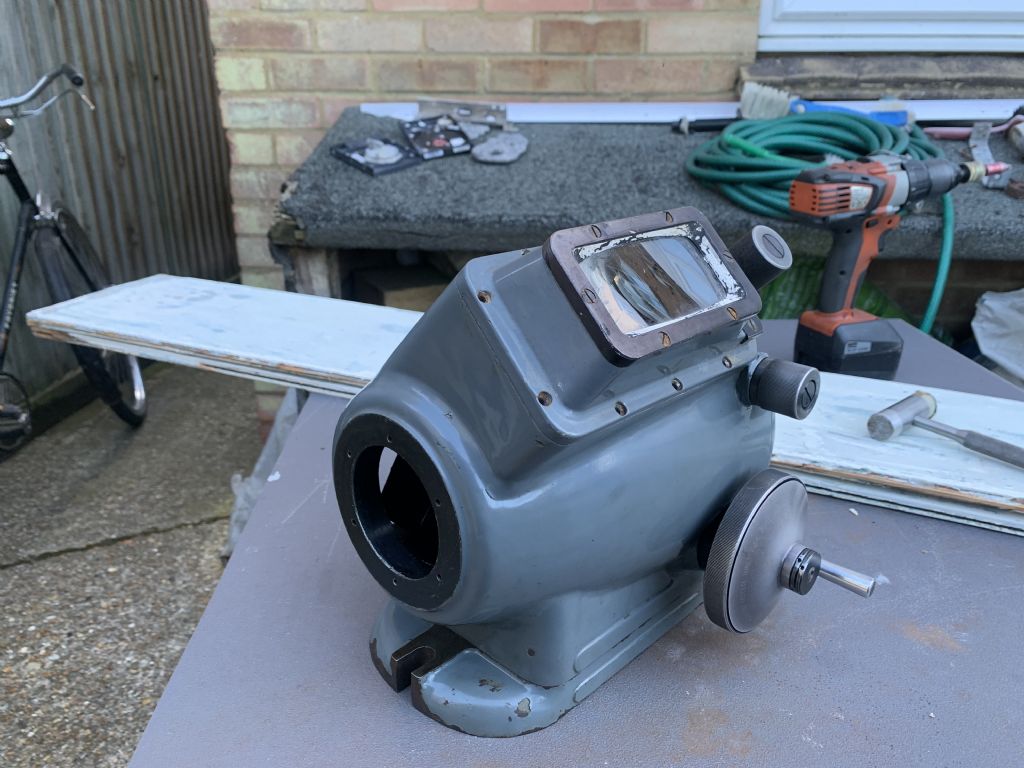
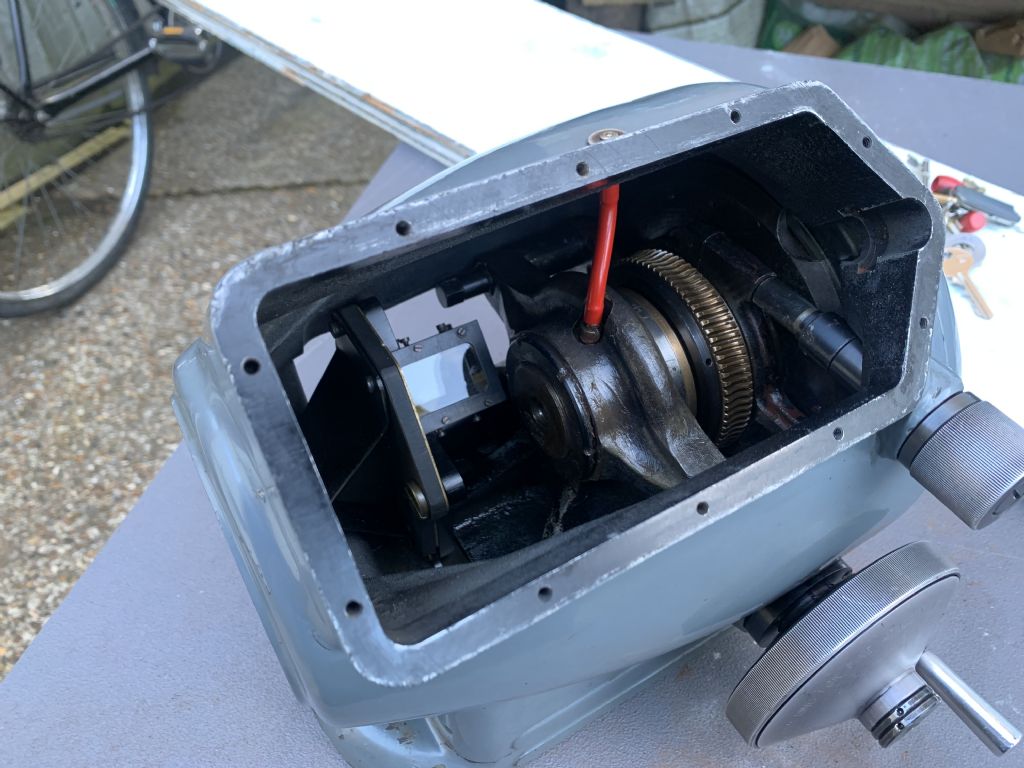
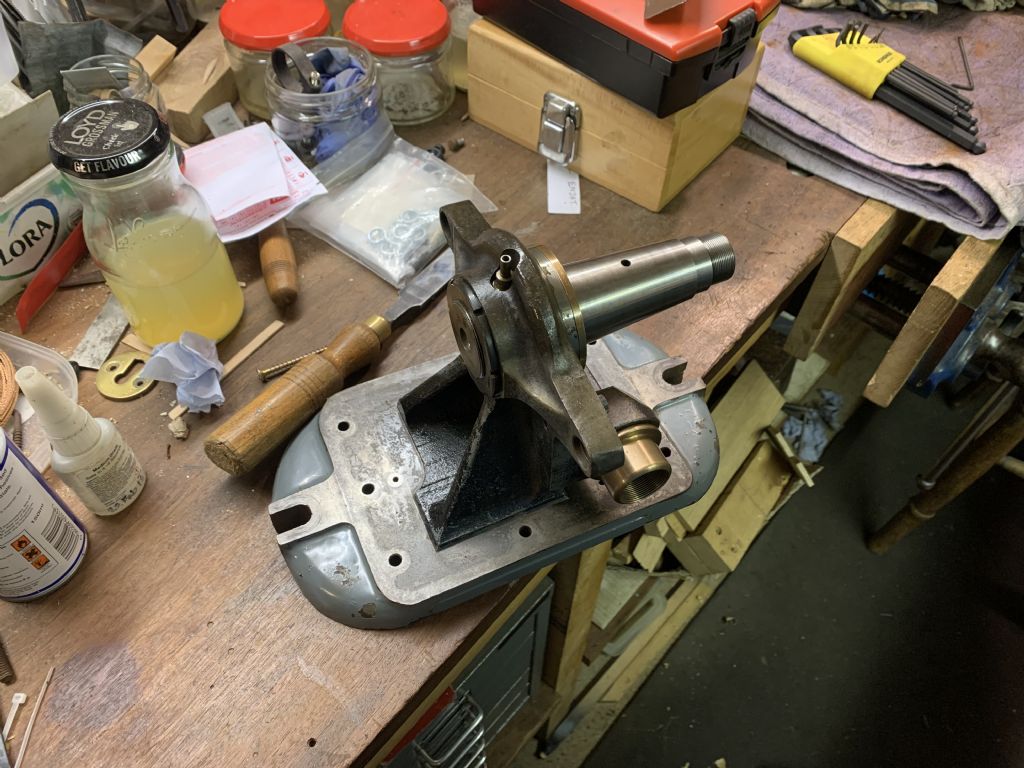
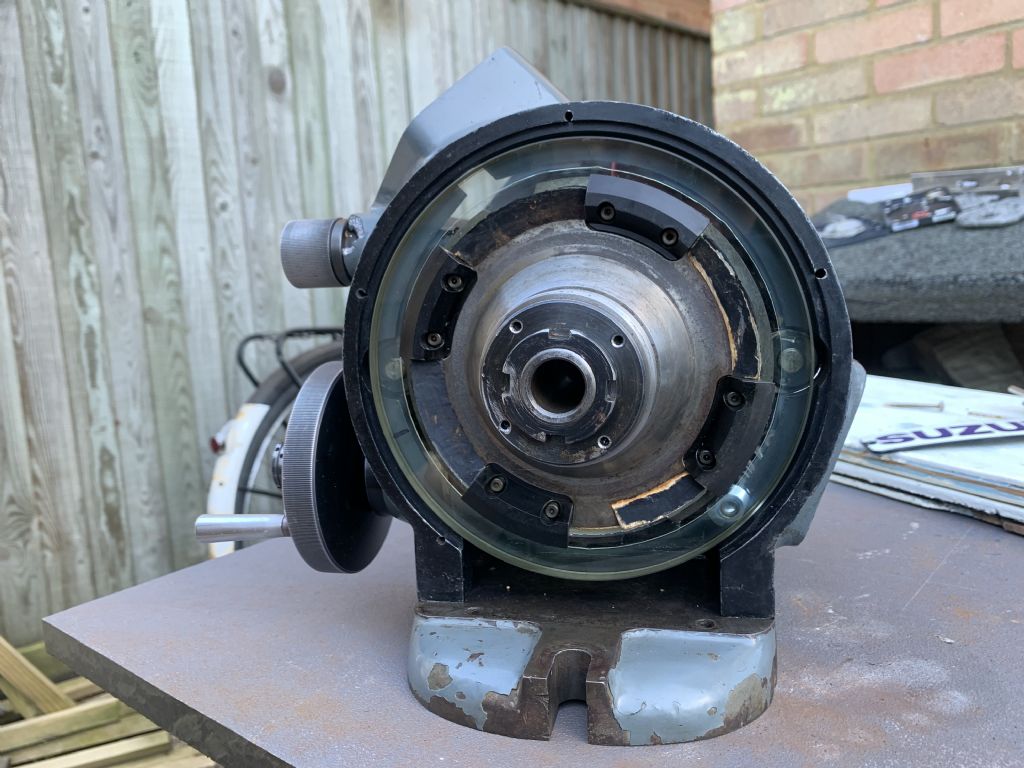
      Just after winning this piece of vintage kit, I said that it is going to be the best £134 or worst £134 I have probably ever spent! I'll let you decide:

      059b1cc3-42d0-4352-99a5-1791505d4d6e.jpeg

      319d6168-e152-496c-8925-39106a5d68b8.jpeg

      275e1f17-aa0b-483a-9f74-5194d95fdc35.jpeg

      65d47603-818d-436f-9acb-d9dc98251bcf.jpeg

      946723b3-c0a6-475a-9f34-af07944d7a68.jpeg (sorry for the orientation of these 2 pictures! The recent thread about picture orientation has taught me how to orientate my phone when taking the pictures!)

      dea104b2-07d4-4a93-8a92-35915f81113e.jpeg

      4fe0a8fe-90ed-402f-8cce-217306ff0661.jpeg

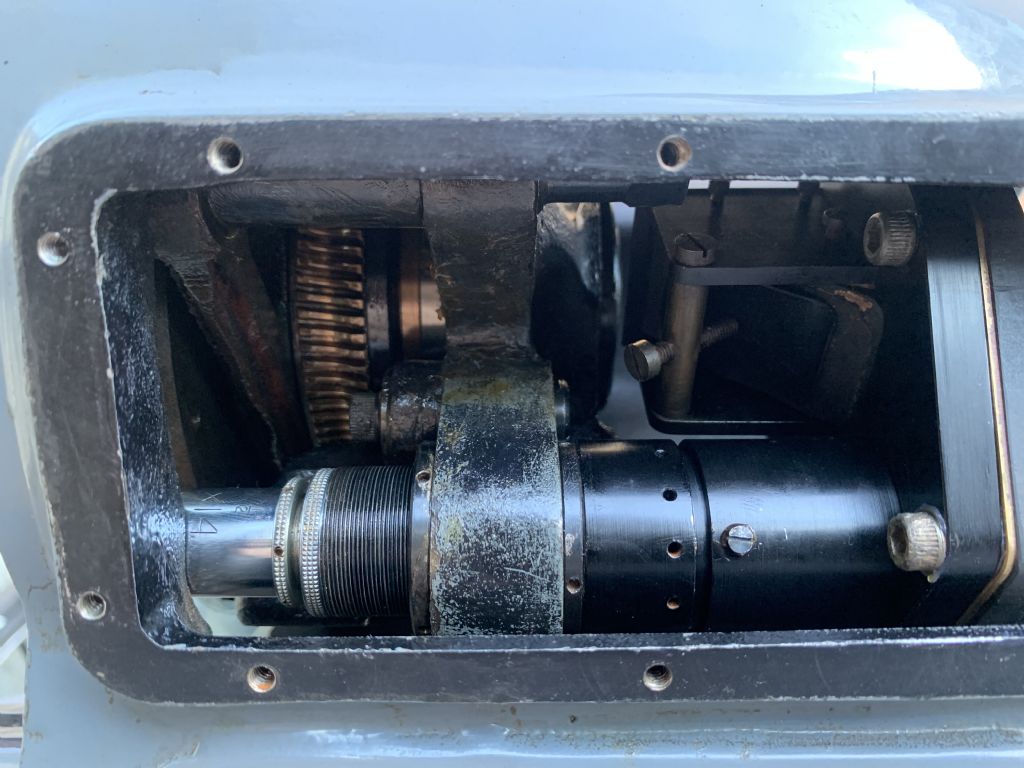
      So that what it looked liked inside upon arrival!, it was sold as being sat in a shed for a few years, seemed to be an uninsulated shed! The constant temperature changes and being basically a sealed unit means it has basically sweated inside, and ended up in the mess as seen above.

      Advert
      #14300
      William S
      Participant
        @williams

        Are the optics saveable?

        #552488
        William S
        Participant
          @williams

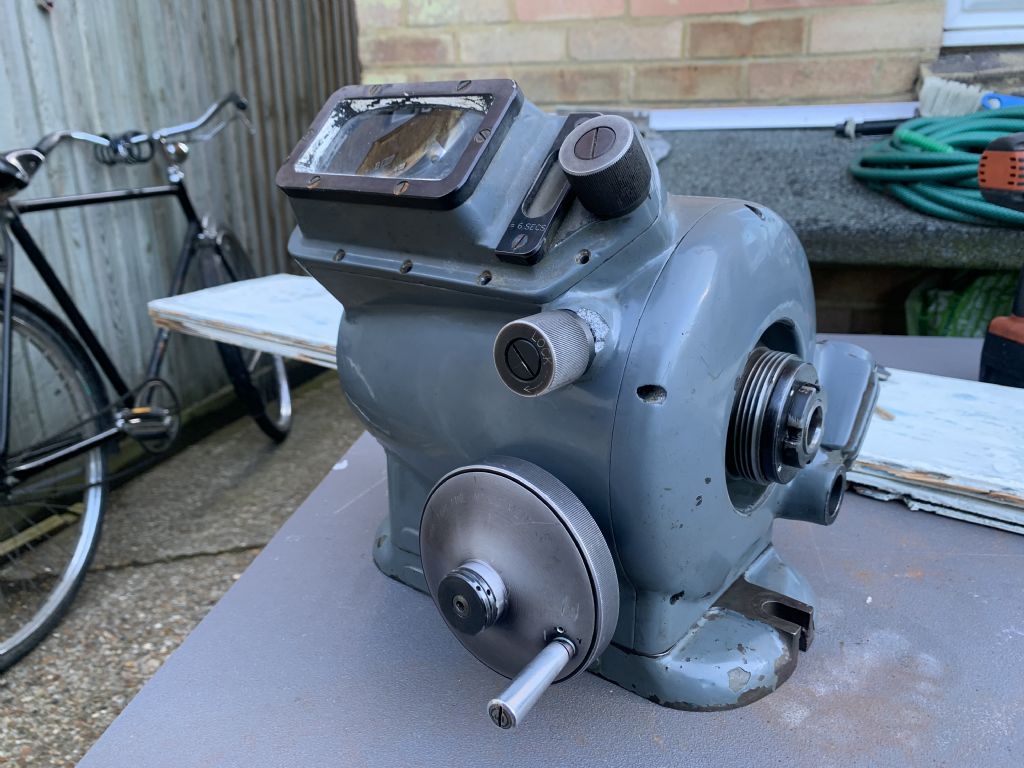
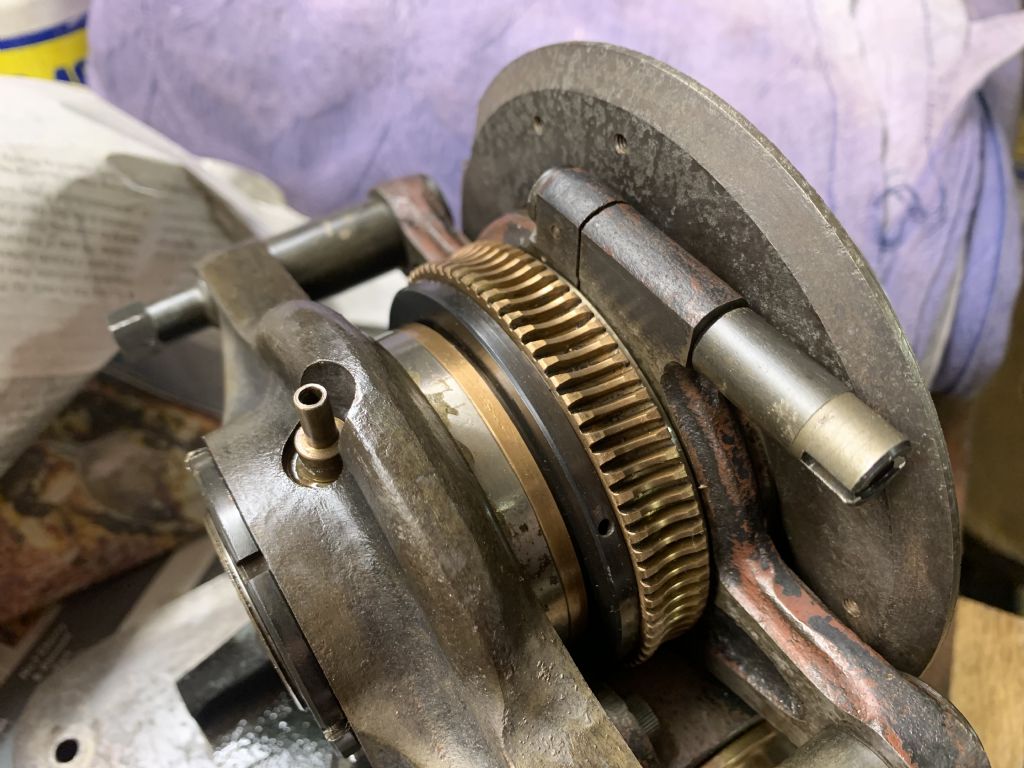
          However a bit of dismantling, WD40 and a razor blade, most rust was scraped off ending up with:

          4c250168-30b0-4237-a49c-e36042d3522b.jpeg

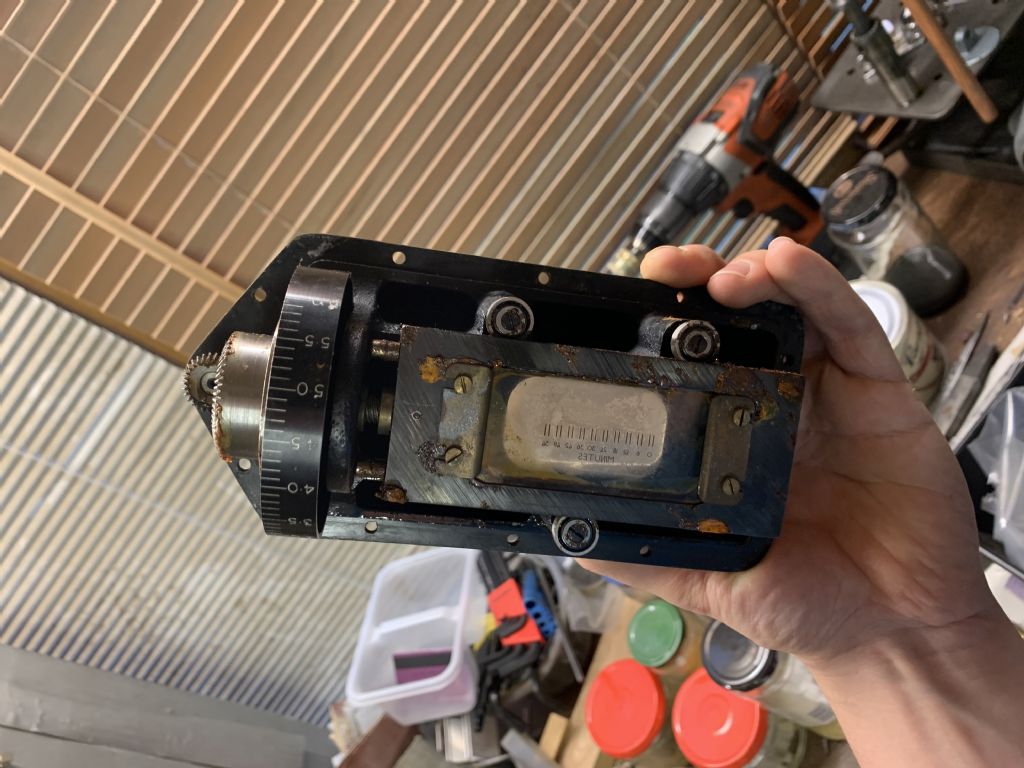
          4a85bb4b-ba75-462f-98dd-a03d6a08e202.jpeg(I am yet to clean to the readout assembly)

          e1f36618-a067-4da1-89da-8832039d7b60.jpeg

          80bfbc83-9b0f-4d13-a001-1177d178124e.jpeg

          dfe8e873-322d-418b-a058-e5d51e2da931.jpeg

          e25b8190-23db-42f5-a6e9-288a02220bd3.jpeg

          590909fe-b2f3-4853-880b-c9f145bd2cd4.jpeg

          3026750a-d3d3-4376-8d38-3fd77527600a.jpeg

          Not too bad if I say so myself! The only damaged I subjected it to was the cracked casting around the locking knob, this was not my finest hour and I am quite peeved with myself. The rust hasn't eaten in to the base metal really it had almost just furred up like scale in a kettle so was quite easily removed.

          Now mechanically it is in good condition there is very little wear, helped by the rather simple yet clever oiling system.

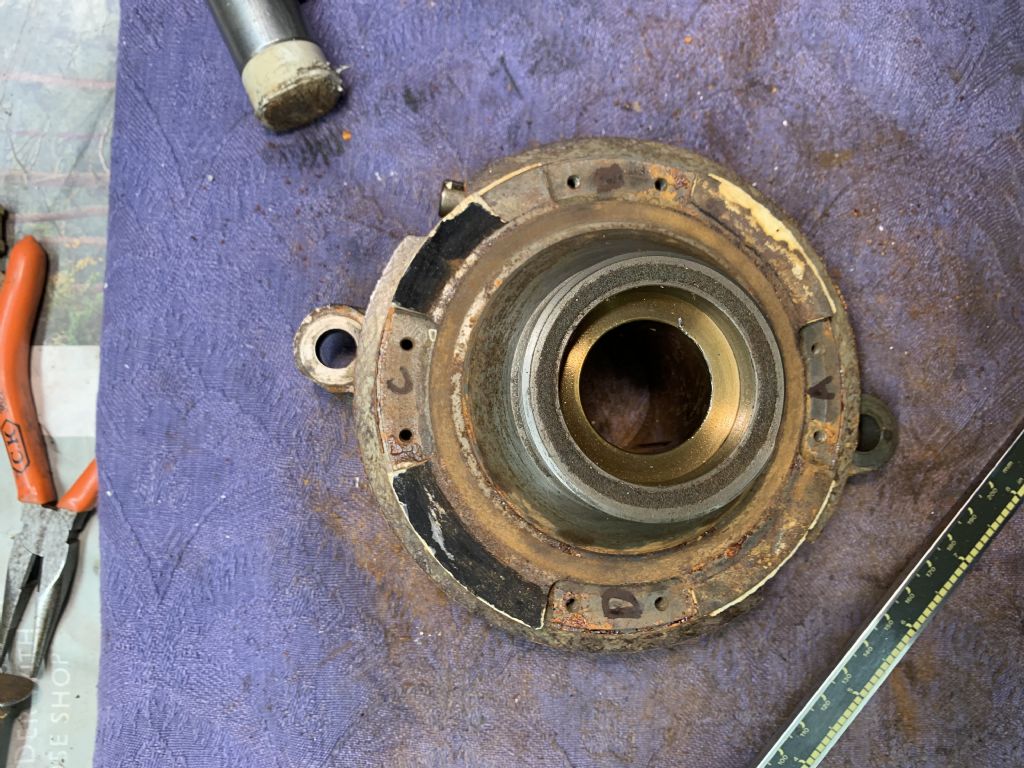
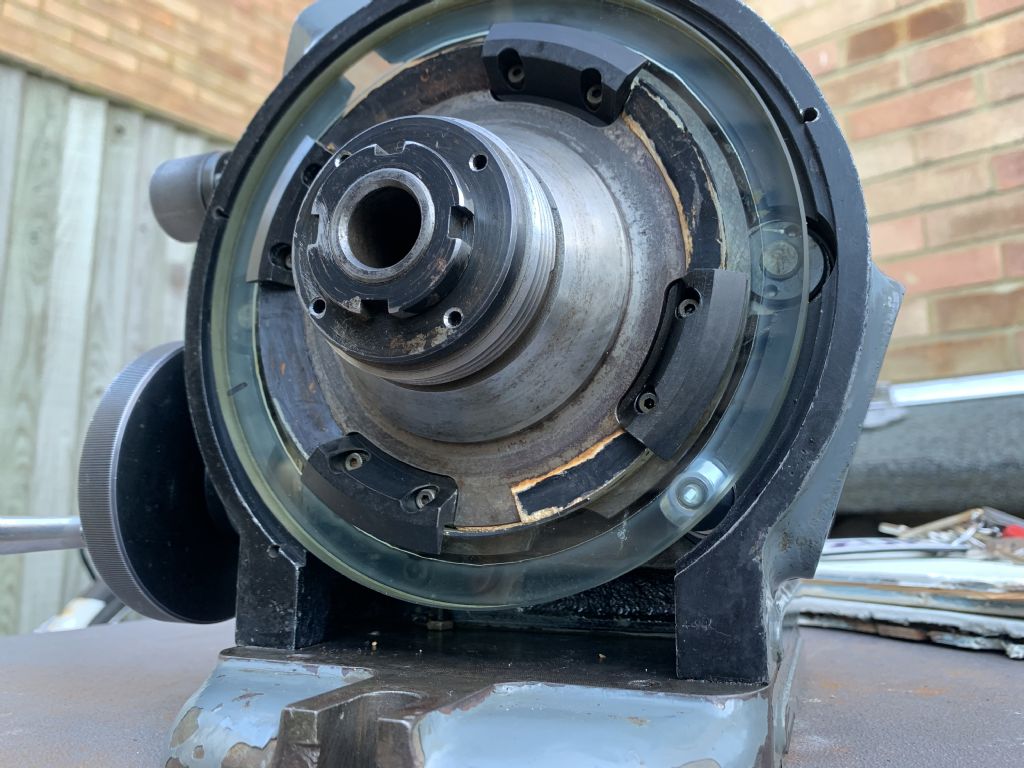
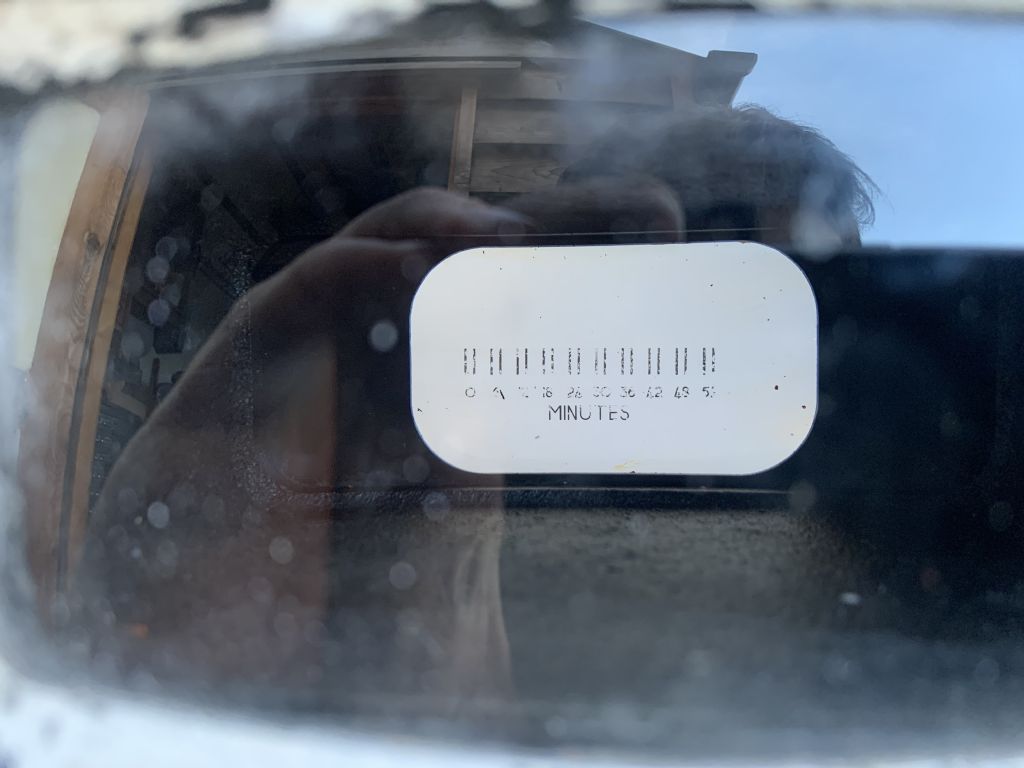
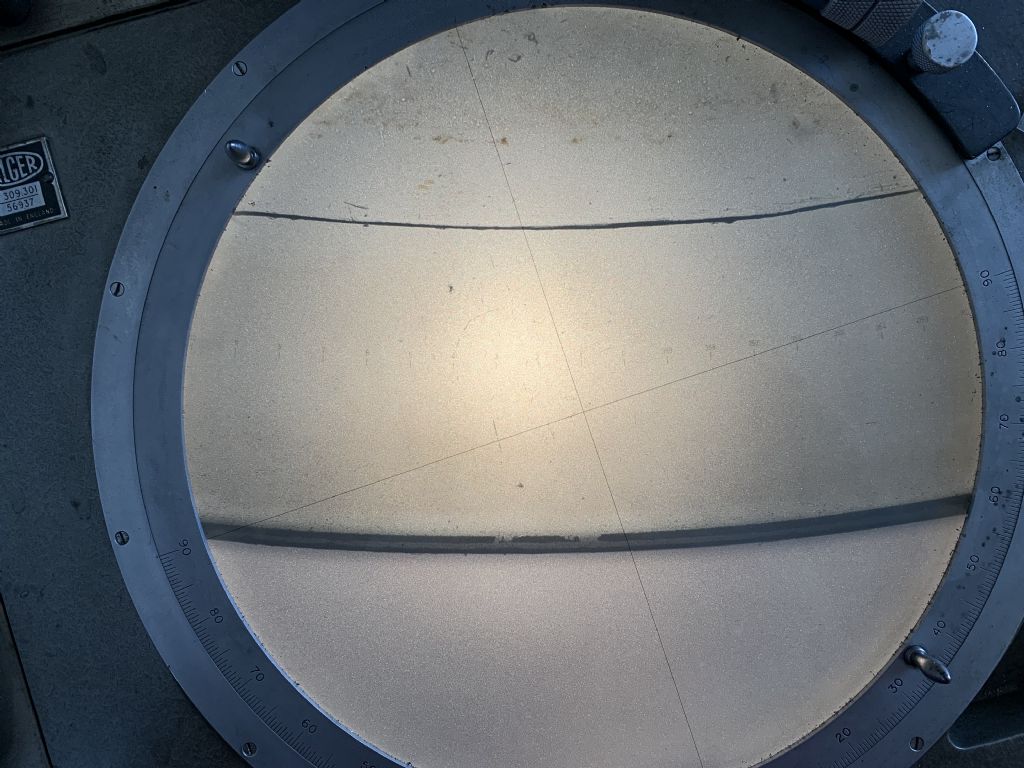
          Optically however it is challenged. Its internal soaking has dissolved what I believe were water slide transfers on the glass(or could they of been something else?), The glass ring around the spindle is totally void of any markings, this was like this on me dismantling it, however the minutes scale on the was in ''good'' condition because it was sandwiched between to pieces of glass however on me separating them to clean the water staining between has meant I have disturbed the very brittle transfer and ended up with:

          d70bcbd2-6d15-458d-9f24-b32799339759.jpeg

          So basically it is useless as it stands,

          How do you think it is best saved?

          Could one get water slide transfers made up?

          Could lazer engraving be a contender?- My worry would be precision with this method, I.E., set up in the machine etc. There is a local firm who I am thinking of talking to.

          The glass ring I was thinking about setting it up on the my pantograph on a rotary table with a diamond drag tool in the spindle and scoring the glass. Again though my worry is actually getting it right as it all depends on getting them exactly 1 degree apart! (or does it?)

          Or is it a really specialist task? Would a company who produces microscopes be worth contacting.

          So there we go, please fire away with your thoughts! I look forward to hearing them

          William

          Edited By William S on 03/07/2021 20:53:53

          #552493
          Michael Gilligan
          Participant
            @michaelgilligan61133

            It doesn’t help with your predicament, William … but feast your eyes on this one:

            **LINK**

            https://www.nielsmachines.com/en/pg-optical-dividing-head.html

            MichaelG.

            #552499
            Alan Charleston
            Participant
              @alancharleston78882

              Hi William,

              It's probably a long shot, but the markings on the glass glass could have been etched into it, and made visible using a dark material (like the graduations on an old glass thermometer) which may have been washed out during wet storage. It might pay to get some finely powdered graphite, (or filed off pencil lead), and rub it across the surface of the glass where the markings are and see if any new markings appear.

              As I say, a long shot, but worth a try.

              Regards,

              Alan

              #552553
              Chris Evans 6
              Participant
                @chrisevans6

                I believe PG are still trading, worth trying to contact them. They did have a fire in the late '90s so may not have older stock.

                #552569
                old mart
                Participant
                  @oldmart

                  As Alan says, it is worth a very close look just in case the marks are etched as was common with instruments then.

                  #552573
                  KW56
                  Participant
                    @kw56

                    Hi,

                    I have just been making waterslide transfers for a model I am making. Look on ebay for 'waterslide transfer paper'.

                    It is available for laser or inkjet printers and you just create your transfer in either Word or CAD. print on a normal printer then apply just as we used to do on our Airfix models.

                    #552575
                    Bazyle
                    Participant
                      @bazyle

                      I'm not sure how these things work. Is the optical scale on a glass plate attached to the main spindle, I know should be obvious but just to make sure? If so the accuracy is in that scale, not the worm. Therefore normal dividing unless done on another similar quality device would not be 'up to spec'.
                      I assume the essence of these things is that the scale is produced as a photographic plate. Back 40 years we produced etched microwave circuits by photo reduction from a master made with black tape on a drawing table. In the extreme we could tape it up 6ft square and reduce to 1 in square. I think the same would be done for this. The surface of the glass would not be etched, rather it would be optically very good and flat, able to take a photo sensitive coating. Not in itself all that difficult but needing the right 'know how'.

                      #552623
                      William S
                      Participant
                        @williams

                        Hello all, thanks for all your thoughts,

                        Yes Micheal, I have come across that, although that one has a resolution of 3 seconds as opposed to mine which is a 6 second resolution. I think they just engraved another line on the dial. That is about the extent of online information!

                        Alan, and old mart, it was worth a try, I had a go today with some graphite it sadly didn’t highlight any etched markings so I don’t think it was previously etched.

                        Making water slide transfers up is something I have contemplated, however accuracy is my biggest worry.

                        Chris, you might be correct, I did a bit of online digging they appear to be under a slightly different name of PGT Ceewrite/Ceewrite engineering Ltd. I will give them a call and find out. Just quickly glancing google for PG hadn’t found much.

                        Bazyle, yes the glass ring shown in the last 3 pictures is what carry’s the degrees markings, so really has to be accurate to within the resolution of 6 seconds.
                        The light is shone through the glass ring which rotates with the spindle, the markings on the glass ring are picked up by the magnifying lense (4th picture, second post) the light then goes through a load of right angle lenses at the end of the end of the black tube, until it reaches the last lense, on the inside of the unit. The assembly in my hand magnifies from the last lense, up through the screen with the minutes readout on it. I hope that explains the basics of it, not the best I know! I’m not exactly certain on how the minutes adjustment is used in practice yet. So you are correct the worm is only used as the positioning device. So I need an optical rotary table to get the same accuracy myself!

                        I like the idea of laying it out on a large scale, that is something worth thinking about. It was doable 40 years ago so it should be possible in this modern day and age!

                        Thanks again, I’ll keep you posted with what I find out.

                        William

                        #552633
                        Clive Hartland
                        Participant
                          @clivehartland94829

                          William, having replaced etched circles many times be aware that if you remove the circle, when replacing it will have to be accurately centered.

                          The circles are in fact photo etched and then baked to set the etch permanently, I have never seen the markings

                          come off. as a cost comparison a glass circle from a theodolite cost all but £200. There are optic companies who will make one, but of course cost is the crunch.

                          #552648
                          Alan Charleston
                          Participant
                            @alancharleston78882

                            Hi William,

                            Sorry to hear there aren't any invisible etched graduations.

                            One option to consider is forgetting about the optical part of the dividing head and converting it to a more usual configuration. If you can determine the number of turns of the handwheel required for 360 degrees, you should be able to make an appropriately graduated collar to fit on the handwheel shaft. You'd need to add a pillar to the body of the head to provide a reference mark to measure against – maybe with a vernier scale on it to improve the accuracy.

                            Regards,

                            Alan

                            #552675
                            gerry madden
                            Participant
                              @gerrymadden53711

                              William, just a quick though occurs to me…. some of the graticles in my OMT microscope optics were almost so fine they were invisible to the naked eye. It might be worth going over the glass with a microscope to see if there is anything there, or at least the remnants of something which may show you where to put new marks if that's what you decide to do.

                              Gerry

                              #552785
                              Bazyle
                              Participant
                                @bazyle

                                Some very rough calculations.
                                6in dia disc, 18in circumference, so 1 degree is 50 thou.
                                So 1 minute of arc is 1 thou. ( I said rough)
                                So 6 seconds is a tenth.

                                If your photo reduction is 10:1 the master is 60 inches dia. And you have to mark up that master to 1 thou accuracy.

                                If I've got this right I can understand why they are expensive.

                                #552940
                                Michael Gilligan
                                Participant
                                  @michaelgilligan61133

                                  I hope William will forgive the slight digression, but Gerry’s post prompts me to share this:

                                  **LINK**

                                  Optical Measuring Tools Ltd. (OMT)

                                  MichaelG.

                                  #554020
                                  William S
                                  Participant
                                    @williams

                                    A quick update:

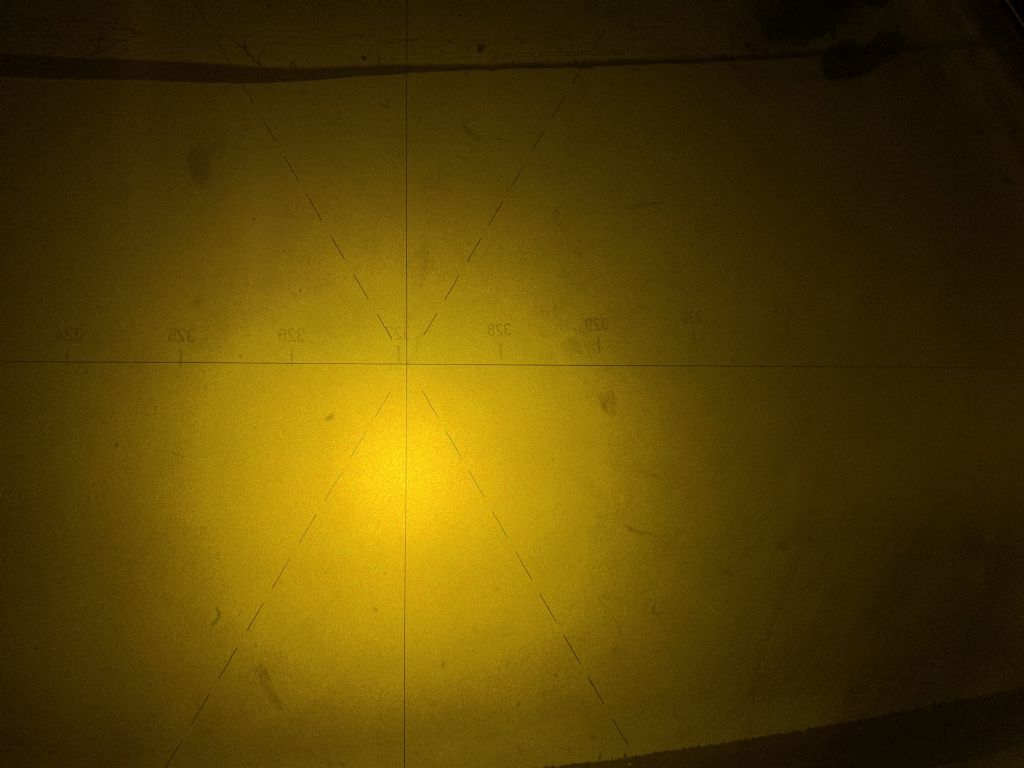
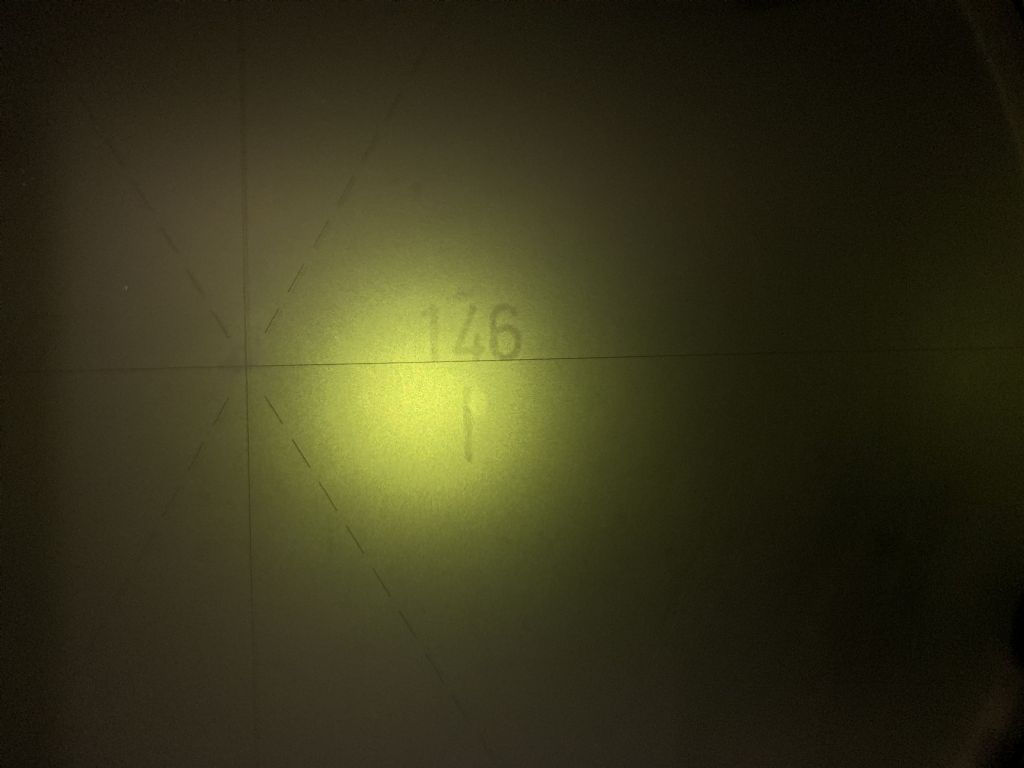
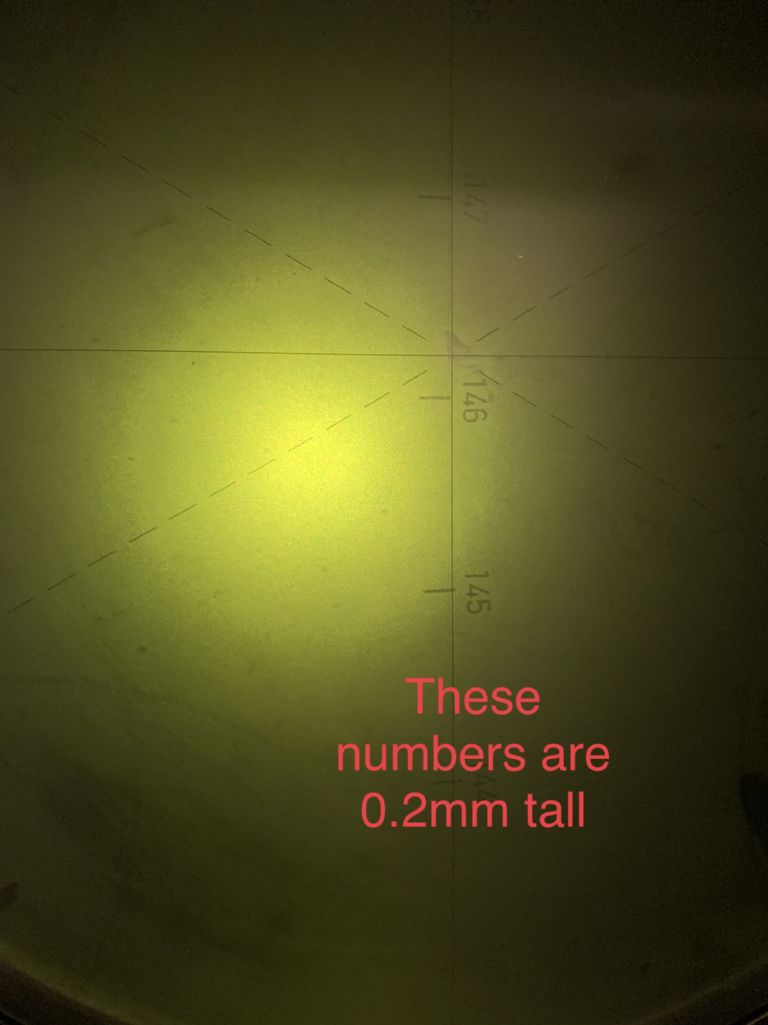
                                    The prize goes to Gerry for suggesting that the markings might be practically invisible to the naked eye, which they almost are! They are absolutely miniscule, how they were done 40 years ago is blowing my mind!

                                    All markings on that ring are present and correct, I'm going to have a look at it tomorrow on the shadowgraph at work, hopefully I can then get some pictures as well.

                                    I found them by playing about with a little led bulb, I was just shining it down the hole and turning the handle when in the corner of the readout I just saw the flash of a very feint line and what looked like numbers above. I then twiddled the handle back and forth and could just see a few lines. You would not belive the relief that was. I then spent all day at work eager to get back as shortly after finding the lines I then subsequently lost them again! When I got home I took the glass ring off and in holding it up to a strong light I could just make out the blobs of the numbers and lines, all the way around the ring.

                                    Under my Prior dissecting microscope I can just about read each number! Although I don't have any of the actual magnifying hoods so I am unsure of the magnification, I will try as I said with the shadowgraph and post my findings.

                                    Many thanks

                                    William

                                    #554025
                                    Michael Gilligan
                                    Participant
                                      @michaelgilligan61133

                                      Excellent news, William yes

                                      MichaelG.

                                      #554045
                                      gerry madden
                                      Participant
                                        @gerrymadden53711

                                        Thanks William. Its nice to know that one can give to the forum occasionally as well as take

                                        I also dont know how they can make these things so small !

                                        Gerry

                                        #554058
                                        Kiwi Bloke
                                        Participant
                                          @kiwibloke62605

                                          Fascinating! It looks like you're winning – certainly hope so. Does anyone know how the markings are made? Pantograph and diamond (scratch) engraving?

                                          I gather diffraction gratings were ruled by similar refined, but essentially simple, methods. I'm sure I remember the 'Amateur Scientist' section of Scientific American had an article on DIY-making diffraction gratings – must have been in the '60s. Same source carried all sorts of exciting – and dangerous – projects, often involving very high voltages, toxic chemicals, etc. Now considered too dangerous even to think about… However, all the articles are/were available on data disks. Must get around to hunting them down!

                                          #554162
                                          William S
                                          Participant
                                            @williams

                                            Here’s some pictures of the “non existent” markings!

                                            5c1c2451-04e6-4b8c-a8c2-3280ebd9bcae.jpeg
                                            That was on the old Hilger shadowgraph. Not the best I know

                                            f100d1ad-f3cf-4a8c-a24f-a2ebb6a9161e.jpeg
                                            Now on the big Sigmascope, at 10x magnification

                                            448b7835-4c5e-47ff-9bbf-b5b08e25e0d8.jpeg
                                            464d9fc4-728d-425f-b37b-825aa403a9ec.jpeg
                                            still blows me away the size and quality of the markings, I believe as Clive said they must be (photo?) etched. Think about car glass, the triplex etc markings I guess are done in a similar way.

                                            I think now my issue is some staining on the middle lens of the magnifying lens. It’s marked C Baker 1/2” 14x. If any one can suggest how that comes apart, I’ve unscrewed it in to 3 parts but I think there’s 2 glass parts together and moisture is trapped between them making it almost impossible to see through. I’ll get some more pictures it’ll explain better than I can say in words!

                                            I do understand the need to clock the ring Clive, there is putty which was/is acting as a locator, but I may replace this as it’s very delicate, Do you think the markings were done concentrically to the ring o.d/I.d or do I need to be creative? The ring had to come off to disassemble it, there was no way around that, I was very reluctant to remove the ring due to getting it back concentric.

                                            William

                                            #554166
                                            Michael Gilligan
                                            Participant
                                              @michaelgilligan61133

                                              Posted by William S on 14/07/2021 23:46:26:

                                              […]

                                              I think now my issue is some staining on the middle lens of the magnifying lens. It’s marked C Baker 1/2” 14x. If any one can suggest how that comes apart, I’ve unscrewed it in to 3 parts but I think there’s 2 glass parts together and moisture is trapped between them making it almost impossible to see through. I’ll get some more pictures it’ll explain better than I can say in words!

                                              […]

                                              .

                                              Yes please, William … detail photos of the Baker would be interesting and hopefully ‘diagnostic’

                                              From your brief description it sounds like there is a cemented achromatic doublet in there, and delamination may be the problem.

                                              MichaelG.

                                              .

                                              P.S. __ Impressive as it may be in the context of a large glass ring … 0.2mm high lettering is by no means uncommon on graticules/reticles

                                              Ref. https://www.graticulesoptics.com/products/stage-micrometers-calibration-scales-grids/stage-micrometers-professional-range

                                              Ref. https://www.graticulesoptics.com/manufacturing

                                              Edited By Michael Gilligan on 15/07/2021 07:06:57

                                              #554168
                                              Clive Hartland
                                              Participant
                                                @clivehartland94829

                                                I think by looking at the pics. the glass ring is held by those blocks?

                                                In any case, centring needs to be done by rotating the ring mount and viewing through the microscope and nudging the circle at reciprocal degree readings till there is no error. Use a copper nail to move gently with soft tapping on the copper nail.

                                                Secure the circle with dobs of Shellack or thick cellulose, several dobs around the circle, not using too much or it will run.

                                                Best of luck on that.

                                                #554178
                                                Roger Hart
                                                Participant
                                                  @rogerhart88496

                                                  I agree with Michael. I think you should have a very good chance of rescuing the optics. Old lenses were glued with Canada balsam or similar, this discolours over time and does not like damp. First get the lens out of its brass cell making careful notes of distance and orientation. Special spanners may need to be made, look out for little locking screws etc. Once out mark lens pair with a V in pencil so you are certain which way it goes back and which surface matches with which.

                                                  If lens does not fall apart soak in methylated spirit for 24 hours (assumes lens is glass!) when it should slide apart. Clean up with meths. With luck lens components will not be too etched by mould etc.

                                                  I have never re-glued lens components – too nervous. I have put back together using 3 very small slips of cooking foil to stop the lens components touching. The cell hides them from view. Other people may know how to re glue and what with. The books Amateur Telescope Making do contain the detail using Canada balsam – looks pretty fiddly and sticky. Probably a modern UV setting clear glue would work but the permanence of that stuff makes me nervous.

                                                  #554192
                                                  SillyOldDuffer
                                                  Moderator
                                                    @sillyoldduffer

                                                    I've never tried anything like this either, but my Microscope hobby suggests Canada Balsam substitute rather than the original Balsam. Not difficult to use on cover slips but I suggest buying a box of microscope slides and practising on them! From memory, the solvent is Toluene, which Brunel also sell.

                                                    Dave

                                                    #554197
                                                    Clive Hartland
                                                    Participant
                                                      @clivehartland94829

                                                      Canada balsam, forget it. nowadays a clear liquid is used that is set by exposure to UV light. It is available but I cannot remember the supplier, Google may help. No heat required, like canada balsam.

                                                      Cleanliness is paramount and I use Ether to clean glass. Only handle the edges of the lens. Good idea to mark positions of lenses in a stack. Because they are centered for the least optical deviation.

                                                    Viewing 25 posts - 1 through 25 (of 47 total)
                                                    • Please log in to reply to this topic. Registering is free and easy using the links on the menu at the top of this page.

                                                    Advert

                                                    Latest Replies

                                                    Home Forums Manual machine tools Topics

                                                    Viewing 25 topics - 1 through 25 (of 25 total)
                                                    Viewing 25 topics - 1 through 25 (of 25 total)

                                                    View full reply list.

                                                    Advert

                                                    Newsletter Sign-up