Part built Allchin 1.5 inch

Advert

Part built Allchin 1.5 inch

Home Forums Traction engines Part built Allchin 1.5 inch

Viewing 25 posts - 451 through 475 (of 548 total)
  • Author
    Posts
  • #436607
    Essm
    Participant
      @essm

      Hi Derek,

      that cladding looks really neat so now its your turn to help someone – how thick was the sheet and how did you cut it particularly the circular holes?

      any hints and tips would be appreciated

      Thanks

      Stuart

      Advert
      #436614
      derek blake
      Participant
        @derekblake72550

        Hi Stuart.

        it was 22 gauge soft brass, which came in at around 0.79mm.

        i brought 2 sheets off eBay for £16, I first made a cardboard template and then the cut shape out on the brass, what I did have to do was invest in a slip roller to curve the metal.

        the hole worked out better than I expected, this was done by laying that template over the curved brass and punching a centre hole and then I used a step drill up to 20mm.

        trust me it took a lot of trial and error as my boiler is not spot on, nor is the shape of the cylinder saddle so if yours is even more accurate you should find it even easier.

        i did have to remove the trunk guide to fit the sheet, any further info feel free to ask.

        hope that helps,

        Derek

        #436618
        derek blake
        Participant
          @derekblake72550

          The brass was CZ108

          #436627
          Essm
          Participant
            @essm

            Thanks Derek

            #437130
            derek blake
            Participant
              @derekblake72550

              Hi All

              do any of you know know where you can by very small globe valves, if anyone has seen the Allchin it has two valves that screw onto the steam manifold.

              i don’t have the skills or machines to make these so feel I should go down the commercial route, however obviously due to the size I may have to find someone to make these for me.

              regards,

              Derek

              #437163
              derek blake
              Participant
                @derekblake72550

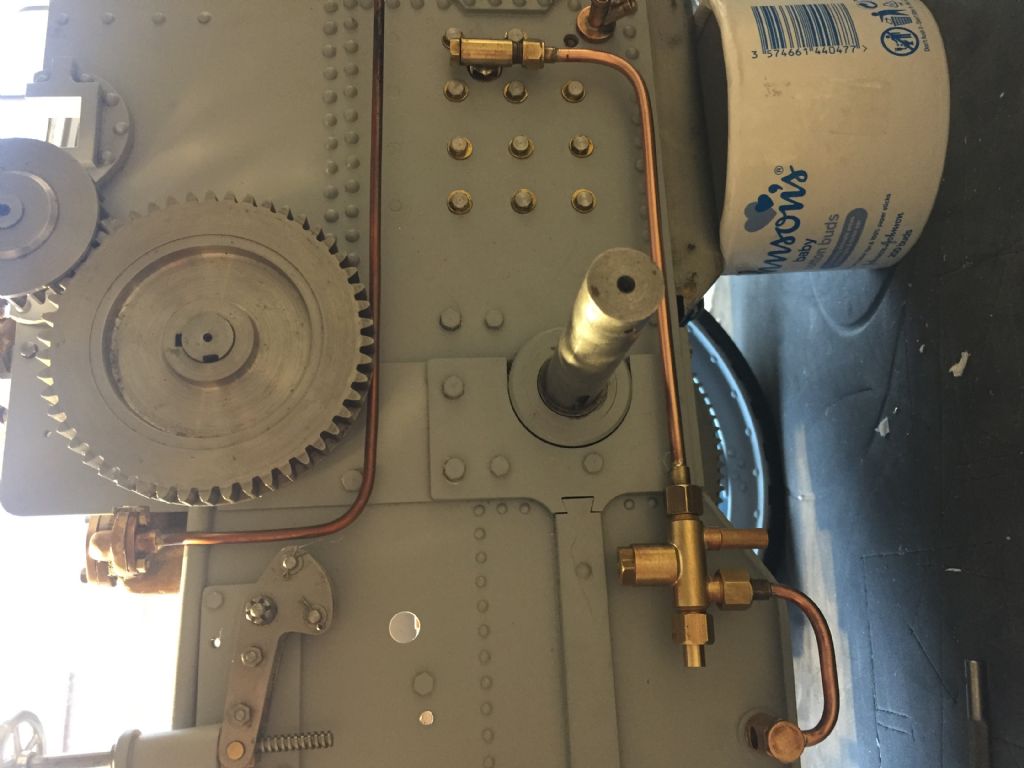
                I’m also looking to plumb in a commercial injector, the water fitting in the bottom on the commercial is obviously different from the side fitting on the drawing.

                this would mean some sort of adapter or to make a pipe work join maybe placing the injector slightly forward.

                Do you require the injector to be in a certain position for the water to flow, it’s hard to explain but could I do a pipe from the end of the water valve in a down loop and up into the water inlet.

                one idea is like the below picture, someone has made a commercial fitting into the original drawing water valve.

                Derek

                Edited By derek blake on 13/11/2019 20:51:46

                #437165
                derek blake
                Participant
                  @derekblake72550

                  162ba207-1b6f-4e39-bc4d-d3115f277525.jpeg

                  #437173
                  Essm
                  Participant
                    @essm

                    Hi Derek,

                    What size is the pipe for the valve? – Maidstone Eng. Supplies have a globe valve for 1/8" pipe

                    Will that be small enough?

                    #437174
                    derek blake
                    Participant
                      @derekblake72550

                      Hi Essm

                      i think 1/8 is correct, I did buy a small globe valve but I still feel it’s too large but I will check again on the website.

                      thank you.

                      #437175
                      derek blake
                      Participant
                        @derekblake72550

                        Here’s my idea for the injector fitment, to copy someone else’s design…

                        67178597-a9fd-4f10-b0e9-ea4acb09915b.jpeg

                        #437189
                        John Baguley
                        Participant
                          @johnbaguley78655

                          Hi Derek,

                          Steam Fitings also do smallish globe valves that you may be able to adapt:

                          Globe Valves

                          I bought a couple of the 1/4 x 40 size for an injector testing boiler. I can measure the diameter if it would help.

                          Your idea for the water feed for the injector should be fine.

                          John

                          #437198
                          derek blake
                          Participant
                            @derekblake72550

                            Hi John

                            many thanks for the response, yes please could you measure the valves.

                            kind regards

                            Derek

                            #437199
                            JasonB
                            Moderator
                              @jasonb

                              You will have a job getting ones small enough as most will have a larger than 3/8" dia body

                              You will have a job getting ones with 7/32 x 40 threads

                              You will have a real job finding ones with a female thread one side, male the other.

                              #437202
                              derek blake
                              Participant
                                @derekblake72550

                                Hi Jason

                                i agree if I’m honest the threads are 1/4 x 40 on my manifold, so I may have a go making one by hand.

                                or I shall farm the job out in the new year.

                                regards

                                Derek

                                #437426
                                derek blake
                                Participant
                                  @derekblake72550

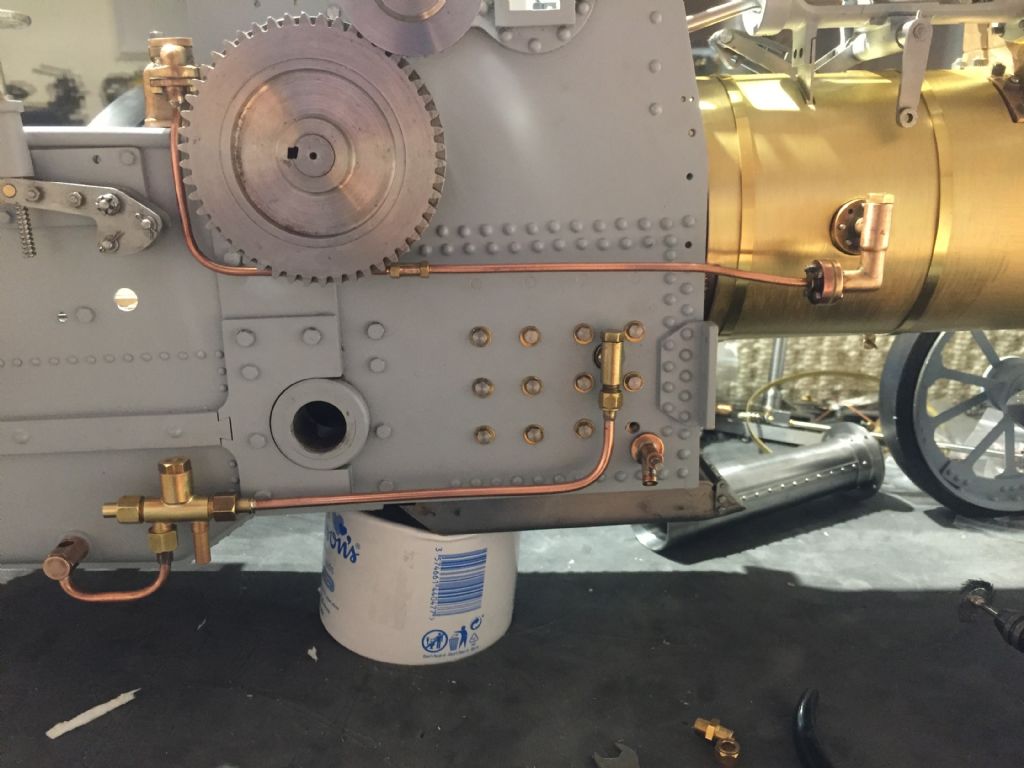
                                  So I’ve done some plumbing the same as the previous picture and another builders idea so I’m guessing it should work.

                                  hopefully the water will run into the injector OK. Not sure how to turn the picture.

                                  c87f7492-4f7a-4aa6-8252-77810d6ba975.jpeg

                                  Edited By JasonB on 16/11/2019 06:52:48

                                  #437497
                                  derek blake
                                  Participant
                                    @derekblake72550

                                    b68feb12-8993-455d-95ed-6b98b6e23152.jpeg

                                    #437566
                                    derek blake
                                    Participant
                                      @derekblake72550

                                      Pipework for the injector has been done with 5/32mm pipe, 1/8th for the water pump.

                                      hopefully this will be ok, I checked other models and they seemed to do the same.

                                      im going to fit just one globe valve for the steam feed to injector, as I don’t need the other globe valve as I’m not fitting the water lifter.

                                      #437764
                                      derek blake
                                      Participant
                                        @derekblake72550

                                        Any ideas how to fill these holes, I had to enlarge the Hornplate fixing holes to be able to see the mis-alignment sidestay holes.

                                        because of this I’m having to use washers which look rubbish, is there any trick to filling the area around fixing to do away with the washers, I was thinking of making inserts but I’d have to make they all different and with off centre holes,

                                        thanks in advance.

                                        c5af1c99-86d1-438a-8522-553aa78ecc7b.jpeg

                                        #437868
                                        derek blake
                                        Participant
                                          @derekblake72550

                                          Small update today, I’ve been concerned that the exhaust plug in the base of the cylinder wasn’t steam/airtight as I had air god up the chimney on its test with the ports closed.

                                          i did think I could remove the cylinder but thankfully all went well and this plug is now secure.

                                          on the next air test, possible reasons for leak up the exhaust as suggested kindly by John is likely the valve or regulator.

                                          i had no control over speed on my last air test so I think I need to concentrate on lapping the regulator against its face and see if I can get a better seal.

                                          its possible that I have a leak from the valve chest to exhaust I’ve used gasket and liquid gasket so I’d be surprise, hopefully the work on the regulator will solve the leak.

                                          other than taking the engine apart no real step forward, however I do have more pipe coming to plumb in the globe valve to injector.

                                          that will be the plumbing sorted after that’s done, and next air test will be due.

                                          updates soon…

                                          #438279
                                          derek blake
                                          Participant
                                            @derekblake72550

                                            So I was unsure if I had sealed the exhaust blanking plug well enough so to make sure I was OK, I removed the cylinder this week.

                                            i was scared to death it would cause issues but I was lucky and it removed well, while it was off I replaced the three bronze studs and changed them for stainless as per the other fixings.

                                            blanking plug was hard to remove so I think it was actually ok, but I added new steam seal loctite and covered the hole with Jb weld just to be 100% sure.

                                            cylinder refitted this evening, what I’m struggling with is the oil lubricator the pipe as per drawing is tiny so is this the correct pipe? I’m also struggling to make the fixings as well as actually getting the oil to enter the cylinder.

                                            i think it’s to do with the ball and spring which maybe too strong, so I’m going to have to start fresh and make a new parts and try again.

                                            has anyone any info on pipe size or how to make the fixings for these pipe ends as I’m assuming you can’t buy bits that small.

                                            i appreciate explaining in a message is difficult so no problem if no comeback on the questions, weekend work involves finishing pipe for the steam valve to injector which I’ve positioned next to the pump.

                                            i couldn’t find the correct size valve for pipe so this position should be fine for now, it’s not to drawing of course but I’m more for making a working engine over a 100% to real engine model.

                                            as I become more skilled I hope to make these valves in the future….

                                            #438372
                                            derek blake
                                            Participant
                                              @derekblake72550

                                              I’m not sure if I have readers of this thread but I will update anyway.

                                              so I fixed cylinder back on tonight with new sealant all went ok until one bolt stripped I didn’t seem to even get to tight and it stripped.

                                              not completely stripped as bolt still threaded in but wouldn’t tighten, this was in the middle of a row of 6 so I do think there is plenty of fixing force.

                                              so instead of panicking like I have before I decided there wasn’t much I could do so I added some 542 thread lock to the stud and once it set the nut tightened down a turn or two so hopefully this will work.

                                              unfortunately this boiler has been a pain from the beginning and the fixings along with it but we shall see how things are if I ever get a fire inside.

                                              after this fiasco I worked on the plumbing again and have pretty much finished the injector, so other than get the water pump setup on the eccentric and fully working I think it’s close to sealing every steam joint and trying again on air.

                                              i will add some pictures in due course for anyone who maybe interested.

                                              Derek

                                              #438382
                                              Paul Kemp
                                              Participant
                                                @paulkemp46892

                                                Derek,

                                                Been watching but not logged in much to reply! On your horns I can't think of an easy way of correcting the stay holes, there are ways of doing it including welding them up and re-drilling but that is likely to introduce distortion. You could machine up stepped bushes and counterbore the plates to suit but again will be time consuming and won't be invisible to close examination so unless anyone else has any bright ideas for a simple fix I think you are stuck with what you have unless you want to make a new pair. Hindsight being a wonderful thing there was another way to mark those holes for drilling using a threaded point screwed into each hole in turn and a whack with a hammer to transfer the mark. Careful measurement for the first hole, secure with the first bolt and a dummy crank and axle to get the alignment with your screwed point in one stay, whack with hammer to transfer a mark, remove plate, centre punch mark proper and then drill, refit for the next ad finitum till you have them all! The way I did my half size was mount the boiler up on the horizontal borer, locate spindle over centre of stay, clamp the plate on lined up with the dummy crank and axle, drill the hole tapping size, remove plate and open hole to clearance, refit with the bolt having centred up to the next stay and repeat ………. Took me about 4hrs a plate but they were all in the right place bang on the centre of the stays.

                                                Injector plumbing looks fine. Small lubricators well made are usually capable of producing quite high pressures when dead headed so I doubt the spring is too strong. NRV's are a bugger to seal usually so I doubt that is your problem either they are more likely to leak back than block the flow altogether. Start at the lubricator making sure that delivers oil at its outlet (remember steam oil is thick, thin oil in the lubricator may not give the best performance!). If you have oil at the lubricator outlet, put the pipe on it without the valve and see you have oil through the pipe, then connect the valve and confirm it passes the valve. The most likely cause is the pipe blocked by silver solder when you have soldered the fittings, easy done with small bore pipe!

                                                Can you not tap that stripped thread out to 5ba and fit a stepped stud? Would be more secure, will hurt if it blows out! Sounds like you have eliminated any potential leaks under the block now so you will need to make sure the regulator seals next.

                                                Overall from the pictures it looks like you have made a cracking job of the engine generally, that boiler cladding is excellent. It will be quite a buzz when you get it lit up for the first time!

                                                All the best,

                                                Paul.

                                                #438399
                                                derek blake
                                                Participant
                                                  @derekblake72550

                                                  Hi Paul

                                                  thankyou for your reply, the stud that stripped is a 4BA and it did still thread in so I’m hoping with the thread lock it would stop put.

                                                  the only other way to fix would be to step up size again and that would be 3ba so I’m not sure if that’s possible? For now I think it’s tight enough.

                                                  i really hate this boiler with how many issues it’s given me with the strengthening plate being in the wrong position etc, anyway thank you I’m pleased with how the engine looks externally.

                                                  the cladding definitely helps with the appearance, I’m going to finish the pipe work today and upload some picture tonight.

                                                  as for the lubricator, I think the pipe for the oil is 1/16 which has a tiny tiny bore is this correct? It’s so small I didn’t think this was the correct size pipe.

                                                  if the clack valve under the dummy lubricator wasn’t working would this allow steam out and maybe even blow the pipe off?

                                                  Derek

                                                  #438446
                                                  derek blake
                                                  Participant
                                                    @derekblake72550

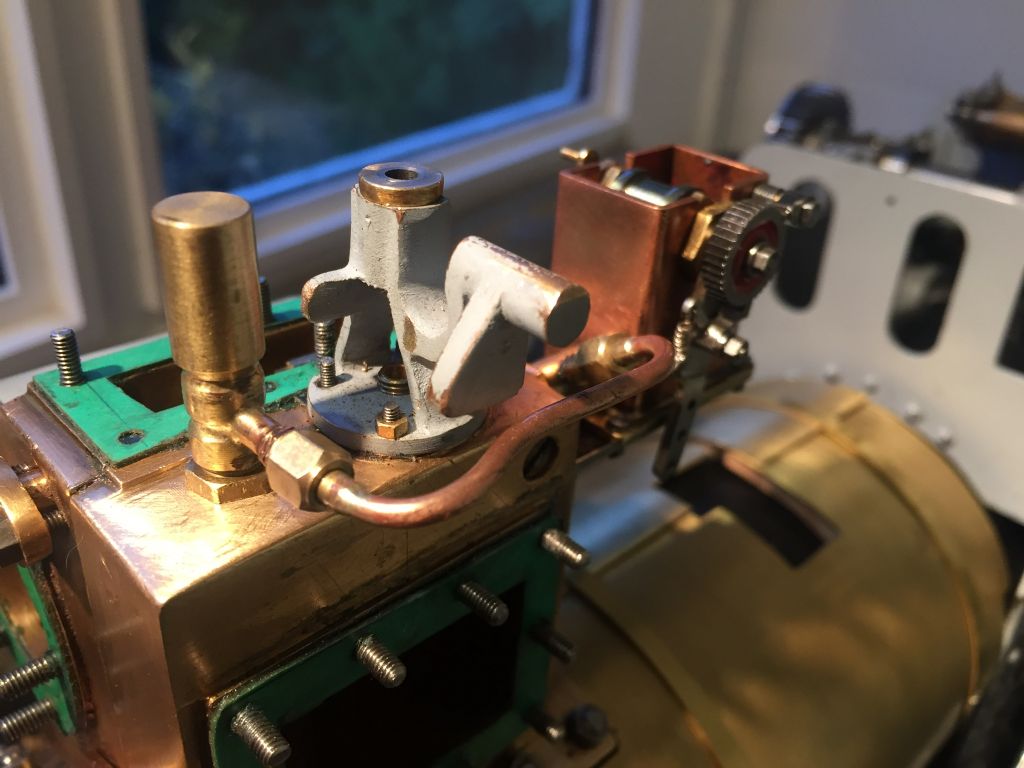
                                                    Small update, I’ve made a new dummy lubricator with 3/16 x 40 fixing for pipe.

                                                    i made a 5BA to 3/16x 40 adapter the other end for the lubricator itself as seen in the attached picture, oil pumps into the valve chest so I’m pleased with the result.

                                                    admittedly not 100% to drawing but it work oil wise, hopefully the ball will work and no steam come up the other direction.aa9f2ce4-d0e3-4200-9be0-749d703b09ba.jpeg

                                                    #438669
                                                    Paul Kemp
                                                    Participant
                                                      @paulkemp46892

                                                      Derek,

                                                      Glad you got it sorted.

                                                      Paul.

                                                    Viewing 25 posts - 451 through 475 (of 548 total)
                                                    • Please log in to reply to this topic. Registering is free and easy using the links on the menu at the top of this page.

                                                    Advert

                                                    Latest Replies

                                                    Home Forums Traction engines Topics

                                                    Viewing 25 topics - 1 through 25 (of 25 total)
                                                    Viewing 25 topics - 1 through 25 (of 25 total)

                                                    View full reply list.

                                                    Advert

                                                    Newsletter Sign-up