Old School Drawing Exercises and 2D CAD

Advert

Old School Drawing Exercises and 2D CAD

Home Forums CAD – Technical drawing & design Old School Drawing Exercises and 2D CAD

Viewing 21 posts - 126 through 146 (of 146 total)
  • Author
    Posts
  • #487581
    SillyOldDuffer
    Moderator
      @sillyoldduffer
      Posted by blowlamp on 25/07/2020 13:45:32:

      Dave.

      I did a two-rail sweep (in MoI) to create the spokes.

      Draw two curves to represent the spoke outline with an elipse at one end. Sweep said elipse along both curves and it will scale in accordance with the distance between the curves.

      If Fusion 360 doesn't have that feature, then you should be able to Loft a number of various sized/positioned elipses to get what you are after.

      Martin.

      Thanks Martin,

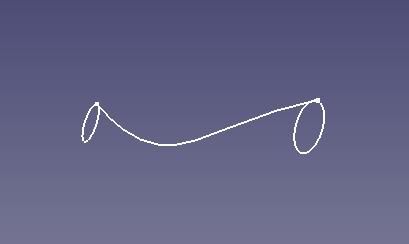
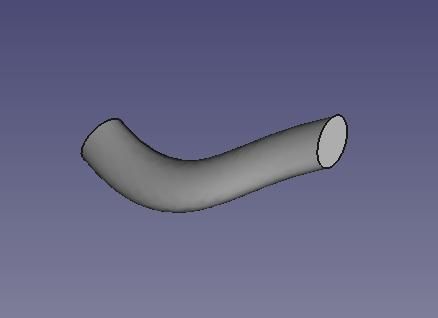
      Firing up my Windows 10 Laptop triggered a big update after which Fusion no doubt will also have to be refreshed. In the meantime, I tried lofting in FreeCad, similar to MOI I suspect except there's only one rail.

      pipesweepsketches.jpg

      Two ellipses on different planes joined by a spline curve, producing:

      pipesweep.jpg

      Although the curve's not correct for Jason's Flywheel the method works as a demo I expect Fusion to be easier to use, but my Windows machine is still downloading, installing and rebooting. Oh, and the Windows mouse is missing!

      Dave

      Advert
      #487597
      Farmboy
      Participant
        @farmboy
        Posted by Gary Wooding on 21/07/2020 10:24:29:

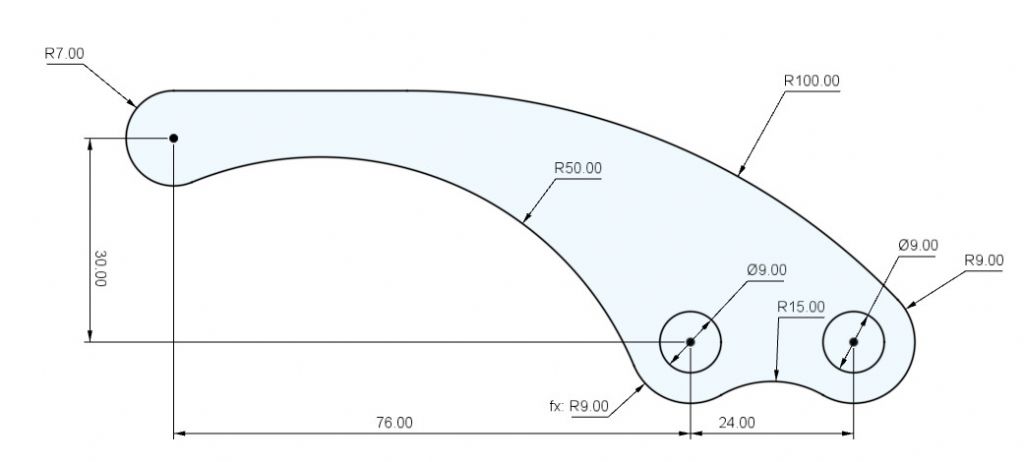
        Here's another challenge for you. All transitions are tangents, and the top line is horizontal.

        cad drawing test2.jpg

        Going back a bit to the 'simple' exercise, is it safe to assume that both circles are in the same position on the Y-axis? Although they appear to be, the dimension line does not pass through the right-hand one. I am genuinely interested to know if there is any way of calculating its position from the dimensions given, except that it is 24mm from the left-hand one on the X-axis. If you centre both circles on the same horizontal the exercise seems very simple using just T-square and compasses.

        #487598
        JasonB
        Moderator
          @jasonb
          Posted by SillyOldDuffer on 25/07/2020 13:00:44:

          Stage One: Gather Information, identify Risks & Issues, & Tooling

          1. How does the engine work? A. Brayton Open Cycle, issues for later: From Graham's description "Picture a canister filled with a pressurised combustible mixture of air and Town gas, a recipe for disaster if ever there was! Well this was exactly how the fuel was stored prior to combustion. At bottom dead centre the admission valve opens allowing the mixture to pass by a burning pilot light within the cylinder head. The result is an expansion of the Nitrogen that presses against the underside of the double acting piston. On the other side of the piston the air and gas that was drawn in on the last downstroke is being moved through a non return valve into the tank that forms the engine's beam support column. At a given point the admission stops to allow further expansion due to the heat generated by the flames. As the engine reaches TDC the exhaust valve opens and the flywheel carries the piston down both exhausting the power cylinder and drawing in a fresh charge of mixture in. The cycle repeats…. Well until sometimes the flames could pass the many safety meshes and ignite the fuel in the column!! The engine was fitted with a large volume safety valve to allow for this condition without an explosion of the cast Iron receiver." model will probably run on propane.
          2. Decide what the parts are. Many obvious, like cylinder, piston, flywheel, others less so. Is the bedplate/frame 1 part or 2? Is the top bearing block part of the frame or separate? Is the reservoir part of the frame or separate? Can the reservoir be cast into the frame directly, avoiding machining? Bedplate will be a separate casting, reservoir will be be formed bya core cast into the frame. Bearing block will now be separate so that a 50mm dia corepring can be used to support the reservoir core

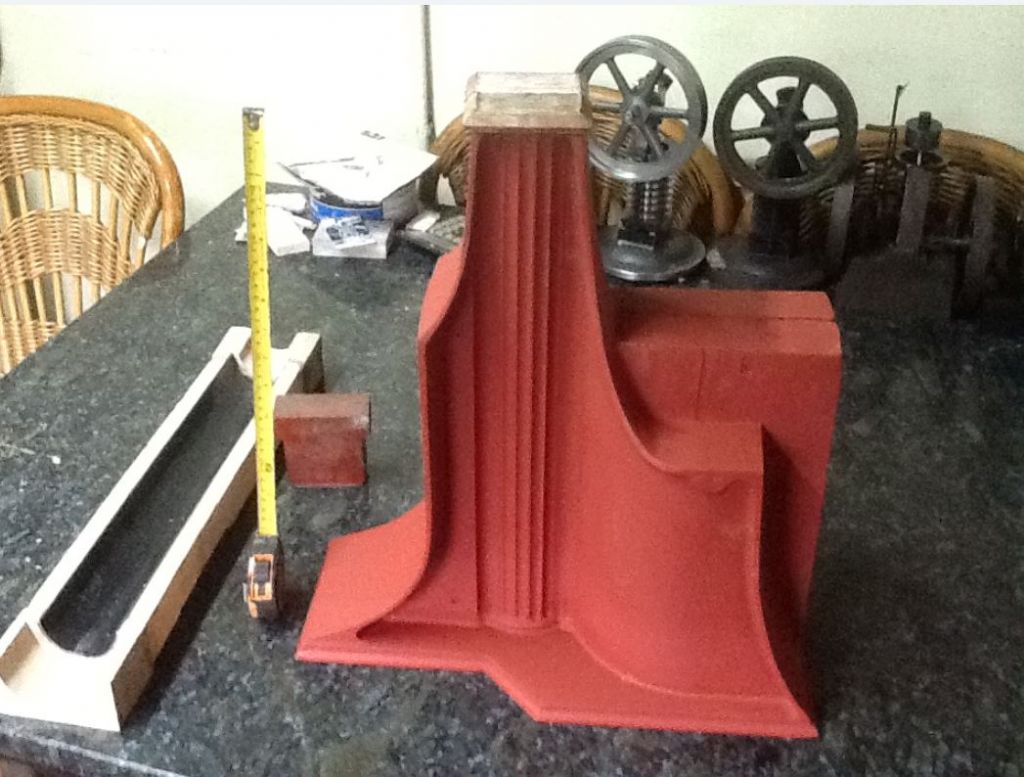
          Graham's cylinder, head and frame pattern with half a corebox along side

          brayton cylinder.jpg

          brayton frame pattern.jpg

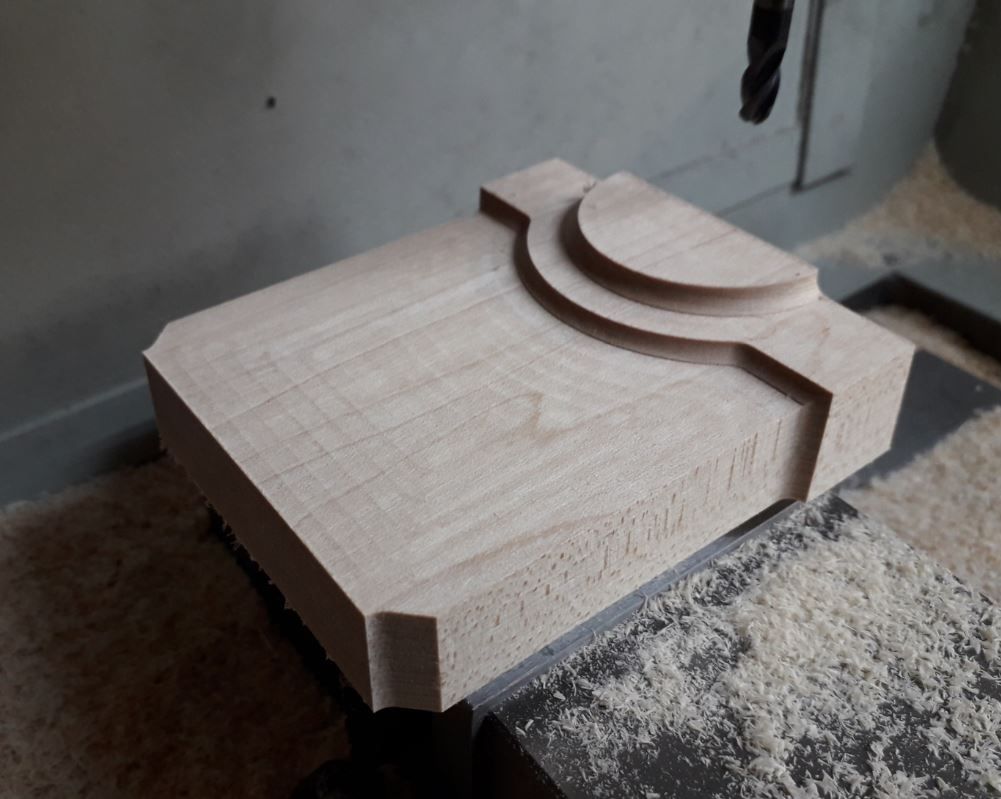
          part of the top bearing yoke pattern I cut earlier today

          yoke half.jpg

          I tend to draw to the size I want the model in Alibre including machining allowances on the faces that need it and draft angles where required then scale the model at the end to increase the pattern for shrinkage allowance. Fusion makes it a bit easier to draw the finished part then add draft and machining allowances before scaeing the shrinkage.

          #487612
          SillyOldDuffer
          Moderator
            @sillyoldduffer

            Delighted to see I've not got it completely wrong. This bad-boy has got to be the James Dean of Internal Combustion engines! Every home should have one!

            I guessed wrongly the engine didn't have inlet and exhaust valves! The gubbins that works them must be round the back.

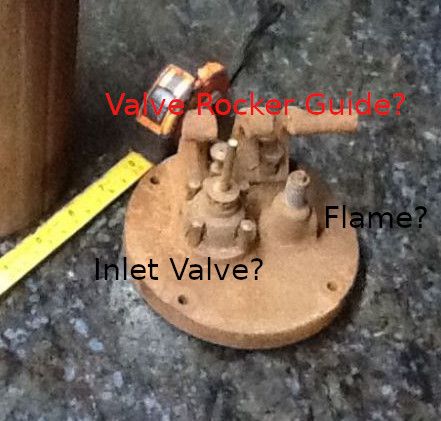
            This clip from Jason's photo reveals what's on the mysterious bottom of the cylinder, which I was ignoring:

            braytonbase.jpg

            I now think the claw holds a rocker arm driven from the back of the engine, and the Inlet Valve is the spike thing. Still mot clear to me where the fuel connects, or how the flame works.

            This is a fascinating engine, a nice mix of clever engineering and genius design, but with many early imperfections. Very inventive considering it's a piston engine based on the same thermal cycle as a modern gas turbine. (I'm sure Duncan is right.) I'd pay money to watch a few of these ticking over at an Exhibition.

            Dave

            #487686
            Gary Wooding
            Participant
              @garywooding25363

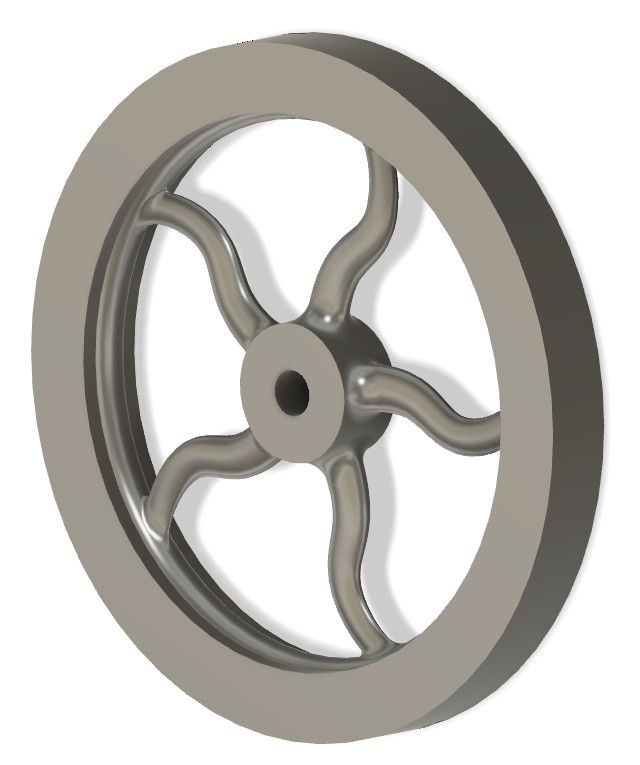
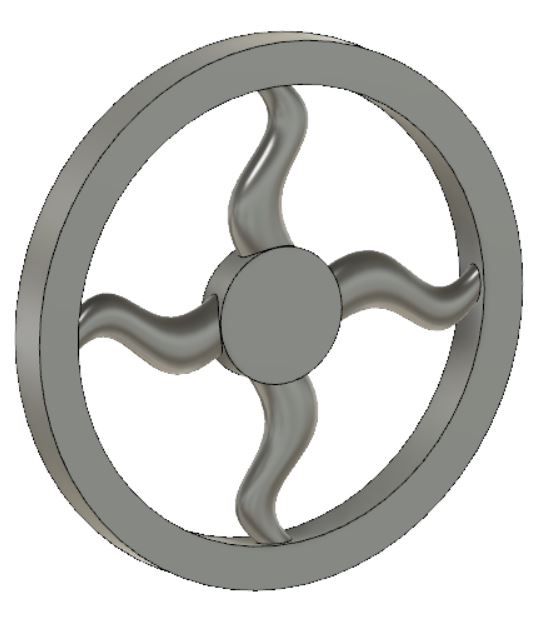
              Here's my attempt in Fusion.

              flywheeld.jpg

              #487700
              SillyOldDuffer
              Moderator
                @sillyoldduffer
                Posted by Farmboy on 25/07/2020 17:10:32:

                Posted by Gary Wooding on 21/07/2020 10:24:29:

                Here's another challenge for you. All transitions are tangents, and the top line is horizontal.

                cad drawing test2.jpg

                Going back a bit to the 'simple' exercise, is it safe to assume that both circles are in the same position on the Y-axis? Although they appear to be, the dimension line does not pass through the right-hand one. I am genuinely interested to know if there is any way of calculating its position from the dimensions given, except that it is 24mm from the left-hand one on the X-axis. If you centre both circles on the same horizontal the exercise seems very simple using just T-square and compasses.

                Is it safe to assume both are on the same axis? No, but it's not unreasonable. Drawings are supposed to avoid unnecessary clutter, but it could be a mistake. I can't see a way of calculating the second circle's position unless it's on the same axis as the other one.

                Have you tried doing the exercise with just a T-Square and Compasses? It's not hard to approximate the drawing by eye, more difficult to get it spot on geometrically so that everyone produces exactly the same drawing. Consider Points A, B, C, D and E added to Gary's original:

                templateabcd.jpg

                A is easy, but the exact length of A to B is harder because point B meets the arc radius R100 at a tangent. Not a blend from a near miss, but a bulls-eye. And the centre point of R100, point D, has to be found exactly so that the arc is tangent at both ends. Likewise the centre of the R50 arc, point C, also has to be found such that the arc intersects at an exact tangent with circles at both ends. Point E (arc R15) presents the same problem, but is easier to solve.

                The exam problem is finding points A,B,C,D,E accurately rather than drawing something like Gary's original. (Even though a blending approximation would be 'good enough' to make one of these in the real-world.)

                It can be done accurately with T-Square and Compass but I don't think it's simple unless the draughtsman already knows about tangents.

                A decent CAD package makes tangents easy because tools are programmed to calculate them. Having been told the ends of an arc, radius R, must be tangent to other objects, it does the sums and finds the centre automatically within a few microseconds. Otherwise, the centre is found by knowledgeably drawing construction lines, which an expert can do in several minutes, while an amateur might fumble for hours, and fail!

                Dave

                #487706
                Farmboy
                Participant
                  @farmboy

                  Thanks for your answer, Dave. I genuinely wondered if it was a trick question and I had missed something.

                  I should obviously have included a rule and possibly a set-square with my T-square and compasses! For quickness I used the digital version (TurboCAD) to produce my 'approximation' of the drawing based on the assumption about the second circle, but I didn't use any of its other functions. Point D may be determined by the intersection between a parallel line 100mm below A-B and a 91mm arc centred on E. Point B is where this arc meets the line A-B. All other arcs were similarly centred as shown on my drawing. Incidentally, my coordinates for point D seem to agree with those mentioned in answer to Michael Gilligan's earlier question.

                  While none of this really matters here, it might have serious consequences in a real-life situation to make assumptions about missing dimensions on a drawing. No doubt someone will now point out some grave error in my work, on which I have now spent far too much time

                  capture1.jpg

                  #487708
                  JasonB
                  Moderator
                    @jasonb

                    Point B should not be too hard to find, I've added a couple of dimensions onto my hand drawn one posted earlier.

                    First draw a line parallel to the top horizontal AB 100mm below it

                    Then set compass to 91mm (100-9) and swing an arc with compass point in the far right point so it intersects the 100mm down line.

                    The intersection not only gives you the springing point for the R100 edge but if a line is projected vertically upwards this will be the point where the horizontal top edge joins the 100R arc.

                    20200726_132503[1].jpg

                    #487731
                    SillyOldDuffer
                    Moderator
                      @sillyoldduffer
                      Posted by Farmboy on 26/07/2020 13:07:03:

                      Thanks for your answer, Dave. I genuinely wondered if it was a trick question and I had missed something.

                      While none of this really matters here, it might have serious consequences in a real-life situation to make assumptions about missing dimensions on a drawing. No doubt someone will now point out some grave error in my work, on which I have now spent far too much time

                      capture1.jpg

                      Gary set the question and it had me going! My construction is similar to yours but I got Point D slightly wrong (the centre of the R100 arc). Martin (Blowlamp) showed how to do it with a parallel 100mm from A-B, which is the method applied by Jason. Gary's drawing tests our ability to draw an arc tangent between two circles and also between a circle and an intersection with a straight line. As always, it's easy when you know how!

                      I agree about ambiguities in drawings. The more I draw the more I appreciate how hard it is to get them right. Working in an old-time drawing office must have been tough. Canyon Diablo was the most violent town in Arizona after it became an accidental railway terminus. The railway was supposed to cross a bridge over a deep canyon. Unfortunately, when the metal parts arrived, they were too short to cross the gap. During the time it took to fix that little detail an anarchic wild-west town boomed in the middle of nowhere. The town died as soon as the bridge removed the need for trains to stop. All because someone made a little mistake…

                      Dave

                      Edited By SillyOldDuffer on 26/07/2020 15:04:31

                      #487811
                      JasonB
                      Moderator
                        @jasonb

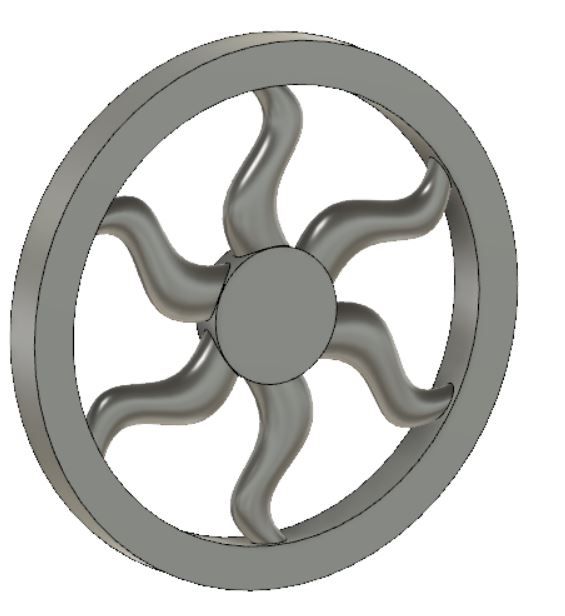
                        Full marks and a gold star to those who managed to produce an image of the flywheelstar.

                        As Dave has not handed his in yet he gets the detention project of manually writing the 27,500 lines of G-code to produce this. One down…………..


                        20200727_122720[1].jpg

                        Edited By JasonB on 27/07/2020 13:07:24

                        #487818
                        SillyOldDuffer
                        Moderator
                          @sillyoldduffer

                          The reason Dave's homework hasn't been handed in:

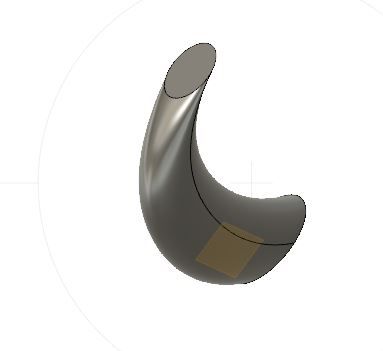
                          f360ellipseloft.jpg

                          f360ellipseloft1.jpg

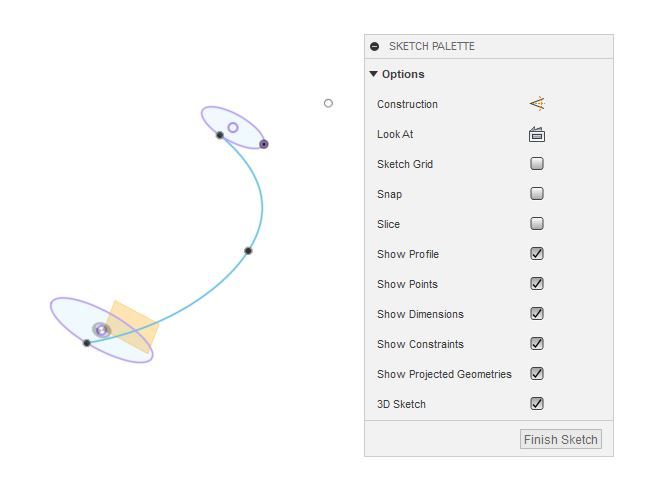
                          f360elsketch3dopt.jpg

                          Got into a fight with Fusion 360, which I have to say is messy in this department. It's easier to do in FreeCAD.

                          No problem drawing two ellipses on separate planes. Likewise, seemed straightforward to draw a spline curve as a rail connecting them, except it isn't. The issue is how to connect two ellipses in 3D space when the model has three 2D sketches in play. The sketches aren't connected automatically, nor is there an obvious 'External Geometry' button. Whilst editing an active sketch, the create toolbar (click it) has a Project/Include option hidden away. It includes projections from another sketch, making them available for snapping in the current one. The two ellipses first have to be selected by this tool, turning them purple (as above) before a rail line can snap between them.

                          I may have made life difficult by switching on the 3D sketch option because moving spline points & angles in 3D is like driving on wet ice with bald tyres. For added fun, Fusion doesn't allow spline points to be grabbed directly by the editor as I expected, instead the Move Tool has to be engaged.

                          Mostly Fusion behaves as I expect it should, but this particular feature was hard work. Maybe I'm making life difficult for myself by not doing it right! I'll try again this evening.

                          As can be seen from the images I haven't got the spoke into its correct S shape let alone set dimensions and repeat copied it into a wheel. If Sir is in a very good mood I might get a C minus for effort…

                          Dave

                          #487820
                          JasonB
                          Moderator
                            @jasonb

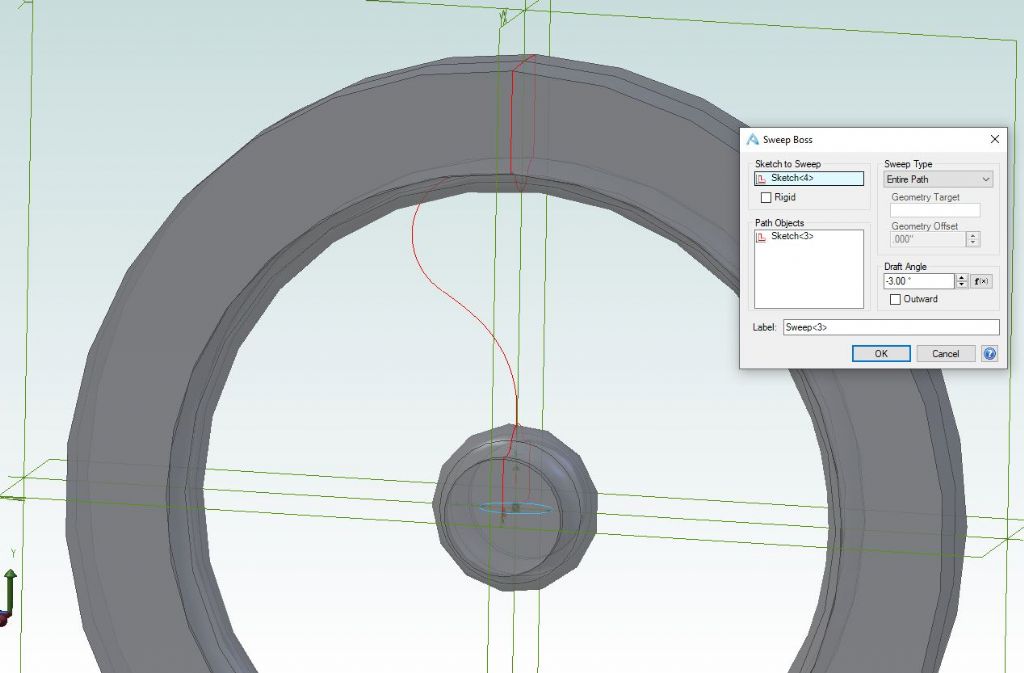
                            This is how I did it in Alibre

                            spoke developement.jpg

                            Firstly the cross section of the rim & hub were drawn and rotated about the central axis

                            Next ellipse drawn on what is the horizontal plane in the above image. (blue)

                            Then the path that the ctr of the spoke is to follow (red) was drawn on what is the plane facing you

                            Then I used "Loft" to make the ellipse follow the path and added 3degrees taper so that the spoke kept the same proportions but got smaller as it radiated outwards.

                            The single lofted spoke was then repeated in a pattern of size about the central axis

                            Finally fillets added where spoke meets hub and rim

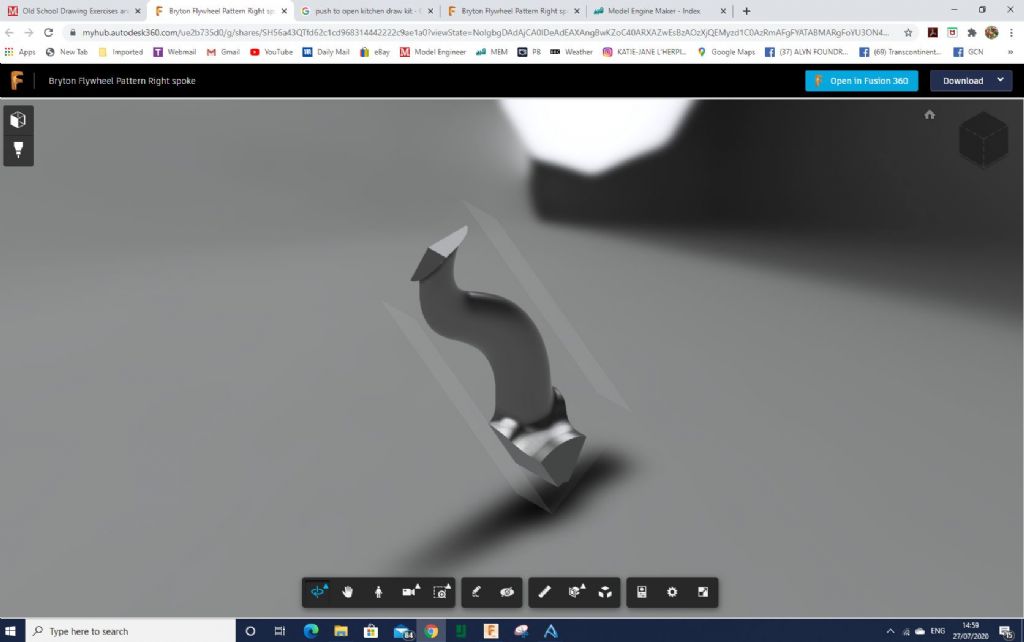
                            If you want to look a it in F360 click this link for the spoke, you can also go to manufacture if you want to look at the tool paths and simulate the cut and the g-code is there too for you to copy out as that may be easier than writing from scratch.

                            #487822
                            Gary Wooding
                            Participant
                              @garywooding25363

                              Hmm, the link just produces a blank screen for me.l

                              #487823
                              JasonB
                              Moderator
                                @jasonb

                                Not sure if you need Fusion or not, it should open as an image that can be moved about with an option to open in F360 so the file can be worked on by anyone, CAM viewed etc..

                                This is a screen shot of how it opens for me.

                                f360 spoke.jpg

                                #487824
                                Gary Wooding
                                Participant
                                  @garywooding25363

                                  This is all I get. It must be something to do with permissions.

                                  jasons spoke.jpg

                                  #487825
                                  SillyOldDuffer
                                  Moderator
                                    @sillyoldduffer
                                    Posted by Gary Wooding on 27/07/2020 15:31:44:

                                    This is all I get. It must be something to do with permissions.

                                    jasons spoke.jpg

                                    Works OK for me in Linux/Firefox which definitely doesn't have Fusion 360 loaded.

                                    Looking at how Jason did his spline, I may have made life difficult by doing mine in 3D. Back to the Drawing Board.

                                    Dave

                                    #487827
                                    SillyOldDuffer
                                    Moderator
                                      @sillyoldduffer

                                      And my version on Fusion.

                                      braytonwheelf360.jpg

                                      Whoops, only 4 spokes, a mistake taking seconds to fix in parametric CAD:

                                      braytonwheelf360.jpg

                                      I seem to have broken the Learner Barrier – only took a few minutes to fix the S shaped spline, loft a spoke, add a hub, rotate 'n' copies and do the rim. Not as nice as Jason & Gary cos' I didn't bother to add fillets, which is rather easy.

                                      Jason's spoke is also finished as a pattern with roots.

                                      I'm supposed to be doing something else!

                                      Dave

                                      #608771
                                      Alyn Foundry
                                      Participant
                                        @alynfoundry54186

                                        Whilst convalescing I came across this thread, very interesting indeed but way over my head.

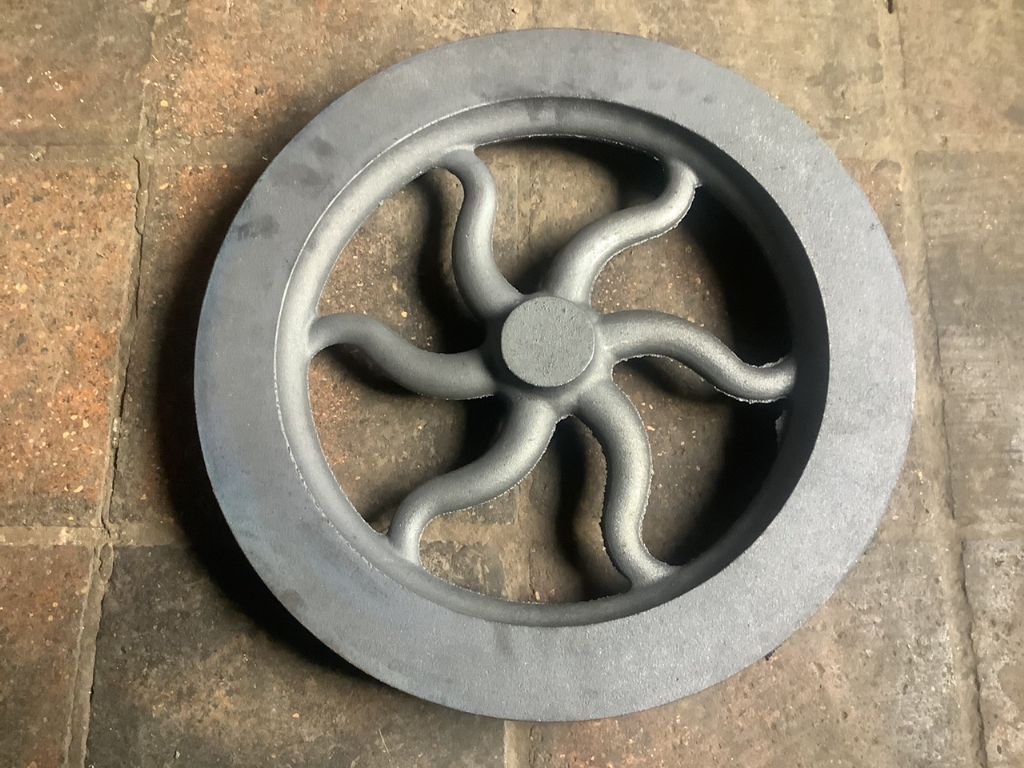
                                        I am very grateful for the amazing work that Jason has done for me of late, I started on the Brayton model way back in 2004. It’s been a mainly off and on type of project but with Jason’s help I’m nearing the finish line now.

                                        The flywheel has been cast and is ready for machining, just waiting for my number 2 son to get his 8-1/2” swing Le Blond up and running. I have a few pictures available but don’t know how to post them here. The model is really taking shape now putting all my equipment to the very edges of their capabilities.

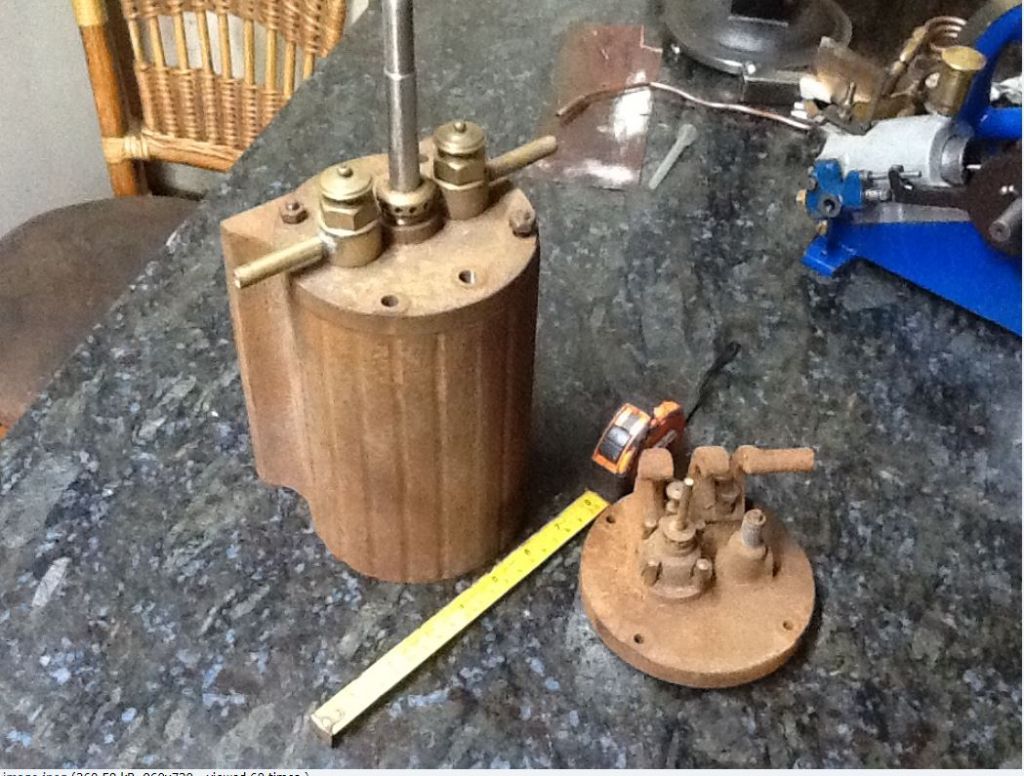
                                        The cylinder head photo, recently posted, shows the inlet valve to the left hand side with a very simple exhaust valve on the right. The inlet is mechanically pulled open to allow the fuel and air mixture, at around 60 PSI into the cylinder which will be ignited by a pilot light ( that’s the original method ) time will tell as to what I will use eventually. The inlet is then mechanically closed to allow for the expansion to occur. Just like a two stroke the exhaust is opened at TDC for the downstroke. The cycle then repeats. The top side of the cylinder is the air compressor. The fluted column is the air receiver.

                                        Please feel free to ask any questions about this project, because of the many other “ Irons “ in the fire might take a little more time to finish.

                                        Cheers Graham.

                                        #608774
                                        JasonB
                                        Moderator
                                          @jasonb

                                          Afternoon sir, you need to create an album and then insert the photos into your post, details here

                                          #608981
                                          Nigel Graham 2
                                          Participant
                                            @nigelgraham2

                                            There are some wonderful puzzles and geometry exercises in this thread, such as the multiple Ying-Yang shapes and that lovely sun-spoked flywheel!

                                            .

                                            Everyone else here has learnt alone to be a very skilled creator of 3C CAD models in order to make things from their projected drawings – by conventional or CAM methods.

                                            I have learnt TurboCAD to a basic but useful level; but not touched it for some months now, nor indeed tried to re-assemble my prematurely-dismantled drawing-board.

                                            Learning's diminishing-returns law means I can identify my natural limit for CAD as essentially just accelerating my drawing on paper, but least CAD doesn't cover the place in eraser "swarf".

                                            I failed with Fusion 360, Alibre and SolidEdge CE; but have up-dated my copy of TurboCAD, which has three advantages for me:

                                            – 1) Honest, single purchase, very reasonable up-front price; no sneaky "subscriptions" months later.

                                            – 2) A CD-mounted, pdf. introductory manual, not a wretched video of a professional user showing off.

                                            – 3) Direct 2D/3D option switch – with a very important proviso that you cannot switch in mid-drawing.

                                            (Apparently that option does catch beginners, because it is horribly easy to switch mode by mistake, producing irreversible difficulties.)

                                            Its main disadvantage is an appallingly weak, incoherent, on-line "Help" manual with no real index, very hard to search for what turn out at best, only prompts for expert users.

                                            '

                                            My main project, a 4-inch scale steam-wagon I should have completed years ago, has no drawings. I have only some photocopies of 1908-dated advertising material with photos of the prototypes, of which no two were exactly alike. I wanted CAD to help me design the remaining parts; but unable to use it to its best, I use it less and less often; and then orthographically because my 3D attempts are of no practical use.

                                            It is easier to use the vehicle itself as its own "drawing" – measuring the metalwork so far, to make rough pencil sketches of the next bits; but still keep having to modify or replace parts made months – even years- previously!

                                            .

                                            I still admire the skills of those able to draw to the standard illustrated on this thread, or published in the magazines' construction series – I just wish I could do it too!

                                            #609102
                                            Alyn Foundry
                                            Participant
                                              @alynfoundry54186

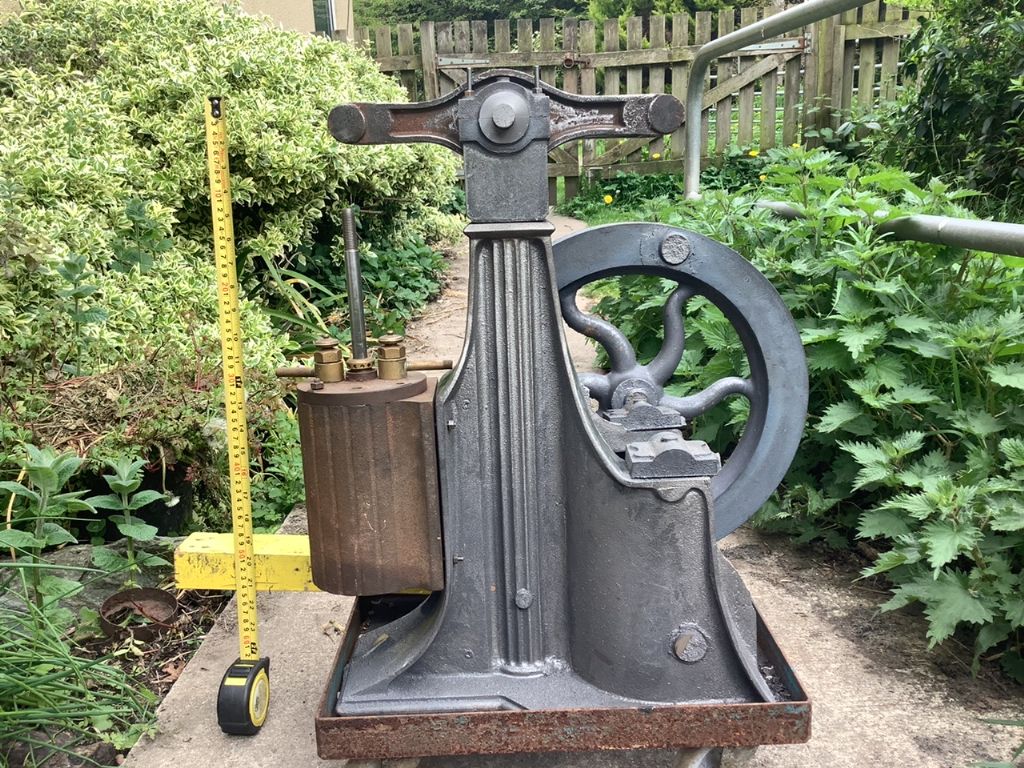
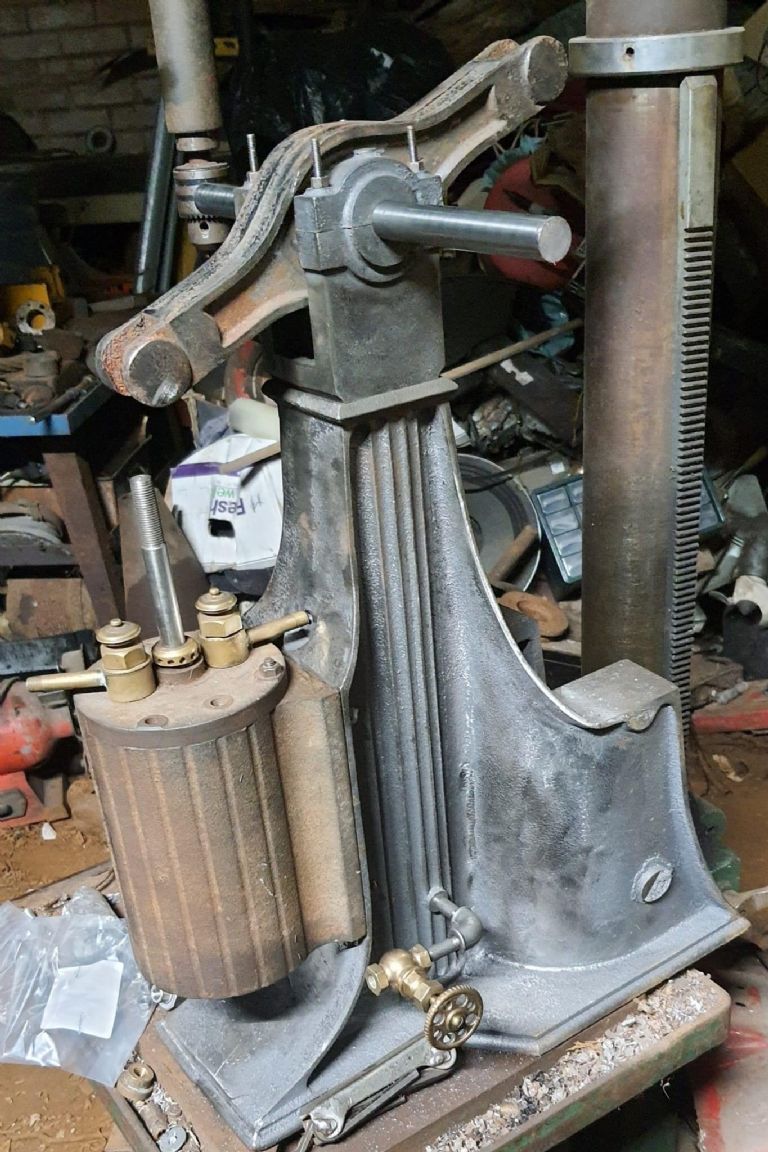
                                              It seems that my tablet couldn't handle the task. Here are a couple of photos of the Brayton Ready-Motor including the lovely flywheel casting that weighs a little over 30 Kgs.

                                              0817a131-26b0-4d96-a47d-56f812083b3e.jpega9af035c-095b-4485-90d1-d52a4344ae75.jpeg7a8f2017-8ba0-4447-b55a-917e38731484.jpeg

                                            Viewing 21 posts - 126 through 146 (of 146 total)
                                            • Please log in to reply to this topic. Registering is free and easy using the links on the menu at the top of this page.

                                            Advert

                                            Latest Replies

                                            Viewing 25 topics - 1 through 25 (of 25 total)
                                            Viewing 25 topics - 1 through 25 (of 25 total)

                                            View full reply list.

                                            Advert

                                            Newsletter Sign-up