New Rotary Table question

Advert

New Rotary Table question

Home Forums Beginners questions New Rotary Table question

Viewing 25 posts - 1 through 25 (of 50 total)
  • Author
    Posts
  • #721883
    Chris Mate
    Participant
      @chrismate31303

      Ok, so I bought a new vertex HV-6 rotary table, feels very solid and good.

      The question I have is will a small clamping kit 10-M8(Those Blue/red holders) be of any use here, I have one but its far too large, or must I just go and made my own small clamps as required-?

      Advert
      #721890
      Huub
      Participant
        @huub

        If you can make your own clamps, do it, so they fit your needs.

        #721894
        Nigel Graham 2
        Participant
          @nigelgraham2

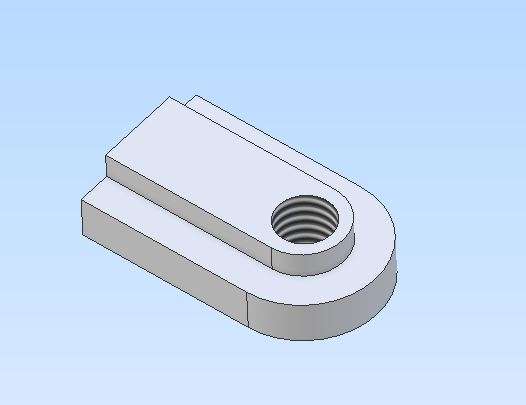
          By all means but do remember that if you also make the nuts and studs or bolts that the fastenings must not penetrate the T-nut enough to reach the floor and force the nut against the slot flanges. For that is a recipe for breaking the table T-slots.

          #721904
          JasonB
          Moderator
            @jasonb

            When I bought my 6″ Soba I got a pair of M8 shuds, nuts and clamps either with it or as an additional item from Chronos. I use them maybe 1/3rd of the time if a part needs clamping. Most of the clamps and packers in an M8 hang on the wall set will be too big to fit the table.

            The rest of the time I use M6 as there is not a lot of room once you have some work on there. These are a mix of my old Unimat clamps which use a jacking screw rather than stepped packers and the tee nuts are simply 5/8 x 1/4 flat bar cut to length and tapped (right throug) with a range of studding and bolts/screws.

            #721906
            Thor 🇳🇴
            Participant
              @thor

              Hi Chris,

              On my hobby size rotary tables I use M6 or M8 studs to clamp parts to the tables. I made my own clamps and T-nuts, not difficult.

              Thor

              #721913
              Nigel Graham 2
              Participant
                @nigelgraham2

                Jason –

                I’d previously made the point that T-nuts should not be tapped right through, or if they are the end thread is closed (or you use studs with short threads).

                The aim, to prevent the bolt jacking the nut against the flange and breaking that, is a point that is often made on here and elsewhere, so I am bit surprised you imply letting the bolt run right through the nut.

                #721918
                JasonB
                Moderator
                  @jasonb

                  The aim, to prevent the bolt jacking the nut against the flange and breaking that, is a point that is often made on here and elsewhere, so I am bit surprised you imply letting the bolt run right through the nut.


                  Using Bolts is the way you will risk damage to your tee slots as when tightened they are driven deeper, far less likely to happen with a stud and nut

                  Well the Emco supplied Tee nuts are threaded right through and after 44 years of use I have not done any damage to my tee slots on whatever machine or accessories they or home made nuts have been used on. Most of my commercially bought M10 Tee Nuts do have a no through thread but not all and even using these I have not damaged anything when using them with studs and nuts.

                  I do use some with bolts such as holding by mill vice down but they only get used with that and bolts are a length that won’t reach the bottom of the tee slot.

                  #721924
                  Nicholas Farr
                  Participant
                    @nicholasfarr14254

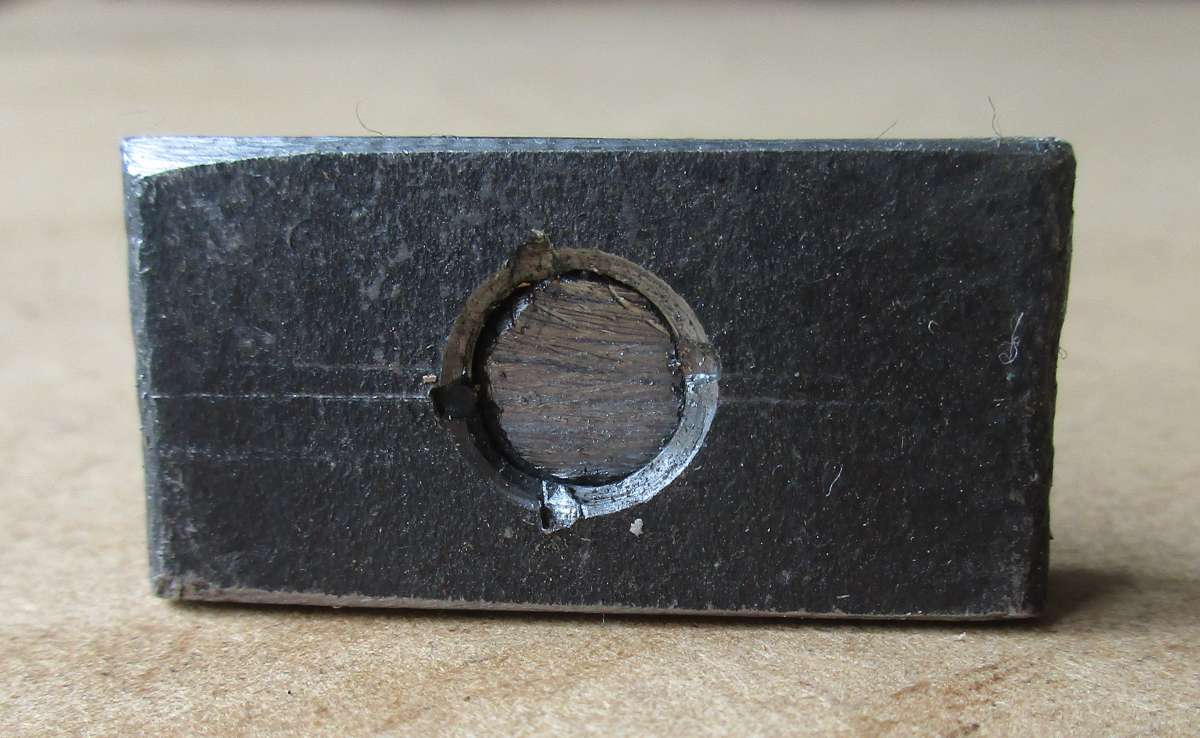
                    Hi, I’ve made nuts from flat bar, and threaded them right through, as it’s much easier than stopping it the right place, but what I do is stake them on one side with a dot punch in four places, which stops the threaded rod pushing through.

                    T nut 3

                    Using threaded rod and nuts, is less likely to jack the T slot up, but if the nut galls up on the thread for any reason, it can be like having a bolt. If you use stainless steel threaded rod, don’t use stainless steel nuts, use ordinary mild steel ones instead, but it’s always best to put a drop or two of oil on them anyway.

                    Regards Nick.

                    #721930
                    Bazyle
                    Participant
                      @bazyle

                      As was pointed out by someone on another thread yesterday T-slots are far less useful than tapped holes. So consider just 4 nut/stud/screws to hold bits of 1/4 plate onto the table to which you then attach your work with holes tapped as needed.
                      It doesn’t have to be a bit that covers the whole table, just bridge over two of the slots to have maybe short screws countersunk below the top out of the way. Your worpiece is so often just over to one side eg to round off the end of a crank.

                      #721936
                      Chris Mate
                      Participant
                        @chrismate31303

                        Ok, thanks for all the replies and advice, I am very aware of the screw down in the table thing, my current clamp set(12M) the T-Nuts are narrowed at the end so stud cannot go through, not all sets has this or maybe older ones.

                        So I thought a long time about this 150mm thing and space and how to try to overcome that problem, so I decided on the following attempt:

                        1-I ordered a round 25mm thick aluminium bar X 200mm extending the 150mm table, its halve the price of a clamping kit.
                        This will be a scrap paper like thing on top of the table and eventually replaceble if I make it longer than the table myself in life.
                        2-I made 3 long T-Nuts to clamp this flat piece on top, 3x bolts countersunked in each T-Nut, so it will be properly clamped down properly, this might be 10mm.
                        3-I bought round 8mm steel bar rods + nuts to start with.
                        4-To centre the table I use part of an 10mm MT2 reamer I was given to centre the table initialy, then centre it with the  coaxial indicator futher, works like a dream.
                        Now the plan is to locate this top part aluminium to that reamer extention, over it, stiff fit, and remember about oil hole.
                        6-At 200mm I can still see the handcrank dial, and if rotary table is set vertical it still clear the mill table, I will see if I need to mill it down to 195mm perhaps & indicatve  groves like the rotary table itself.
                        7-To the vertical position bracket, I want to fit a bracket from where I can start & stop the table movement with 8mm bolts into the table resulting in endmiing to same positions every time, I think it should work.
                        8-As far as the clamping goes I always want at least 3x 8mm bolt clamps self made clamping down on object, as well as 3x 8mm lift/stop fixtures beneath the object, so it can never moves & slightly above the table.
                        9-The 200mm is not really to mill to 200mm but for more clamping freedom. But who knows if I have to clamp something bigger than 150mm from the inside…

                        So this is my plan for now with this addition.I must still decide on thickness/lenght and width of the actual clamps made and if I want step tips or not. I do have a workpiece to mill, so that will give me a clue to start or further suggestions.

                        #721938
                        Howard Lewis
                        Participant
                          @howardlewis46836

                          Three comments

                          1  If you have the Division Plates, Do a few calculations and checks that the chart supplied is correct.

                          If it isn’t, there are at least two charts available on here, which are correct.

                          Hopefully, it has been corrected after I found that the settings for 13 divisions (6 turns and 30 holes on a 39 hole plate) was wrong. Should have been 6 turns and 36 holes on a 39 hole plate. Hope my memory is correct after all this time! There were at least three other errors, and a couple of omissions

                          2  Be VERY careful over screwing studs through the T nuts, or over tightening the nuts. A M6 thread can exert quite enough force to produce a crack. The need for a new Cross slide taught me that!

                          3  Although you can use M10 studs to secure the HV6 to the mill table, in the vertical position, it may be worth extending the slots, and using M8 studs and T nuts. (It was for my RF 25 mill/drill.) It will still be a bit of fiddle getting the fixings into place.

                          If you have the Tailstock, you can use the HV6 and the Tailstock to align each other.

                          I made stepped dowels to locate the Tailstock to the Mill table.

                          A 2 MT Blank Arbor, bored out to be a SNUG fit on the Barrel of the Tailstock cemtre, will align the Tailstock for height (The dowels will align on the Mill table; then clamp up height and angle adjustments). At the same time, the 2MT arbpr. fitting over the tailstock barrel / centre will align the HV across the table.

                          The Tailstock can then be moved along the table to accommodate whatever is held by the HV6.

                          Somewhere in MEW there is at least one article on aligning a HV6 on a mill, for both horizontal and vertical use.

                          HTH

                          Howard  (Typos all corrected, I hope!)

                          #721944
                          Phil S
                          Participant
                            @phils66830

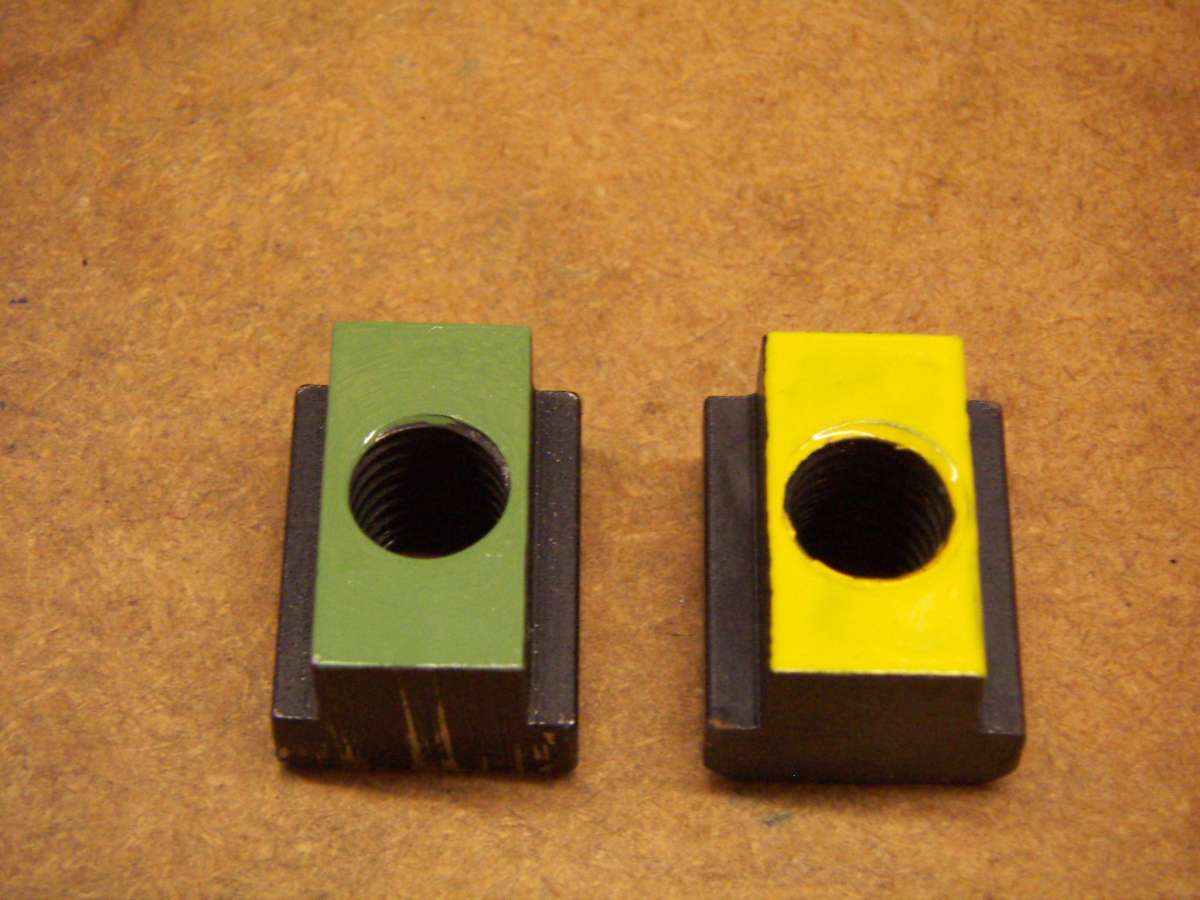
                            Bought in tee nuts that are tapped through may be too hard to bend the bottom thread. If you have a mixture of safe and tapped through types then one solution is to paint the top surfaces green or yellow (as a warning) accordingly. PICT0268

                            #721946
                            Tim Stevens
                            Participant
                              @timstevens64731

                              Correcting your typos, Howard, is the sign of a craftsman. And not common, so well done.

                              It amazes me how some folk who would never think of missing a washer or putting one upside down, are happy to have sentences without verbs.

                              Grumpy, as ever – Tim

                              #721948
                              Howard Lewis
                              Participant
                                @howardlewis46836

                                Tim,

                                My problems are multiple, lack of training, fat fingers, lack of care, failure to proof read adequately (Why do I only spot them a millisecond after pressing”Send”?) and probably heavy hands on small keys!

                                Howard

                                #721950
                                Howard Lewis
                                Participant
                                  @howardlewis46836

                                  My English teachers taught us to hate split infinitives and text lacking finite verbs.

                                  So, we constanly see “English, with which we should not put” as W S Churchill once said!

                                  Howard

                                  #721989
                                  Grindstone Cowboy
                                  Participant
                                    @grindstonecowboy

                                    “…UP with which…”

                                    Sorry! 🙂

                                    Rob


                                    #721994
                                    Peter Cook 6
                                    Participant
                                      @petercook6
                                      On Chris Mate Said:

                                      1-I ordered a round 25mm thick aluminium bar X 200mm extending the 150mm table, its halve the price of a clamping kit.

                                      Chris, when you are deciding on the location of the bolts to clamp the plate down onto the rotary table, do a bit of geometry and see if you can pick spacings which also work for the slots on the mill table. That way the plate can also be used as a clamping system directly on the mill table.

                                      I made a similar 150mm disc for my little 4″ table with three rings of tapped holes for clamping, and it has proved useful directly on the mill for clamping smaller items.

                                      #721998
                                      duncan webster 1
                                      Participant
                                        @duncanwebster1
                                        On Howard Lewis Said:

                                        My English teachers taught us to hate split infinitives and text lacking finite verbs.

                                        So, we constanly see “English, with which we should not put” as W S Churchill once said!

                                        Howard

                                        Trying to apply the rules of Latin grammar to English, otherwise known as showing off.

                                        #722041
                                        Chris Mate
                                        Participant
                                          @chrismate31303
                                           Peter Cook 6 Said:

                                          Chris, when you are deciding on the location of the bolts to clamp the plate down onto the rotary table, do a bit of geometry and see if you can pick spacings which also work for the slots on the mill table. That way the plate can also be used as a clamping system directly on the mill table.

                                          I made a similar 150mm disc for my little 4″ table with three rings of tapped holes for clamping, and it has proved useful directly on the mill for clamping smaller items.

                                          Hi, thanks for this tip, good one. This rotary table has 3 slots spread like a star, I looked again and would like to fit two 8mm bolts screwed into the 3 slots on this rotary table(countersinked cut to lenght not to touch bottom when tightened, I usually use a 2mm aluminium strip slided in to check on this, in this case maybe Imm.

                                          I will see if I can get corresponding possible on mill table, just make different size M8 T-Slots for those then.

                                          Note:I only bought the rotary table alone. The more I look at it the smaller it gets.

                                          #722050
                                          Peter Cook 6
                                          Participant
                                            @petercook6

                                            Chris, couple of other ideas you might want to consider.

                                            I made a short MT2 taper with a collar on top, and counterbored the underside of the disk so centering the disk to the table is a case of dropping the taper in, and fitting the disk onto the collar before clamping it down.

                                            I also bored a recess in the top of the plate (in my case just under 10mm diameter) to take centering fittings. One is a simple point which I use to match to a point in the spindle for centering the table when the plate is mounted. Others are cylinders for locating parts with holes that need to be centred. I make one offs from brass when needed.

                                            A third thing is to drill through the plate, and drill and tap the collar underneath. That gives a central clamping point

                                            #722055
                                            Nigel Graham 2
                                            Participant
                                              @nigelgraham2

                                              As an approach to making long T-bolts…

                                              I made the two 5/16″ BSF X 3″ long T-nuts for the Stent T&C grinder, in two parts for economy of steel, time – and electricity.

                                              I threaded the head end of the stem slightly long, cleaned it and the head thoroughly, and assembled them tightly to the thread limit with ‘Loctite’. Once both bolts had cured overnight I could then skim the underside of the head, removing the little bit of protruding stem as I did, to the finished thickness.

                                              As a general point on making jigs and fixtures, I try as some people here have indicated, to make them potentially useable for future, broadly-similar tasks.

                                              This includes a sub-table I made for my 6″ rotary-table, a steel disc about 4 inches diameter that is drilled for screws for the RT’s own T-nuts but then has rings of M6 tapped holes for clamping small work-pieces.

                                              A spigot on the underside locates in the table’s 3/4″ dia location counterbore above a 1/2″ BSW tapped continuation. (No Morse taper.)

                                              I forget its original purpose but while making it, gave it more holes than needed for that, and among other things it can be used with a commercial, small M6-based clamp-set and the clamps for the BCA jig-borer.

                                              I own a couple of those hefty 3/8″ UNC-based clamping kits, probably bought from ARC Euro. Once I had identified that as the thread I augmented it with standard bolts and set-screws for where I want an arrangement less cumbersome than the original kit alone can give. On the milling-machine but also on the Harrison and I think Myford lathe’s faceplates, and the bench-drills’ tables.


                                              #722060
                                              Chris Mate
                                              Participant
                                                @chrismate31303

                                                Photo of Rotary Table plus MT2(Part of reamer) inserted protruding somewhat, and the 3 T-Nuts I made to bolt the Aluminium 200mm disc on top of the table.

                                                I will see if I can locate the disc to the table using the protruding section of the MT2 and the shaft part of it sticking out.

                                                If disc don’t fit in lathe chuch, I will have to use the mill & boring head.


                                                #722069
                                                David George 1
                                                Participant
                                                  @davidgeorge1

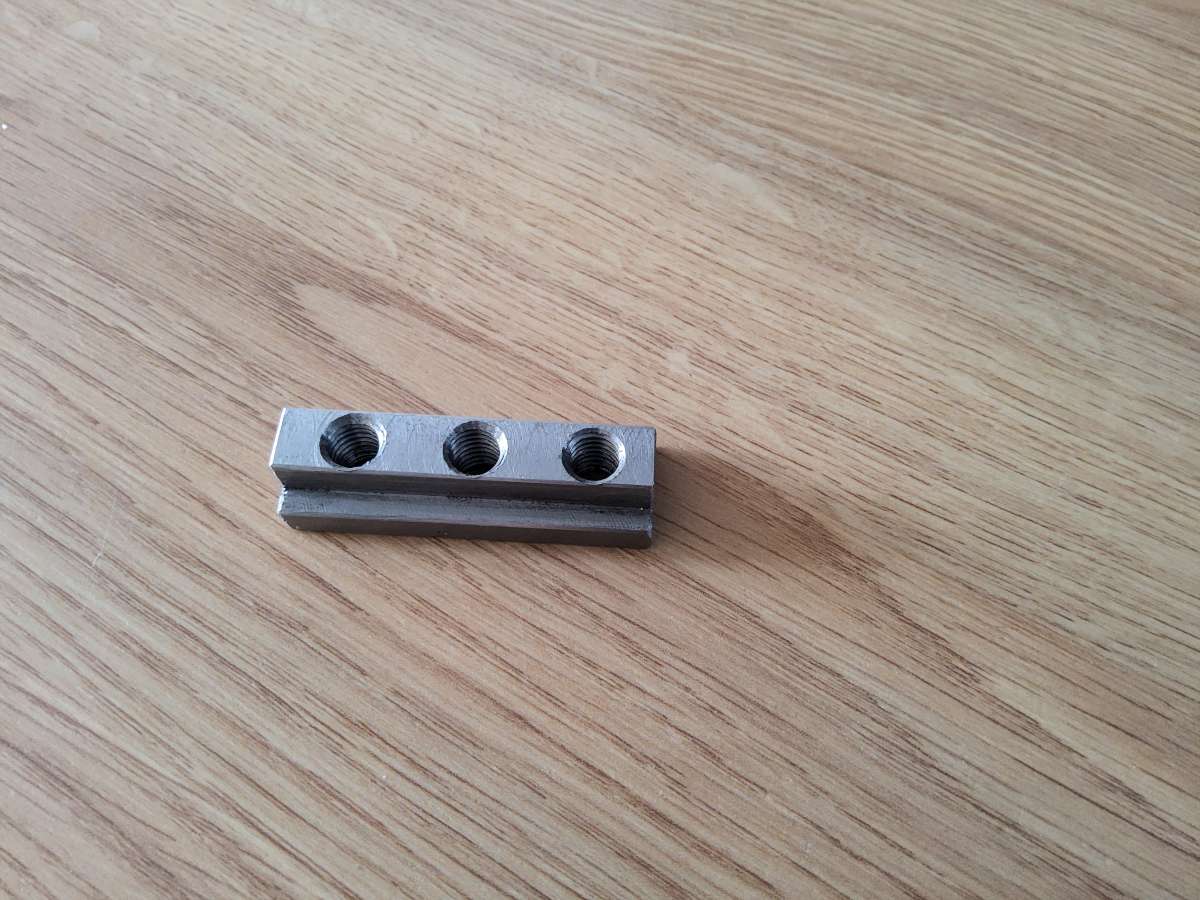
                                                  I have sets of T nuts which are strips with three holes tapped with both 6mm and 8mm threads. They use a larger area in length  which is usful as you can slide the strip along the T slot so the choice of screw position can be from right at the edge to very near to the center of my rotary table without breaking the T slot.

                                                  An 8mm one.

                                                  20240326_072715

                                                  David

                                                  #722074
                                                  JasonB
                                                  Moderator
                                                    @jasonb

                                                    I also found it useful to round off the end a couple of tee nuts so I could get as close as possible to the ctr of the table when needed

                                                    tee nut

                                                    #722139
                                                    Chris Mate
                                                    Participant
                                                      @chrismate31303

                                                      The rounding off of the T-Slot will bring it nearer, make me think that MT 2 the shaft sticking out, that sould be the top guide to the disc so its closed near the centre as appose to the table down below.

                                                      More holes is a good idea, I think in my case I am not going to use T-Slots in the disc, just 8mm holes threaded plus threaded bar lenghts with  bronze round feet at the bottom to support the rear of each clamp at whichever height..

                                                    Viewing 25 posts - 1 through 25 (of 50 total)
                                                    • Please log in to reply to this topic. Registering is free and easy using the links on the menu at the top of this page.

                                                    Advert

                                                    Latest Replies

                                                    Home Forums Beginners questions Topics

                                                    Viewing 25 topics - 1 through 25 (of 25 total)
                                                    Viewing 25 topics - 1 through 25 (of 25 total)

                                                    View full reply list.

                                                    Advert

                                                    Newsletter Sign-up