New gearbox project

Advert

New gearbox project

Home Forums Work In Progress and completed items New gearbox project

Viewing 7 posts - 1 through 7 (of 7 total)
  • Author
    Posts
  • #698263
    John Hinkley
    Participant
      @johnhinkley26699

      Forgive me if this is a double post – I thought that I’d posted it but it seemed to disappear into the ether…..

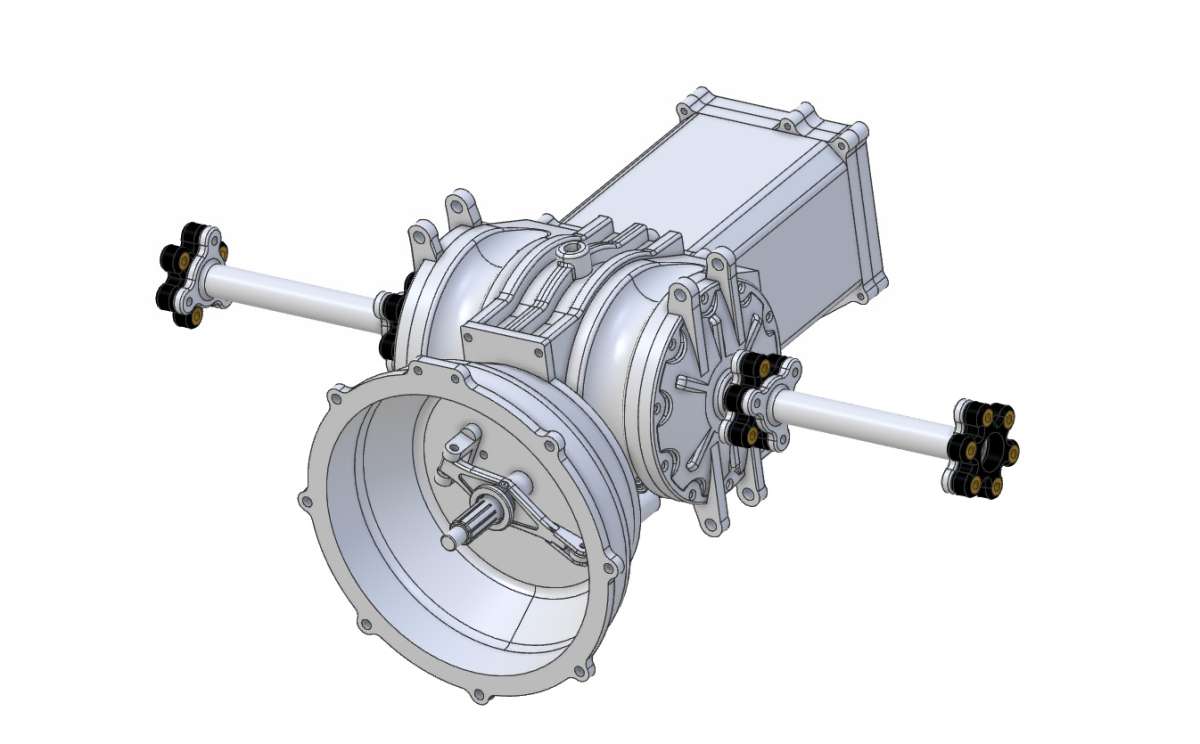
      I’ve been slowly working on my transaxle gearbox project over the last few weeks and have got to a stage sufficiently advanced to warrant a progress report.  My intention with this endeavour is to eventually 3D print it with my BambuLab X1 Carbon printer.  The drawing has almost all been done in Alibre Atom, except a couple of bits I had to do with Fusion 360. As I’m designing “on the fly”, I have only been printing stuff off when I’m pretty sure that the design of a specific item is fixed.  Doesn’t always work out that way!  So far, I’ve got this to show for my efforts :

      Transaxle Assembly


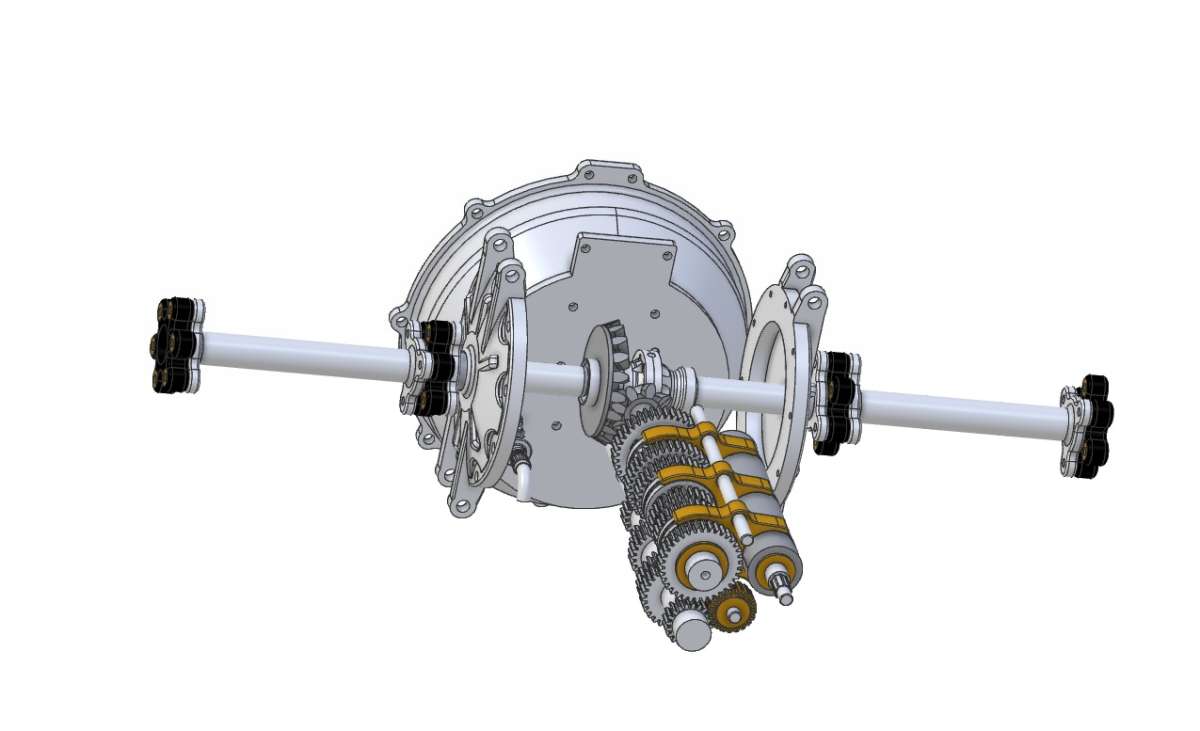
      I have attempted to model the doughnut couplings in a “rubber” material by changing the part colour to a dark grey.  I’ll have to experiment with the materials function if Atom has that facility.  But that’s for later.  Meanwhile, strip away the casings and this what’s inside :

      Naked transaxle assembly

      The gearbox internals and differential are all that I’ve printed so far (some bits more than once!) and I’ve yet to design the mechanism to rotate the selector barrel, so as it stands it’s a one-speed or no-speed arrangement instead of a 5-speed with reverse one!

      I’ll post again when there’s something significant on that front.

      John

      Advert
      #698301
      Colin D
      Participant
        @colind

        Very impressive work  !

        Do please keep us updated on your progress on this interesting design.

        Colin

        #698310
        JasonB
        Moderator
          @jasonb

          That is coming together nicely John, keep us posted

          I’d also like to see the prints as you do them, Alyn Foundry who I’ve been CNCing patterns for have just ordered a Bambu Labs P1S on my suggestion to print some of the patterns so I’ll just be doing the CAD.

          #698318
          John Hinkley
          Participant
            @johnhinkley26699

            Unable to reply on my PC, I’m now on the iPad, which is, as you see allowing me to do so!

            Colin and Jason, thank you for your comments and encouragement.  I will indeed keep the thread updated, though there can be long periods of apparent inactivity until there is something significant to post about.

            I’ll take some photos of the parts that I have printed so far later today if the rain ever stops.

            John

            Jason, posted after I PM’d you.

            #698340
            John Hinkley
            Participant
              @johnhinkley26699

              The rain has stopped, so here are some photos.  All the parts shown are printed with a 0.12mm layer thickness, 25% infill, support enabled where necessary and using a 0.4mm nozzle.  The filament is BambuLab supplied PLA in silver or orange (to simulate bronze).  Print quality is what I consider to be quite good, although I have purchased a 0.2mm diameter nozzle and hot end, in case I need greater detail,

              The input and output gear clusters mounted on temporary plates awaiting the addition of the test fit of the rest of the gearbox internals :

              Gear clusters

              Then a general shot of the parts that will make up the differential :

              Differentialparts

              And finally an overall view of the sum total of the parts printed so far :

              Overall view

              More details are in the descriptions in my gallery but briefly, thought has to be given at the design stage as to the need or otherwise for support and the orientation of the part when printing, adjustable in the slicer program, to minimise overhang and excessive use of material. For example, the selector barrel (the grooved tall object at the top towards the right), has a pivot 10mm diameter protruding from the lower end in the design.  If printed with this in situ, it would require a large amount of support around it to provide a base for the larger diameter material above.  I therefore decided to print the pivot separately and introduce a hole at that end to accept the pivot after printing.  However, in order to prevent the slicer using support material in the hole, that in itself had to terminate in a 45° cone!  All has to be foreseen as the design progressed, mostly in my head which as a consequence, now hurts!

              I think I’m getting to the stage now where I can’t put off any longer printing the differential and gear section casings, but both will take a lot of filament, so I want to get it right first time, if I can.

              John


              #698476
              John Doe 2
              Participant
                @johndoe2

                John, as a relative newbie to CAD and 3D printing, I find that hugely impressive.

                Would you have a moment to give us an outline of how you went about designing and modelling this in CAD ?

                At the moment, my projects are relatively simple and consist of adding and subtracting areas of blocks to get the basic shape I need, then shelling them out and adding holes and other features. Or drawing a 2D half-shape and then revolving it to make a 3D body.

                Obviously something like your transaxle needed significant planning-out before starting to create the individual parts.

                #698502
                John Hinkley
                Participant
                  @johnhinkley26699

                  John,

                  I consider myself to be fairly new to CAD, also, having been dabbling with Alibre Atom for “only” a couple of years.

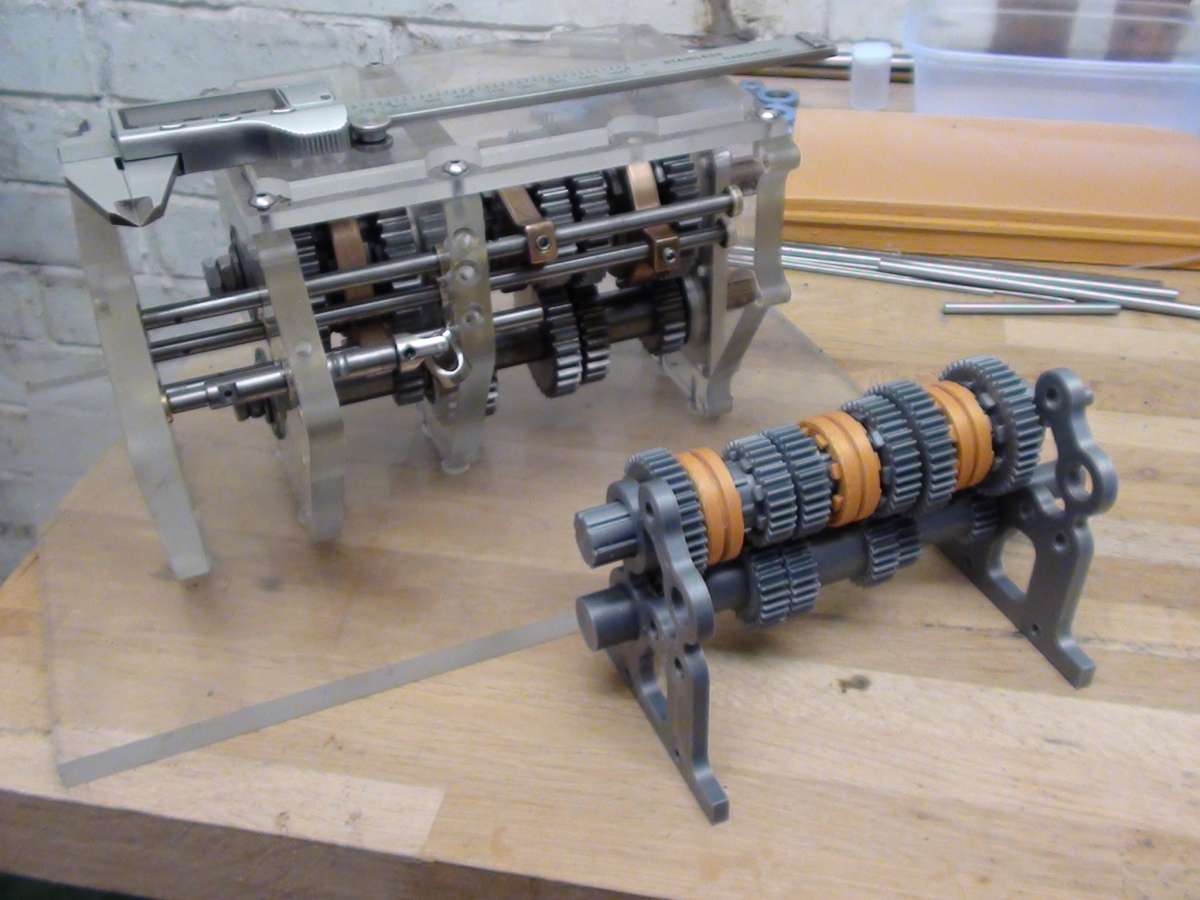
                  The thought process that you describe above is pretty much the same methodology that I use.  In this case I downloaded maintenance manuals for a number of Hewland gearboxes and studied them quite thoroughly.  Originally, I drew up my version of a 5-speed, non-sequential gearbox and made CAD drawings of that, eventually making a model in metal, mounted on transparent perspex for display purposes as seen below in a size comparison with the current project :

                  Comparison shot

                  The 3D print is a scaled-down version of the “old” design, but with the added complication of the sequential gear selection mechanism.  All the gears were made using the GearDFX program from ForestMoon. This is a costumisable program which will output gear forms in a multitude of formats, including DXF, SVG, STEP, STL and OBJ, so it should be suitable for any number of CAD programs or even straight into slicing software.

                  Once the gear clusters were sorted, I designed the differential.  As I mentioned previously, the crown wheel and pinion were done in Fusion 360 and are straight bevel-toothed gears as per the full-size Hewland gearbox.  Now that I had the innards, I drew the casings around them to give an aesthetically (to my eyes) look, adding the strengthening ribs and chassis mounting points, etc as it progressed.  As you can imagine, this took a long time, a lot of trial and error and involved adding various new planes and axes along the way.  It sounds more complicated than it is, really.  It is a matter of taking it a step at a time and if it doesn’t look right, be prepared to press delete and start again. Once the casings were complete, I added a bellhousing and the clutch release fork and slave cylinder/pushrod as the design developed.

                  I am (almost) ashamed to say that there wasn’t  lot of pre-planning involved, like Topsy, “it just grew”.

                  I hope that gives you a brief glimpse of my design philosophy and execution of this design. I’m happy to answer any specific questions, by PM if you prefer, but bear in mind I’m NOT qualified in any way in CAD, engineering, design or machining – just a keen self-taught amateur.

                  Regards,

                  John


                Viewing 7 posts - 1 through 7 (of 7 total)
                • Please log in to reply to this topic. Registering is free and easy using the links on the menu at the top of this page.

                Advert

                Latest Replies

                Viewing 25 topics - 1 through 25 (of 25 total)
                Viewing 25 topics - 1 through 25 (of 25 total)

                View full reply list.

                Advert

                Newsletter Sign-up