Hi Dick,
Thank you for your comments, and for following the clock’s progress. Once again, your comments fit into the picture perfectly.
Now here’s an update on my headway, and a couple of responses.
The clock may require some more tweaking of the balance wheel weights, but I’m pleased to note that it is running very well indeed.
Since I have no data on the validity of the main-spring/fusee `compensation’, I suspect that there could be `patches’ where the `going’ train is over powered. However, for various reasons, I’m compelled to accept that the main spring is here to stay, and changing the fusee profile is not an option either.
When the clock was running fast (28 minutes for one hour), using wire which was 0.011″ (0.28mm) diameter the balance spring was clearly too stiff. My calculations for moment of inertia showed me that to get the same stiffness which John Stevens’ flat-section spring would exhibit, (ie. 0.02″ x 0.005″), the wire diameter would have to be 0.008″ (0.02mm). As an earlier post of mine indicated, this was claimed by my friendly music-shop owner to be the thinnest steel guitar string.
All further springs were wound using this size wire, after removing the stock completely from the music shop. Many springs failed to meet my requirements. Besides gluing the wire to the mandrel, my final method of tensioning the guitar string was to hang a weight onto the end of a braided nylon thread (the same 80lb fishing line I’ve wrapped around the fusee ), then attaching this to the guitar string. Thus I had constant tension, and the wire could twist freely if this needed to occur.
For more information with lots of friendly responses, please see five other threads via :- http://www.modelengineer.co.uk/forums/searchresults.aspSearch=spring&SearchType=1&t=133
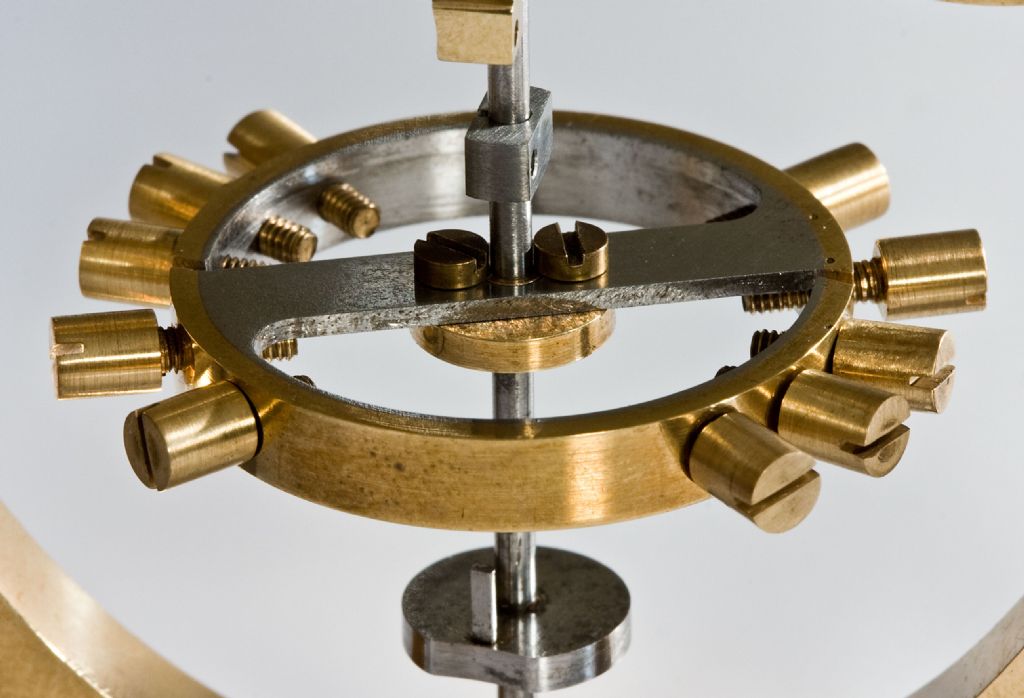
With the best spring that I could produce, (upon reflection, it was perhaps too stiff [not enough turns], my inclination was to add weight to the balance wheel.
As you can see here
the balance wheel has tiny screws with large heads. These are positioned around the rim, the intention being that they provide a means for time adjustment. To increase the mass of the balance wheel, I slid and glued a brass bush onto the heads of both of the two main adjustment screws, and began a more serious approach to getting the speed correct. With more mass and tweaking of the screws several times per day, I finally achieved an accuracy within three seconds per hour. It ran for about five weeks, with occasional but not yet a full winding.
I was therefore satisfied that the clock could be pulled apart for a final scrub up.
After more messing about in the garage (I don’t have a workshop), I had also made a better-looking spring which I duly fitted as per `the book’ instead of using sewing needles jammed into place. Sourcing some clock oil from a very friendly antique clock restorer in Melbourne, I set the clock ticking.
With (perhaps) an extra turn of wire on the spring, this time the clock was running too slow, so off came the extra mass from the two main screws. They did look a bit clumsy alongside the existing screws. I had also used shellac for the glue, so applying a little heat to each main screw and the weights came loose.
Now the clock was running too fast, but gradual unscrewing of the main screws has produced an accuracy equal to or even better than the previous results.
Phew!
Regards to all,
Sam
Edited By Sam Stones on 16/09/2011 01:08:31
Sam Stones.


 .
. 

