My little engine (continued)

Advert

My little engine (continued)

Home Forums Work In Progress and completed items My little engine (continued)

Viewing 25 posts - 451 through 475 (of 602 total)
  • Author
    Posts
  • #204397
    GarryC
    Participant
      @garryc

      Hi Jason

      Thanks, I've had to have a look at one of 'Toms Techniques' to see how a radius corner cutter works… **LINK** – for anyone interested, it looks really useful..

      I definitely need to have a go at milling around the gland and chest like your photos shows as it would be so much easier and a much better job once it feels comfortable – I'll have to think of what I can use to have a practice on and definitely try it that way for my next engine – my vertex vice is a swivel type and I have the Rotary table..

      I'll include a small radius cutter when I get my new cutters..

      Cheers

      Garry

      Advert
      #204399
      JasonB
      Moderator
        @jasonb

        Garry, its a radius corner cutter not a corner rounding cutter – convex cutter corner rather than concave which leaves a nice fillet where the boss meets the flat of the chest. You can buy them but I just freehand grind one from a blunt cutter, does not have to be spot on as the average of the 3 or 4 corners will give as good a curve as the sand casting.

        Best way is to mount the vice ontop of the rotary table, centre on teh valve rod and do the two sides and then centre on each stud hole to do the ends.

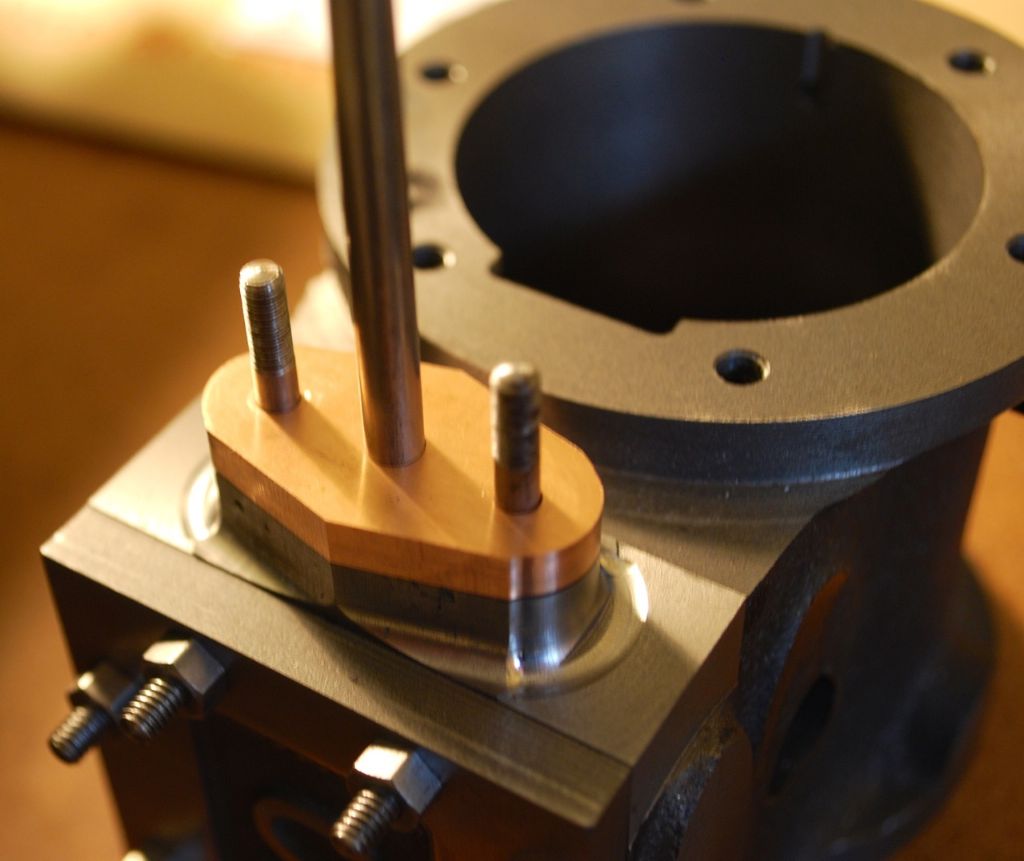
        This sequence shows a badly cast boss being cleaned up, bit harder than your chest as it was on the side of a round cylinder head.

        Similar thing on teh round boss

        And this thread shows how I form the shape of the gland, note I prefer the more tangental shape. But the more eliptical ones are not too hard to do

        #204404
        GarryC
        Participant
          @garryc

          Hi Jason

          Thanks that took a while to go in for some reason, but I have it now – I've exported this and your build link page as pdf's to refer to when I come to do it and I've now found cutters with the right radius, I couldn't see any at ARC though – I'll have to have a think while I'm away whether to try it live on my current gland..!

          and I need to check and see if my vice will fit on the rotary table…

          Cheers thats going to be a bit of an essential technique to learn I think..

          Garry

          Edited By Garry_C on 15/09/2015 17:07:20

          #204464
          GarryC
          Participant
            @garryc

            Hi Jason

            I'm hoping you may see this – I think I'll have a go at tidying around the Steam Chest boss with a radius corner cutter as you suggested and thought I'd order one so that it will be here when we get back, I was thinking of a 2mm radius and wondered what you thought as I've never used one before..

            something like this perhaps (2mm radius) **LINK**

            I thought I'll see what the gland looks like as it is now after doing the radius and stay with that if poss for this engine and then change over to doing both the boss and gland's on the mill in future….

            I think my Vertex vice is going to be too big for my RT but I have a cheap cross vice that may well fit and do for shaping parts that can be held and maybe be easier to use for changing the centering….worth a try anyway until I get a better one. I think one mistake I made was getting a RT with 3 and not 4 T Slots…

            Thanks

            Cheers

            Garry

            Edited By Garry_C on 16/09/2015 08:15:57

            Edited By Garry_C on 16/09/2015 08:17:12

            #204467
            JasonB
            Moderator
              @jasonb

              It could be done with that but its actually a ball nose cutter, at 4mm dia it is likely to flex away from teh work too much and with only 8mm long flutes may come up a bit short.

              Give me a few mins and I'll take a photo of what I use

              #204469
              JasonB
              Moderator
                @jasonb

                Just roughly freehand ground on a bench grinder from blunt cutters, A quick look only shows carbide ones for sale in my catalogues which work out a bit pricy. Something like 10mm dia with a 2mm radius would be about right.

                dsc00241.jpg

                #204474
                GarryC
                Participant
                  @garryc

                  Thats great thanks a lot Jason – I should have some blunt cutters that I hope I haven't binned so I'll have a go at grinding one, if not then its a good time to order new better quality ones and try and grind one of the old ones….

                  edit: – I swear that I'll never throw anything away again – just looked and can't find any old blunt milling cutters.. So I've ordered this to try before grinding any others (trying to make them last a bit longer before replacing), Hopefully just nibbling away with it will do the job and no great loss if not…. http://www.amazon.co.uk/gp/product/B00EZ78H18?psc=1&redirect=true&ref_=ox_sc_act_title_1&smid=A50DZI580G3JX

                  Cheers

                  Garry

                  Edited By Garry_C on 16/09/2015 09:12:00

                  #204477
                  David Clark 13
                  Participant
                    @davidclark13

                    Try using some diamond honing stones to put the radius on. Arc Euro Trade sell some plastic backed ones.

                    #204483
                    GarryC
                    Participant
                      @garryc

                      Thanks David, I'll be getting my new cutters from ARC as they have been highly recommended – I'll order a stone as well. Meantime I hope the 6mm shank cutter I've ordered will do the job (slightly larger diameter shank than the first one I found) if I go at it lightly – i couldn't find a small radius one with a 10mm or thereabouts shank unless looking at high end expensive ones..

                      Cheers

                      Garry

                      Edited By Garry_C on 16/09/2015 10:20:03

                      Edited By Garry_C on 16/09/2015 10:20:22

                      #204485
                      JasonB
                      Moderator
                        @jasonb

                        You can always do most of it with a straight cutter and then just change to the rounded one for the lastt bit.

                        #204486
                        David Clark 13
                        Participant
                          @davidclark13

                          Hi Gary It is easy to stone the radius on. A little bit of practice and take a trial cut on something soft like brass or aluminium to check radius for rubbing and correct size.

                          #204507
                          GarryC
                          Participant
                            @garryc

                            Thats sounds like a good way to go about it Jason will do, and David I can see that's going to be a useful technique to have a go at, bound to come in handy, I'll have a box full of 'old' cutters to modify as and when soon as well…!

                            Trouble is now I'll not only be looking at types of nuts and bolts and threads in photo's of old engines and that – but on joining corners, fillets and such like now as well – what next I wonder smile p

                            Hoping i'm bound to find a 'steam museum' (or two) in Cornwall somewhere while we're there (that allow dogs in)…

                            Thanks both smile

                            Garry

                            #204514
                            Bob Brown 1
                            Participant
                              @bobbrown1

                              I've used ball nose cutters to put a radius on parts even a 25mm one to radius some 6082 aluminium.

                              #204520
                              JasonB
                              Moderator
                                @jasonb

                                The reason I suggested a radius corner cutter rather than a ball nose is that they can take off far more material per pass and are generally stiffer.


                                Take this piece below, 1.5mm radius to the internal fillets, the lug sticks up 9.5mm and a fair amount of metal to remove all round. I took full depth cuts using 9.5mm of the cutter length and fed in 0.050" per pass.

                                To do that with a ball nose cutter would have meant one of 3mm dia, how many passes would that have taken and thats if the flutes even reached down 9.5mm. Any significant stepover would leave a series of "U" shaped grooves on the surface due to the small dia of the cutter, all I did was give it a quick rum over with a garryflex block after machining.

                                Edited By JasonB on 16/09/2015 13:19:59

                                #204534
                                Bob Brown 1
                                Participant
                                  @bobbrown1

                                  Jason,

                                  I suppose to some extent it depends on the radius and I have used both ball nose and a corner radius cutters, the problem of depth can be a problem dependant on how much depth there is even for square end mills when restricted by size.

                                  #204535
                                  GarryC
                                  Participant
                                    @garryc

                                    Not only are the fillets in those photos very nice Jason but also the 'brushed' look, if that would be the right word for it is superb. I've just been looking at some info about garryflex blocks (never heard of them until now). I'm thinking I'll have to give them a go on my next engine… I'm guessing to leave the finish like that they would need some kind of clear protective lacquer to prevent rusting, assuming that's steel in the photo's…

                                    and I'm seeing fillets everywhere I look now – its just never sunk in what a massive difference they make…!

                                    Cheers

                                    Garry

                                    #204550
                                    JasonB
                                    Moderator
                                      @jasonb

                                      Yes bob job in hand will also have alarge influence on what cutter/s suit.

                                      Garry thats Aluminium so no rust.

                                      There is another way to do the fillets as well

                                      #204577
                                      GarryC
                                      Participant
                                        @garryc

                                        Thanks Jason, great to see that, I'll have to get some 'Bondo' and some 'JB Weld ' – I seem to recognise the 'filling material' used as similar to your paint prep of the Gade build…

                                        I've learnt some cracking things on here last day or so….

                                        Cheers

                                        Garry

                                        Edited By Garry_C on 16/09/2015 17:43:02

                                        Edited By Garry_C on 16/09/2015 17:44:11

                                        #207293
                                        GarryC
                                        Participant
                                          @garryc

                                          I'm back I'm afraid – I see there have been some changes and i now seem to have my thread in the wrong place, I don't know how to move it and don't really want to split it again so I'll just let it die if its a problem – no worries my fault for taking so long over getting it done..!

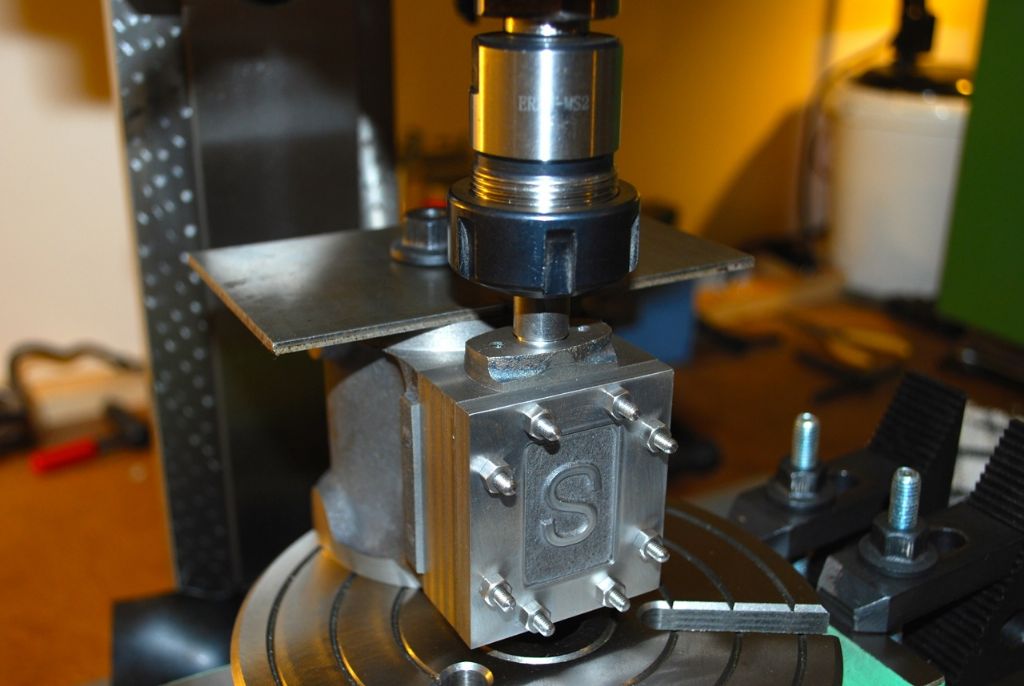
                                          I decided to have a go at milling the Steam Chest Gland and Boss as one. Not made a very good job of it so far as I haven't cut down low enough I think, but its looking better than it was and I have to remember its a first attempt…

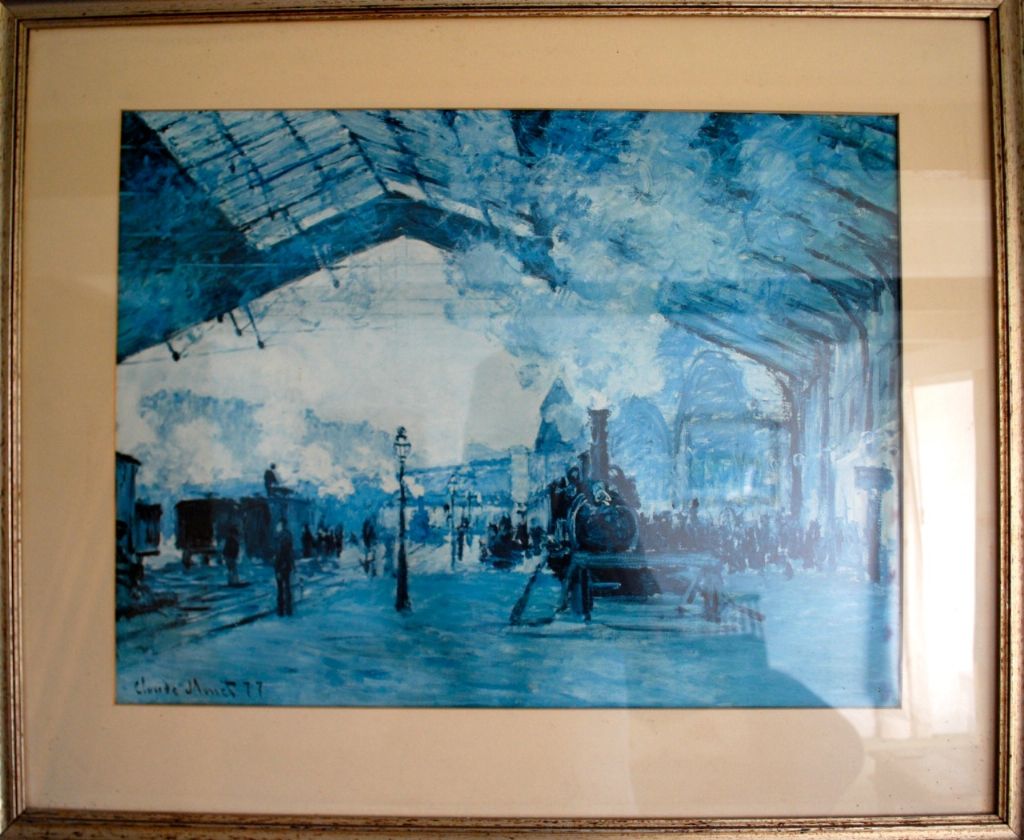
                                          Couldn't resist putting up this pic of the photo that greeted us over the main fireplace of the Cornish Cottage we stayed in, felt right at home…

                                          444. bak after hols.jpg

                                          Setting up to Mill the gland..

                                          445. milling the steam chest gland 1. .jpg

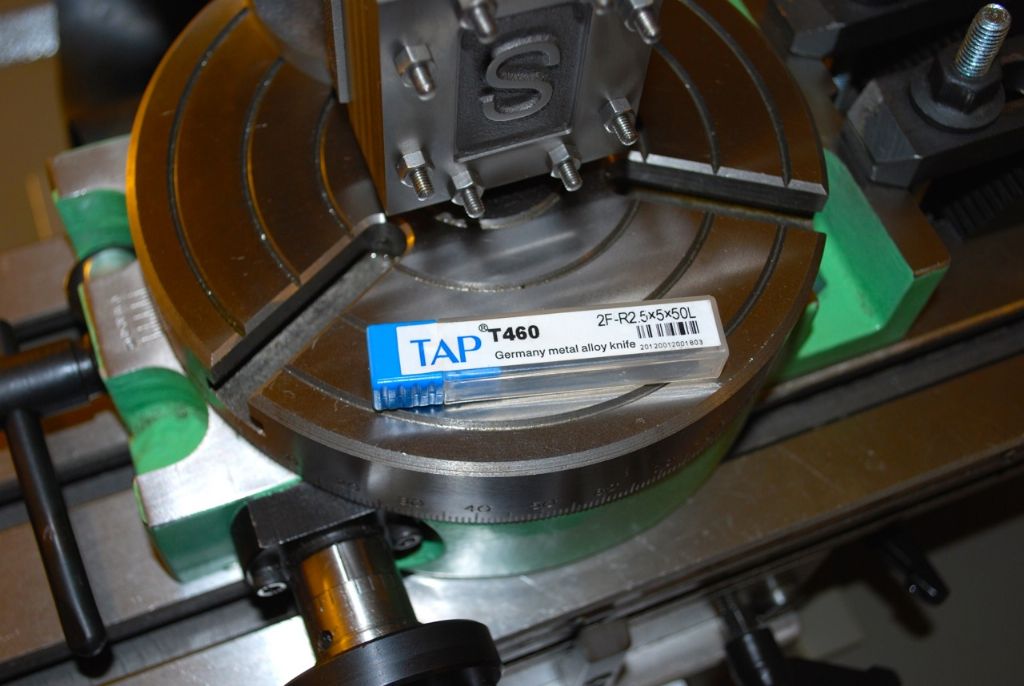
                                          The new Milling Cutter.

                                          445. milling the steam chest gland 2. .jpg

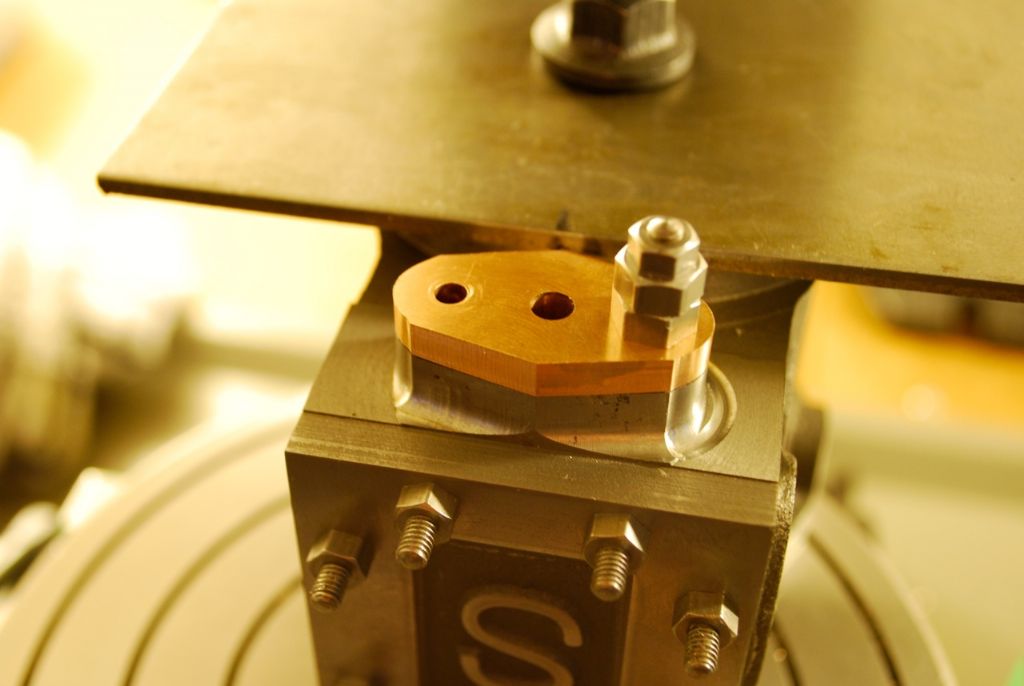
                                          Progress so far.. I haven't touched the rounded ends yet.. (the step looks a lot worse in the photo than the real thing..)

                                          445. milling the steam chest gland 3. .jpg

                                          Cheers

                                          Garry

                                          #207297
                                          JasonB
                                          Moderator
                                            @jasonb

                                            Thread is still in the same (right) place, good to see you are back at it.

                                            J

                                            #207299
                                            Mike Bondarczuk
                                            Participant
                                              @mikebondarczuk27171

                                              Great to see you back on with the project. Like your progress and approach.

                                              Mike

                                              #207305
                                              GarryC
                                              Participant
                                                @garryc

                                                Ok, thats good to hear I must have misread that, thanks Jason – and cheers Mike.

                                                #207378
                                                GarryC
                                                Participant
                                                  @garryc

                                                  Have to put today's session down to experience gained – in finishing off milling the gland, and I think it was very good experience although I guess looking at the photo's it won't look like it..

                                                  All going reasonably well rounding off the first end but then after changing tools a few times for centring on the RT I used my first 0 setting for the maximum depth on end two which of course was very silly by then… Thankfully its pretty much out of sight on the bottom of the engine, but that's not the point of course..

                                                  446. todays progress 1..jpg

                                                  The overall setup used..

                                                  446. todays progress 2..jpg

                                                  So to get things symmetrical I did the same on the first end – I don't think it will look too bad when it is painted – trying to convince myself it may even look better….maybe not.! It looks worse in the close up photo but the one above looks a bit more real and a lot less noticeable…

                                                  446. todays progress 3..jpg

                                                  Have to learn somehow.

                                                  I should also say it was great fun doing it and definitely the way to do them in the future – hopefully will get better with them after more practice…

                                                  Cheers

                                                  Garry

                                                  Edited By Garry_C on 11/10/2015 10:18:47

                                                  Edited By Garry_C on 11/10/2015 10:19:36

                                                  #207583
                                                  GarryC
                                                  Participant
                                                    @garryc

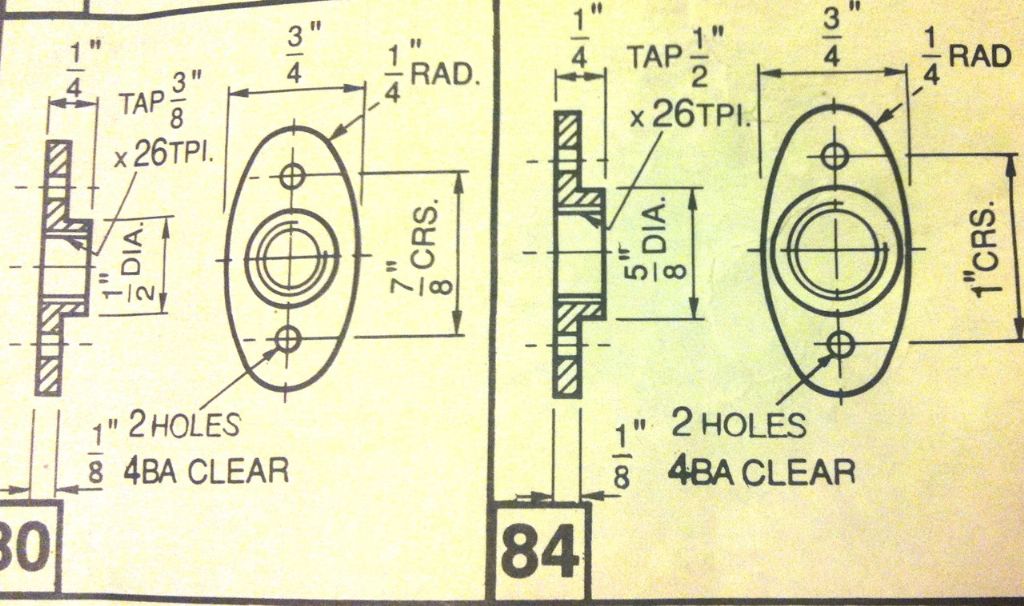
                                                    The Steam Inlet and Exhaust Flanges next, also the fitting hole in the steam Chest for the Displacement Lubricator..

                                                    Inlet on the left and exhaust on the right in the drawings below.

                                                    447. the inlet and exhaust flange drawings.jpg

                                                    Just writing thread data here to refer to as I was getting confused…

                                                    3/8" x 26tpi – BSB Thread (British Standard Brass) – Tapping Size 8.5mm

                                                    1/2" x 26tpi – BSB Thread (British Standard Brass) – Tapping Size 11.5mm

                                                    1/4 x 32 – ME Thread (Model Engineer) – Tapping Size 5.5mm (Displacement Lubricator)

                                                    Cheers

                                                    Garry

                                                    Edited By Garry_C on 13/10/2015 05:02:10

                                                    #207584
                                                    JasonB
                                                    Moderator
                                                      @jasonb

                                                      Garry if you don't have the taps already and are mostly going to be running on air you might want to make the inlet 1/8" BSP and the outlet 1/4" BSP. Both just a fraction larger OD but easier to hook the compressor upto.

                                                    Viewing 25 posts - 451 through 475 (of 602 total)
                                                    • Please log in to reply to this topic. Registering is free and easy using the links on the menu at the top of this page.

                                                    Advert

                                                    Latest Replies

                                                    Viewing 25 topics - 1 through 25 (of 25 total)
                                                    Viewing 25 topics - 1 through 25 (of 25 total)

                                                    View full reply list.

                                                    Advert

                                                    Newsletter Sign-up