Mini Iron and Bronze Furnace
Mini Iron and Bronze Furnace
Home › Forums › Related Hobbies including Vehicle Restoration › Mini Iron and Bronze Furnace
- This topic has 42 replies, 10 voices, and was last updated 22 March 2023 at 14:03 by
 Ady1.
Ady1.
-
AuthorPosts
-
30 June 2022 at 06:58 #603551
 PatJParticipant@patj87806
I built an iron furnace a few years ago, and it will melt up to perhaps an A30 crucible full of gray iron, which is about 60-70 lbs of iron.
I generally operate it with an A10, pouring maybe 25 lbs of iron at a time.I have been looking at making some lead-free bearing bronze, and I don't really want to fire up the big furnace to do that.
I have always wanted a mini iron furnace that would be easier to use for small pours of bronze and iron, and after pondering over exactly what size I should build for years, I have finally started building a mini furnace.
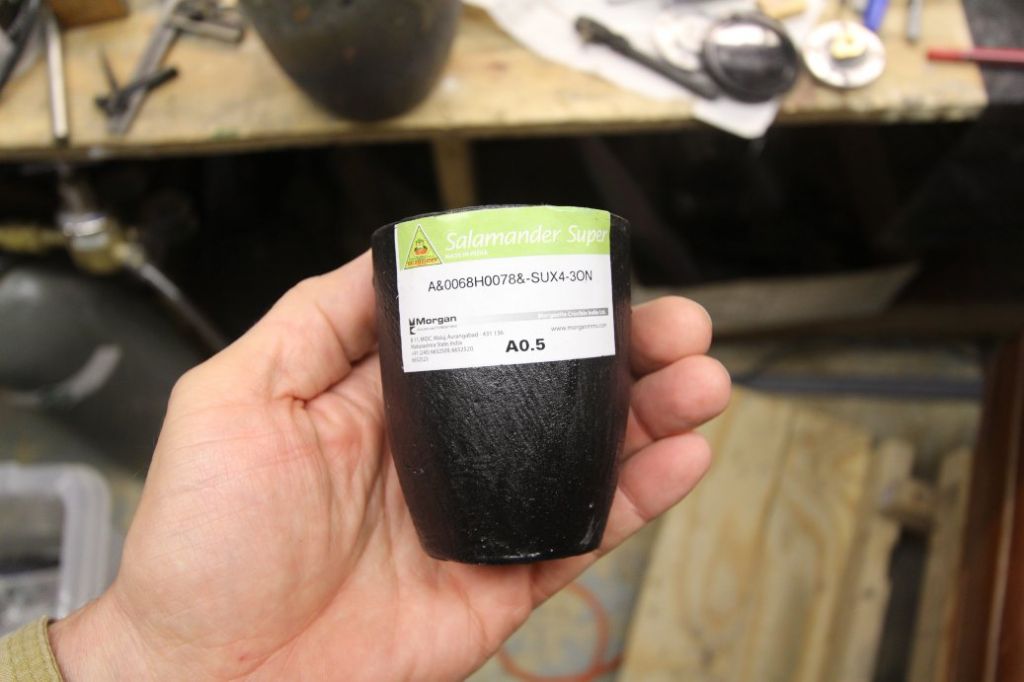
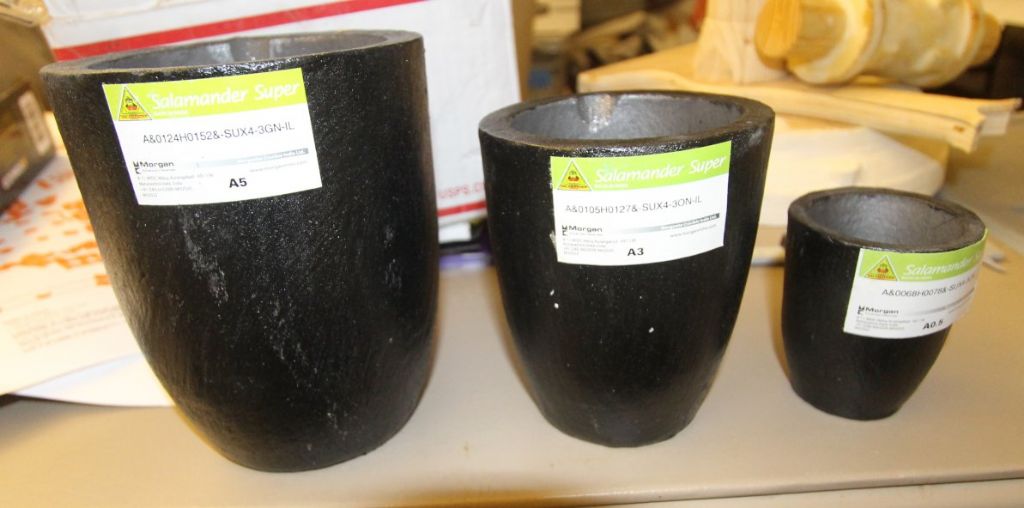
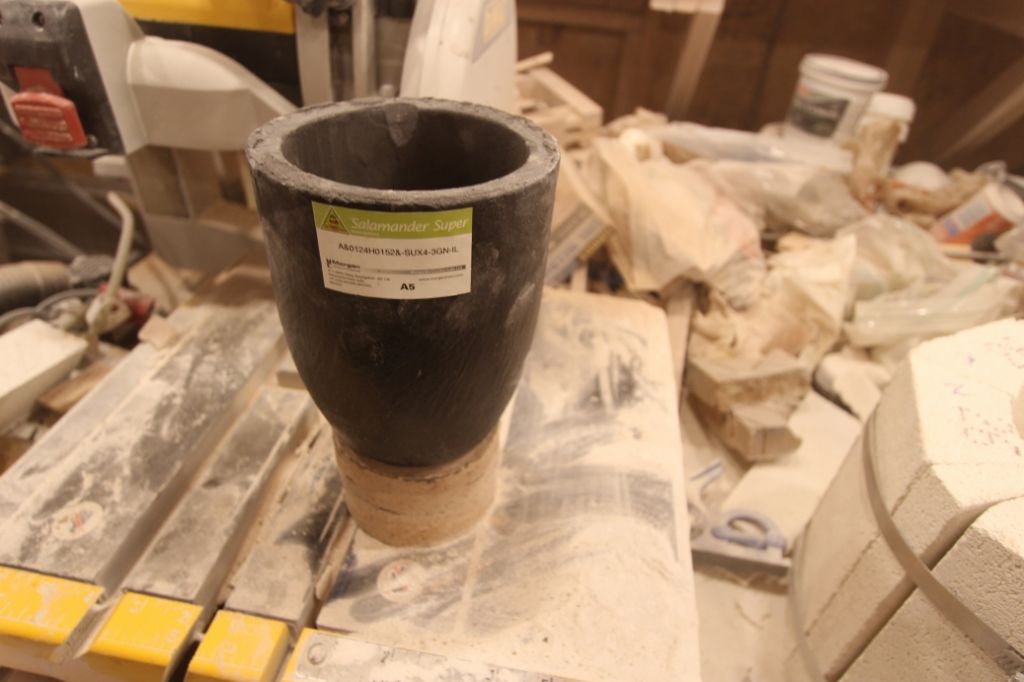
The crucible range of sizes that would work with this furnace would be between an A0.5 at the smallest, and a somewhat tight fitting A5.
I use Morgan Salamander-Super clay graphite crucibles, and they come in all sizes.
I think an A4 will be an ideal size for this furnace.
Edited By PatJ on 30/06/2022 07:03:21
30 June 2022 at 06:58 #34521 PatJParticipant@patj8780630 June 2022 at 07:04 #603553
 PatJParticipant@patj87806
The bearing bronze I am trying to make is:
Lead-Free Bearing Bronze C89835, Bismust Tin Bronze
(Copper=87%, Zinc=3%, Tin=6.7%, Bismuth=2.2%, Antimony=0.35%, Iron=0.2%, Lead=0.09%, Nickel=1%, Phosphorus=0.1%, Silicon=0.005%, Sulfur=0.08%)The intent is to use this material for things like rod ends on steam engines, and other wearing parts, perhaps such as crossheads, etc.
I have some scrap copper, and luckily I don't need very much of the other metals.
Metal prices are rather high these days, along with everything else.In order to keep material costs as low as possible, I am trying to build this entire furnace using the materials I have on hand in the shop.
I am having to get creative with the hot face, which needs to withstand iron temperatures which will be continuous 2,900 F rated.
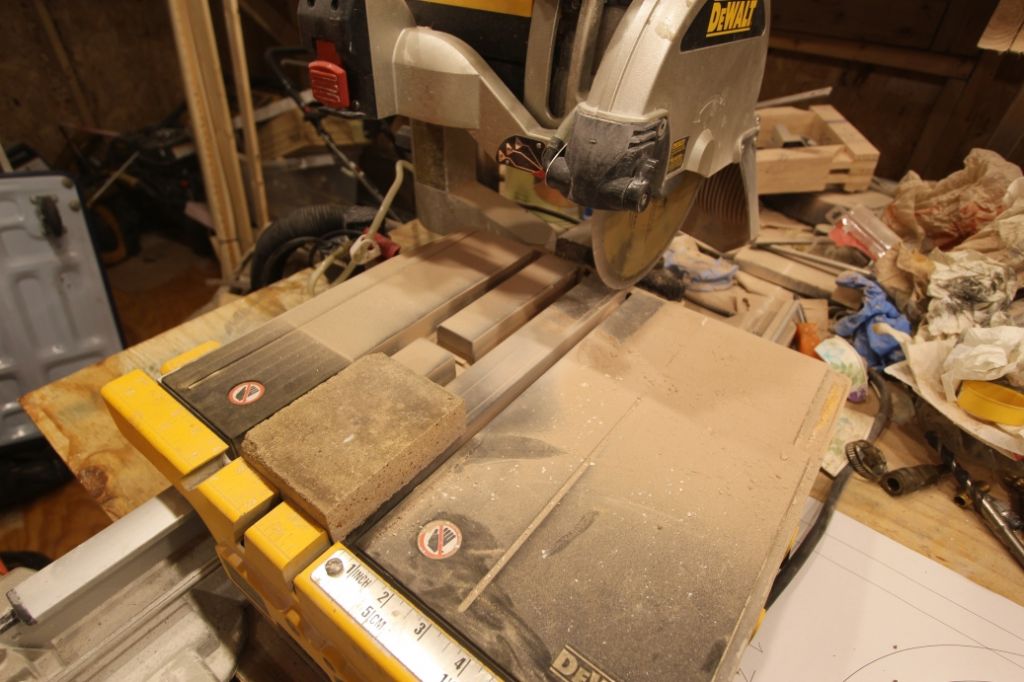
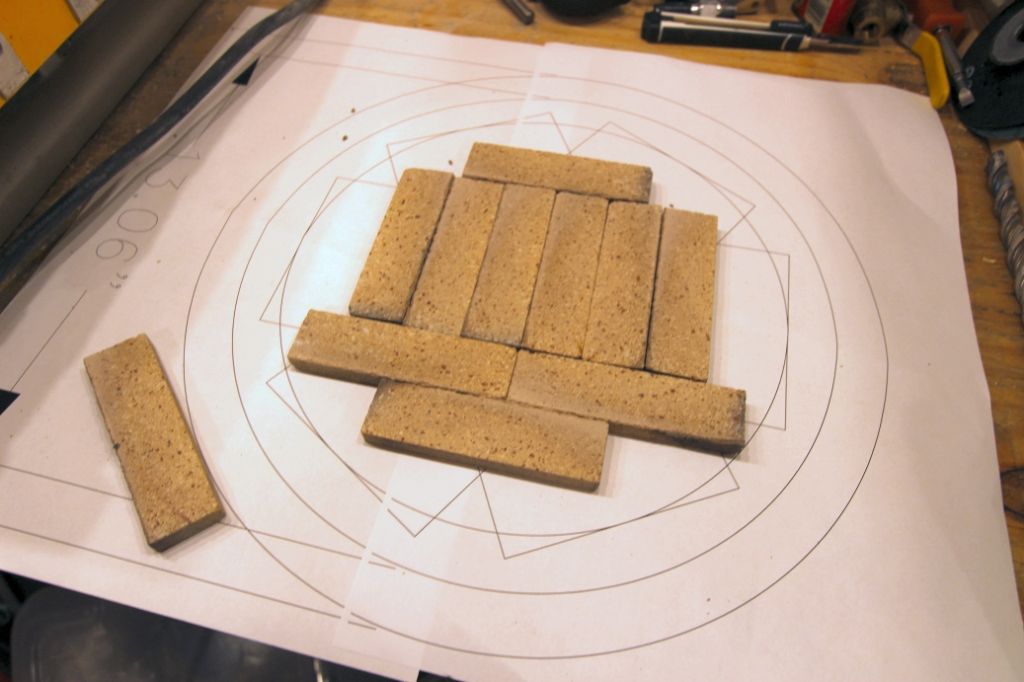
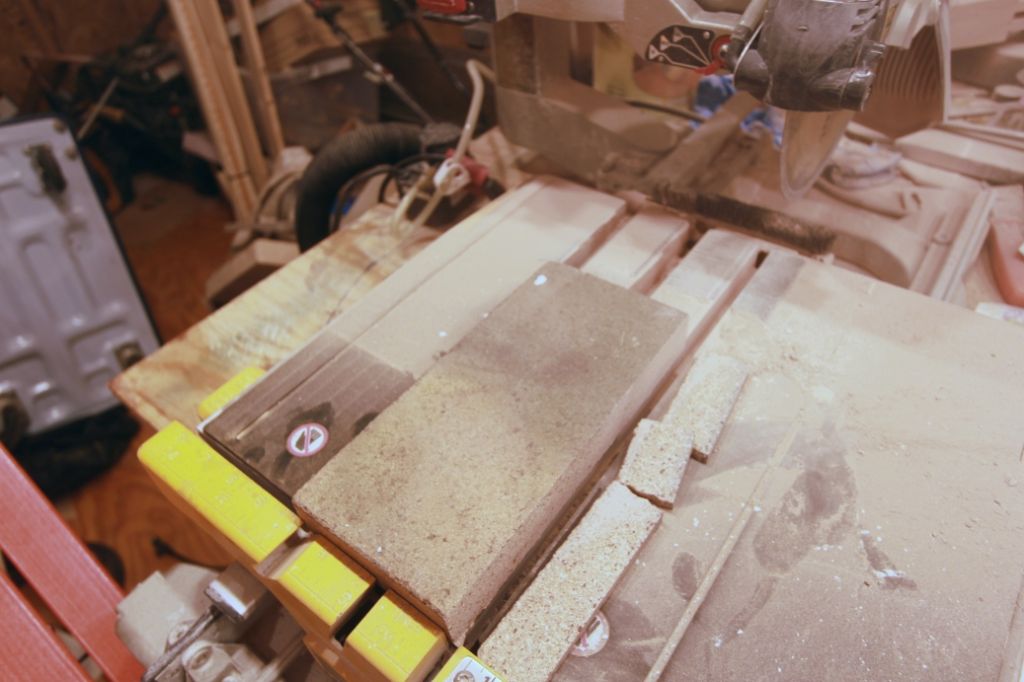
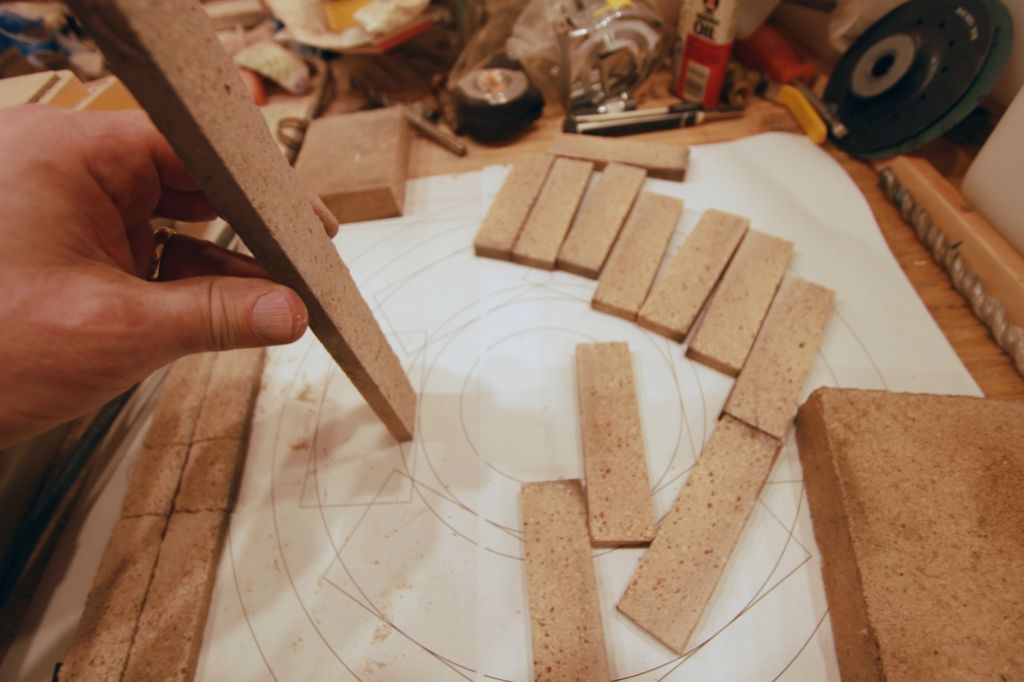
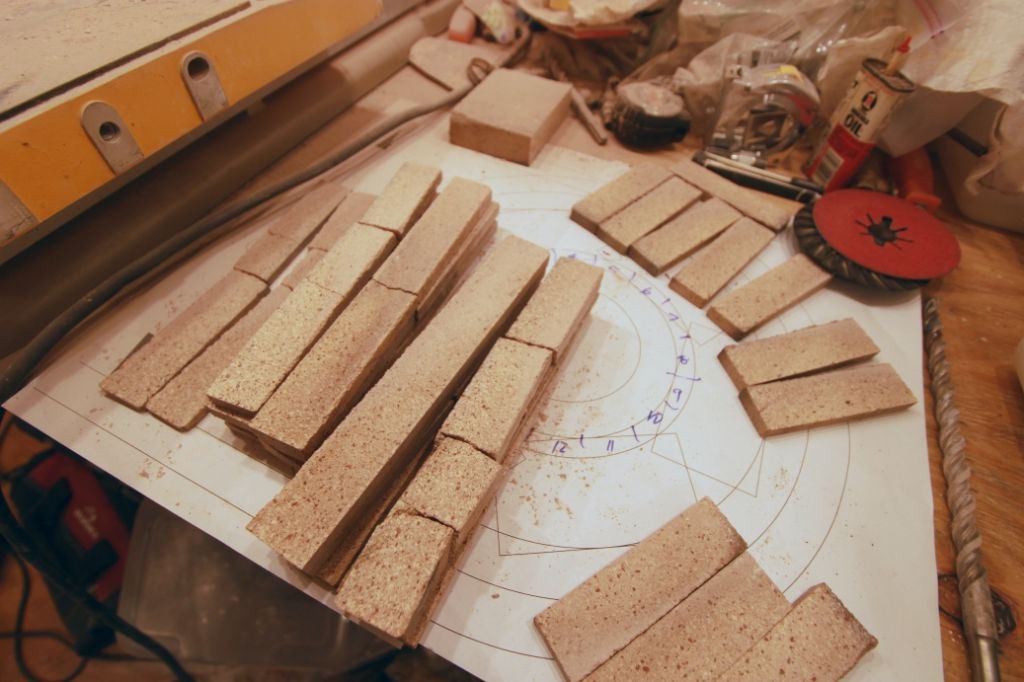
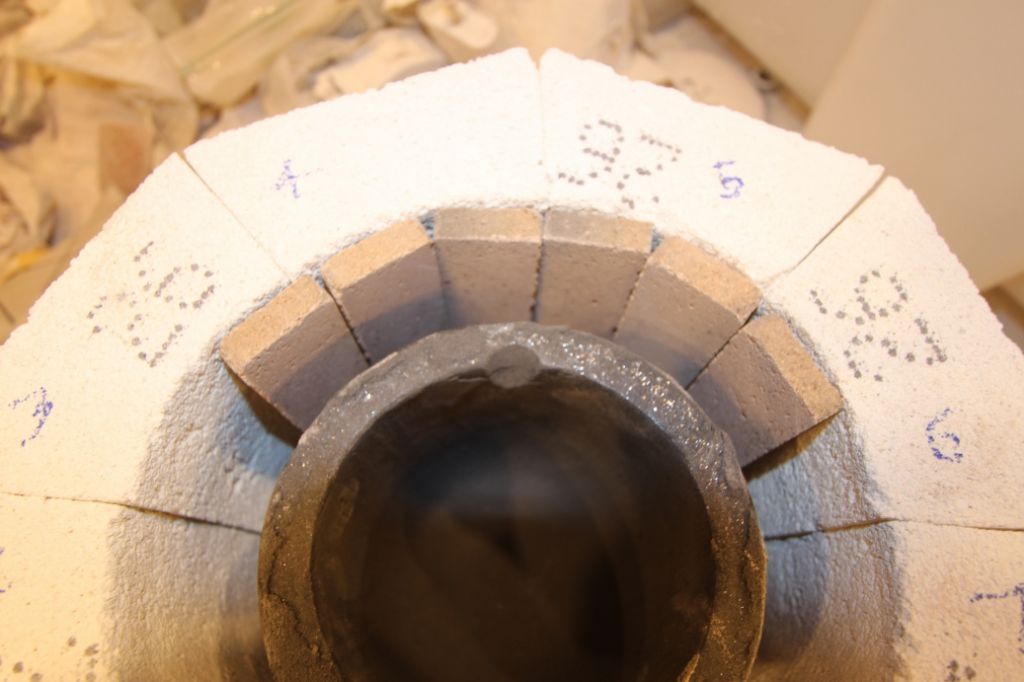
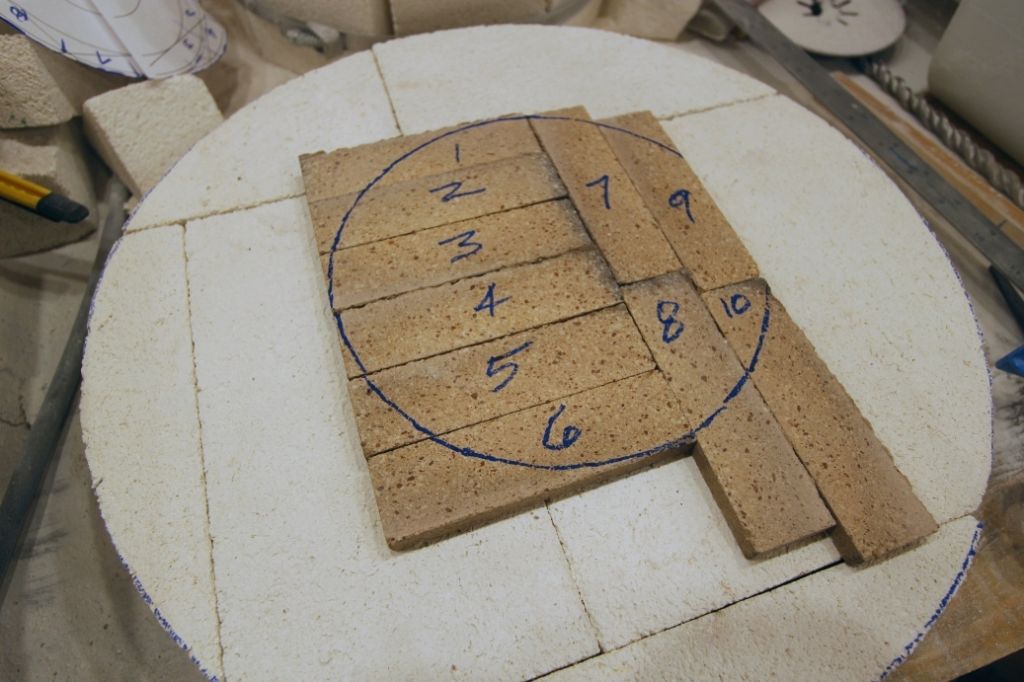
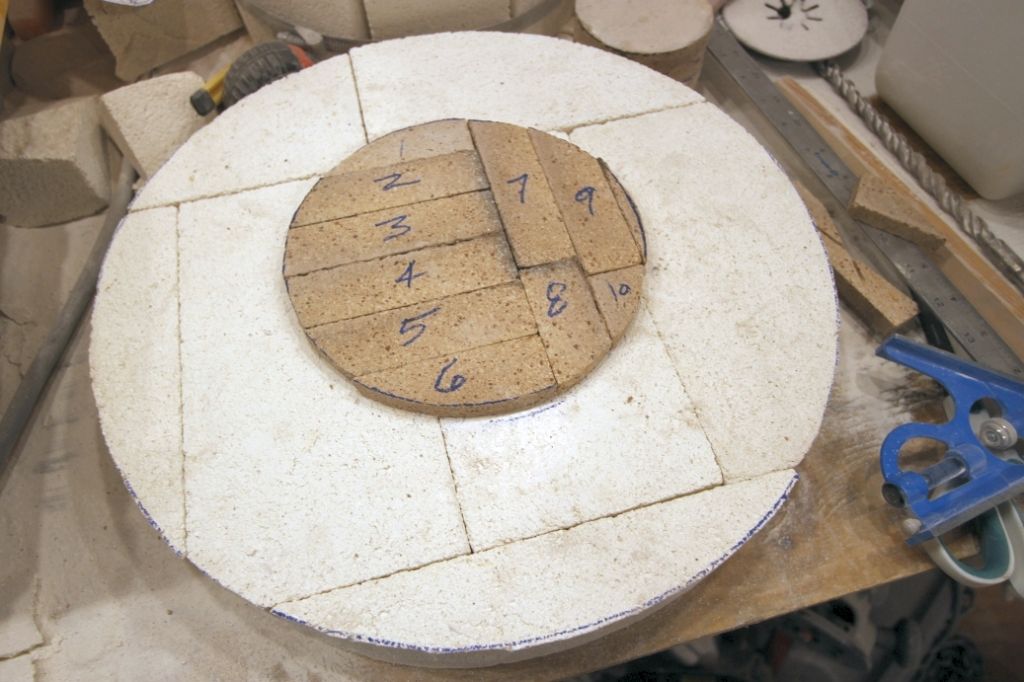
I have some hard fire bricks, which stand up to iron temperatures quite well, and so I am cutting up strips for a hot face veneer.
I have a wet saw, and the cutting went pretty well (using a commercial-grade respirator).A few of the strips broke into two or three pieces, but I have some plastic refractory that is rated 3,800 F, that is good about gluing hot faces together.
If I had enough plastic refractory (which I don't), I would make the entire 3/8" thick hot face using that material.I added tile flooring to several rooms in a relative's house a few years ago, and so I have gotten good with a tile saw.
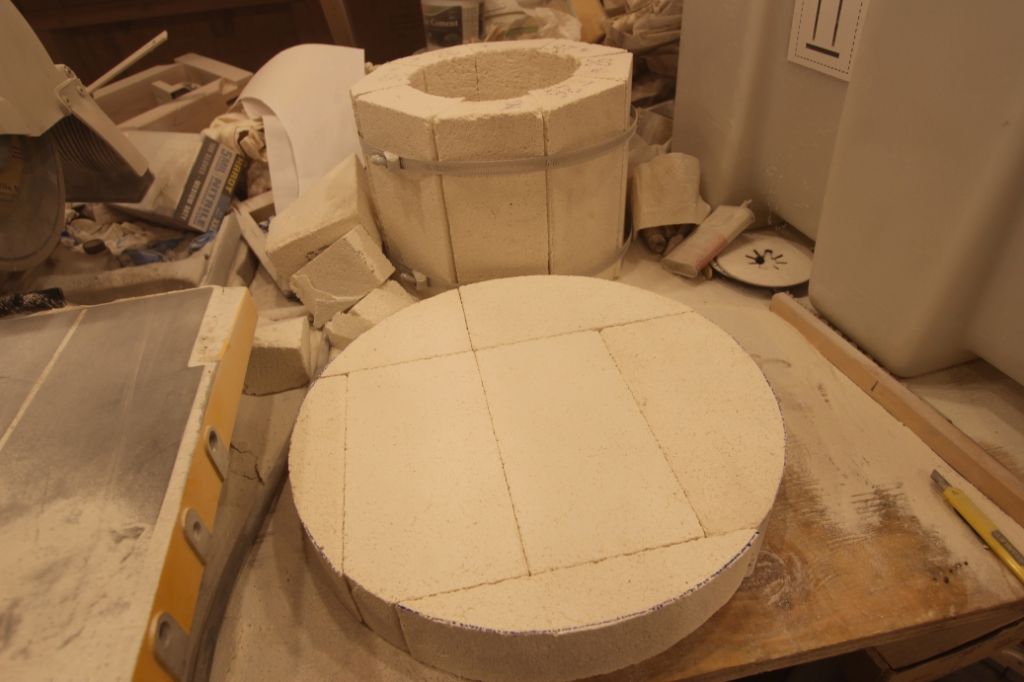
The lighter color bricks are insulating fire bricks rated at 2,600 F.
The insulating bricks will not stand up to iron temperatures, at least not the 2,600 F rated ones, but the hot face will protect them.
The insulating fire bricks are soft and easy to cut with a hand saw.The hard fire bricks have to be cut with a wet masonry saw.
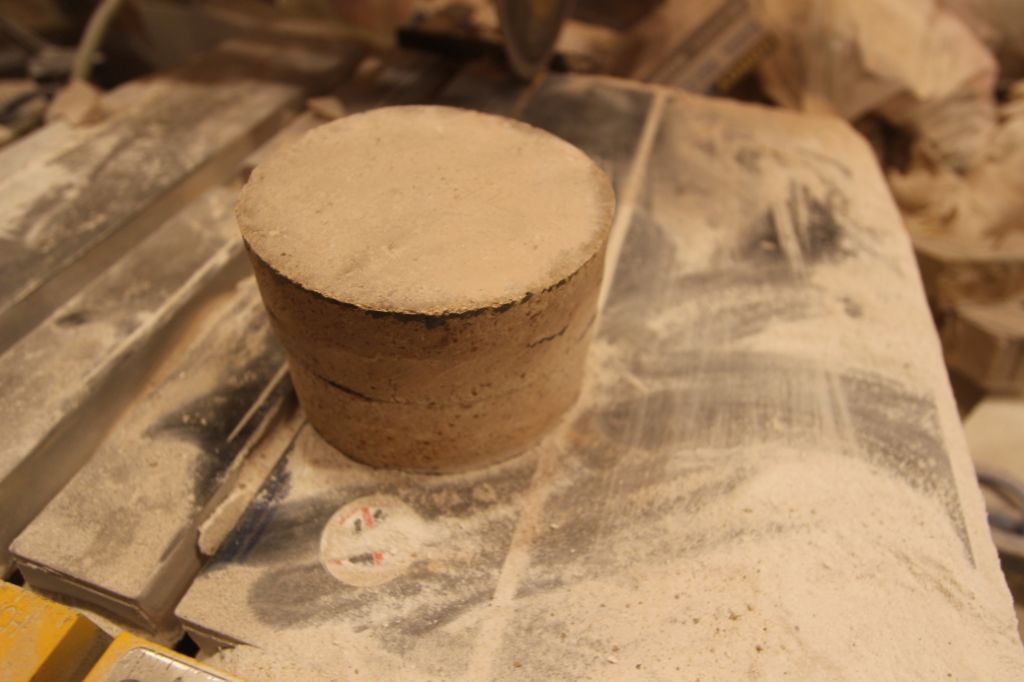
The plinth (the platform that the crucible sits on) is made from two pieces of 1" thick hard fire brick.
Edited By PatJ on 30/06/2022 07:07:28
30 June 2022 at 07:11 #603556 PatJParticipant@patj87806
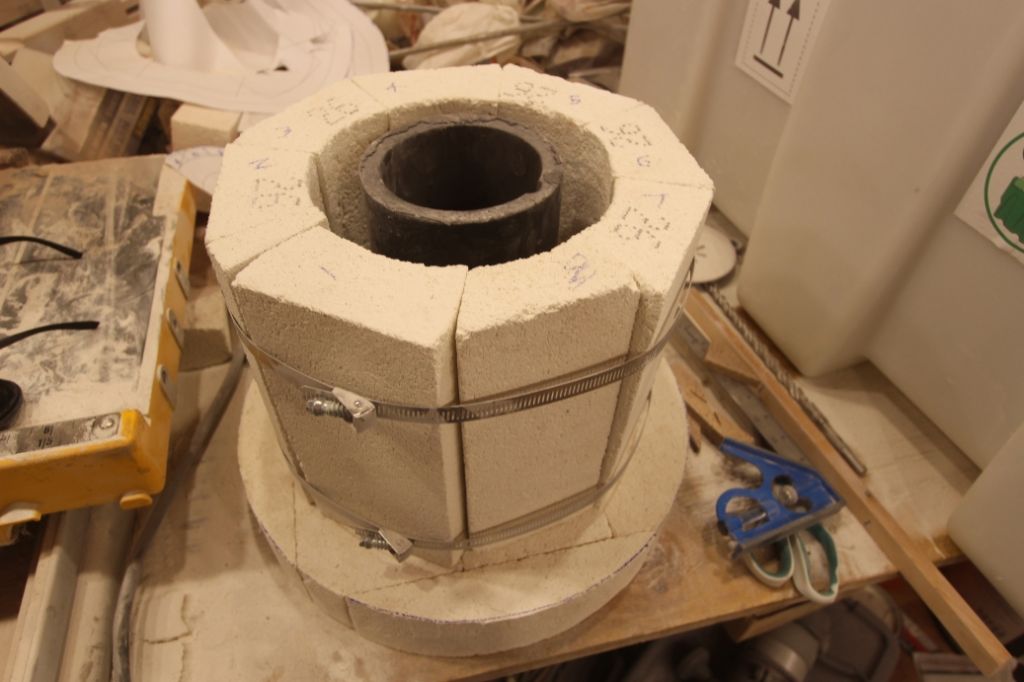
The hot face veneer is 3/8" thick, and it is not shown in this photo.
I think an A4 will be the ideal crucible size for this furnace, which will hold perhaps 8-10 lbs of bronze.
I will wrap two layers of 1" ceramic blanket around this furnace, so that the exterior will operate cool to the touch.
The outer shell will be an old hot water heater steel tank that I will cut up and salvage.
The intent of the insulating fire bricks is to provide a rigid support behind the 3/8" thick hot face veneer.
Some folks use coated ceramic blanket, but I wanted a more robust furnace that cannot be damaged easily.
This is not my finest brick bevel cutting job, but when you see an iron furnace after a few years, you realize there is not much to be gained by making a perfect furnace.
The main goals of this furnace build is to keep the mass relatively low, have a very durable iron-temperature-rated hot face, and have a very long lasting furnace when operated at iron temperatures.
30 June 2022 at 07:13 #603558 PatJParticipant@patj87806
I considered making a mini-oil burner for this furnace, but there is really nothing to be gained from using a small oil burner.
I am going to add an adapter on the end of my existing diesel-fired oil burner, so I can use the burner I have already constructed.
I use a Delavan siphon nozzle, and they will operate over a wide range of fuel flow settings.
I still have to cut the tuyere with a hole saw.
I have all of the materials to make bearing bronze, including tin, antimony, bisuth, sulphur, copper, nickel, iron, etc., and so I am excited about trying this litle furnace out.
Judging from the success of my larger furnace, which was built using the same materials and techniques as this furnace, I fully expect good results.
I have gone lead-free with almost all of the materials in my shop, and so this bronze will also be lead-free.
There is just a trace of zinc in this alloy, and so there should not be any problems with the zinc burning off during the melt, and causing the zinc-fume problems (don't breathe zinc fumes if you melt brass).
.
Edited By PatJ on 30/06/2022 07:20:52
30 June 2022 at 07:16 #603560Kiwi Bloke
Participant@kiwibloke62605Terrific posts! Keep 'em coming!
30 June 2022 at 07:25 #603562 PatJParticipant@patj87806
Thanks much for the kind words.
I will make some mini lifting tongs and pouring shank.
Gererally I make the tongs and shank to fit the largest crucible size, which in this case will be an A5, and hopefully the same tongs and shank will work with the smaller crucibles, pehaps with slight modification or temporary inserts.
One of my goals it to be able to try alloying things like bronze in small batches, so that I don't ruin a large batch of scrap metal if the allow does not turn out correctly.
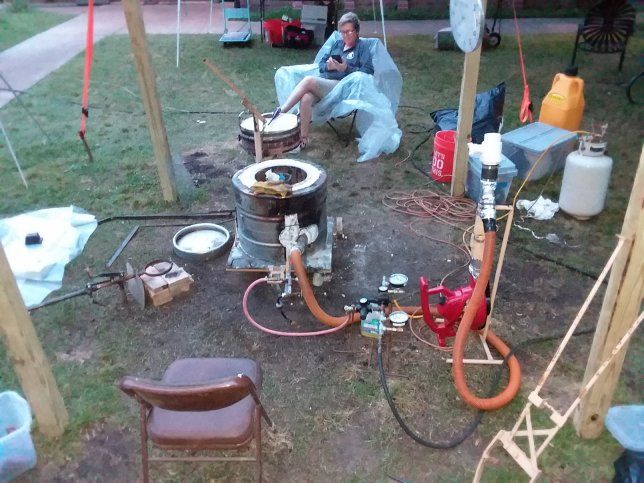
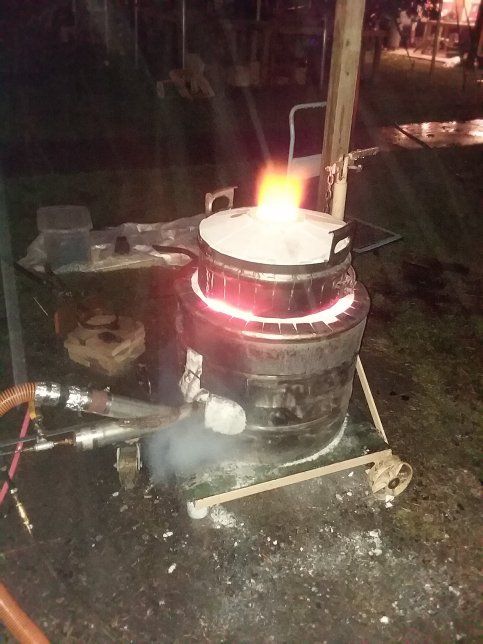
And it will be nice to be able to pour some small parts in any metal (aluminum 356, bronze, or iron) without having to fire up "the Beast".
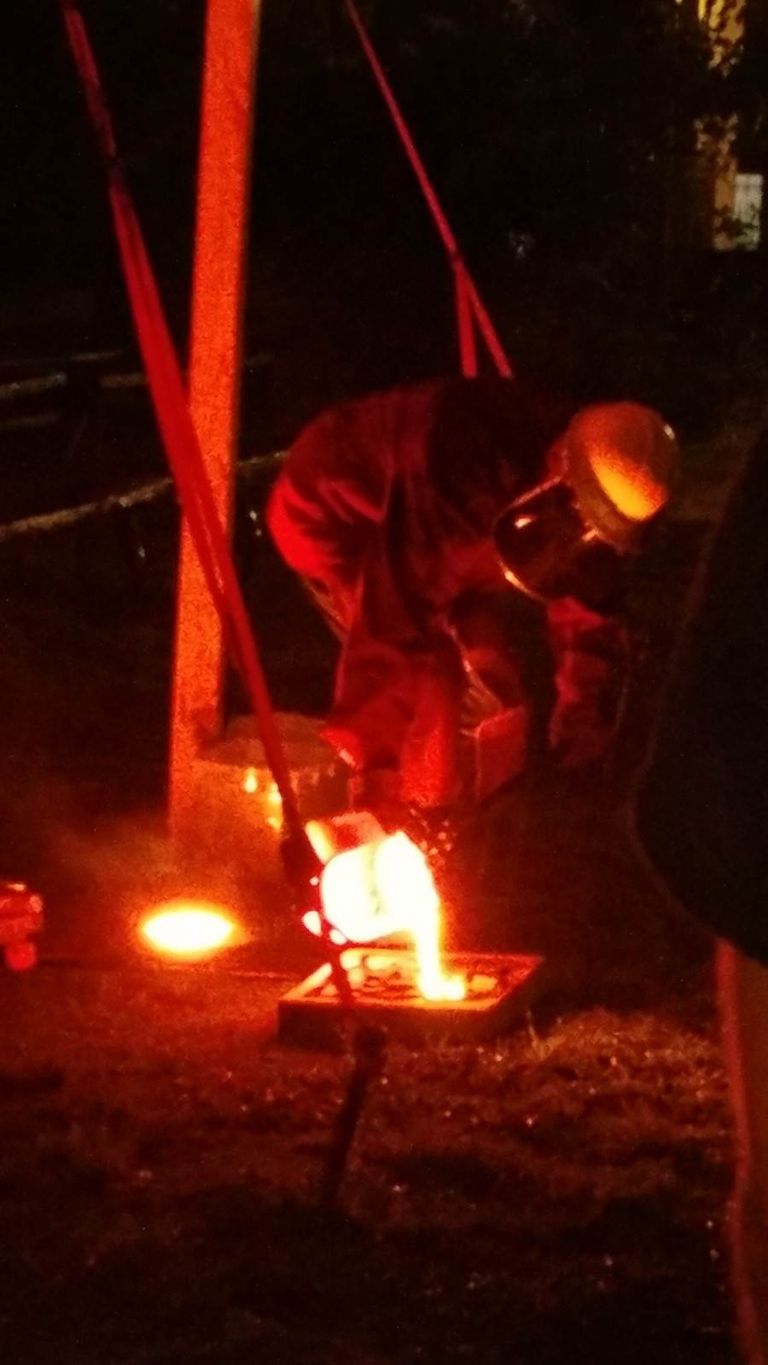
A photo of "the Beast" is shown below.
I am hoping that the radiant heat from the mini-furnace will be proportionally smaller than my larger iron furnace.
Edited By PatJ on 30/06/2022 07:31:35
30 June 2022 at 10:39 #603591 Russell EberhardtParticipant@russelleberhardt48058
Wow!
30 June 2022 at 10:52 #603594 Simon CollierParticipant@simoncollier74340
Great posts. I love the idea of a home foundry.
30 June 2022 at 11:05 #603599noel shelley
Participant@noelshelley55608Very Good,! with such a small gap between furnace wall and crucible lifting out may be difficult. A4 and A5 will be big enough for most small jobs.Be cautious of using lift out tongs for multi sizes, and the pouring shank needs to be exactly right for the crucible in use. I made a double ended ring shank, the end not in usr being the handle. For non ferrous I would favour propane – but with fuel cost rising I may have to reconsider that. Many people seem to judge temperature by eye, iron not so critical but for non ferrous I would counsel it is vital. To that end an inconel sheathed 3mmdia, K type thermocouple is good, without a protective covering it will read fast – OK it will eventually burn out but the speed of reading is more important. A handheld read out is not costly and rules out one of the reasons for failure – wrong temperature.! For small experimental non ferrous melts a rather smaller furnace and an A3 crucible, gas fired is quick and easy. Using the soft K23 material and ceramic fibre a very light and easily handled unit can be built. I made one using a largeish sievert burner that would run melts of brass in a matter of 10 or 15 minutes. Are you in the UK ? Good Luck Noel.
PS the man to speak to on homemade alloys is Luker- he's here somewhere ! N
Edited By noel shelley on 30/06/2022 11:15:15
30 June 2022 at 11:25 #603600 Ady1Participant@ady1
wow, very impressive
Not your usual back garden activity
30 June 2022 at 13:14 #603616Luker
Participant@lukerPosted by noel shelley on 30/06/2022 11:05:22:PS the man to speak to on homemade alloys is Luker- he's here somewhere ! N
Edited By noel shelley on 30/06/2022 11:15:15
I’m here, enjoying these foundry threads! Fred and Pat are doing some great things!
I've had to make my own alloys out of necessity, mostly bearing alloys without tin and a wide range of cast irons for various applications.
Looking forward to seeing the results!
1 July 2022 at 14:13 #603782 PatJParticipant@patj87806
Very Good,! with such a small gap between furnace wall and crucible lifting out may be difficult. A4 and A5 will be big enough for most small jobs.
I will probably use an A4 for most melts in this furnace.
The maximum total weight that I would melt in an A4 will probably be 12 lbs, and so it won't take much in the way of lifting tongs. The A5 is a bit tight for iron, but I think would work well for aluminum.
A buddy of mine recently built a furnace, with very little clearance at all around an A10, and it works perfectly with iron, so I think it takes less room than most people think. The hot fire brick walls are very durable, and so no chance damaging them with lifting tongs.
The A30 for my large furnace requires some very hefty tongs indeed, and I have a pouring cart and lifting crane for that. An A30 could hold up to perhaps 80 lbs of iron, so is in a different league as an A4.
Be cautious of using lift out tongs for multi sizes, and the pouring shank needs to be exactly right for the crucible in use. I made a double ended ring shank, the end not in use being the handle.
I have been able to use one set of tongs for more than one crucible size, as long as the tongs fit into the furnace. I have a mechanical stop that I can adjust, and I can adjust the tabs that contact the lower 1/3 of the crucible too, so it can be done, but one has to do it with caution.
For non ferrous I would favour propane – but with fuel cost rising I may have to reconsider that.
I started with propane, and it is quick and easy to use, but with iron melts, the tank tends to lose vapor pressure due to the cooling effect. One problem with propane is that there are just a few places that exchange tanks for a refill, and often the folks working in their work at glacier speed. Diesel is available at almost any gas station, generally 24/7, and cold weather has no effect on my diesel burner down to perhaps 32F. A Delavan siphon nozzle burns very cleanly with diesel, with no smoke, and is extremely controllable, so that is what I use, even for aluminum. If I only melted aluminum, I would use propane only.
Many people seem to judge temperature by eye, iron not so critical but for non ferrous I would counsel it is vital. To that end an inconel sheathed 3mmdia, K type thermocouple is good, without a protective covering it will read fast – OK it will eventually burn out but the speed of reading is more important. A handheld read out is not costly and rules out one of the reasons for failure – wrong temperature.!
I have a MIFCO digital pyrometer, and it works well for aluminum. I think it would work at bronze temperatures too. For iron temperatures, the pyrometers get very expensive, and the tips only last a few melts, so I just judge by eye my iron temps. Iron will start to send out sparks when it reaches pour temperature, which from what I am told is in the 2,400-2,500 F range (from someone who measures his with an iron pyrometer).
For small experimental non ferrous melts a rather smaller furnace and an A3 crucible, gas fired is quick and easy. Using the soft K23 material and ceramic fibre a very light and easily handled unit can be built. I made one using a largeish sievert burner that would run melts of brass in a matter of 10 or 15 minutes.
A buddy of mine recently built a ceramic blanket iron furance, with a high temperature coating, and it works well for iron. I prefer a more robust rigid hot face, which will withstand a lot of long-term iron abuse with only minor patching. For a small amount of money, the coated ceramic blanket is the way to go. For long term iron use, I recommend a high temperature thin hot face such as Mizzou, or 3,800 F plastic refractory.
Are you in the UK ?
I am in the UK-Extended, which is the US (LOL). We are a distant suburb of the UK.
Good Luck Noel.
Thanks much for the thoughtful feedback. I appreciate it.
PS the man to speak to on homemade alloys is Luker- he's here somewhere !
I am going to look up Lurker. I am sure I must have seen some of his work.
Edited By PatJ on 01/07/2022 14:14:51
1 July 2022 at 14:27 #603786 PatJParticipant@patj87806Posted by Ady1 on 30/06/2022 11:25:00:
wow, very impressive
Not your usual back garden activity
Thanks much for the kind words.
I do use commercial-grade materials, and so I can get commercial grade iron castings.
When I first considered casting iron in the backyard, I was told my many/most that making quality iron castings in the backyard was not possible. I was assured that my castings would have all sorts of defects, gas holes, inclusions, hard spots, etc.
It took me about 6 years to figure out the exact process that has to be used for iron, including a good sand, the right gating layout, pouring techniqes, how to handle the slag, how much 75% ferrosilicon to add, how to handle the radiant heat, and how to coat the molds with ceramic mold coat for a superb surface finish.
I follow John Campbell's 10 rules for good castings, and a few of Bob Puhakka's rules too (which are derived mainly from John's rules).
I can repeately make defect-free gray iron castings that don't need any heat treating or tempering in order to be easy to machine. One secret to avoid gray iron hardness it to leave the casting in the mold for 24 hours, and let it cool as slowly as possible. Iron should never be removed quickly from a mold after casting.
I have busted a lot of myths along the road to learning how to cast iron, and I can definitely say that many iron castings I see these days are junk-grade. There is no excuse for making defective iron castings, when you can just make them correctly. I have tried to spread the work, and get others involved in the iron casting process for model engines.
If you know how to cast iron, it is not really much more difficult to cast than aluminum.
One has to use heat shields and such on skimming shanks, and lots of leather protection, since the IR is very high from the hot furnace and crucible surfaces.
Aluminum castings can be made on a relatively casual basis for a minimal amount of money.
To make iron castings, you have to fasten your seatbelt (so to speak), and be extremely religious/consistent about what you do, and how you do it.
Edited By PatJ on 01/07/2022 14:31:38
1 July 2022 at 14:33 #603787 PatJParticipant@patj87806Posted by Luker on 30/06/2022 13:14:26:Posted by noel shelley on 30/06/2022 11:05:22:
PS the man to speak to on homemade alloys is Luker- he's here somewhere ! N
Edited By noel shelley on 30/06/2022 11:15:15
I’m here, enjoying these foundry threads! Fred and Pat are doing some great things!
I've had to make my own alloys out of necessity, mostly bearing alloys without tin and a wide range of cast irons for various applications.
Looking forward to seeing the results!
I will look up your posts.
I am excited to see others doing foundry work.
I don't want hobby casting to be a lost art, and so I am working overtime to document how I make iron castings, and try and preserve and spread that information with anyone who wants to learn the art of iron.
Fred's work is very impressive, and I have really enjoyed following along with that.
.
Edited By PatJ on 01/07/2022 14:34:16
1 July 2022 at 15:13 #603797 PatJParticipant@patj87806
I looked up Luker's posts and casting videos.
Very impressive work from so many repects.
The UK locomotive and stationary engine work is so world class; it is very humbling to see such a level of engine building. Not really something that I see over here.
Here are a few of my thoughts on my backyard casting journey:
I started trying to learn how to cast iron in 2012, and have studied it intensively since then.
I scoured the the internet for information, and found several commercial foundry suppliers who I quizzed about materials.
After several false starts, I settled on a Delavan siphon nozzle burner, pressurized fuel tank, diesel fuel, and a furnace with a thin dense hot face, and low density insulating fire brick as a backer material.
I tried numerous burner types including Ursutz, drip-style, siphon-nozzle, etc.
The Delavan siphon nozzle burner is the Rolls Royce of foundry burners, and with 10 psi on the fuel tank, it operates without the need for adjustment ever. It is highly variable in output across a wide range of fuel flows.
I will share a few observations about your furnace and burner arrangement, with the understanding that everyone has their favorite burner and furnace style/type, and people are often highly resistant to changing their configuration.
.
Edited By PatJ on 01/07/2022 15:15:28
1 July 2022 at 15:38 #603801 PatJParticipant@patj87806
Furnace combustion dynamics:
I learned furnace combustion dynamics through observation, and a buddy of mine who was an expert in commercial oil-fired furnaces, later explained to me what was actually happening inside a furnace.
For any given foundry furnace, there is an interior surface area (floor, walls, and lid surfaces).
That total area (say "X" will completely combust "Y" amount of fuel, using "Z" amount of combustion air.
To reach the maximum temperature achievable in a furnace, you need to mix about 14.7 parts air to 1 part fuel.
I studied multiple white papers on atomizing nozzle dynamics, and the types, sizes, and cone spreads that achieve the hottest and most complete combustion.
A Delavan siphon nozzle uses compressed air to atomize the fuel, and it is not a matter of producing the most fine droplets, but a matter of producing a droplet size that burns the hottest.
You can consider a candle flame, where there are hot parts of the flame, and cool parts.
The objective with droplets is to maximize the hottest surface area of every droplet.
Edited By PatJ on 01/07/2022 15:39:42
Edited By PatJ on 01/07/2022 15:59:16
1 July 2022 at 15:45 #603804 PatJParticipant@patj87806
Drip-style vs Siphon-Nozzle Style Burners:
There is an ardent group of drip-style burner advocates who insist that there is no need for anything other than a drip-style burner. If you are in the drip-style camp, then there is no need to read any further.
I have found drip-style burners to have very poor control, inconsistent regulation, narrow operational range, and often don't burn cleanly during startup or shutdown.
If you like your drip-style burner, more power to you, but there is a much better burner style in my opinion.
I have had several folks demonstrate their drip-style burners to melt cast iron, with perfect results, and all I can say is that if a drip-style burner works for you, and you are happy with how it operates and functions, then there is no need to change burner types.
As will all things foundry, what is important is not that you use my method, or someone else's method, but rather find a method that you like, and a method that works for you.
Backyard casting methods vary widely.
.
Edited By PatJ on 01/07/2022 15:46:39
Edited By PatJ on 01/07/2022 15:59:06
1 July 2022 at 15:54 #603806 PatJParticipant@patj87806
Maximizing the furnace interior temperature:
In order to determine the maximum amount of fuel that you can completely combust inside of your furnace, the following method can be used.
1. Start the burner at some nominal fuel flow value, such as 1.5 gal/hr, and adjust for a consistent burn.
2. Allow the furnace interior to come up to red hot temperatures (interior of the furnace is glowing red hot).
3. Increase the fuel flow until yellow flames (this is for oil-fired furnaces) protrude out the lid opening about 4 inches.
4. Increase the combustion air into the furnace (I use a variable speed Toro leaf blower with an additional PVC dump valve) until the flames at the lid are drawn back into the furnace completely.
5. Increase the fuel flow until yellow flames protrude 4" above the lid opening.
6. Increase the combustion air until the flames are drawn back into the furnace.
At some point, you will increase the fuel flow, and then when you increase the combustion air flow, instead of the flames being drawn back into the furnace, the flames will increase in size above the furnace lid.
Reduce the fuel flow slightly, and your furnace is now completely combusting as much fuel as its hot interior surface will allow.
Any significant changes from this fuel flow and combustion air settting will cause the furnace interior temperature to drop from its maximum obtainable level.
For my large furnace, the optimum fuel flow rate is about 2.6 or 2.7 gal/hr of diesel.
.
Edited By PatJ on 01/07/2022 15:55:12
Edited By PatJ on 01/07/2022 15:58:35
1 July 2022 at 15:58 #603807 PatJParticipant@patj87806
Oxidizing or reducing combustion:
Reducing the fuel amount slightly from its optimal setting will create an oxidizing flame, which means there is a bit of excess oxygen that can react with your metal to create slag.
For melting iron, I increase the fuel flow slightly above the optimum setting, to get about 4" of yellow flame out the furnace lid opening.
This is a reducing flame, and it helps a great deal with minimizing the slag that forms on top of an iron melt.
.
1 July 2022 at 16:10 #603809 PatJParticipant@patj87806
Hot or Cold Burner Tube Operation:
One of the most pervasive myths that I have seen online is the thought that the burner tube must operate at a red hot temperature in order to be efficient, or in order to get good vaporization of the fuel (oil).
I call it the "better mouse trap" myth. If someone creates a burner style, and it works well, then they assume that a burner must operate that way in order to work well.
It is a total falacy, but a persistent and prevalent one.
The truth is that there is no need to ever operate a burner tube at a temperature that is not cool to the touch along almost the entire burner tube length.
I have buner tubes that I made 8 years ago, and they operate cool to the touch, and they show no degredation after multiple iron melts.
Any flame impingement on a burner tube should be avoided.
People yell "Yes, but I saw on YouTube………………..".
If you saw something related to furnace and oil burner operation on YouTube, you should almost without exception avoid that configuration at all cost.
Another common mistake I see is people allow their burner tube to protrude into the inside of the furnace.
This is poor design.
The burner tube should stop in the tuyere (the opening in the side of the furnace for the burner tube), and be at least 1/2" back from the furnace interior.
Some folks bevel the end of there burner tubes. This is not necesary.
A flat end on the burner tube works perfectly.
Some folks use spin vanes inside the end of the burner tube.
I have tried a number of types of spin vanes, and never found them to be of any use, so I don't use them.
Spin vanes are used in commercial heating units because you are combusting into a large open chamber.
For foundry furnaces, the flames are spinning around the furnace interior, and thus you get a good mixing effect without spin vanes.
.
1 July 2022 at 16:16 #603810 PatJParticipant@patj87806
Pressurized Fuel Tank vs Non-Pressurized Fuel Tank:
I often see people elevating their fuel tanks, in order to provide a little fuel pressure for fuel flow.
I use a larger fuel tank, perhaps 10 gallons, and there is no way to lift it in the air.
If an elevated fuel tank falls, you can spill oil everywhere.
If you want a burner that never requires adjustment, use a fuel tank that can be pressurized to perhaps 10 psi (with a 15 psi safety valve), and you will always have an exact fuel flow rate regardless of fuel tank level, etc.
I literally never have to adjust my burner, not during startup, not during operation, and no adjustment from melt to melt. I mean I NEVER touch the needle valve.
If an elevated tank works for you, then that is great.
Again it is about what works for your setup.
I can only describe what works very well for me.
.
Edited By PatJ on 01/07/2022 16:16:50
1 July 2022 at 16:23 #603812 PatJParticipant@patj87806
Coated Ceramic Fiber Furnace vs Castable or Plastic Refractory Hot Face:
I prefer a thin castable or plastic refractory hot face (such as Mizzou) that has an excellent resistance to iron splatter.
For my large furnace, I used a 1" thick hot face, and a 2.5" thick insulating fire brick behind that, and then two layers of 1" ceramic blanket wrapped around the entire thing.
The exterior of my furnace is cool to the touch during an iron pour over much of the surface (but not up towards the lid, which gets a bit warm).
Molten iron gets caught up in the combustion air flow, and so will gradually splatter over the interior of an iron furnace. Not really a problem.
The trend it to build furnaces using ceramic blanket lining, which is coated with a high temperature material.
This is a matter of preference in how you like to build a furnace.
My preference is a thin cast refractory hot face, keeping the overall furnace mass as low as possible (to minimize heating times). A cast refractory hot face is very tough and long lasting (if you use Mizzou), and will take a lot of abuse. A cast refractory hot face can easily be patched with plastic refractory.
.
1 July 2022 at 16:29 #603815 PatJParticipant@patj87806
Aluminum, Bronze or Cast Iron:
Once you get a good furnace and burner built, and get some good shanks and tongs with sheet metal heat sheilds to protect the gloved hands, then I find gray cast iron to be easier to cast than either aluminum or one of the zinc containing brass/bronzes.
Gray iron does not seem to have any gas issues, and I have never had a gas bubble in any iron casting that I have made.
If you overheat aluminum (I pour aluminum at 1,350 F), you will get all sorts of gas defects.
I have heard you can have gas defects in some brass/bronzes too.
I tried brass and Naval Brass castings, and I must say, those were miserable melts, with all sorts of semi-toxic zinc fumes, etc.
The reason I am making lead-free bearing bronze is that it has almost no zinc in it, and so shoud be easier to pour.
Given a choice, I would pour most engine parts in gray iron as a first choice.
Second choice is 356 aluminum.
If I succeed with the lead-free bearing bronze, then I may like that better than aluminum.
.
Edited By PatJ on 01/07/2022 16:30:43
1 July 2022 at 16:52 #603819 PatJParticipant@patj87806
Green Sand, Petrobond, Resin-Bound Sand, Sodium Silicate Bound Sand:
I have tried all of these sand types, and have settled in on a commercial fine-grained foundry sand called OK85 (made in Oklahoma), and a 3-part resin-binder sytem.
Your foundry sand will either make or break your casting quality, and regardless of anything else, such as the quality of your burner or furnace, if your sand is not right, your castings will be low quality with lots of defects.
Sodium silicate bound sand is what I consider a compromize between the somewhat toxic resin material, and green sand.
Greensand is sand mixed with clay, and sometimes a few other additives such as sea coal, etc.
The beauty of resin-bound sand is that it can produce complex and highly accurate commercial-quality gray iron castings repeatedly and consistently, without problems in the castings.
If you spray on an alcohol-based ceramic mold coat onto the interior of a resin-bound mold, your iron castings will come out of the mold bright and clean, with no surface cleanup required, and a superb smooth surface finish.
Sodium silicate molds can be used with iron (so I am told, I have not tried that).
Most harden the sodium silicate with CO2, and many ruin their cores and molds my overgassing with CO2.
You should gas with CO2 for 5 seconds only.
And most try to compensate for a weak over-gassed core by increaing the amount of sodium silicate, which just exacerbates the problem, and creates a concrete-hard core that is almost impossible to remove.
I think 5% sodium silicate is the maximum amount that should be used.
They do make sodium silicate sytems that have a catalyst, and the catalyst hardens the core/mold without the use of CO2.
The beauty of the resin-bound 3-part resin/hardener/catalyst is that the set time of the sand molds can be varied from 5 minutes to 45 minutes or more.
Drawbacks of the bound sand binders are that the sand can not easily be reused, and with resin-binder, you must wear a commercial chemical-rated respirator.
Petrobond works well with aluminum, but it must be conditioned, since it tends to dry out.
I don't use Petrobond just because I don't want to spend time trying to get it conditioned correctly every time I use it.
With green sand, the pattern is rapped, to break it lose from the mold.
With resin-bound sand, you never rap the pattern, and so the result is castings with very tight tolerances, and dimensions that rival lost-wax castings.
Resin-bound sand is a very deluxe type of core and mold material, and is the most accurate and versatilve molding sand method available. Resin bound sand is quick and easy to use, and works well every time.
The lost wax method is very labor and fuel intensive, and very time consuming, and produces gray iron casting quality only slightly above resin-bound sand molds.
There is a lot of interest in lost PLA 3D printed castings in gray iron these days, but I still say resin-bound sand will produce the same quality or better, with infinitely less time and trouble.
The only thing lost wax castings are really useful for is mass production of numberous tree-mounted wax patterns. For mass production, lost wax is hard to beat.
.
-
AuthorPosts
- Please log in to reply to this topic. Registering is free and easy using the links on the menu at the top of this page.
Latest Replies
Home › Forums › Related Hobbies including Vehicle Restoration › Topics
-
- Topic
- Voices
- Posts
- Last Post
-
-
Supply company catalogues
Started by:
nevillet in: Workshop Tools and Tooling
- 2
- 2
-
5 April 2025 at 22:51
Stuart Smith 5
-
Machinery Handbook
1
2
Started by:
Dalboy in: Books
- 30
- 38
-
5 April 2025 at 22:31
Huub
-
Chester DB10LB Lathe – Not starting
Started by:
David Deaville in: General Questions
- 2
- 2
-
5 April 2025 at 22:19
Denis O’Kane
-
Measuring increments on boring head
Started by:
Bill Phinn in: Workshop Techniques
- 15
- 20
-
5 April 2025 at 20:50
 JasonB
-
Elliott Omnimill Quill Clamp
Started by:
dangermouse in: Manual machine tools
- 4
- 5
-
5 April 2025 at 20:27
Paul Kemp
-
Problem getting the right parameters on a VFD
Started by:
Robert Graham in: Electronics in the Workshop
- 6
- 7
-
5 April 2025 at 19:45
 peak4
peak4
-
Flattening brass plates
Started by:
t1krt in: Workshop Techniques
- 4
- 5
-
5 April 2025 at 19:27
t1krt
-
How to wire up 3 phase motor and 3 phase converter?
Started by:
ell81 in: Beginners questions
- 7
- 15
-
5 April 2025 at 18:36
 Robert Atkinson 2
-
Morse Key
Started by:
Steve Withnell in: Work In Progress and completed items
- 3
- 3
-
5 April 2025 at 18:20
Mike Hurley
-
Stripped aluminum threads. Now what?
1
2
Started by:
brucemc777 in: Beginners questions
- 19
- 34
-
5 April 2025 at 17:51
brucemc777
-
My week this week! My workshop videos
1
2
…
11
12
Started by:
Phil Whitley in: The Tea Room
- 14
- 286
-
5 April 2025 at 16:00
Phil Whitley
-
Myford S7 Taistock Adjustment
Started by:
 Harry Wilkes
in: General Questions
- 9
- 12
-
5 April 2025 at 15:17
 Harry Wilkes
-
James Coombes Drawing Error (or mine?)
Started by:
Steve Withnell in: Drawing Errors and Corrections
- 4
- 5
-
5 April 2025 at 10:51
Steve Withnell
-
Flexispeed Meteor 2
Started by:
ferroequinologist in: Manual machine tools
- 11
- 19
-
5 April 2025 at 07:01
ferroequinologist
-
What Did You Do Today 2025
1
2
3
4
Started by:
 JasonB
in: The Tea Room
- 23
- 78
-
4 April 2025 at 20:57
Nigel Graham 2
-
Powered hacksaw – blade lift for the return stroke
Started by:
 Sonic Escape
in: General Questions
- 8
- 17
-
4 April 2025 at 20:00
 Nicholas Farr
-
Damp proofing concrete floors
Started by:
Duff Machinist in: General Questions
- 13
- 13
-
4 April 2025 at 19:57
 Bazyle
-
New member old lathe
Started by:
t1krt in: Introduce Yourself – New members start here!
- 8
- 16
-
4 April 2025 at 19:52
t1krt
-
Tangential tooling
1
2
Started by:
Keith Matheson in: Workshop Tools and Tooling
- 13
- 29
-
4 April 2025 at 18:14
Howard Lewis
-
Which lathes have drawbars in the headstock?
1
2
Started by:
ell81 in: Beginners questions
- 17
- 26
-
4 April 2025 at 18:04
Howard Lewis
-
gear cutting with the shaper
Started by:
jacques maurel in: Workshop Techniques
- 5
- 6
-
4 April 2025 at 15:15
Andrew Tinsley
-
Electric motor vibrations
Started by:
 Sonic Escape
in: General Questions
- 8
- 12
-
4 April 2025 at 07:38
 JasonB
-
Build Your Own Metal Working Shop From Scrap (7 book series)
Started by:
Dr_GMJN in: Books
- 6
- 7
-
4 April 2025 at 06:39
Pete
-
Scraping
Started by:
ryan.carter848 in: Books
- 7
- 10
-
4 April 2025 at 05:11
Pete
-
Ml10
Started by:
keel in: Beginners questions
- 5
- 7
-
3 April 2025 at 23:06
duncan webster 1
-
Supply company catalogues
-
Latest Issue
Newsletter Sign-up
Latest Replies
- Supply company catalogues
- Machinery Handbook
- Chester DB10LB Lathe – Not starting
- Measuring increments on boring head
- Elliott Omnimill Quill Clamp
- Problem getting the right parameters on a VFD
- Flattening brass plates
- How to wire up 3 phase motor and 3 phase converter?
- Morse Key
- Stripped aluminum threads. Now what?


