Years ago I purchased all the items to build a power feed for my small mill. As far as I can remembered, the articles (2) were in Model Engineers Worksop magazines.
However, I cannot now find the magazines.
Does anybody remember the articles.
I have searched on this forum, but cannot find anything relevant.
Peter, there have been many postings here on this topic over the past year or two – some of them mine! My album shows some pics of my version – the electronics might be not what you want but the mechanics might be useful. My own version uses a stepper driving a modified handwheel incorporating a pin clutch. Driven by an Arduino which can also control a rotary axis for dividing. This thread describes another approach.
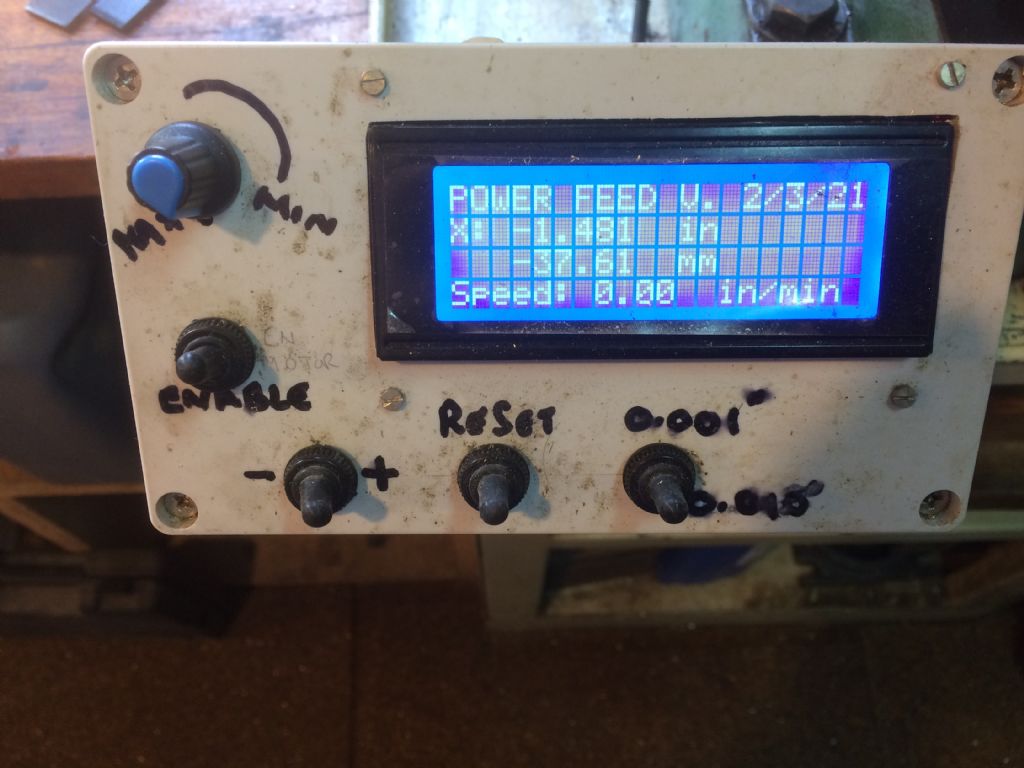
As stated, several projects. I wanted a display to indicate where on the 'X' axis the table was, so I used some ARDUINO code from the net (Saunders & Reig) and ELECTRONOOBS and modified them to my own requirements. [apologies if I have miss quoted authors].
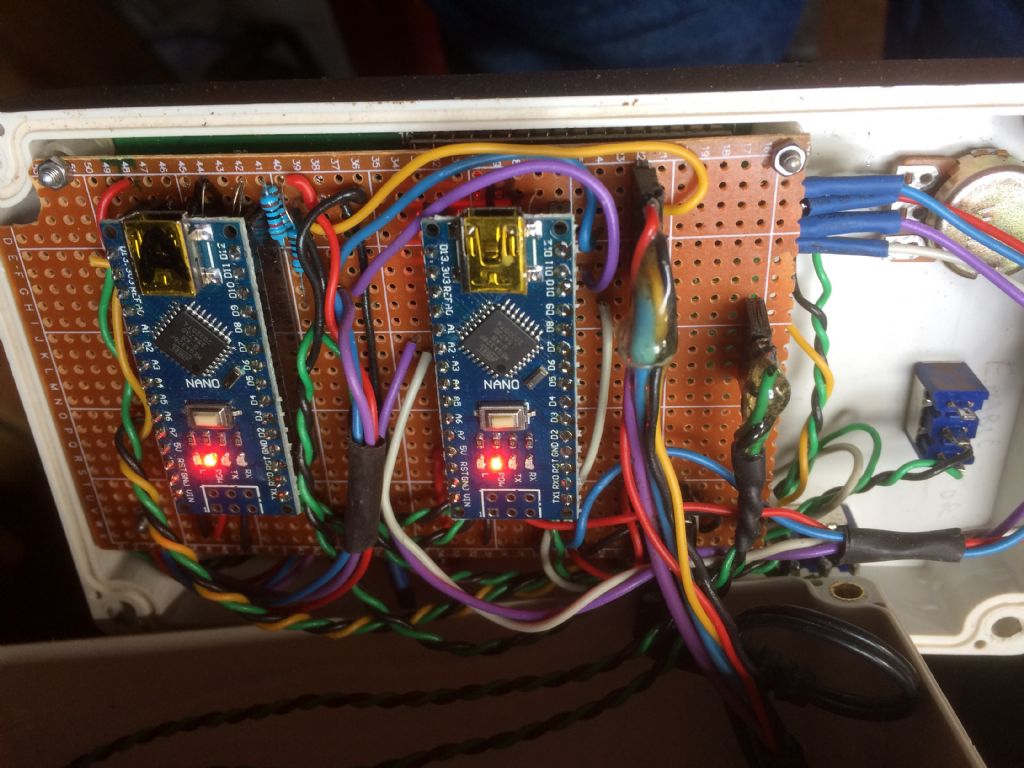
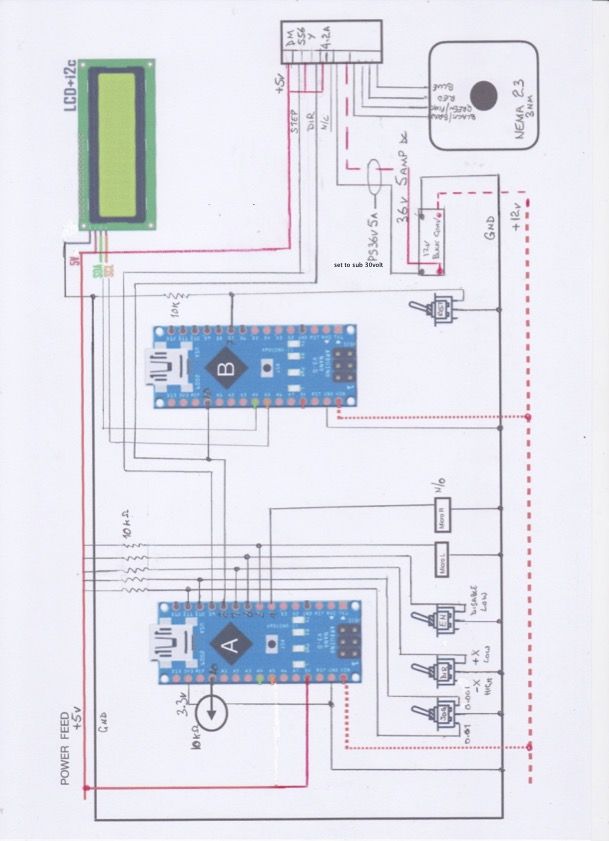
Basically I have a pair of Arduinos, one which controls the stepper motor and the other for the display. The advice I was given was that a single processor didn't have the speed to doo both tasks.
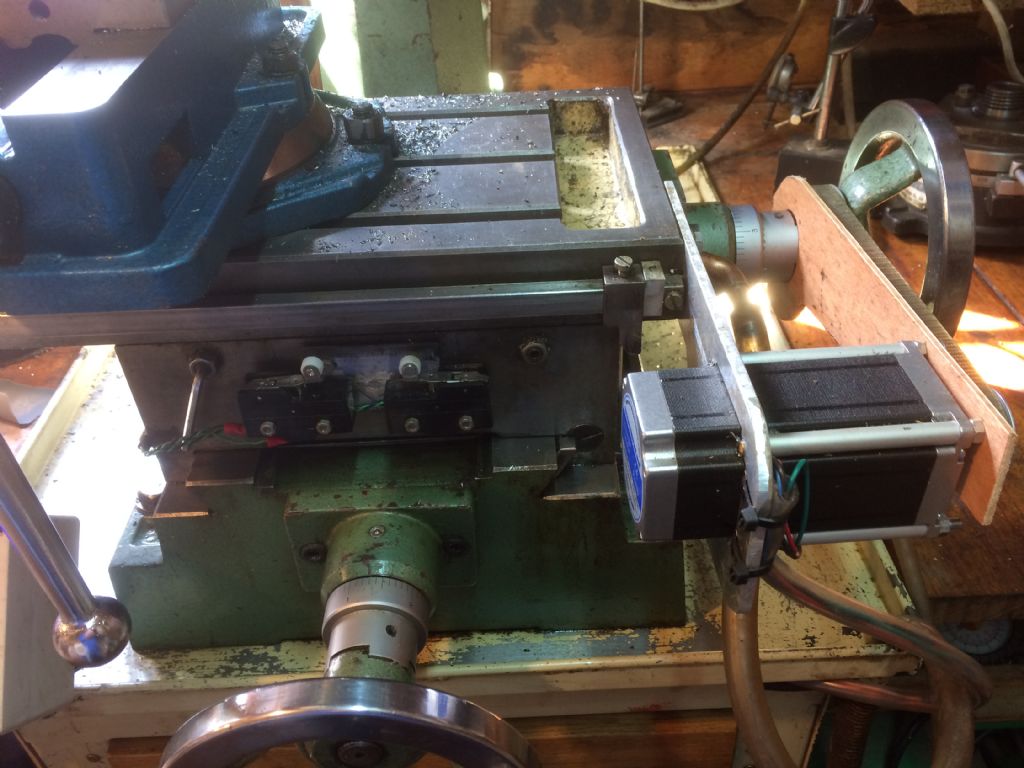
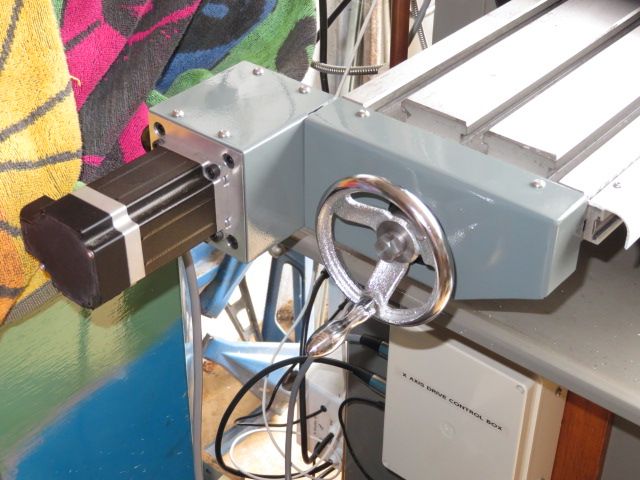
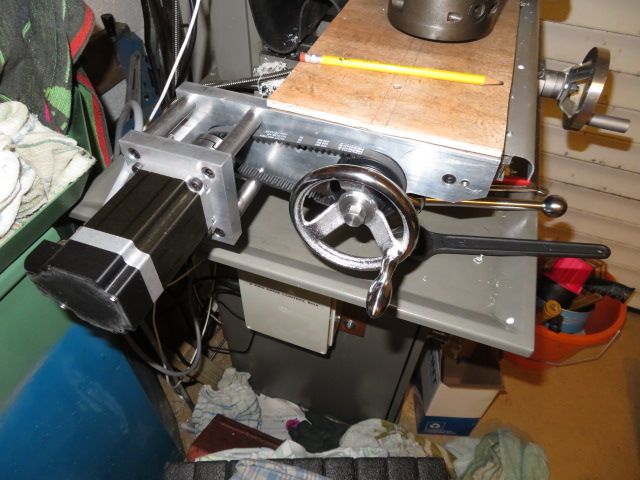
The "clutch" for the lead screw is just a simple pin between the timing wheel and hand wheel. The piece of wood is a crude guard to keep chips away from the toothed belt.
Here are some pictures of my X axis drive fitted to a Chester Champion V20 mill. It uses an Arduino for control purposes, a simple design compared to that of Speedy Builder 5 above.
You don't need a clutch to disengage the motor, just wind it round by hand with the enable signal off. It's a little notchy in 1/2 thou increments on mine with 10 tpi screw
There are two schools of thought on this. If in the middle of a milling session you want to make a small manual adjustment, doing this with the stepper stationary but powered up is not so easy as you have to work against its holding torque geared up through any reduction you have. That can be quite hard, so a clutch is welcome (or you have to switch off the drive which is a pain, or as Duncan suggests use the drive enable signal if it has one) – and you can't just disconnect the motor as that will probably make the driver emit magic smoke. There are different views on back driving the stepper when switched off – might it blow something in the drive or not? For both reasons I installed a clutch. It wasn't hard, just a pin through the timing pulley into the handwheel, and makes life easier.
That can be quite hard, so a clutch is welcome (or you have to switch off the drive which is a pain, or as Duncan suggests use the drive enable signal if it has one) – and you can't just disconnect the motor as that will probably make the driver emit magic smoke. There are different views on back driving the stepper when switched off – might it blow something in the drive or not?
I guess a small toggle switch in series with the stepper drive enable signal ( they all have this signal..) is just as easy to activate, if not more so, than a lever/pins, etc for a clutch action, and a lot easier to implement mechanically.
The issue of back driving the stepper – I did cover this with an analysis on some previous post on the subject, but the posts get lost in time so quickly..
There is NO down side to backdriving other than if the stepper is a powerful one you may feel a slight notchiness at the handwheel.
All half decent stepper driver will have back-emf diodes at the switching devices, and if FET's these are inherent in the FET. In addition, the back emf will never exceed what is seen under driven conditions, since the generator action back emf is the same as that seen while the stepper is driven as well – it is a permanent magnet motor/generator..Most stepper drivers are rated from at least 24volts, most 4 to 6 amp drivers at 40 to 50 volts – spin a poweful stepper at 200rpm and see what voltage you get, even off load – you will be hard pressed to reach 50volts rms…And when 'spinning' the mill table handwheel, the stepper rpm will never reach 200rpm…
Since my driver unit uses a CNC shield on a Uno and the driver boards plug directly on to the shield, I can't get at the enable pins! Yes, stepper drives have schottky bridges, they are essential for commutating the current. I have seen the indicator lights on the boards come on when de-powered and turning the stepper by hand. I'd just rather not take the risk and anyway the clutch is desirable mechanically.
I thought a "data point" might be useful so I just nipped down to the 'shop and did the following experiment. I have s=fitted DROs to my mill with 5um resolution. So first I unplugged the stepper from its drive, engaged the clutch, and drove the feed by hand. Significant amount of notchiness making it more difficult to put on a small shift of say 0.01mm. Then plugged into the driver but the latter switched off; then switched on. The degree of notchiness increased each time and with the driver "on" it was really quite hard to put on a small amount of feed as the motor has preferred cogging positions. There is a 3:1 step down from motor to screw, of 3:1 step-up in speed the other way. With the clutch disengaged the feed is smooth and it's fairly easy to say put on an indicated 5um.
Basically I have a pair of Arduinos, one which controls the stepper motor and the other for the display. The advice I was given was that a single processor didn't have the speed to doo both tasks.
…
Though it complicates the wiring, using a second Arduino to drive the display is a good idea.
The problem is the display rather than the microcontroller, because the Arduino 'blocks', ie stops and waits until the display gets its act together and does it's stuff. LCD displays in I2C mode are slowest, 4-wire much better, and 8-wire parallel the quickest but they're all slow compared with writing to USB or a serial comms connection. It makes sense to have one Arduino blast data to another, and have the second Arduino sort out the display.
A while ago Duncan Webster and I collaborated on a Dynamometer project and looked into improving Arduino performance in some depth. On the dynamometer, display delays limit the maximum RPM that can be measured and/or accuracy. (Be nice to measure RPM with more than one pulse per revolution.)
Our cure was to stream the data to a PC over USB for off-line analysis, and to send edited highlights only to the onboard display. This approach isn't OK for all applications.
USB/Serial can cause trouble too. If USB speed is important, it pays to choose between the various Arduino boards. For example Uno USB is relatively slow and primitive, whilst a Mega is smart and faster.
I've recently been experimenting with the new Raspberry Pi Pico, a £4 board with two fast CPU's on the same chip. Each is about ten times faster than an Arduino Nano. In theory, I ought to be able maximise throughput by collecting data on one CPU whilst the other manages the slow display. In practice, using two CPUs is slower than one! Ho hum, something is wrong… At least Speedy's circuit works!
Dave, Interested in your comments re Dynamometer project and using 2 Arduino with one for the display. I've tried doing this but failed miserably earlier this year so wondering if the code is around anywhere as original Dynamometer project is on the WDMS website or failing that if you have anything you could share?
With the approaching darker nights feel some Arduino coming on!
Just on the display question, as I used basically a UNO running GRBL as a pulse generator, with GRBL Controller running on an old phone as the terminal via Bluetooth, the position display comes for free. You can also set how much auto feed you want and the speed via the jog commands.
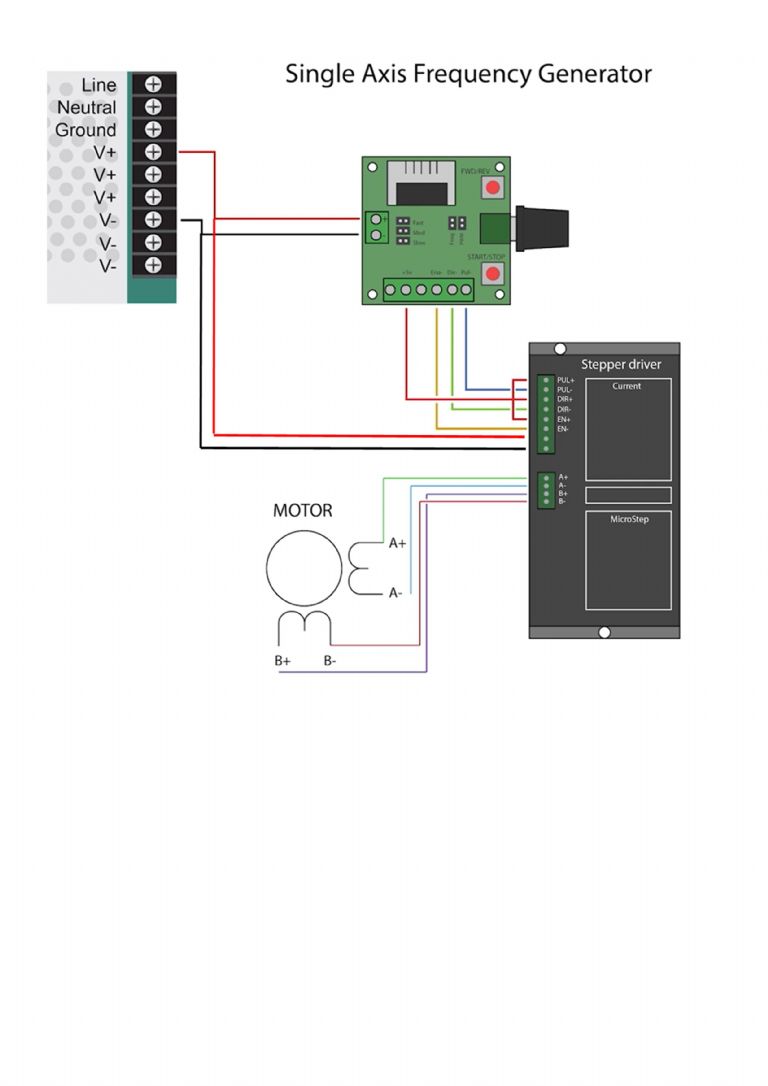
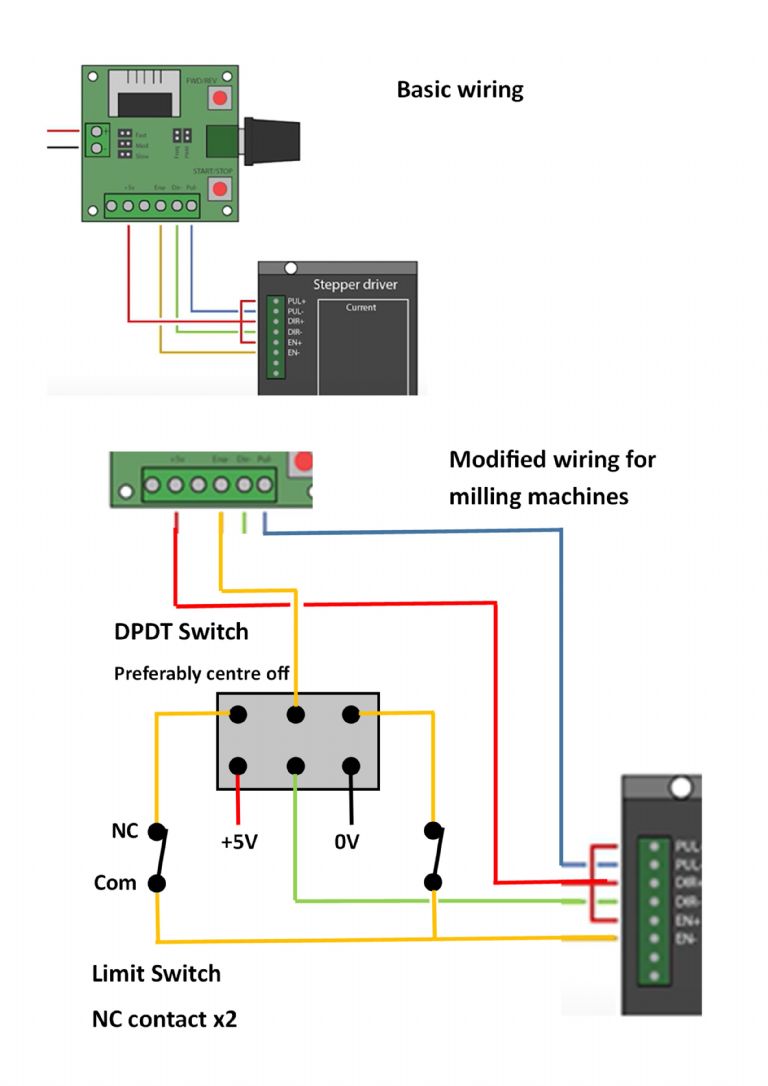
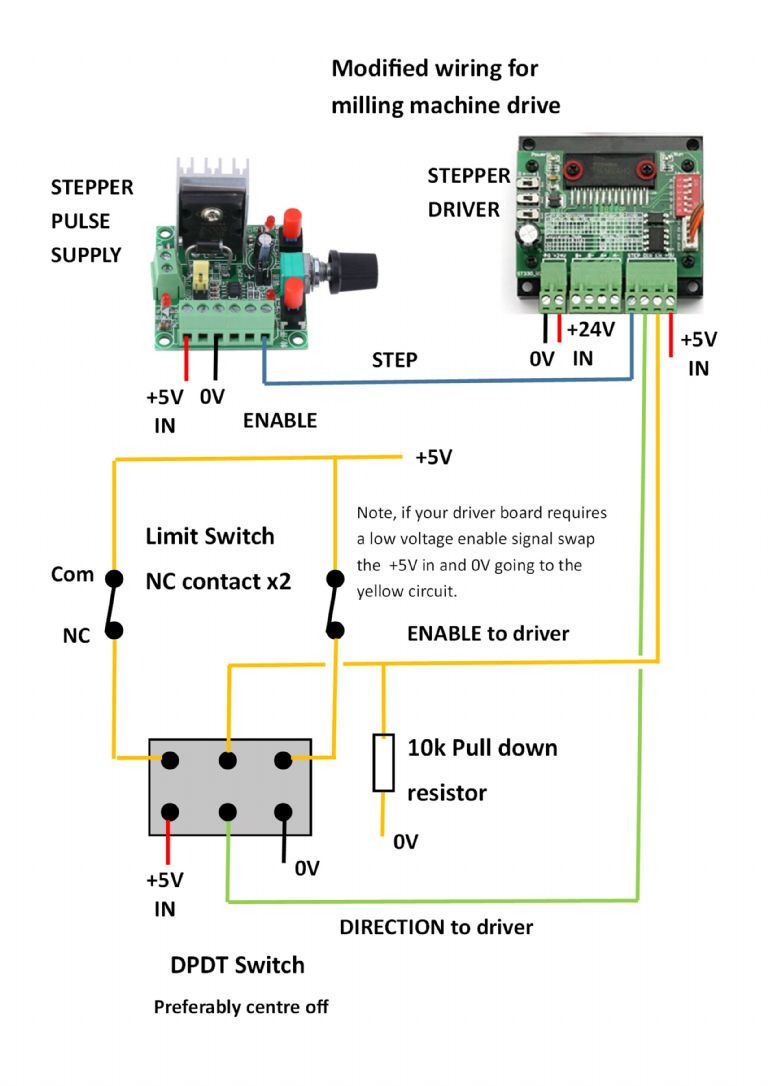
I have had a think about the circuit I posted on 08 Oct and modified it. I then cobbled together a simulation of a milling machine table with bits and pieces I had laying about. The power supply I was using has an always on fan so sorry about the background noise. I found that the pulse signal was present at switch on and did not require the start switch to be pressed to make everything run.
Martin, I found that crashing into a microswitch stop at end of travel was a bit severe. By using a microcomputer, you can slow the stepper motor down thereby reducing the shock of a heavy table attempting to come to a dead stop. Then whilst you are about it, add the jog function,
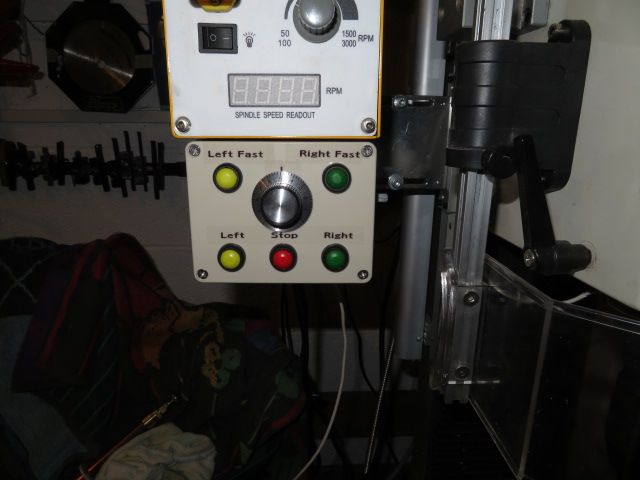
I didn't have the parts to do it but in theory you can have a three position switch for low, medium and high speed to replace the jumper on the pulse driver board since they share a common ground connection. I think if you had a table heavy enough to cause a shock when the microswitch operates then you wouldn't be using stepper motors. I also would not expect such high speeds on a small machine since for a machine with a relatively short travel there is no real need for very high speed travel.
This is just a how to for people who want to use a stepper motor for power feed on small machines.
Yesterday I saw your project and it’s very interesting and simple. I think I will use this system on a manual milling machine. I just have a doubt: after wiring with your configuration, are the buttons on the PWM board automatically ignored or do they need to be disabled? Or, will they continue to work and need to be operated before the three-way switch? Thank you in advance. Leo
just a note to the above, if the stepper is going full pelt and you crash into the stops, there is a lot of inertia stored up to be dissipated into the tooth belt drive. With a micro controller, you can reduce speed progressively on hitting the stops. Ie:- stop the stepper motor within – say 1 revolution ?
I guess that you could also monitor current consumption of the stepper motor to detect a crash into the workpiece.
Some 15 years ago I bought a Cincinatti Toolmaster turret mill. It had a fancy power feed system with rather special motors. One motor packed up and the replacement was about £1500.
I grafted in the largest available stepper motor from Mr Arc Euro Trade and made up a simple 555 timer pulse generator (circuit from the Brabani books). I made up two 6 way rotary switches with a matrix of resistors to give ABCDEF and 123456 so 36 different feeds. Plus “straight through” for rapid. It is still working fine.
The control panel featured in my article on Lasertrans in MEW, again some years ago.