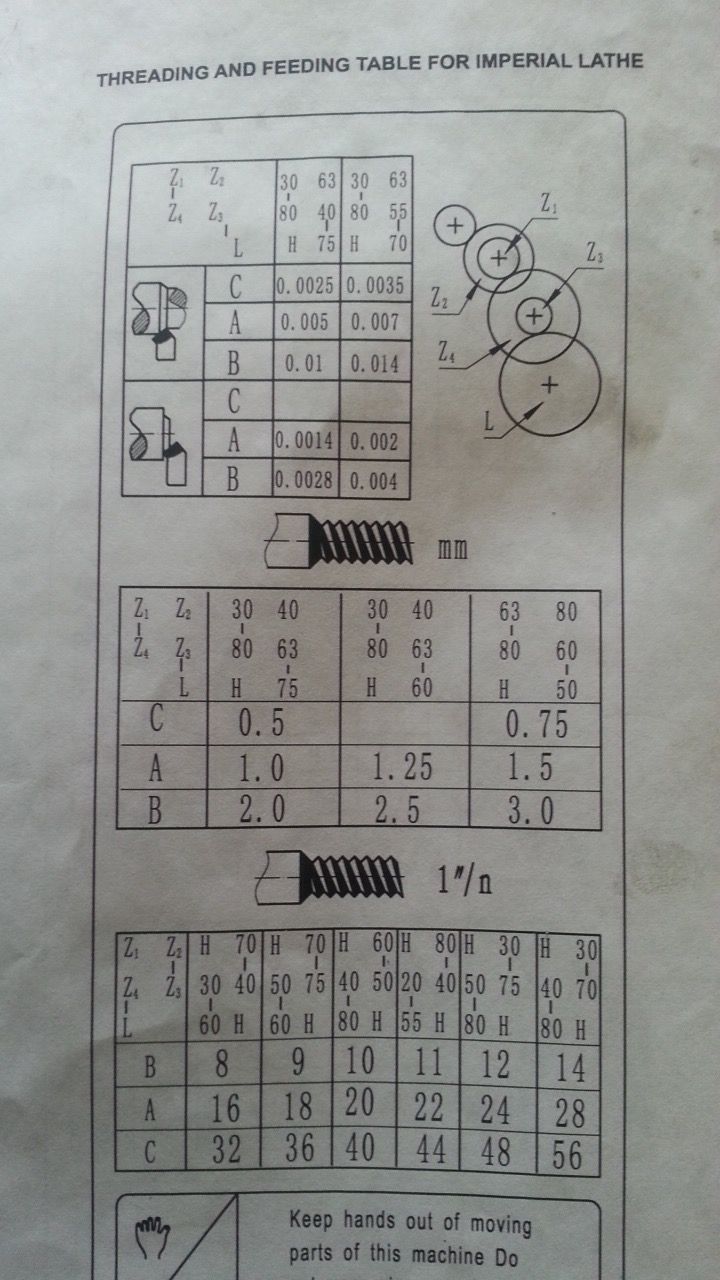
Nicky your image has not come out but I assume you have similar to this though there are a few WM250 variants.
The top chart is the fine feed chart with cuts along teh lathe shown first followed by finer cuts, below that are the metric pitches and then the imperial ones.
The group of circles is basically what you would see if you take the end cover off the lathe and look at it from the end. The top left circle is the fixed 40tooth gear on the spindle, then you have two pairs of gears Z1-4 on studs which can slide along the banjo and finaly gear L on the end of the lead screw.
You can now look down at the table and it shows what gears need to go in the Z1-4 positions as well as L to get the gear you need. AB&C are the position of the front lever eg one gear train will give 3 pitches. H on the chart means a spacer.
So for 1.5mm itch you need 63T and 80T on tehtop stud with teh 80T nearest the headstock, then 80T and 60T on the next stud with 60T nearest the headstock and finally a spacer and the 50T gear on the lead screw with 50T nearest the headstock and select lever position A. The studs can slide on teh banjo to mesh the gears correctly and the banjo also pivots around the leadscrew to adjust mesh with the fixed 40T spindle gear. You should have two 80T gears.
You won't get an exact 1.5mm pitch using a 63T in the train but the resulting 1.477mm should do for most things.
Thanks very much for your detailed reply much appreciated.
Odd the picture didnt show cos it's showing here on my PC but yes its the same as the one you supplied. I did grasp the initial set-up for threading thank you, it was the feed part of the diagram I didnt get to be honest.
Don't know about yours but my user manual shows different gear train set-ups for threading compared to the outer-cover? The outer-cover references a 39T gear? Upon checking the manual I did notice the twin 80T option but don't think I have 2 of them in my kit.
I'll have to check, failing that it's cheaper just to buy a split die than a new gear/gears.
Great to have this resource for queries cos even though I been in trade for last 30years+ I never owned any machinery myself and it's like doing my apprenticeship again lol.
I actually have a 280 but there are quite a few 250 owners here who will hopefully chip in later.
The feeds are really nothing more than very fine threads so you set them up in the same way, having said that in the 10 years that I have had my 280 I just use the finest setup and use the lever to get 3 feed rates which seems to work OK for me, you do still get a very fine facing cut with the lever in the "C" position even though it is shown blank
Don't really understand what all that means I won't lie so please can you tell me in simple terms if I can machine the 1.5 pitch, or therabouts, with a combination of the gears I already have and if so how I arrange them?
Most probably knowing my luck I'll have to procure something additional as life never seems that easy to me.
You won't get an exact 1.5mm pitch using a 63T in the train but the resulting 1.477mm should do for most things.
No you won't but the error is less than the average leadscrew tolerance. Here's a standard metric threading plate from a Colchester with a 6tpi leadscrew. They did metric transposing from the factory without using a 127 tooth gear.
Problem is all the old change gears knoocking about are going to be imperial you need a metriv MOD gear. Not too expensive to buy a stock gear from someone like Beltingonline and modify it to fit.
Neils you are right it's a lot closer I hit 3.125mm for the leadscrew pitch not 3.175 should come out at 1.50019
Not sure if it will fit on the banjo but you could try 40T spindle driving 80T, 63T driving 40T, 60T driving 50T on leadscrew and put the lever in C. Which basically doubles the drivetrain pitch but by changing the lever you run at half that.
Try out the settings first by just touching your threading tool on a bit of barstock to leave a mark that will enable the pitch to be checked. 1.5mm pitch will be 20 threads per 30mm length.
I always make my first threading pass with a black marker. Just hold it against the tool with the tip touching the work. Check the marks with a thread gauge..