Merryweather Fire King

Advert

Merryweather Fire King

Home Forums Work In Progress and completed items Merryweather Fire King

Viewing 25 posts - 51 through 75 (of 79 total)
  • Author
    Posts
  • #569313
    Roger Best
    Participant
      @rogerbest89007

      It looks the real deal Bob. cool

      Advert
      #571757
      Bob Wild
      Participant
        @bobwild67557

        Thanks Roger.

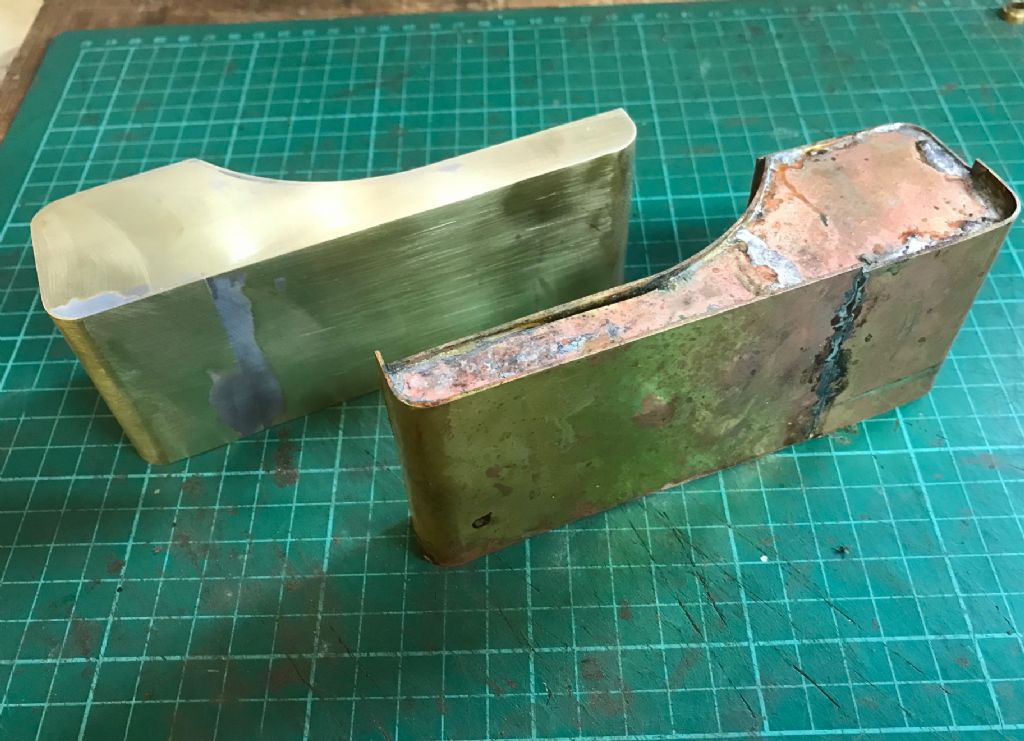
        So we are progressing with the water tanks. Quite fun metal bashing. Here is one after soldering and the other after a bit of filling with JB weld and then cleaning up:

        water tanks.jpg

        Next up is the rear platform, and then some painting.

        #571790
        Martin W
        Participant
          @martinw

          That all looks brilliant, I envy people that can produce results like that. Keep posting your progress and like Werner's I really enjoy seeing projects like this coming to fruition.

          Martin W

          #571886
          Bob Wild
          Participant
            @bobwild67557

            Hi Martin. Thanks for your generous comments. But, I certainly am still very much a novice. There are many members of this forum, like Werner, who have far more skill and experience than me. I do have a lot of patience, and will always reject a part if I’m not happy with it. One day I might publish a photo of my scrap bin to make the point.

            Like you I like to follow the build progress of other modellers both for interest and to learn the techniques of the experts. I’m a bit disappointed however that such threads are such a small proportion of threads here. I wonder why that is. I don’t know if it is because the software is a bit old and clunky – for example a “like” feature would let you know that people are actually reading your threads. Also it is a nightmare uploading photos; why not a “cut and paste” feature rather than messing around with albums? But I must come down from my hobby horse and let the thread continue back on track!

            Bob

            #581686
            Bob Wild
            Participant
              @bobwild67557

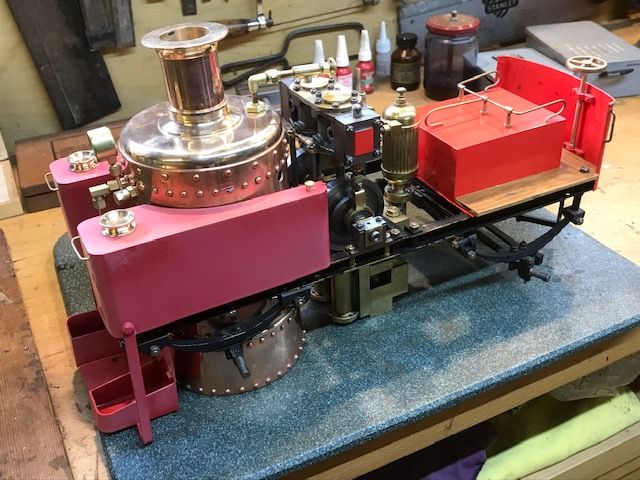
              A Nightmare Painting Job

              When I finally got to paint the water tank assembly I discovered to my horror that there was absolutely no colour match with the front parts. This was despite the fact that I used the same tin of paint.

              bad paint job.jpg


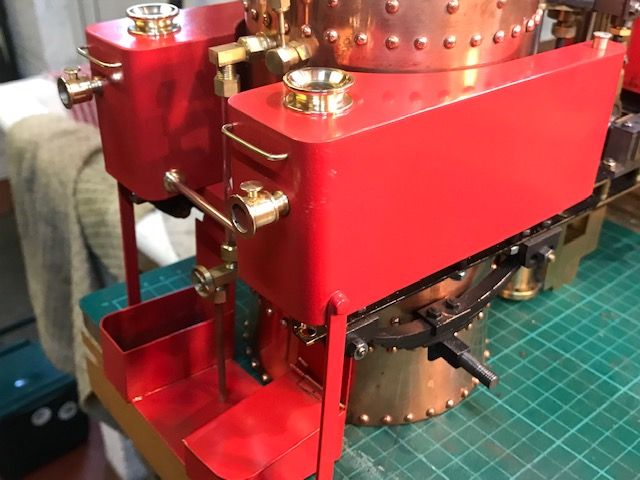
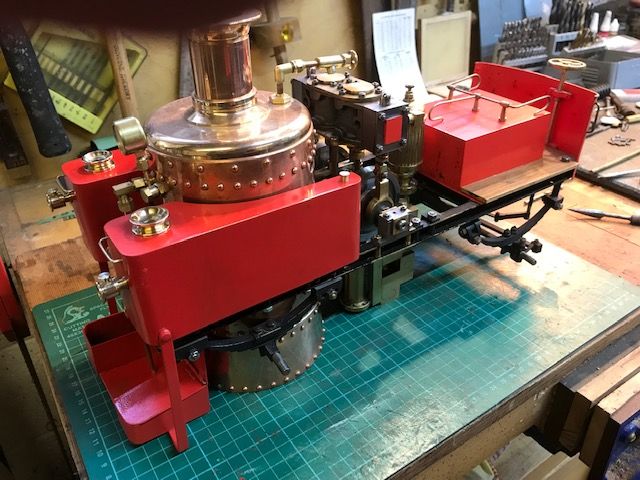
              I contacted the supplier who suggested it was something to do with the primer I had used. He very kindly sent me some isolating primer and some more paint (at a very nice discount). But this was not much better. He then suggested I brushed on more coats. This ended up with an awful finish, so I spent ages with paint stripper to get back to bare metal. In desperation I went to my local paint shop and a very helpful guy found me some spray paint that was almost the same colour as Fire Engine Red. So finally I got a good finish, and assembled all the fittings. I added a few more, such as the spotlights and filler mountings. These were not on the Julius drawings but I copied them from Cherry Hill's model, just to add a bit of detail and also because I like machining little bits of brass!

              good paint job.jpg


              good paint job #2.jpg

              Next up the wheels, which look a challenge. Not to mention 60 tapered spokes! I nearly forgot. I was thinking about pinstriping on the tanks. Never done that before, so any suggestions would be most welcome.

              Bob


              Edited By Bob Wild on 22/01/2022 12:19:53

              Edited By Bob Wild on 22/01/2022 12:26:36

              #581710
              noel shelley
              Participant
                @noelshelley55608

                A beautiful model, of which you should be proud. As to pinstriping, a bit pricy but beugler make a neat tool for the job. Noel.

                #581839
                Werner Schleidt
                Participant
                  @wernerschleidt45161

                  Hi Bob,

                  congratulations for your modelwork. If you want to have an unknown adventure paint your parts. This was the same experience I had with painting. Important is the correct hummidity and temperature. I painted a roof o my loco in summer with a good result . Then in October in the sun with the same paint can, i made the roof of the second loco. The outcome was terrible not black it was more grey. I made it two times with the same result. Then I go in my workshop and do the same and it was perfect. The difference was the hummidity. Outside about 80 % and inside 50 %. This had a great influence. After i noticed this, I build up a paintbox form a big cardboard box with a small fan and a pipe to bring the paint gases out of the basement window. This was made with many improvisation with hot glue and so on. The result was very good.

                  With my fireking i had acrylic based colour from the hobby store . This was premium marked two in one. The greatest trash i ever had. At the start it looked good and it was a nice paint cover and after some short time the colour begins to move and it was one blot of colour in the midddle. The only solution i found then, bring it out with a foam roll and roll as it is nearly dry. Then it stays were it have to belong. And i made the experience in the hobby store, the suppliers change the base material every three years and when you have the experience it was good the next time it behave different. And premium is only the price you pay for it. It is very impportant to read the small printed discription of the incridents. My friend bought his paint at the professional paint store and this is as i know good and it is only cleanabel with thinner and not with water. The only problem there is, the can format of one liter.

                  You see you are not alone with your experience.

                  I am eager to see your fire king ready ,keep the good work.

                  Werner

                  #582024
                  Bob Wild
                  Participant
                    @bobwild67557

                    Werner, I’m glad I’m not the only one with paint problems. I’ve heard about temperature problems and took the precaution of bringing the paint and model from my (cold) workshop into the house to warm them up. But I hadn’t thought about humidity. That is something I will have to think about.

                    Noel, thanks for your encouraging comments. When I did Technical Drawing at school many years ago, I spent a lot of time using a drawing pen and Indian Ink. And I still have the drawing equipment! I was going to have a go like that but using gold acrylic paint. Done a few tests with reasonable success. The main problem was avoiding a big blob of paint at the start of the line. I might avoid this with a bit of practice. I will keep you posted.

                    Bob

                    #582091
                    Bob Unitt 1
                    Participant
                      @bobunitt1

                      I had paint problems on my Lady Stephanie too, not a very smooth finish at all (applied by brush). Having discussed it with a friend who's an experienced model-railway scratch-builder we came to the conclusion that I should have done it in the house, not the workshop – too cold and humid out there; and that I should have thinned it a lot more and put more coats on. Phoenix paints seem to require more thinning than Humbrol or Revell – not a problem now I know, but it was the first time I'd used paint of that particular brand. I've also bought myself an airbrush for the next model, so another skill to learn…

                      I'll leave it as it stands for now, but eventually I'd like to strip and repaint some of the larger flat pieces – what's the best non-mechanical way of stripping enamel paints off brass ?

                      Edited By Bob Unitt 1 on 24/01/2022 11:49:19

                      #582112
                      Bob Wild
                      Participant
                        @bobwild67557

                        Hi Bob,

                        I used Nitromors applied several time for stripping the bulk of the paint. I did finish off with 1000 grit wet and dry to remove the stubborn bits.

                        I think you are right about where to do the painting as Werner said earlier. My workshop (garage) is outside and cold. I'd like to do the painting inside, but I'm not sure SWMBO would approve.

                        Bob

                        #582150
                        Bob Unitt 1
                        Participant
                          @bobunitt1

                          Hi (also) Bob smiley

                          Thanks, I have some Nitromors here somewhere, so I'll give it a try. Does it need re-etch-priming, or can I paint direct onto the stripped surface ?

                          I have the same painting-location problem as you, but my SWMBO does disappear across the country to her mother's for the day, every so often…

                          wink

                          Bob

                          #582522
                          Bob Wild
                          Participant
                            @bobwild67557

                            Hi (also Bob)

                            I used Hammerite smooth gloss (not the old hammer finish). On the tin it said that primer was not required. So that is what I did. I did rub it down after four coats and then treat it with car polish. I'm quite happy with the result, but we shall see what it's like in the long term. Unfortunately, I'm no expert in these matters, so it is very much a matter of learning from experience!

                            Bob

                            #585150
                            Bob Wild
                            Participant
                              @bobwild67557

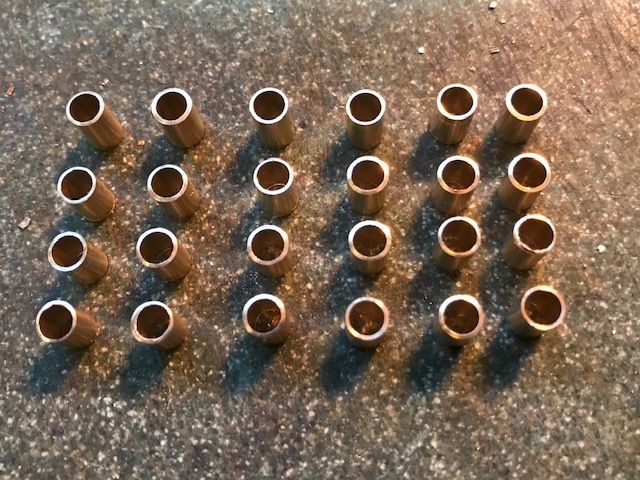
                              Who said model engineering was interesting and challenging ? Got to make fifty six of theses little blighters to locate the wheel spokes !

                              spoke sleeves.jpg

                              And then there's the little matter of fifty six spokes.


                              Bob

                              Edited By Bob Wild on 11/02/2022 22:42:13

                              #587575
                              Bob Wild
                              Participant
                                @bobwild67557

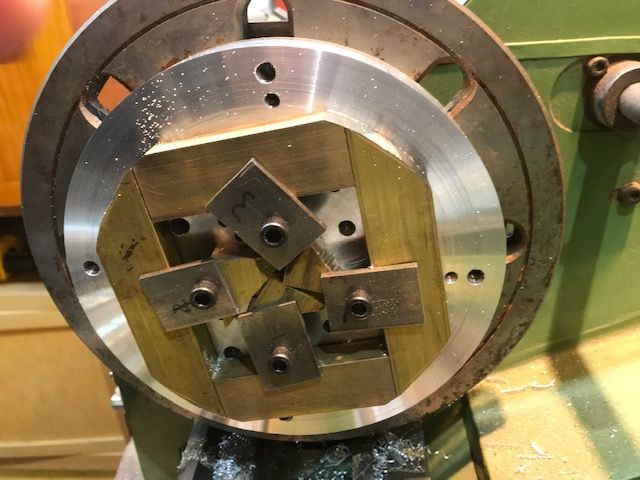
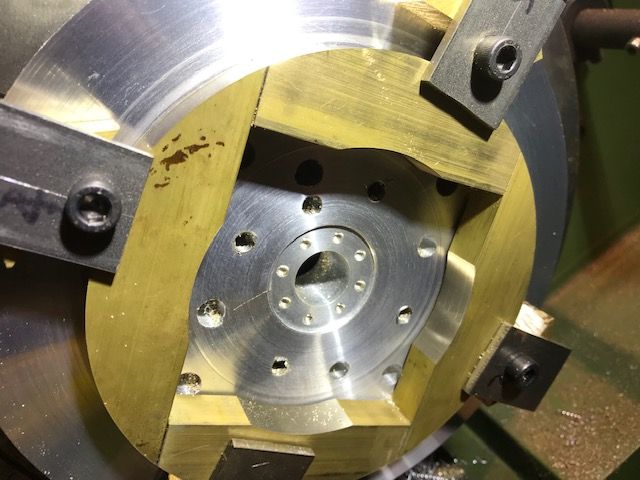
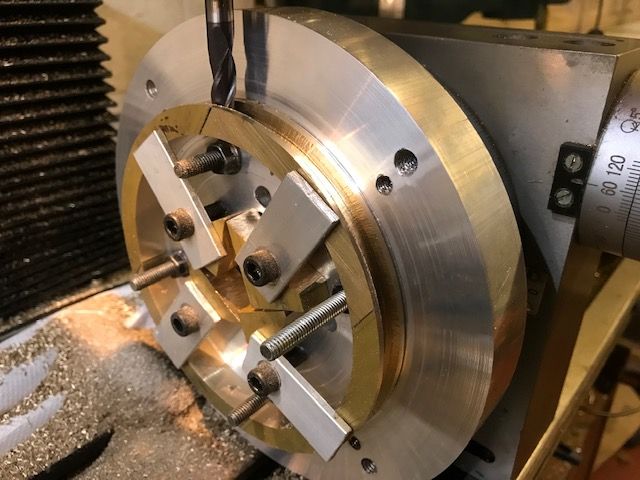
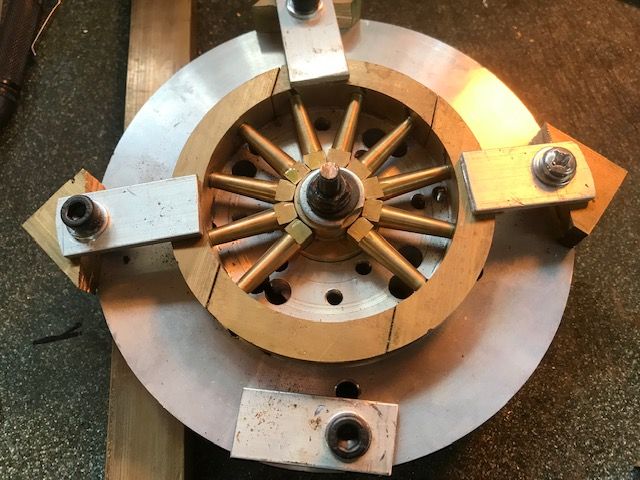
                                Good progress with the wheels. I thought I'd show some of my machining operations as I was using a faceplate for the first time. Any comments from the experts would be post appreciated. My idea was to build the whole assembly on a disc of aluminium which could be moved between the faceplate and the mill rotary table without moving any parts. This way I would (hopefully) maintain concentricity.

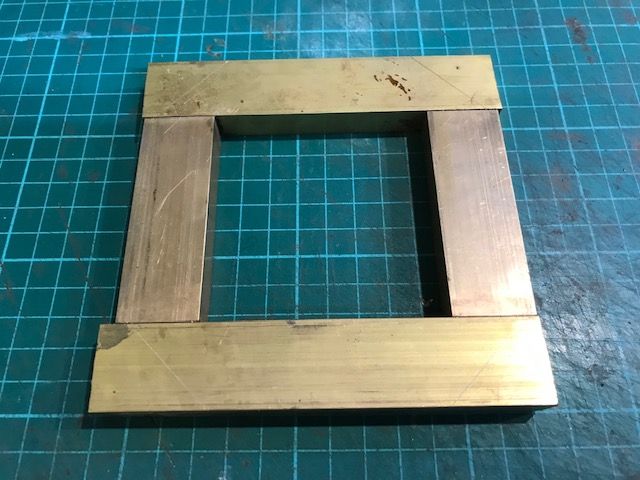
                                The outer rim was made from four strips of brass pinned and glued together:

                                rim frame.jpg

                                Mounted on the faceplate I machined the outer diameter:

                                machining outer rim.jpg

                                Then the inner diameter:

                                machining inner rim.jpg

                                Because of the size of the rim I couldn't figure out how to machine the tyre groove on the OD, so I transferred to the rotary table and slowly milled the groove:

                                milling tyre groove.jpg

                                I also drilled the holed for the axles with the same setup. Then on the bench I could assemble the axles and the hub:

                                fitting spokes.jpg

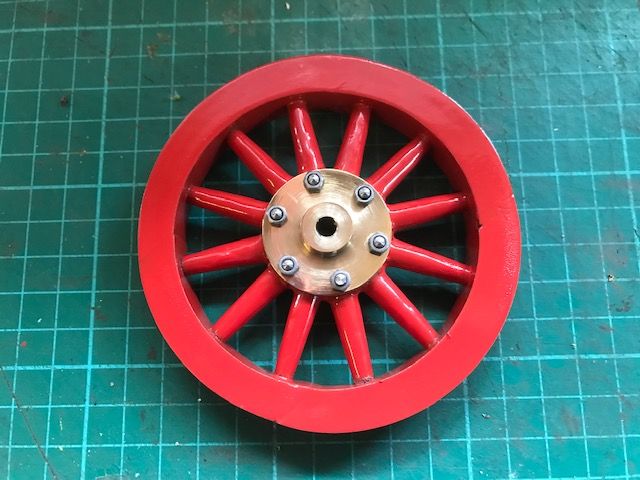
                                I was disappointed to realise that when I machined the tyre groove most of the pins I had put in to hold it all together had been nearly machined away and the whole assembly looked a bit flimsy. So I decided to add a brass tyre at the bottom of the groove and screw that in place. That seemed to work well, but it did reduce the depth of the groove from 8mm to 6 mm. Fortunately I already had the neoprene square section for the tyres and with a bit if experimenting found I could mill 2mm off the thickness – disaster averted. So here is one of the finished wheels. Not sure how to bond the neoprene tyre to the rim though. Any suggestions?

                                finished wheel.jpg

                                Bob

                                #587605
                                Werner Schleidt
                                Participant
                                  @wernerschleidt45161

                                  Hi Bob,

                                  I use on my small fire engine ,a little bit bigger than yours, wooden wheels. The rubber was a band 20 mm wide and 5 mm thick . The rubber Band was glued together with second glue cyan acrilate. The rubber ring was a liitle bit smaller in diameter. So i have to use two screwdriver to pull it on. As adhesive i used contact glue.

                                  This fire engine is radio controlled and have a weight of 20 kg. After a few days of driving one tire came off in a curve during steering. I sanded the glue away and made the surface rough and glue it again. After that it was no problem.

                                  On my Merrywheather Fire King i have a few time the problem that the glue came off the steel tire. I read in the traction talk forum that some use polyurethan glue from a british trader. With this tip i found in ebay from UHU and Pattex polyurethan glue for craftsmen workers. With this i made several test trys and this glue is much more elastic and i made measurements and found that the factory data are correct. It worked perfect for glueing metal to rubber ,for shoe repair and many other difficult things where i was not able to glue before. My problem on the fireking was that the epoxy glue is to hard and was destroyed after driving of compound cuble stones. They hit permanent against the rubber metal surface and so the connection to the metal surface was destroyed.

                                  I hope you get some additional practice informations.

                                  keep up the good work

                                  Werner

                                  #587689
                                  Bob Wild
                                  Participant
                                    @bobwild67557

                                    Hi Werner,

                                    I haven't seen your radio controlled fire engine. Are there any posts about it? You certainly seem to have had fun with your tyres. That's a good idea about UHU. I was thinking of using some similar type of contact adhesive. Maybe the kind used to bond car windscreen rubber in place or an impact adhesive like Evo-stick.. I'll do a few experiments.

                                    Bob

                                    #590627
                                    Bob Wild
                                    Participant
                                      @bobwild67557

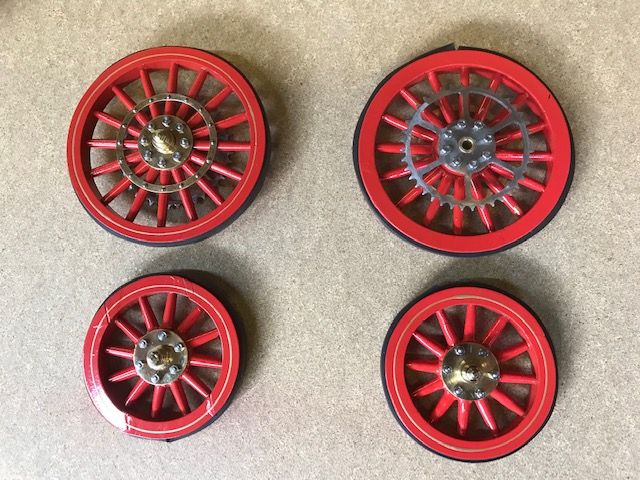
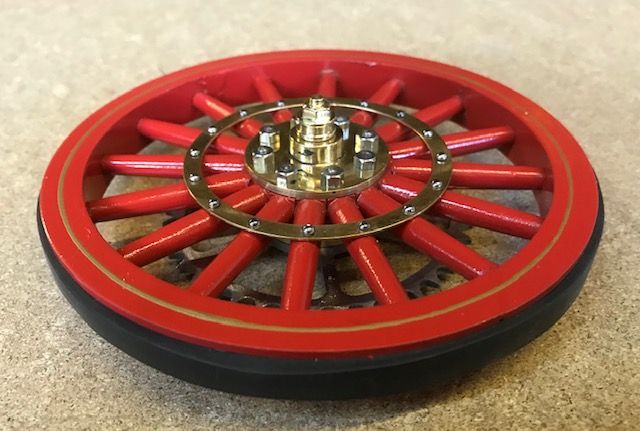
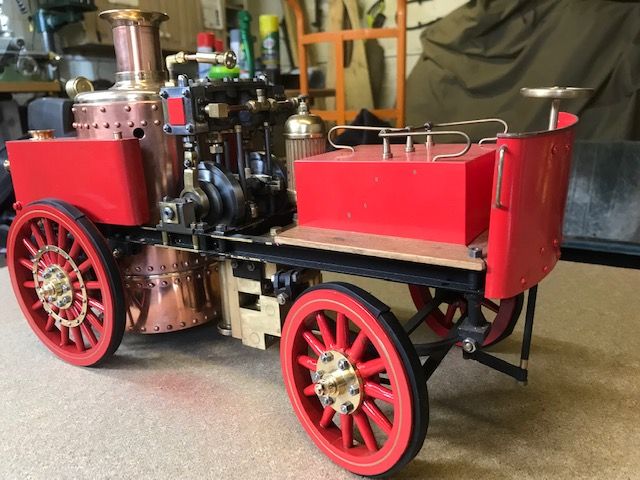
                                      Finally got the wheels finished, including some gold striping. Quite pleased with the results. The lines could have been wider, but that was the maximum my pen would open.

                                      four wheels.jpg

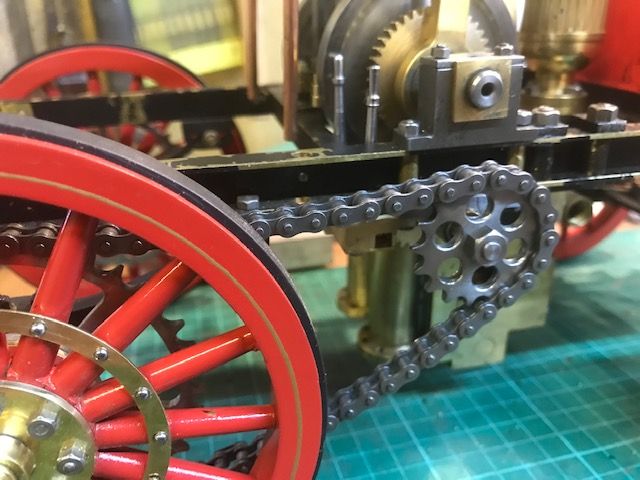
                                      Added minor details to be more like the real thing. The rear wheels have an extra (strengthening?) ring. The chain wheel was solid when I got it, so I machined some spokes for authenticity. Also each hub has a funny fitting in the centre. Not sure what they are; grease boxes perhaps ?

                                      rear wheel.jpg

                                      And finally it is starting to look like a fire engine:

                                      fk on wheels.jpg

                                      #590694
                                      Paul Lousick
                                      Participant
                                        @paullousick59116

                                        beugler.jpgYour engine is very impressive Bob. Well done.
                                        Thicker lines can be painted with a Beugler pinstriping tool. Rollers are available in different widths.

                                        #612529
                                        Bob Wild
                                        Participant
                                          @bobwild67557

                                          A major milestone today!

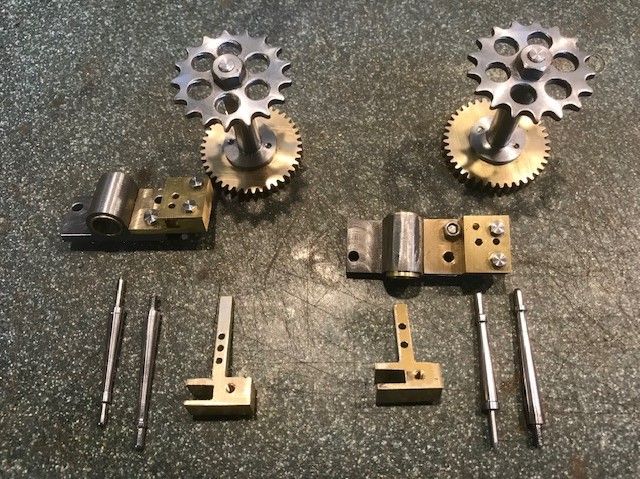
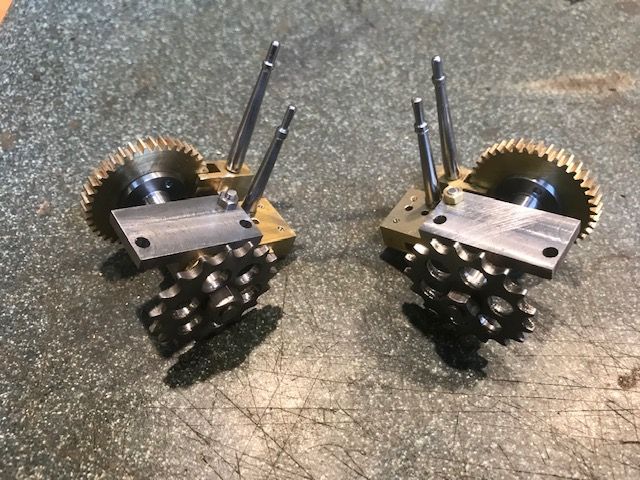
                                          Cut the gears, which was a new experience for me. Not too many problems once I got the hang of the dividing head. Since I moved the valve eccentrics ages ago I couldn't use the engagement lever as Julius designed it. So I had to resort to what is probably an unorthodox but effect design of my own. The gear slides in a clevis which is moved in and out with a square shaft. A pin is used to lock the clevis in either the engaged or disengaged position. Here are the parts of the assembly (the chain wheels are proprietary items) :

                                          gear parts.jpg

                                          And this is the complete assembly:

                                          gear assembly.jpg

                                          And here installed in the engine:

                                          gears installed.jpg

                                          And finally I have drive to the wheels. Fitting the chains was a nightmare. To start with I made the chains such that they just fitted with a minimum of play. But the links kept jamming. So I tried making them a bit longer. But you can't get a bit longer because you have to increase by one whole link. The end result means that the chain flaps around terribly. So I'm going to try inserting some sort of tensioner. Anyway the engine does drive the wheels which to me is a major achievement. I was quite pleased that the control valve does indeed control the speed. Pity the wheels are a bit wobbly, so I'll have to have a look at that!

                                          #612538
                                          Werner Schleidt
                                          Participant
                                            @wernerschleidt45161

                                            Hi Bob,

                                            it look nice running. To the length of the chain you have to think when the fireking is on its wheels yo have a length change by compressing the axle springs. I do not know how much it is on your small engine , but it is not negligible. In addition normally there are bars to adjust the tension of the chains.

                                            Werner

                                            #612560
                                            Roger Best
                                            Participant
                                              @rogerbest89007

                                              It all looks terrific Bob, a work of art.

                                              Paint is a real nag, I am building a booth in my workshop as I never want to paint when there is good weather. It takes up a lot of space but should help my sanity.

                                              Does you chain manufacturer do "half links"? that might halve your problem. A tensioner is a good idea although to allow axle movement I think the bars that Werner refers to are better, not sure how they fit in this design.

                                              #612638
                                              Werner Schleidt
                                              Participant
                                                @wernerschleidt45161

                                                Hi Bob,

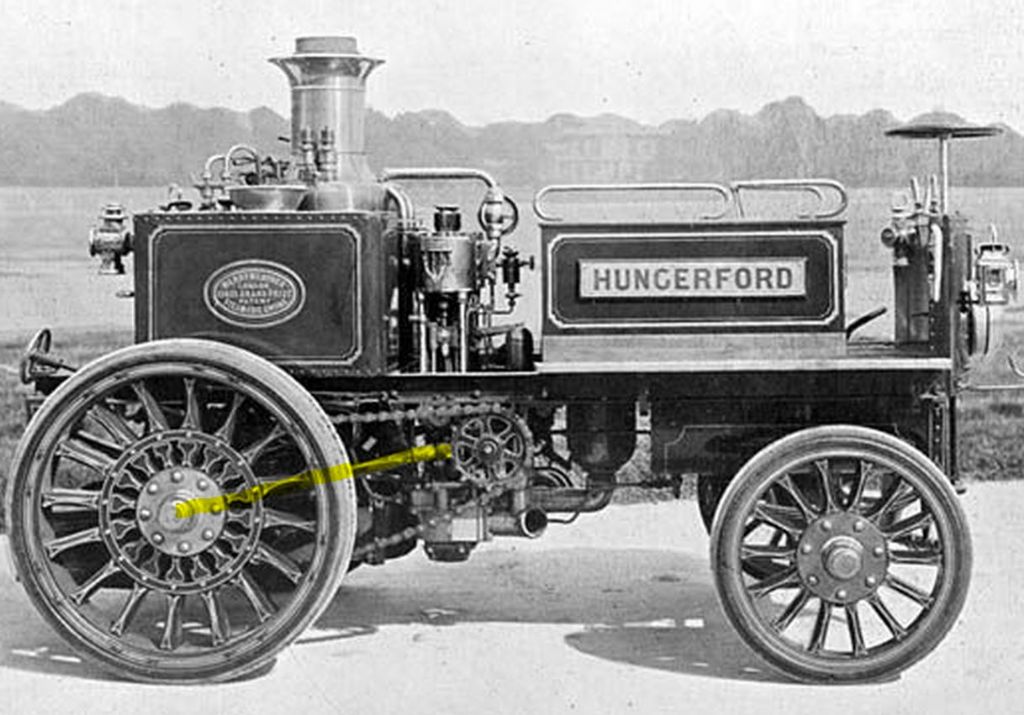
                                                in this original picture I marked the tension bar . It is connected to the rear axle and to the drive axle. This shifts the springs in the radius of the tension bar, but it have to be adjusted when the fire king is on the wheels. It is adjustable with right and left hand thread.

                                                tensionrod.jpg

                                                Werner

                                                #612655
                                                Bob Wild
                                                Participant
                                                  @bobwild67557

                                                  Thanks Werner and Roger. Yes, I am going to put a tensioner on the chain. I tried it with a hand held support which did indeed help. The method used on the Hungerford machine looks too complicated for me. The springs are very stiff and don't deflect very much at all. My only problem will be fitting one in the space available – ti is getting very crowded in that area!

                                                  Incidentally, I have been thinking about a good way to make an authentic looking fire hose, Any ideas? I habe posted a general question in this thread:

                                                  Fire Hose like Cherry Hill

                                                  Bob

                                                  #612688
                                                  Werner Schleidt
                                                  Participant
                                                    @wernerschleidt45161

                                                    I made my suction hose from a standard plastic suction hose. This had a good function but it looked terrible.

                                                    Then I had the idea to wrap a gauze bandage around it and fix it with black paint . This look is very realistic from my opinion.

                                                    In your size it is more difficult to find something, but I think a small yarn made from natural fibres can do the job.

                                                    I am interested to see which tipps came in.

                                                    good luck

                                                    Werner

                                                    #615912
                                                    Bob Wild
                                                    Participant
                                                      @bobwild67557

                                                      A major milestone today. Got the drive chains mounted and finally managed to get the FK moving. The video is a bit short cos it careered off under my car. Then I realised that the front wheels were not actually bolted on.


                                                      The end is in sight – just got the hoses and water stuff to do. Then a bit of cleaning and touch up the paint


                                                      Edited By Bob Wild on 03/10/2022 22:57:09

                                                      Edited By Bob Wild on 03/10/2022 23:02:34

                                                      Edited By Bob Wild on 03/10/2022 23:04:53

                                                    Viewing 25 posts - 51 through 75 (of 79 total)
                                                    • Please log in to reply to this topic. Registering is free and easy using the links on the menu at the top of this page.

                                                    Advert

                                                    Latest Replies

                                                    Viewing 25 topics - 1 through 25 (of 25 total)
                                                    Viewing 25 topics - 1 through 25 (of 25 total)

                                                    View full reply list.

                                                    Advert

                                                    Newsletter Sign-up