Mega Adept

Advert

Mega Adept

  • This topic has 202 replies, 33 voices, and was last updated 11 October 2016 at 17:08 by Saskatoon Model Engineering Society.
Viewing 25 posts - 26 through 50 (of 203 total)
  • Author
    Posts
  • #166607
    Bazyle
    Participant
      @bazyle
      Posted by Neil Wyatt on 14/10/2014 20:03:54:

      I'm just joking – the 4" chuck is on my other lathe which I'm using to turn the spindle.

      Neil

      Oooo you cheat.

      I think you should be doing it all on the original Adept, and in public on the SMEE stand at Sandown.devil

      Advert
      #166614
      Neil Wyatt
      Moderator
        @neilwyatt

        Michael,

        OK I'm cheating, the back-gear/pulley section won't be at the same setting, but what a chance to get he whole machining sequence straight in my head:

        • Face end
        • Centre end and support from tailstock
        • Rough out spindle
        • Turn over-length section for back-gear and pulleys – accuracy +0 -0.0005" over whole length
        • Reverse in chuck and test for concentricity – run out is <0.0004" so don't bother setting up in 4-jaw (despite what the knockers say this Zither chuck is amazingly accurate!)
        • face end
        • Centre end and support from tailstock
        • Turn large section left on end down to 3/4" (diameter not critical)
        • Turn 1/2" long 0.500" section as close to dead on size as possible for spindle nose also facing a dead flat surface for chucks to tighten up against.
        • Cut 20tpi thread on first 3/8" of spindle, leaving 1/18" of register at 0.500". This will be master thread, all chucks etc. will be screwcut to match this.
        • Turn 8-degree cone for front bearing, bring to mirror finish with superfine abrasive. (I think I will get better concentricity with eth front bearing this way rather than trying to turn to this accuracy on the Adept).
        • Top slide must not be moved until front bearing bush is turned (NB it was set using the 8-degree 'square' I made for making ER collets, so in theory I can reset it).

        This is where I am, now the rest of the sequence looks like being:

        • Remove tailstock support
        • Drill front end of spindle to letter W in stages
        • Bore internal nose taper at 8 degrees
        • Replace tailstock support
        • Thread for first set of rear thrust bearing adjustment washer(s) also 0.500", 20 tpi.
        • Turn rear journal to 0.375" as near dead on as possible, going well past expected end of spindle.
        • <The 0.375" section also takes a roller thrust bearing and the first screwcutting gear, keyway can be cut later.>
        • Thread 0.375" 20tpi (3/8" BSF) for second set of rear thrust bearing adjustment washers.
        • Remove tailstock support
        • Drill through to letter F (0.257&quot in steps

        I may decide against boring the spindle internal taper at this stage, or I might just rough it out. It will be 8 degrees and suitable for ER8 collets which will be vastly more useful than old-style 8mm collets or MT0. I can make a custom closing nut to it the spindle taper easily enough.

        Phew!

        Neil

        #166615
        Boiler Bri
        Participant
          @boilerbri

          Neil it's amazing how many of those steps you will do without thinking about them. It's only when you pen them that you realise how many things we do without thinking. I think!

          Bri

          #166616
          Michael Gilligan
          Participant
            @michaelgilligan61133
            Posted by Neil Wyatt on 15/10/2014 15:56:59:

            … what a chance to get he whole machining sequence straight in my head.

            .

            star Looks like you have a plan

            [ note: I was only suggesting that you might finish-turn the nose register and internal taper with the spindle installed in the Adept … I'm sure you are doing the right thing by finishing the bearing taper at stage 1 ]

            I suppose the "proper" way might be to do the job between centres; but if the Zither chuck is good, I think you are on to a winner.

            MichaelG.

            #166617
            Michael Gilligan
            Participant
              @michaelgilligan61133
              Posted by Boiler Bri on 15/10/2014 16:04:31:

              Neil it's amazing how many of those steps you will do without thinking about them. It's only when you pen them that you realise how many things we do without thinking. I think!

              .

              Bri,

              That's why I was encouaging Neil to expose his plan … It's all too easy to miss something crucial, and take the work out of the chuck just before you should have

              MichaelG.

              #166618
              Saskatoon Model Engineering Society
              Participant
                @saskatoonmodelengineeringsociety

                Looks like a good sequence. I don't remember how I did mine but I'm pretty sure I rough turned the nose register at this stage then finished it off in the Adept. My bearings were not tapered, when I replaced the headstock bearings with brazed on pieces I made removable caps instead of a split bearing and I scraped them to final finish. They are straight bearings 1/2" dia at the front and 3/8" at the back. There is a roller thrust bearing inset into the back of the pulley. Thrust adjustment is by a nut on the end of the spindle.

                I made provision for internal collets in the spindle nose. Mine were own design standard collet shape with a 40 degree (incl) nose angle closed by a through the spindle drawbar. I only made a few collets, never used them much.

                38 degrees would work OK in for the pulleys. I cannot imagine why the originals had that really wide angle, they knew better even way back then.

                Looks like you have an original chuck. Does it have a separate backplate? If you and up wanting a three jaw, Sherline chucks will fit (with an adapter) and are really well made.

                I tried to open your "spindle.jpg" link in the first post but got a file not found. Could you post it again?

                Just as an aside, I've been a TurboCad user for years but I use a really old version (TC-v7) because I can get it to run on my Linux system.

                #166623
                Neil Wyatt
                Moderator
                  @neilwyatt

                  I have an original 4-jaw, faceplate and catchplate, all easily opened up to 1/2" – plenty of 'meat' in them.

                  I have a flange fitting 2 5/8" lever scroll chuck I bought for a small home-made dividing head. I can easily make a backplate for it from a slice of 1 1/2" bar.

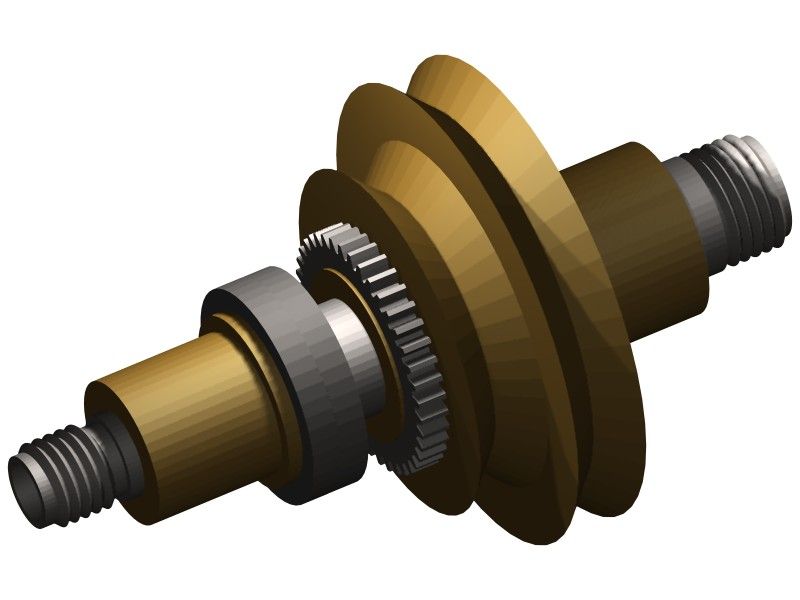
                  spindle.jpg

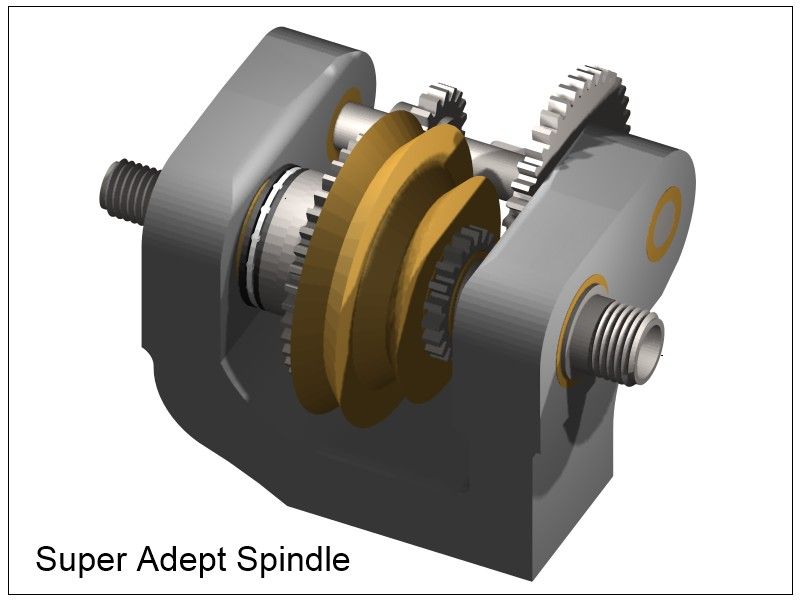
                  My thinking has evolved a bit since I made this model, though, even the image below lacks the bearings and change gear at the back of the headstock, and the flange is wrong:

                  back gear.jpg

                  Lots of bits missing, like oilers etc. and a tenon below the headstock, but you can see how the rear overhang will be greatly increased

                  Neil

                  #166630
                  Neil Wyatt
                  Moderator
                    @neilwyatt

                    Will I put in the first third of the spindle bore, sharpened up a 3/16" D-bit on the diamond wheel and put in an 8-degree bore (I can clean up later on the adept if necessary) and used a big slocombe bit to put the trace of a 60-degree cone back around the lip for the tailstock centre.

                    All done using a fixed steady set by the chuck and slid along in time-honoured fashion.

                    The front is still running true to a quarter of a thou, so hopefully I have not upset the end near the chuck for finishing the.rear journal.

                    Neil

                    #166631
                    John Stevenson 1
                    Participant
                      @johnstevenson1
                      Posted by Saskatoon Model Engineering Society on 10/10/2014 19:41:24:

                      Neil: Actually it is not an original restoration but an upgrade to make it into a useable lathe similar to what you are planning.

                      The only Adept parts left are the main bed casting and the tailstock casting.

                      .

                      So this begs the question was this model the first one that was not fit for purpose ?

                      If so where are all the posts in the postbag of the day from the flat earth society saying "Send it back ", "Get onto trading Standards ", Distant selling regulations " etc etc.

                      Or was it that our intrepid heroes of the day understood they were buying what they had paid for and had more sense to alleviate the short comings of the day ?

                      Answers to Neil please on the back of some 5 thou shim so he can get the tailstock in line.

                      #166635
                      Saskatoon Model Engineering Society
                      Participant
                        @saskatoonmodelengineeringsociety

                        There were two models of Adept….the "plain" one did not have a sliding saddle, the saddle was locked in one spot and londitudinal motion was done with the top slide. It would have worked but a sliding carriage is much better. The "Super Adept" had a dovetail V bed and sliding carriage like Neil's.

                        I started from a VERY worn out plain version which I obtain in trade for some other bits. It had been used as a grinding spindle for lapidary work and I do emphasis the "VERY" worn out. Since it needed a complete rebuild anyway it was a simple matter to cut the dovetails on the bed.

                        I do think "back in the day" buyers must have realized what they were getting and not put their expectations too high but there were a few who did use it as a base to make improvements.

                        Neil: From your reference to a "tenon" I'm assuming you are going to machine off the bed casting and have a removable headstock?

                        I would also suggest to fit in a roller thrust bearing if you can manage to work it in. I am convinced that the thrust surfaces create more friction than the radial surfaces of a properly adjusted (and lubricated with very thin oil) plain bearing spindle.

                        #166649
                        Neil Wyatt
                        Moderator
                          @neilwyatt

                          Hi Sask,

                          I plan to fit a roller thrust bearing at either side of the rear plain bearing.

                          You can ignore JS he's just jealous because he can't afford one

                          Neil

                          #166709
                          Neil Wyatt
                          Moderator
                            @neilwyatt

                            I have got as far as rear journal turned to 11mm. Well, 10.989 mm after polishing.

                            Neil

                            #166720
                            Michael Gilligan
                            Participant
                              @michaelgilligan61133
                              Posted by Neil Wyatt on 16/10/2014 21:32:33:

                              I have got as far as rear journal turned to 11mm. Well, 10.989 mm after polishing.

                              Neil

                              .

                              I will ask before Mr Stevenson does … What temperature question

                              MichaelG.

                              #166722
                              John Stevenson 1
                              Participant
                                @johnstevenson1

                                Actually it's not that I can't afford one it's more I would need 4 of them as I have had an idea to used 4 as wedges hammered into the ground to support me loose gate post.

                                Could probably get away with two sooper adapts for the side to side movement and a couple of Winfields for the critical front to back wobble ??

                                #166724
                                Saskatoon Model Engineering Society
                                Participant
                                  @saskatoonmodelengineeringsociety

                                  Just found this history of the Adept lathe, thought it interesting. ….but maybe you've already seen it. http://www.bedroom-workshop.com/shaper-perfectoliterature/1.760861AdeptLathesbreaklink.pdf

                                  Clickable link.  http://www.bedroom-workshop.com/shaper-perfectoliterature/1.760861AdeptLathesbreaklink.pdf

                                  Edited By John Stevenson on 16/10/2014 23:38:02

                                  #166780
                                  Neil Wyatt
                                  Moderator
                                    @neilwyatt

                                    Hi Sask,

                                    I've been enjoying a correspondence with Andrew Webster, he has a small collection of adepts, perhaps he could help John out?

                                    Neil.

                                    #166916
                                    Neil Wyatt
                                    Moderator
                                      @neilwyatt

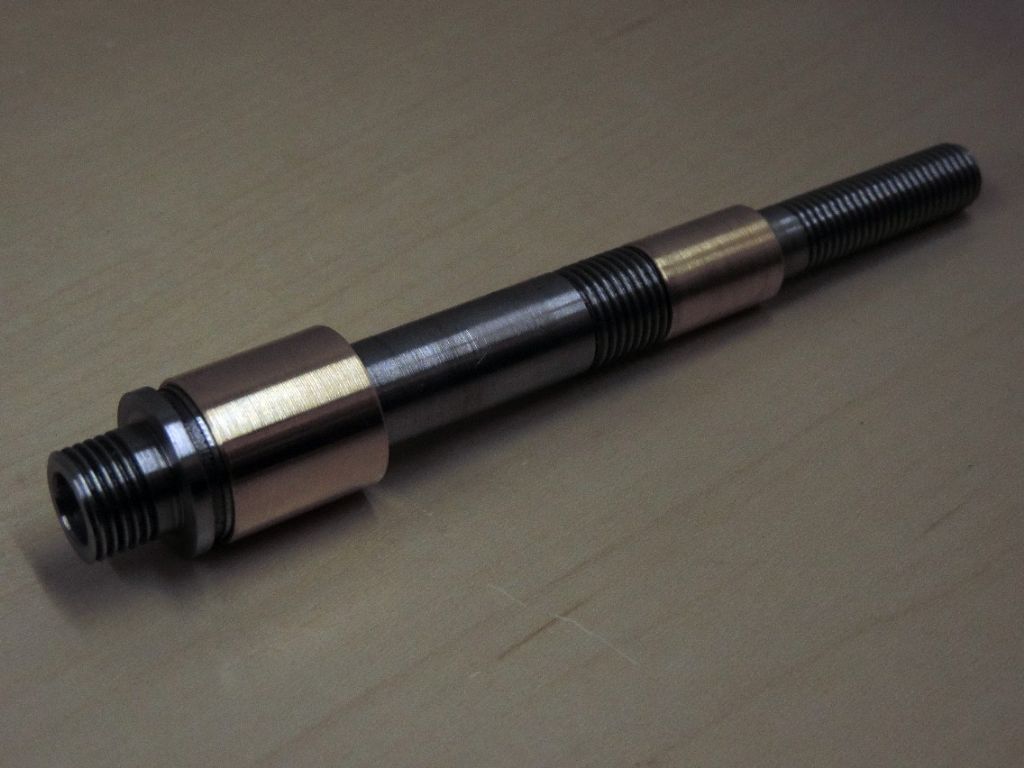
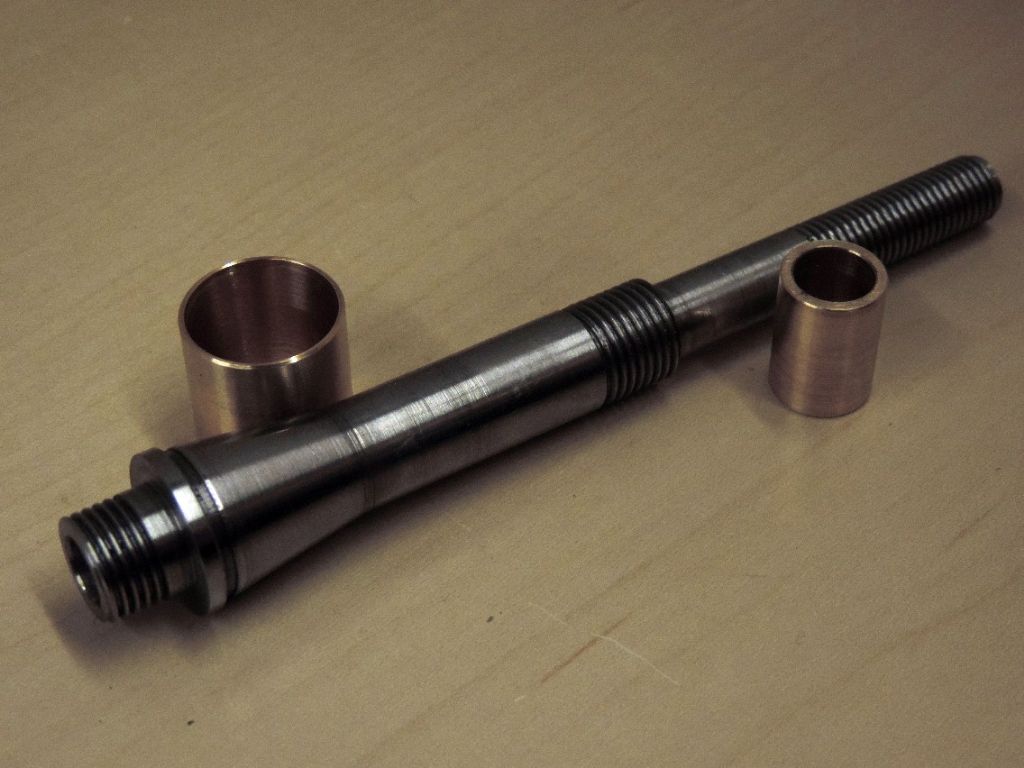
                                      Real progress at last. the new spindle with its bushes fitted:

                                      spindle 2 small.jpg

                                      spindle 3 small.jpg

                                      And with them off. The finish is, as always, better than it looks in the photo, just a bit tatty at the transition from taper to the 1/22 section for the back gear. The front bearing locks solid with virtually no force, but 1/10th of a turn of the 20TPI thrust washer adjusters will move it 10 thou increasing clearance by 1.4 thou, so realistically I will be able to adjust the clearance to a fraction of a thou. The rear bearing is reamed with a H6 3/8" reamer. After polishing the journal is somewhere around .3747 to .3748 and feels like a very nice precision fit with no rattle – probably the best bearing to journal fit I've managed to date. I've got high hopes of success, as long as I can bore the headstock accurately in line. Yes the outer diameters were turned at the same setting as the bores, and I bored the rear bearing true before reaming.

                                      Left with a bit of PB in the chuck reamed 1/2" (so I could test the taper in situ), ready to make bushes for the pulley.

                                      The screw thread on the tail is a bit overlength, should be plenty of room between the bearings for pulley, back-gear and thrust bearing on the thread. Still juggling these trying to decide the best arrangement.

                                      Came up with a good tip today – when boring a taper socket and you need to move the tool right out of the way, use the screwcutting indicator to ensure you put the saddle back in exactly the right place for the next cut. make sure you use the handwheel to take up any backlash, though.

                                      Neil

                                      #166926
                                      Michael Gilligan
                                      Participant
                                        @michaelgilligan61133

                                        Looking good, Neil

                                        … Lucky you decided to draught-proof the Cat-Flap.

                                        MichaelG.

                                        #166943
                                        John Olsen
                                        Participant
                                          @johnolsen79199

                                          Well, it turns out that the little lathe that I have lurking in pieces in a drawer is the TNC version, possibly made by Hercus in Australia going by the Saskatoon pdf. Seems to be in pretty fair condition too, but then I know it hasn't suffered any wear during the last thirty years since it has been in a drawer all that time.

                                          John

                                          #167008
                                          Bazyle
                                          Participant
                                            @bazyle

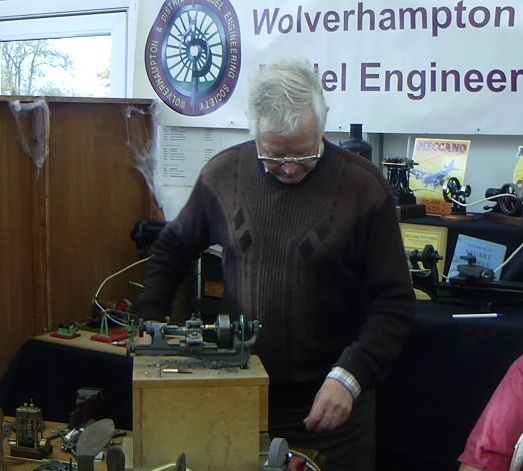
                                            At the midlands show the Wolverhampton club stand had an 'old style' workshop with someone working on their Adept.

                                            midlands peatol pdc_1148.jpg

                                            It was nicely mounted on a box that contains the motor to make a very compact unit. Behind him you can just see another lathe that I think might be a Flexispeed or one of the similar ones. An added touch to this display was that he was working on a whitewood kitchen table. It might have been better though to have moved up closer to the 'window' to show and talk to the punters. It is good to see clubs putting some effort into their stands like this to add some variety to the displays for the interest of regular visitors who go regularly and may have seen a lot of the club exhibits before. (ooops drifted into the exhibition thread there)


                                            Edited By Bazyle on 19/10/2014 14:06:21

                                            #167013
                                            Roderick Jenkins
                                            Participant
                                              @roderickjenkins93242

                                              I was impressed with the guy treadling the full size lathe to cut steel using the fine feed !

                                              Rod

                                              #167409
                                              Neil Wyatt
                                              Moderator
                                                @neilwyatt

                                                I milled the base of the 'foot' flat – apparently the standard 'first step' for any precision work on the Adept family. The original base seems to have been left as cast. In fact, many of the non-working parts of the casting are rough as a badger's bottom! Some small blow holes have juist been painted over.

                                                I clamped the casting to eh mill bed with two stops and two clamps. Unfortunately it seems to have a chilled skin so the finish was less than perfect, even after a second skim, and just the first one had left the foot lower than the bottom of the section under the gap. About 15 thou off in the end carefully linished the supporting bit so it didn't foul a surface plate. Using a surface gauge as a guide the bed was low by a few thou at the tailstock end and there was a wee bit of rock. Now my favourite bit (not!) out with the blue and using quick lick on linisher then a file in hybrid mode (some filing, some scraping)eventually managed to get it sitting flat without any rock and apparently level (both ways) according to the surface gauge. I will check using a dial gauge when I mill the tenon for the new headstock, and use a shim to ensure it's dead level, but its certainly good enough for mounting the lathe now.

                                                I can't bring myself to chop off the old headstock until I have made the new one.

                                                Neil

                                                #167411
                                                Neil Wyatt
                                                Moderator
                                                  @neilwyatt

                                                  Quick tip – when using a bandsaw to cut two vertical slots (for the basic headstock U-shape, after chain-drilling) think twice before wandering off to answer a few emails. I narrowly avoided an expensive mistake, my saw shoots through 2 1/2" CI!

                                                  Neil

                                                  #167414
                                                  Oompa Lumpa
                                                  Participant
                                                    @oompalumpa34302

                                                    Very helpful shot of the Adept there. Having never seen one it gives a sense of proportion. My Taig Micro is bigger than that and it is tiny!

                                                    graham.

                                                    #167416
                                                    John Stevenson 1
                                                    Participant
                                                      @johnstevenson1
                                                      Posted by Neil Wyatt on 22/10/2014 20:27:29:

                                                      I milled the base of the 'foot' flat – apparently the standard 'first step' for any precision work on the Adept family. The original base seems to have been left as cast. In fact, many of the non-working parts of the casting are rough as a badger's bottom! Some small blow holes have juist been painted over.

                                                      Neil

                                                      .

                                                      Not fit for purpose, send it back.

                                                      Invoke Distant selling regulations

                                                      Get on to Trading Standards.

                                                      Don't accept shoody workmanship like this.

                                                      I know it cot 17/6 but bloody hell where DO you draw the line……………………………

                                                    Viewing 25 posts - 26 through 50 (of 203 total)
                                                    • Please log in to reply to this topic. Registering is free and easy using the links on the menu at the top of this page.

                                                    Advert

                                                    Latest Replies

                                                    Viewing 25 topics - 1 through 25 (of 25 total)
                                                    Viewing 25 topics - 1 through 25 (of 25 total)

                                                    View full reply list.

                                                    Advert

                                                    Newsletter Sign-up