Measuring Gears (including pressure angle)

Advert

Measuring Gears (including pressure angle)

Home Forums Hints And Tips for model engineers Measuring Gears (including pressure angle)

Viewing 14 posts - 1 through 14 (of 14 total)
  • Author
    Posts
  • #481350
    Andy Pugh
    Participant
      @andypugh44463

      If you have a gear and need to replace it or match to it (for example to make a missing change gear for your lathe) here is how to do it.

      (Most of this isn't new, but I think that the pressure angle table is)

      There are two main standards for gears, imperial and metric.

      To buy or make a gear you need the number of teeth (N) the tooth size (DP or MOD) and the pressure angle (PA).
      PA is generally 20° in modern applications, but was generally 14.5° early in the 20th century, and could be either mid-century.

      Designers use the Pitch Circle Diameter (PCD) to design geartrains, but that's in the middle of the teeth and can't be directly measured.

      For metric (module, or mod) gears the PCD is N x MOD
      For imperial (DP) the PCD is N / DP.

      The OD of a gear is the PCD + the "Addendum" which is normally 1 module (or 1" / DP) per tooth, so 2 modules extra on diameter.

      So, to identify a gear.

      1) Count the teeth. = N

      2) Measure the OD in mm and divide by (N + 2) = MOD

      3) Divide (N + 2) by the OD in inches = DP

      4) DP is generally an even number, MOD is usually an integer down to 3, then goes by 0.5, 0.25 or 0.1. Pick the most likely.

      4a) Gears can be "profile shifted" to improve the geometry when the ratio is large, or if the centre distance is critical, and not easy to change. Note this deviation from the theoretical OD.

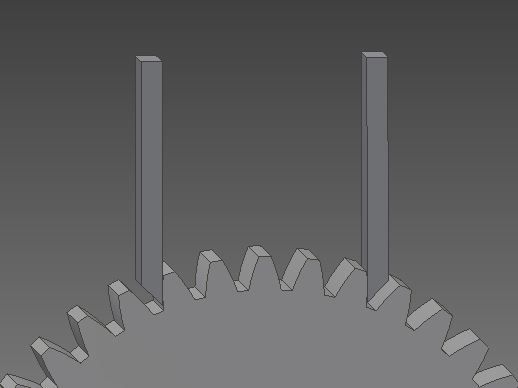
      5) (The main point of this email) To measure the Pressure Angle (PA) measure the span across the flanks of 4 teeth (or 3 on a smaller tooth-count gear) with a digital caliper and zero it.
      Then measure the span over 1 fewer teeth, and over one more teeth. That should give the same number both times (one being negative, of course.) Refer to the table below to determine the most likely PA.

      ->VVVV<- would be the span over 4 teeth. The caliper jaws need to be on the sides of the teeth, not the tip.

      DP 14.5° 20°
      4 19.314 18.746
      6 12.876 12.497
      8 9.657 9.373
      10 7.725 7.498
      12 6.438 6.249
      14 5.518 5.356
      16 4.828 4.687
      18 4.292 4.166
      20 3.863 3.749
      22 3.512 3.408
      24 3.219 3.124
      26 2.971 2.884
      28 2.759 2.678
      30 2.575 2.499

      MOD 14.5° 20°
      8 24.32 23.617
      6 18.249 17.713
      5 15.208 14.761
      4 12.166 11.809
      3 9.125 8.856
      2.5 7.604 7.380
      2 6.803 5.904
      1.75 5.323 5.166
      1.5 4.562 4.428
      1.25 3.802 3.690
      1 3.042 2.952
      0.9 2.737 2.657
      0.8 2.433 2.362
      0.75 2.281 2.214
      0.7 2.129 2.066

      Advert
      #30742
      Andy Pugh
      Participant
        @andypugh44463
        #481371
        Alan Charleston
        Participant
          @alancharleston78882

          Thanks Andy. It's good to have all this info in one place. I've printed it out for reference. I've always been stumped when it comes to determining the pressure angle. I'm not sure how to measure the span across the flanks. Are the tips of the caliper presented to the circumference of the gear, which will measure the span fairly high up the tooth, or to the side of the gear where the span can be measured fairly close to the root?

          Regards,

          Alan

          #481372
          Michael Cox 1
          Participant
            @michaelcox1

            Thanks for your post. Is this an original idea? What is the maths behind it?

            Regards Mike

            #481377
            IanH
            Participant
              @ianh

              Nice post!

              How about some info and photos on the use of those nice gear verniers?

              Also I would like to hear more about corrected gear forms, I suspect this is the same as profile shifted forms mentioned in the original post. As an example, I am thinking of the case where the original fine tooth gears in the JAP cam train were replaced with coarse tooth gears running on the old gear centres to avoid the fine tooth gears stripping under the action of starting the engine through the cam train.

              #481384
              Andy Carlson
              Participant
                @andycarlson18141

                Thanks for the info.

                Cooincidentally I gave the PA measurement/calculation method a try on my 14DP gears just a few days back. I found it impossible to get a usable answer just using the calipers and formula. As your table shows, the difference between 20 and 14.5 degrees is a little over 0.2mm. My measurement error was a good deal more than this because I could only get the very tip of the calipers between the teeth at the root and things were further thrown into doubt by the radius at the root. I didn't get an answer from the formula because I ended up with a 'cosine' number of more than 1.

                I found this thread which suggests a couple of other bits of 'evidence' including the age of the machine and the appearance of the root area…

                https://www.practicalmachinist.com/vb/general-archive/measuring-pressure-angle-spur-gears-74835/

                Starting with the possible answers (as per your post) to the calculation was somewhat more useful – I guesstimated the root pitch using a steel rule (measuring just one tooth and gap) and decided whether it was closer to the higher or lower figure.

                So all things considered I concluded that my Faircut 14DP gears are more likely 14.5 degrees PA.

                Edited By Andy Carlson on 22/06/2020 08:36:03

                Edited By Andy Carlson on 22/06/2020 08:36:48

                #481393
                Anonymous
                  Posted by Alan Charleston on 22/06/2020 07:36:31:

                  I'm not sure how to measure the span across the flanks.

                  Use a disc micrometer.

                  The underlying maths is simple. The disc micrometer will measure the distance across the teeth, but not on the pitch circle diameter. By varying the number of teeth the exact point of measurement will vary. The thickness of a tooth, away from the pitch circle diameter, is determined by the pressure angle. So by comparing the results to the theoretical values the pressure angle can be determined.

                  Andrew

                  #481398
                  Michael Gilligan
                  Participant
                    @michaelgilligan61133
                    Posted by Andy Carlson on 22/06/2020 08:34:58:

                    Thanks for the info.

                    Cooincidentally I gave the PA measurement/calculation method a try on my 14DP gears just a few days back. I found it impossible to get a usable answer just using the calipers and formula. As your table shows, the difference between 20 and 14.5 degrees is a little over 0.2mm. My measurement error was a good deal more than this because […]

                    .

                    It’s interesting to note how good the human eye can be at detecting ‘difficult to measure’ differences in shape.

                    Although it unfortunately doesn’t include 14.5° … The animation in post #21 here is very effective:

                    https://www.chiefdelphi.com/t/turning-down-the-od-of-a-gear/137417/21

                    Whilst I doubt if any of us could see the difference between 14° and 14.5° PA, it is easy to tell 14.5° from 20° once you “get your eye in”.

                    MichaelG.

                    #481400
                    Andy Pugh
                    Participant
                      @andypugh44463
                      Posted by Alan Charleston on 22/06/2020 07:36:31:

                      I'm not sure how to measure the span across the flanks. Are the tips of the caliper presented to the circumference of the gear, which will measure the span fairly high up the tooth, or to the side of the gear where the span can be measured fairly close to the root?

                      The measurement should be tangent to the tooth flanks. As long as it isn't wedged deep in the root or teetering on the tip the measurement should be the same.

                      gearspan.jpg

                      #481403
                      Andy Pugh
                      Participant
                        @andypugh44463
                        Posted by Michael Cox 1 on 22/06/2020 07:38:51:

                        Thanks for your post. Is this an original idea?

                        It is measuring "Basic Pitch".

                        I have an excel spreadsheet that does basic gear calculations, and one thing it gives is a "span across N" which can be used to check when the hobbing process has cut deep enough.
                        I found a reference online that mentioned using the difference between two spans to determine PA, but that only had an equation.

                        I used my spreadsheet to calculate the numbers for the range of gears shown

                        However, armed with these phrases, I have actually found a much more extensive table and a more detailed explanation:

                        **LINK**


                        Edited By Andy Pugh on 22/06/2020 09:34:26

                        #481408
                        Michael Gilligan
                        Participant
                          @michaelgilligan61133

                          Posted by Andy Pugh on 22/06/2020 09:33:40:

                          I have actually found a much more extensive table and a more detailed explanation:

                          **LINK**

                          .

                          Thanks for the very useful link, Andy

                          PDF duly downloaded to my iPad

                          MichaelG.

                          #481419
                          Oily Rag
                          Participant
                            @oilyrag

                            Ash Gear Supply, Novi, Michigan has a detailed website with tables on gear tooth pressure angles defined by the span measurement system. The Span measurement across a predetermined number of teeth is entered into a table and it spits out the Pressure angle. Even shows how to check for Stubs profiles. A very informative website.

                            Ash Gear also do a range of gear tooth cutters, hobs, spline cutters and can also supply Stubs profile cutters, I managed to get some 12/14 DP cutters from them for BSA gearbox manufacturing. No connections just a decent bunch of people to deal with and very helpful if you need any 'specials'.

                            #481565
                            Michael Cox 1
                            Participant
                              @michaelcox1
                              Posted by Andy Pugh on 22/06/2020 09:33:40:

                              Posted by Michael Cox 1 on 22/06/2020 07:38:51:

                              Thanks for your post. Is this an original idea?

                              It is measuring "Basic Pitch".

                              I have an excel spreadsheet that does basic gear calculations, and one thing it gives is a "span across N" which can be used to check when the hobbing process has cut deep enough.
                              I found a reference online that mentioned using the difference between two spans to determine PA, but that only had an equation.

                              I used my spreadsheet to calculate the numbers for the range of gears shown

                              However, armed with these phrases, I have actually found a much more extensive table and a more detailed explanation:

                              **LINK**

                              Edited By Andy Pugh on 22/06/2020 09:34:26

                              Hi Andy,

                              Thanks for the post and the link.

                              Mike

                              #483712
                              Dave S
                              Participant
                                @daves59043

                                Another method, assuming involute teeth:

                                Take some plasticine or other softish clay like material, create a small block on a flat surface and then roll the gear over it.

                                The matching rack form is then created and the pressure angle can be measured directly with a protractor from the sides of the flanks.

                                Dave

                              Viewing 14 posts - 1 through 14 (of 14 total)
                              • Please log in to reply to this topic. Registering is free and easy using the links on the menu at the top of this page.

                              Advert

                              Latest Replies

                              Viewing 25 topics - 1 through 25 (of 25 total)
                              Viewing 25 topics - 1 through 25 (of 25 total)

                              View full reply list.

                              Advert

                              Newsletter Sign-up