Mc Donald Model tractor

Advert

Mc Donald Model tractor

Home Forums Work In Progress and completed items Mc Donald Model tractor

Viewing 25 posts - 251 through 275 (of 359 total)
  • Author
    Posts
  • #595409
    PatJ
    Participant
      @patj87806

      Fred-

      Great build thread. I just now ran across it; not sure how I have been able to miss it from the beginning.

      After much reading today, I have looked at all of it with great interest.

      I tried to make a bar stock engine in 2012, and quickly learned that this was very much a brute-force way to make things. I decided after that attempt that I would make patterns in wood, and cast engine parts.

      Then 3D modeling came along, and 3D printers, and I found that I could do 98% of the machining in the 3D modeling program, and get very close to final net size of of a part.

      As 3D printers became viable, I discovered that a 3D printer could make a very accurate pattern, and save having to have a lot of dusty woodworking equipment, not to mention the time it takes to make wood patterns.

      I began casting with 356 aluminum, but really wanted to cast part in gray iron. I had some early (accidental) successes with gray iron, but it took me six years to be able to cast consistent quality parts in iron.

      Along the way I learned a great deal about foundry sand types, binder types, pour temperatures, surface finish, gating/runners/risers/sprues, flasks, burners, furnaces, and foundry work in general.

      I became pretty good at 3D modeling in the process.

      I have been using a Prusa MK3s, but have ordered a new Prusa XL so as to be able to print multi-part patterns in one piece. I am not sure when Prusa will ship the XL's, due to supply chain problems.

      Great pattern/foundry work you have here.

      I will post a few comments/suggestions of things I have learned over the years below.

      Pat J

      .

      Edited By PatJ on 22/04/2022 13:45:02

      Advert
      #595410
      PatJ
      Participant
        @patj87806

        A few comments/observations:

        1. Sodium silicate molds and cores are very sensitive to how much CO2 gassing you apply.

        The worst thing you can do is put a SS mold into a bag of CO2; it will cause the core/mold to crumble.

        SS sand has to be gassed about 5 second, and absolutely no more. And the ratio of SS to sand has to e what is recommended by the SS manufacturer (I seem to recall 3 or 5 %). Too much SS makes for a core that is very difficult to remove. All of my first SS cores would crumble after about 24 hours, due to overgassing, and so I would up the SS amount, which did not help much at all.

        After I found out about the 5 second gas rule, my SS cores lasted over a year laying on the open shelf in the shop; this is with the low % of SS.

        2. There is a fine line between getting aluminum hot enough to get a complete mold fill, and too hot, thus causing sand errosion and gas bubble defects.

        Aluminum should be brought quickly to pour temperature (about 1,350 F generally seems to work), and then poured immediately. Overheating an aluminum melt, and delaying the pour can cause terrible gas defects.

        For thin sections, a hotter pour is needed, which degrades the surface finish, especially with oil-based sands.

        .

        #595414
        PatJ
        Participant
          @patj87806

          3. I started with Petrobond (oil-based sand), and then discovered resin-bound sand.

          I use OK85 sand, which is a commercial foundry sand that is very dry, and a fine round grain.

          Sand used with resin binder has to be very dry, and I think OK85 is kiln dried during its manufacture.

          Some tricks with resin-bound sand are to lightly flame it with a propane burner (lazy large flame), to drive off any uncured resin. This improves the surface finish quite a bit.

          And you can spray on alcohol-based mold coat onto resin bound sand, and get a superb finish on iron, with a shiny clean surface finish, with not need for wirebrushing to remove sand from the casting (I use a dry paintbrush to clean my iron castings, and that is all that is required when using mold coat).

          I have seen several people bake their sodium silicate cores, and I think SS cores/molds can also be lightly flamed to drive off any moisture or uncured SS.

          4. I also make multi-part cores and molds from resin-bound sand, and cement them together with a foundry cement. This works pretty well.

          5. You can hold intricate cores in place using chaplets (at least with iron castings, perhaps with aluminum castings too, although the chaplet remains imbedded in the casting).

          Chaplets

          5. I use a 3-part resin binder, which is resin, hardener, and catalyst, and I can vary the catalyst amount to vary the set time. I can vary set time anywhere from 5 minutes to over an hour, and this is an very useful feature.

          6. I use resin-bound sand for both cores and entire molds.

          I make custom flasks for each mold, out of wood, and generally design the flask to minimize sand usage, since resin-bound sand is not reusable. Resin bound sand molds can be very thin, such as 1/2" think in places, and sometimes 1" thick maximum.

          .

          #595417
          PatJ
          Participant
            @patj87806

            7. Knife gates seem to work well for thin parts, since you can fill a large thin section very quickly.

            I generally use generous V-shaped runners, often one on each side of the mold, with gates either side of the mold cavity. The runners have spin traps at their ends, to allow the metal to spin and rise up the trap, and out the top of the mold, before metal starts to enter the mold cavity through the gates.

            The gates are always at the top of the runners, and as low in the mold cavity as possible to try and avoid the waterfall effect.

            The metal velocity is controlled by the gates, not by the sprue or any chokes in the system.

            Oversized runners allow the cooler metal and trash/entrained metal/air to flow to the spin trap, and then feed very hot clean metal to the mold cavity.

            8. To solve your strobe screen problem, hit the "PrtScn" button on the keyboard, toggle over to your favorite photoshop program, hit Paste, and then crop off the unwanted screan area. This produces a perfect screen capture every time.

            9. I acutally have found that casting gray iron is easier than casting aluminum, since gas absorption does not seem to be a problem with iron. I can get iron as hot as possible, and not have to worry about getting it too hot and degrading surface finish.

            Iron requires a good clay-graphite crucible such as a Morgan Salamander-Super, and furnace refractory such as Mizzou, which holds up well to iron temperaturs.

            I #10 full of iron takes about 1 hour to bring to pour temperature, and that requires about 2.5 gallons of diesel (some use waste oil; I don't).

            10. Gray iron scrap does not have to be cleaned prior to melting it, in contrast to what many will tell you.

            I have seen scrap with 1/4" of thick rust get melted and make the most beautiful castings you have ever seen.

            Any paint, rust, etc. on iron scrap comes out in the slag. I had to see this to believe it, but it is true, and can easily be proven with a couple of test pours.

            .

            #595418
            PatJ
            Participant
              @patj87806

              So in summary, great work you have all across the board, such as pattern making, core making, 3D modeling, 3D printing, machining, etc.

              You most definitely have it "going on" as they say in these parts.

              I will add a few pictures of the snap flasks that I make, to use with resin-bound molds.

              Snap flasks are very useful, and they totally prevent any damage to flasks from spilled metal, since the mold is poured without the flask being in place.

              .

              #595419
              PatJ
              Participant
                @patj87806

                All metal should be poured as cool as possible, while being hot enough to completely fill the mold cavity.

                Dropping the pour temperature 20 F can have a huge affect on surface finish (for the better), if you can get the mold to fill without cold-shuts.

                With cast iron, there is little chance of overheating it, and few use a pyrometer with iron, due to the cost of iron pyrometers.

                I can get a good iron surface finish without paying any attention to pour temperature, but aluminum is very sensitive to pour temperature and surface finish, especially with oil based sand.

                .

                #595443
                DiogenesII
                Participant
                  @diogenesii

                  Hope that it all comes out well, Fred – thanks for continuing the posts, it must feel like an extra task on top of each job to keep this up, it's much appreciated.

                  #595507
                  Four stroke Fred
                  Participant
                    @fourstrokefred

                    Thanks to Jon,Pat,Roger and Diogenes for your comments and pleased to hear that you enjoy reading the progress on this project. I have been working on this model tractor for the past 3 years – time flys by quickly when your having fun and it’s good to share opinions and comments with like minded friends. When one visits an exhibition you see the finished models but it doesn’t show the effort and time that has been used to create them. This thread has been a record of both success and failures and even now I am not sure what the outcome will be!
                    Pat your information has been taken on board and was very interesting to read. When discussing the finished casting with my mates we came to the following:-

                    The runner height could have been lower.

                    The speed of the pour could have slower.

                    The temperature of the melt may have been to high.

                    The last casting is usable but the school report would have read “ could do better” and with this in mind I may have another attempt. If at first you don’t succeed you just keep trying!

                    Fred.

                    #595518
                    Keith Rogers 2
                    Participant
                      @keithrogers2

                      I must admit I really enjoy reading of your trials and tribulations Fred.

                      Keep up the good work. It'll be a fabulous model when it's finished. I look forward to seeing it.

                      Keith.

                      #597913
                      Four stroke Fred
                      Participant
                        @fourstrokefred

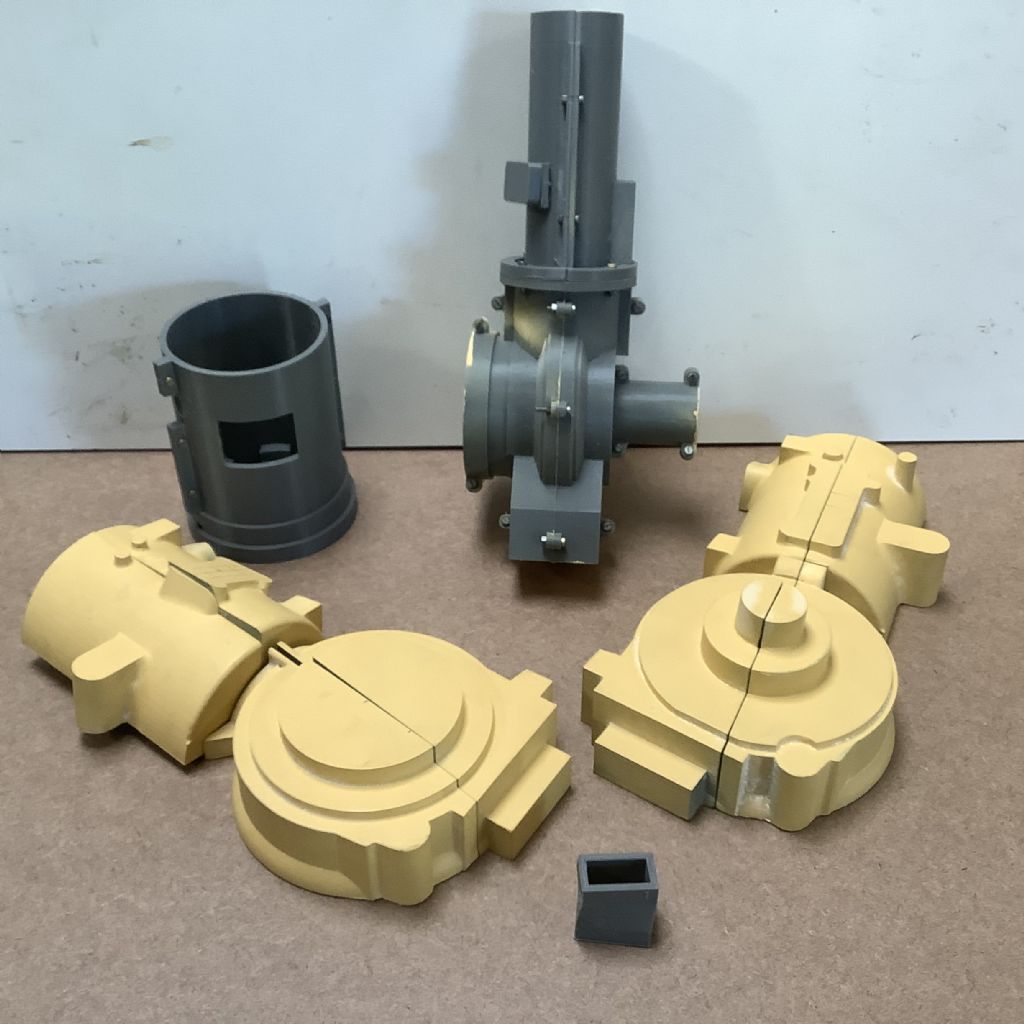
                        Usually winter in Australia in our area brings a large high in the weather pattern and this results in stable weather, blue sky and it is relatively dry but not this year. Queensland has had rain and more rain and this means the out door foundry can not be used and we have to wait for the next dry spell. Over the last couple of weeks I have been modifying both the pattern and core boxes for the engine. There was not a great deal to be done on the pattern as that works quite well but I did enlarge the water outlet on the top of the cylinder to give a smoother flow to the thermo siphon cooling system. The core box has been refined to give more metal when machining the bore and thus reducing the water passage volume. The original core box was in four parts but I have now decided to make it in six parts to ease the withdraw of the sand core. The 3D printer is now working over time as each of the six parts takes approximately 9 hours to make. Having now received advice and having consulted doctor goggle I realise that there is more than just make a runner and pour in the molten metal into the flask. I will give this area and the venting much more consideration and take care to 3D print the correct shape and size of runners, risers and vents. Being an amateur in the field of foundry work and trying to produce a difficult casting means that there is a very steep learning curve but this is a self inflicted problem that presents a challenge and that is just one of the joys of our hobby.

                        Fred

                        #600018
                        Four stroke Fred
                        Participant
                          @fourstrokefred

                          Although I have not written up my exploits for a few weeks I have still been busy and the photographs show the new patterns and core boxes for the engine. I still have to 3D print the inside of the water core box but there has been a delay as my computer decided not to co- operate and has to go to the computer ‘doctor’ to be sorted out but should be back tomorrow. Unfortunately our small group of model engineers in this area has run out of the resin and hardener and it is not easy to buy in small quantities. We are hoping to buy a 20 Lt can ( with suitable hardener that will give 20 minute hardening time factor) and divide it up to spread the cost. 015d4e44-a141-4f91-9883-0e4dabcbd48d.jpegFred.

                          #601199
                          Four stroke Fred
                          Participant
                            @fourstrokefred

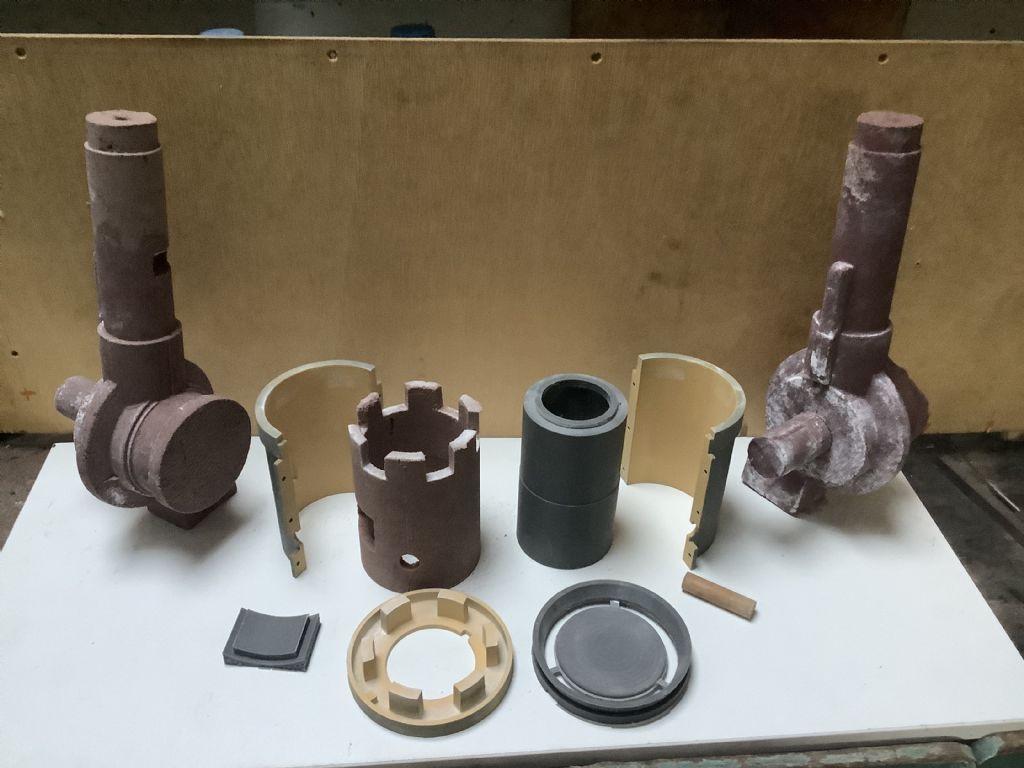
                            Sometimes progress and success arrive in small steps. The photo shows a small step that was made this week as I now have made the sand core for the water passage. It has taken quite some time but the development and 3D printing is a lengthy process. The castellated sand shape in the centre of the photo is the water passage and around it are the parts of the mould. The grey part, front right, is the capping part and was designed to act as a funnel and a cap for the centre tube. Packing the sand has to be carried out quickly and the funnel definitely helps out here, plus some manual dexterity! This was the first attempt and it worked, even if it took quite some time to extract the end product. I have been studying runners, risers, gates and the whole process of pouring the molten metal into the mould and I am now ready to make this part of the system work. I have read conflicting information where the theory and practice do not match up and that’s in the same document. More study and reading required. Our small group are still chasing up a supplier of small quantities and of both resin and hardener but progress is being made (transportation is expensive).

                            Fred.

                            #601200
                            Four stroke Fred
                            Participant
                              @fourstrokefred

                              20e4f38d-f2e9-436b-b942-9264adcb9f9f.jpeg

                              #601218
                              A Smith
                              Participant
                                @asmith78105

                                Following with great interest.

                                Andy

                                #602670
                                Four stroke Fred
                                Participant
                                  @fourstrokefred

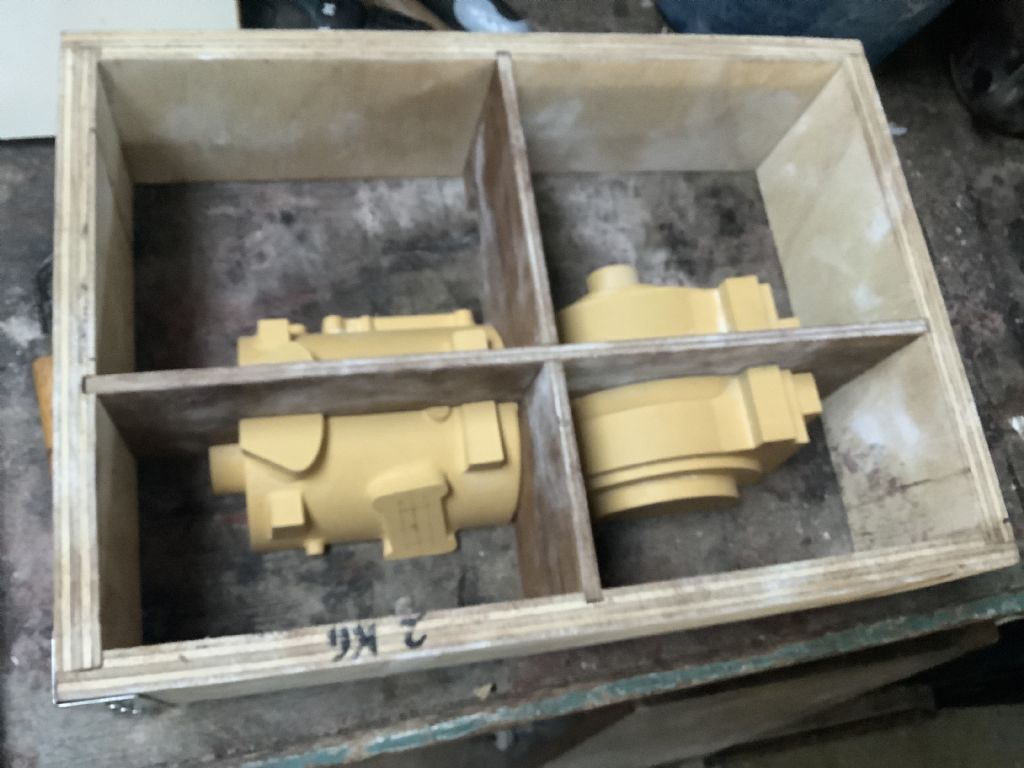
                                  I have just checked back on this forum and discovered that I have been working on this casting for the engine for about ten months ! The last few weeks have seen a repeat of the processes that I carried out except this time I am using new patterns and core boxes. There is no substitute for experience as long as it it a learning process. The photographs show the latest attempt with modified runners and risers. Tomorrow I hope to pack the top half and next week attempt pour number three! This time I am using a finer facing sand and this leaves a crisper finish to the mould. Photo to follow.

                                  Fred.

                                  #602671
                                  Four stroke Fred
                                  Participant
                                    @fourstrokefred

                                    cf23f624-bb06-4e28-bd0d-9d463d0ebf23.jpegFred.dcb140bb-0ef9-4281-bf17-144a6eeb5ccf.jpeg

                                    #602692
                                    Adrian R2
                                    Participant
                                      @adrianr2

                                      I may have mentioned this before but have you come across a Youtube channel called "Olfoundryman" in your research? He is, I think, a retired professional foundry worker who up until some recent poor health was still casting in his home workshop and producing high quality work. I have tried to copy his advice on pouring basins and runners in my own poor attempts. A recent video titled "possibilities" includes some recommend reading, e.g. Dr John Campbell.

                                      #603096
                                      Four stroke Fred
                                      Participant
                                        @fourstrokefred

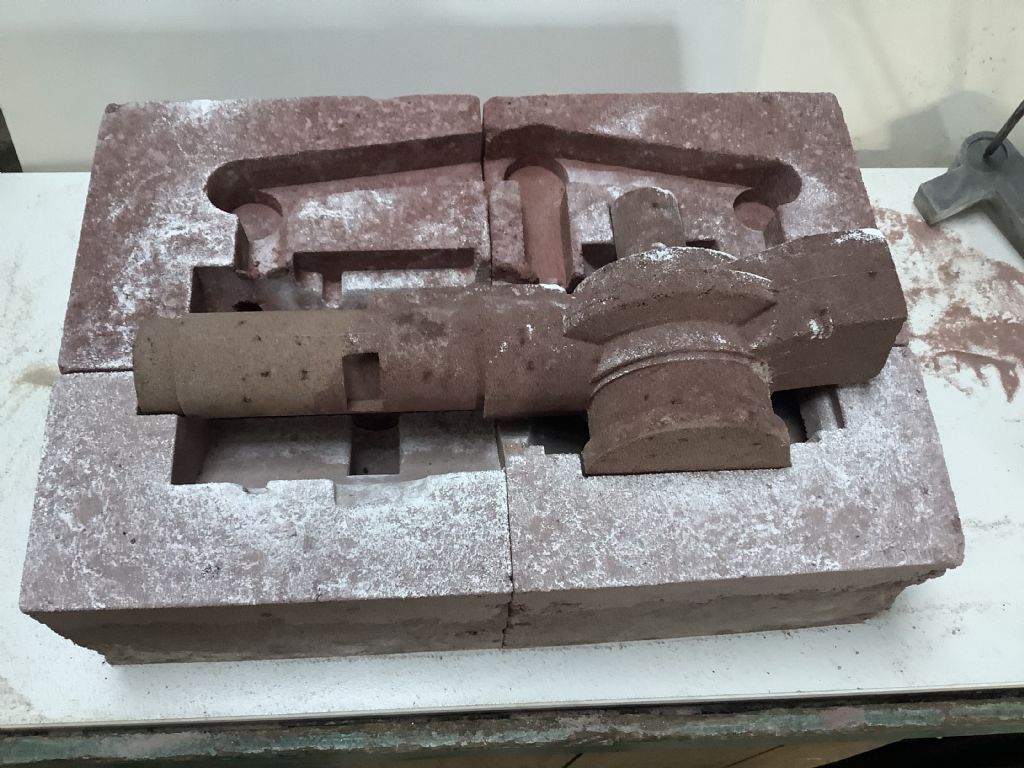
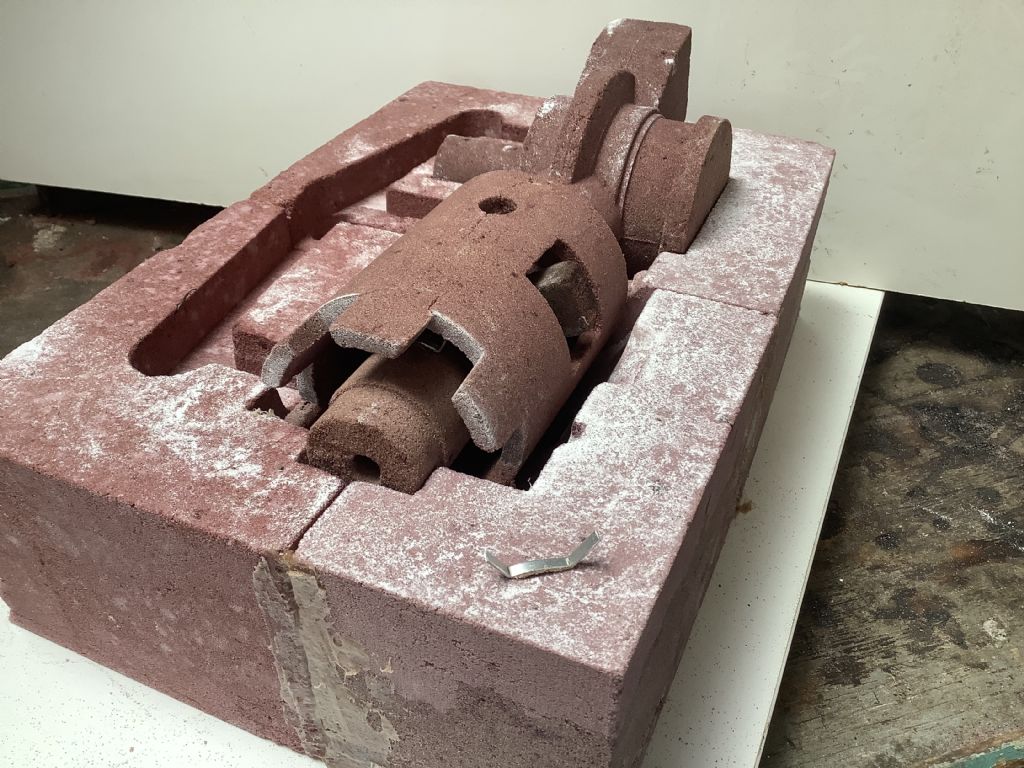
                                        58804087-dfa4-4a52-be2a-379edec120fd.jpegIToday I assembled the blocks ready for casting next week, weather permitting. The top photo shows the three cores in position with the water passage core held in place by the chaplets – sample shown in front right hand corner. This was a real fiddle and a test of will power! All the blocks have been glued together and vents cut into the top blocks to release any gas build up from inside. It seems almost a pity to pour metal in but the aim is to produce a good casting and hope that this is the last time. With this part of the project it makes me feel almost like a child who leaves his home work to the last minute ( having completed most of the other parts already) but you know it has to be done!

                                        Fred

                                        #603443
                                        Four stroke Fred
                                        Participant
                                          @fourstrokefred

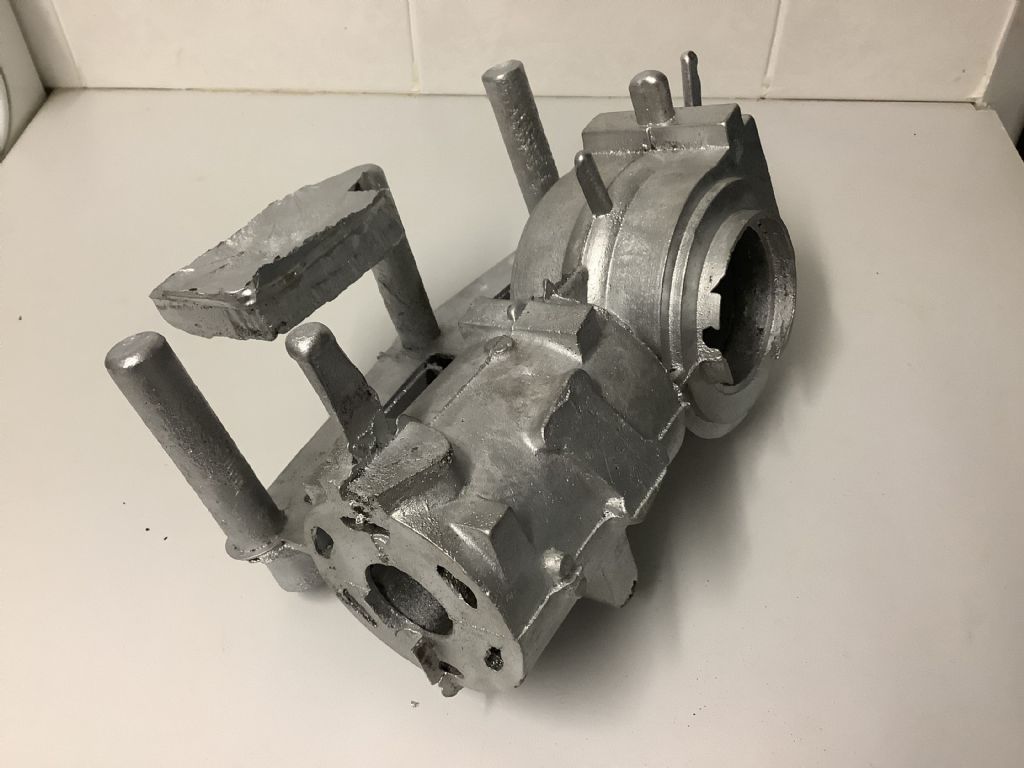
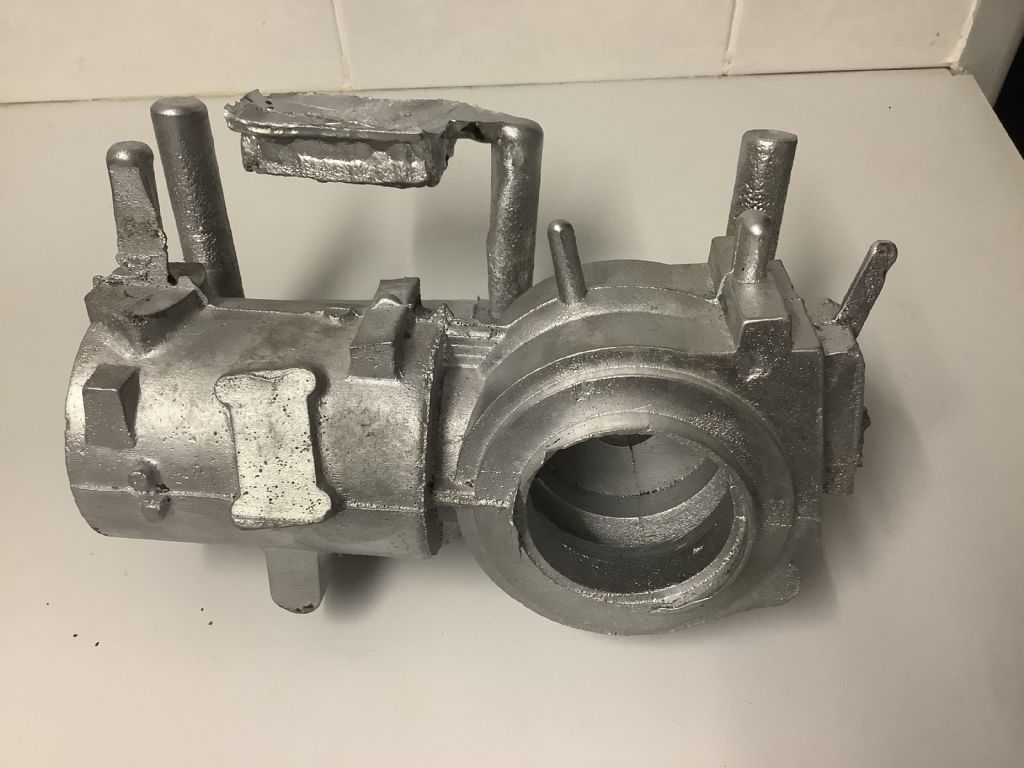
                                          After many months of trying to produce a good casting, today was the day. The photographs show the cleaned up engine casting with all the runners, risers etc. The quality of the casting ,particularly the surface finish both inside and out has improved over the other two attempts and pouring method worked very well. The rectangular block is the pouring basin and it was a pleasure the see the molten metal being drawn into the mould and the rise up the vents. Fortunately the sand core for the water passage did stay in place and with the sand now removed it looks good. One could say the cloud has been lifted! The next stage is to trim off the parts not required and prepare the casting for machining.

                                          A very happy,
                                          Fred.

                                          caebabed-258a-4646-a017-b087662860aa.jpeg

                                          #603451
                                          lee webster
                                          Participant
                                            @leewebster72680

                                            Hi Fred,

                                            This is the first time I have seen this thread, so I hope I am not asking questions you might have already answered.

                                            1) What sand system did you make the cores and mould with? It looks like some kind of bound sand, resin?

                                            2) What metal did you use for the pour?

                                            3) Not a question, fantastic job! Such a nice casting.

                                            I am nearly ready to produce the moulds for my, what started out as half scale but is now third scale, Austin Seven engine. I have 3D printed the crankcase just to have a look at in the flesh and decide the best way to produce the patterns. I started to realise that a two piece pattern might not do it, I might need a four piece. I didn't think I could do that with green sand, it would have to be a resin bound sand. And then I come across this thread with a four piece mould. Talk about perfect timing!

                                            Lee

                                            #603456
                                            Four stroke Fred
                                            Participant
                                              @fourstrokefred

                                              I it took me a while to find the second photo but here it is. Thanks for your comments Lee and to answer your questions. I use a resin bonded sand ( with hardener) for both the cores and the “blocks” and use “ Liquid Nails” to join them all together. The sand used on the surface of the casting is quite fine but I back it with a courser mixture. The ratio I use is 1kg of sand ,25cc of resin and 2.5cc of hardener. The resin needs to be well mixed into the sand and contrary to information that I have read I then add the hardener. You do not have a long time to play with it ! I make sure the mould is well vented and as you can see I use a reservoir to pour into. The casting is in aluminium – melted down Lister diesel pistons and degassed. I was interested in your new project of the Austin 7 engine. This brought back many memories as that was my dads first car when we lived in North Wiltshire – ah those were the days! I hope all goes well and would be interested in the outcome.

                                              Fred.

                                              ee4bbc7d-abac-450c-af05-d1b7afb9e034.jpeg

                                              #603458
                                              Hopper
                                              Participant
                                                @hopper

                                                Awesome work Fred. You got there in the end. Worth all the work by the look of it too.

                                                #603459
                                                Four stroke Fred
                                                Participant
                                                  @fourstrokefred

                                                  P.S. I forgot to add a big thanks to my mates Ray, John and John whose help made this possible. We are only a small group of vintage years who share our interests and enjoy our hobby.

                                                  Fred.

                                                  #603468
                                                  Roger B
                                                  Participant
                                                    @rogerb61624

                                                    That looks good smiley

                                                    #603486
                                                    lee webster
                                                    Participant
                                                      @leewebster72680

                                                      Thanks for the information Fred. I see that you are in Australia. I wonder if what you call "liquid nails" is what we here in the UK use to stick timber and panels to walls etc?

                                                      I have a long way to go with the A7 engine. It's my first attempt at anything like this.

                                                      Lee

                                                    Viewing 25 posts - 251 through 275 (of 359 total)
                                                    • Please log in to reply to this topic. Registering is free and easy using the links on the menu at the top of this page.

                                                    Advert

                                                    Latest Replies

                                                    Viewing 25 topics - 1 through 25 (of 25 total)
                                                    Viewing 25 topics - 1 through 25 (of 25 total)

                                                    View full reply list.

                                                    Advert

                                                    Newsletter Sign-up