Making Tool holders for my Shaper

Advert

Making Tool holders for my Shaper

Home Forums Work In Progress and completed items Making Tool holders for my Shaper

Viewing 7 posts - 1 through 7 (of 7 total)
  • Author
    Posts
  • #314828
    Joseph Noci 1
    Participant
      @josephnoci1

      Me again…

      I used my Nice New ALBA NC shaper to make new jaws for its vice, and promptly decided that the next thing to make is a darn Chip guard! Wow, can that shaper toss chips about! As the only space I have left for it is in the Woodwork shop, chips don't go down well in there!

      So, here are some pics of the guards – quickly fitted and removed by means of 4 thumbscrews, and 4 ex-hard-disc drive magnets siliconed to the guards:

      chip guard1.jpg

      chip guard2.jpg

      chip guard3.jpg

      Two right side thumbscrews

      chip guard thumbscrews.jpg

      Two left underside magnets

      chip guard magnets under.jpg

      chip guard front end open.jpg

      Then I started making some toolholders for cutters made from 10mmx16mmx80mm HSS.

      First doing the flat bars in the shaper:

      smoking chips1.jpg

      smoking chips2.jpg

      One bar is 12mm thick, the upper bar in the pic below, the other is 16mm thick. The 12mm bar made horrid chips – all squashed and scrunched, torn out of the bar, while the lower bar chips curled off nicely. Both mild steel, with black scale, flame cut to sort of size – supplier could not tell me what grade/type of steel these were!

      strange chips1.jpg

      strange chips2.jpg

      strange chips3.jpg

      The lousy chips come from the upper bar in the pic below…Surface finish is strange! Same feed speed, DOC, ram speed and cutter as the lower bar. Upper bar cut first.

      both bars finish.jpg

      holder bar odd finish.jpg

      Cutter as ground as used – a HSS cutter 10mmx25mmx150mm

      25x10 cutter end view.jpg

      25x10 cutter oblview.jpg

      25x10 cutter top view.jpg

      The open slot end of the tool holder – fitted with steel insert to be welded..

      slotted end weldup.jpg

      Castle tool holder clamped to bar, ready for welding

      holder weld prep.jpg

      TIG Tacked…

      tig tacked.jpg

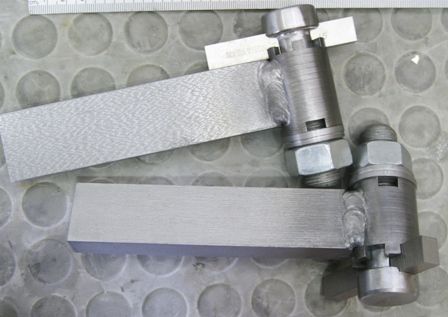
      All welded and cleaned up, ready to use.

      Welding dome with TIG, at 200amps to get real deep penetration, and to put the weld where I wanted – not so easy with MIG..

      all assembled.jpg

      all assembled2.jpg

      Advert
      #31181
      Joseph Noci 1
      Participant
        @josephnoci1

        Used the shaper to make parts for Toolholders for itself..

        #314832
        richardandtracy
        Participant
          @richardandtracy

          I suspect the upper bar was structural steel. Had the same finish on a bit of S275 (430 N/mm^2 ultimate, 275 N/mm^2 yield, weldable fine grain steel) from a channel section. Not nice finish. Retains grease well, if it's any consolation.

          Looks pretty good otherwise.

          Must use my Boxford more.

          Regards,

          Richard

          #314834
          Andrew Tinsley
          Participant
            @andrewtinsley63637

            Blimey! The shaper looks brand new! I didn't think shapers were made any more, so it must be a really high grade restoration! CNC too, the mind boggles!

            Seriously I suggest that you submit the rebuild (?) as an article in MEW, very little good shaper information about. It would make a change from "One man and his Lathe"

            Andrew.

            #314842
            Neil Wyatt
            Moderator
              @neilwyatt

              > Seriously I suggest that you submit the rebuild (?) as an article in MEW,

              It would be most welcome. I have mentioned this thread in the next issue.

              Neil

              #314851
              IanT
              Participant
                @iant

                Damn Joseph, now I'm going to have to upgrade from the cardboard box I've been using too!

                Regards,

                IanT

                #314862
                Clive Foster
                Participant
                  @clivefoster55965

                  Another vote for wanting to see a write up on the restoration job and details of how the numerical control was done.

                  Vested interest in my case as a similar NC exercise for mine is on the "have a good look at it list" for, provisionally, 2020 – 21. Shop Gremlins permitting of course. Fairly sure Josephs work on the NC side will be better than what I'd do if starting from scratch. Special attention to gear cutting in y case as I'd like to do a full set of extra gears for my P&W B once the service, spruce up and re-paint planned for 2019 – 20 is done. Not that I need the gears but might as well do the job right.

                  Clive.

                Viewing 7 posts - 1 through 7 (of 7 total)
                • Please log in to reply to this topic. Registering is free and easy using the links on the menu at the top of this page.

                Advert

                Latest Replies

                Viewing 25 topics - 1 through 25 (of 25 total)
                Viewing 25 topics - 1 through 25 (of 25 total)

                View full reply list.

                Advert

                Newsletter Sign-up