machining problem

Advert

machining problem

Viewing 13 posts - 1 through 13 (of 13 total)
  • Author
    Posts
  • #32396
    Martin Botting 2
    Participant
      @martinbotting2
      Advert
      #170940
      Martin Botting 2
      Participant
        @martinbotting2

        Hi there fellow swarf makers!

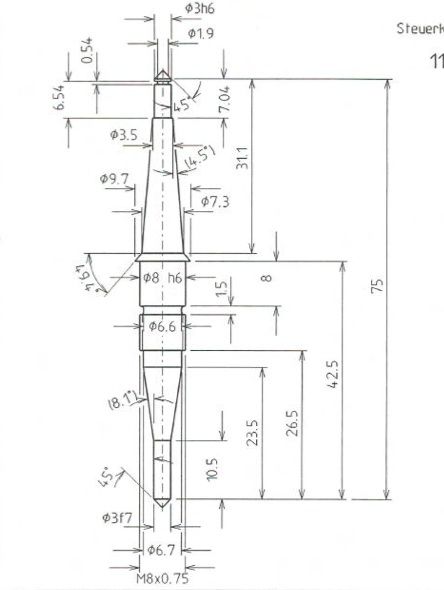
        got a small problem I would like to fire into the ether of the www… I am working on a project that i asked for help with ref: understanding German drawings. I am working on the actuating shaft and I have come upon a few glitches. I have attached a screen shot of the part I am trying to machine for your perusal. Now the problem thus far is this, I decided to turn it between centers ( right or wrong) thats what I did Mk1 was all going swimingly UNTIL i was machining the lower end of the component which was now closest to the headstock and the tool ( tipped indexable type) dug in and PING snapped it and I now had a loverly nearly finished part. As you can imagine the air was blue! Nahil desperandum as my old latin teacher would say prior to beating the C@&p out of me… I cleaned the lathe of all the shards of stabby brass and un- screwed the catch plate and re- chucked the collet holder, a fresh bit of brass was duly faced center drilled and then re swung between centers… (Don't you wish you had a second lathe?) and work started again lesson learnt light cuts working as close to the headstock each time to facilitate turning those pesky tapers and then turn end for end to do the lower portion.. now relying on the mic and my turning skills (HA!) it was time to part off… well my faith in my parting such a thin bit of brass was not great so hacksaw ( chuck board in place.. and a nod to Mr John of twastard engineering) I parted off.. eager to try the bearings and cut the thread halfway up only to find the slackness in all the bearing surfaces. I can only put this down to poor measurement and the spring in the stock from turning between centers..

        AT LONG LAST I get to the cry for help, could any kind soul with more experience like to suggest another way of manufacturing this component on a rather old Myford ML7 with 3+4 jaw chucks, ER collets. NO traveling steady…

        many thanks in advance Martin.

        screen shot 2014-11-28 at 20.24.09 copy.jpg

        #170942
        Roger Provins 2
        Participant
          @rogerprovins2

          Although long experienced with wood turning I'm very new to metal turning.

          It just seems to me that it it might be better to do it half and half using a 3 jaw chuck and half passing through the chuck into the headstock out of harms way and greatly reducing flex.

          I'll be interested to see replies from our expert members.

          Edited By Roger Provins 2 on 28/11/2014 21:40:21

          #170945
          Michael Gilligan
          Participant
            @michaelgilligan61133

            Martin,

            Forgive me if I missed it; but I don't think you mentioned what gender of centres you are using.

            This job is crying-out to be turned between female centres [although with 90 deg. cones you will probably need to make your own] … Turn the ends first, using the 4-jaw; then mount between female centres.

            MichaelG.

            .

            Edit: It's surprisingly difficult to find a decent photo or description; but this should help.

            Edited By Michael Gilligan on 28/11/2014 22:02:39

            #170949
            Neil Wyatt
            Moderator
              @neilwyatt

              Bad form to specify tapers with length, big and little end dimensions AND taper angle!

              Flex shouldn't really be affecting the size of those short journals, assuming you finish with light cuts. Are you fitting them, to your own holes or bought in bearings/bushes?

              The 3H6 and 8H6 are best turned dead to size and perhaps used with reamed holes?

              The 3f7 should be about a thou over size

              Neil

              #170951
              Clive Foster
              Participant
                @clivefoster55965

                Maybe a master-slave style chucking system would help.

                Start by making an accurate bush with concentric double diameter bores to fit the two plain sections in the middle. Do it all at one setting so insides are true to outsides. Put a slot in it so it can be compressed to grip the shaft when mounted in either collet or four jaw. Or you could leave it plain and mount the shaft inside with loctite but it will need a good deal of warming to break the loctite for removal.

                Now start the shaft. With just enough stock material projecting from whichever chuck you choose to use machine the two plain sections and take the overhung portion of material down just far enough for your bush to slide on. Fit the bush to the part you have just made and set-up in chuck or collet ensuring that things are running true and the bush has sufficient grip to hold against machining forces. With the aid of a supporting centre machine up one end. Flip bush and part as a unit and machine the other end.

                Probably best to turn your stock piece true before you start so you have something to measure concentricity from after flipping.

                Clive

                #170962
                JasonB
                Moderator
                  @jasonb

                  First of all I can't quite work out how you could do it between centres and then say you parted off?

                  Myself I would use the collet chuck and firstly face off a piece of bar 12mm overlength and use a small centre drill to do each end.

                  Then holding in a collet by what will be the longer tapered area and supporting one end with a tailstock ctr turn all the diameters and tapes that make up the 42.5mm section leaving teh end dia overlength right to the end of teh work.

                  Change to an 8mm collet and hole by teh 8mm dia with tailstock support and turn the other half of the part

                  Once that is all done hold by a 3mm collet with teh other end in a fixed steady and turn away the ctr holes and form the pointed ends.

                  Also use sharp HSS or a CCGT type ground tip in your indexable tool they will put less side force on the work.

                  Regarding the fit of the bearings, when you get close to size use the bearing to test the fit rather than just taking measurements

                  #170967
                  JasonB
                  Moderator
                    @jasonb
                    Posted by Neil Wyatt on 28/11/2014 22:07:16:

                    The 3H6 and 8H6 are best turned dead to size and perhaps used with reamed holes?

                    Neil

                    Carful there Neil, H tollerances are for holes, h tollerances refer to shafts as shown on the drawingswink 2

                    3f7 should be undersize by 0.006mm to 0.016mm not oversize

                    3h6 should be bang on to 0.006mm undersize

                    8h6 should be bang on to 0.01mm undersize

                    These are to aim at but if you come out a fraction undersize you are going in the right direction.

                    Worth buying a recent Zeuz book as it gives the basic allowances for the commonly use tollerances over a range of sizes, you won't find these in old ones.


                    Edited By JasonB on 29/11/2014 08:39:14

                    #170975
                    Martin Botting 2
                    Participant
                      @martinbotting2

                      Neil.

                      They have to pass through bought bearings, so need to be spot on or should they have what is known as an interference fit i.e. tight and now thats on how do I get it of short of a large 'ammer.

                      Ref: the bad form of the drawing office thats out of my control as you may recall from an earlier post I was having problems understanding them as they are german from the Voith company, and not being an engineer anything beyond a crayon and the back of a fag packet I would not know a good drawing if it bit me.

                      Posted by Neil Wyatt on 28/11/2014 22:07:16:

                      Bad form to specify tapers with length, big and little end dimensions AND taper angle!

                      Flex shouldn't really be affecting the size of those short journals, assuming you finish with light cuts. Are you fitting them, to your own holes or bought in bearings/bushes?

                      The 3H6 and 8H6 are best turned dead to size and perhaps used with reamed holes?

                      The 3f7 should be about a thou over size

                      Neil

                      #170976
                      Martin Botting 2
                      Participant
                        @martinbotting2

                        Jason.

                        my method of parting off on the first and second attempts were by means of the 12" eclipse held in bent frame method, a hacksaw. Please don't judge me! I could not sleep last night so donned the overalls and went and had a reflective "ciggy" down the workshop and found myself chucking a piece of brass and messing about and this was before i had read your posting and tried the collet method mentioned by another poster and did end for end. this gives me the access to try fit the bearings as I go and you know what it seems like it's working.

                        Posted by JasonB on 29/11/2014 07:44:50:

                        First of all I can't quite work out how you could do it between centres and then say you parted off?

                        #170978
                        Martin Botting 2
                        Participant
                          @martinbotting2

                          Thanks to all posters for your valuable input I will have another bash and see what I can do. now for a giggle I will take some pictures of the disasters and hopefully the success. please at least try and mask the laughter!

                          I took the drawings to my local ME club and there was a symbol used on the drawings that I really could not understand, I was told by a very wise and experienced engineer " thats the surface finished tolerance, and being thats in metric they will be microns" he said… I knew from his expression that he knew his words were lost on me. and the rolling eyes when I mentioned "so more emery cloth and less 'dreadnaught' draw filing then?"

                          This is where I say again the value of the web and the willingness of forum members and other ME's is great and thanks again everyone…. Till the next disaster!

                          #170989
                          Neil Wyatt
                          Moderator
                            @neilwyatt

                            I flagellate myself, I looked up a hole table instead of a shaft table :-6

                            Neil

                            #171060
                            Nigel McBurney 1
                            Participant
                              @nigelmcburney1

                              The two two tapers on the drawing dimensioned with both diameters and length plus the angle is NOT bad practice,if you look carefully the two angles are shown in brackets indicating that they are reference dimensions and not to be used for manufacture or inspection ,some companies use the designation ref after after a reference dimension, it is just for information say for the lathe setter.Looking at this part and being of German origin the draughtsman probably had in mind that this long thin complex pin would be made on a sliding head Swiss auto,Making it on a centre lathehe would not be easy,and I would reccomend hss tools ,very sharp,with zero top rake,if it was on my super seven it would be spinning at 2000rpm

                            Viewing 13 posts - 1 through 13 (of 13 total)
                            • Please log in to reply to this topic. Registering is free and easy using the links on the menu at the top of this page.

                            Advert

                            Latest Replies

                            Viewing 25 topics - 1 through 25 (of 25 total)
                            Viewing 25 topics - 1 through 25 (of 25 total)

                            View full reply list.

                            Advert

                            Newsletter Sign-up