Lift-span Bridge

Advert

Lift-span Bridge

Home Forums Work In Progress and completed items Lift-span Bridge

Viewing 25 posts - 1 through 25 (of 78 total)
  • Author
    Posts
  • #333335
    Peter Hausamann
    Participant
      @peterhausamann71795

      This is my first modelling project. I am 63 y.o. and hoping that my skills set will see me through.

      A while ago our local maritime museum acquired an antiquated lift-span bridge console (1964-1995). They wanted to know if it could be used somehow as an interactive display. A friend, who knows my background in avionics (RAAF 1980-86), and works at the museum, asked me to examine the console. After a brief discussion, with the curator and president, I got roped into converting the console to operate a working model of the lift-span bridge come diorama. Nobody there had the skills to build the model, or do the electronics, To do both projects (console and bridge) I became a volunteer worker. Gratefully, they left me alone to do the whole lot (no bosses).

      Actually, the whole museum is run by volunteers. It is a non-profit organisation, so it has limited funding. This project is going to be built with minimum expense. The museum workshop has few tools and space to build this display. So I am building it in my lounge room (I have no garage). Besides a Dremel drill press with a bent spindle, and a few electronic instruments, everything is built by using basic hand tools. So please accept my methods as I use them.

      The lift-span bridge is at Wardell, NSW, Australia. The museum is in Ballina, the next town downstream on the Richmond River.

      0_wardell lift-span bridge.jpg

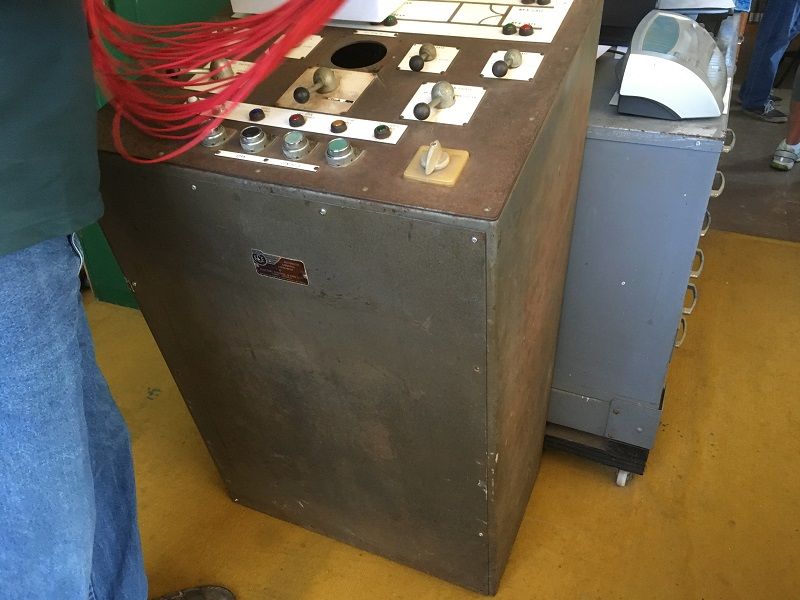
      Here is the console as photographed when it arrived at the museum:

      1_old control panel.jpg

      I was unable to get any schematics for the console, so I have to reverse engineer it to understand how the switches work. Also, the bridge plans were not available for the public, or any information on how to operate the bridge (a security caveat). Instead, I got as many photos I could from the Internet about the Wardell bridge, and measured the span length and the width of the bridge road. From these two I was able to extrapolate the rest of the measurements from the photos (I snapped many photos as well).

      As to the bridge operations, I interviewed the current operator. I was informed that he cannot tell me how to operate it. However, he was able to tell me what each switch and button did (though he has never seen the control panel before). From this, and many hours of deciphering the information, I was able to work out the operating sequence. It is not a simple matter of raising and lowering the span. In a nutshell, there is much safety precautions, and both road and vessel traffic conditions need to be controlled.

      The curator wanted the model bridge to fit across a display area of 2400 x 1200 mm (8 x 4 feet). From my measurements, a 1/72 scale would fit the bridge nicely into the 8 foot length. I made plan drawings for the model to that scale. Later I discovered that a 1/76 scale would have been better due to the resources available for that scale, being OO model railway gauge.

      to be continued:

      Advert
      #31196
      Peter Hausamann
      Participant
        @peterhausamann71795

        Beginners scratch-build 1/72 scale working model diorama.

        #333339
        Michael Gilligan
        Participant
          @michaelgilligan61133

          That looks a great project, Peter yes

          I look forward to reading your story.

          MichaelG.

          #333349
          Neil Wyatt
          Moderator
            @neilwyatt

            Fascinating!

            #333383
            Peter Hausamann
            Participant
              @peterhausamann71795

              Thank you Michael and Neil for your interest.

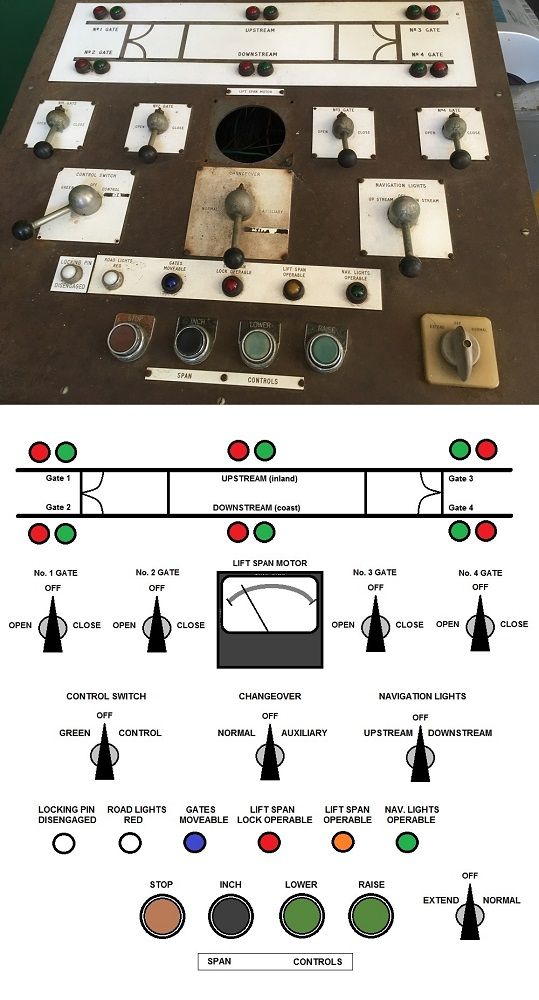
              To make my life easier,I quickly made a layout drawing of the control panel for a visual reference.

              1_bridge model update_control panel basics.jpg.

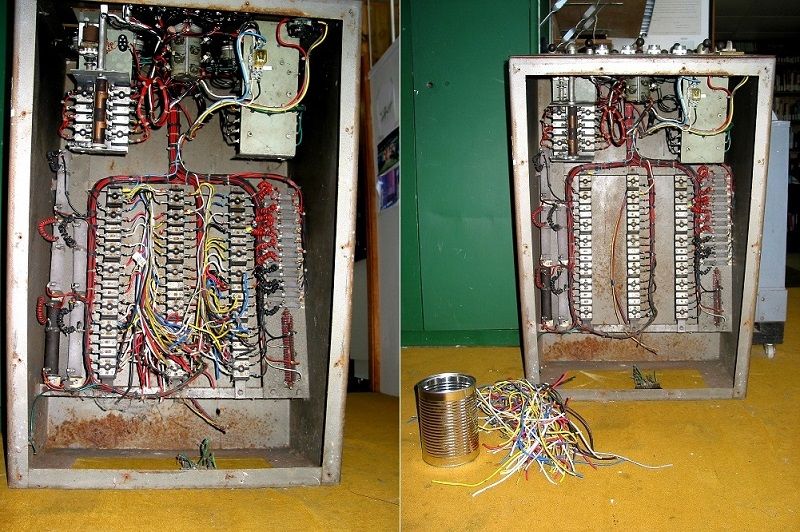
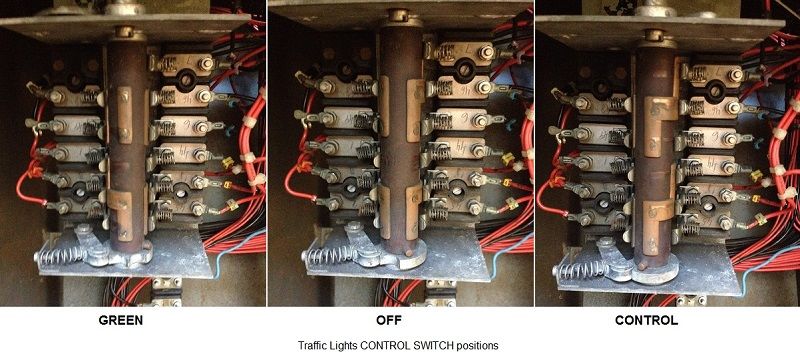
              Took the front panel off to access the internals. Many wires were simply cut at the base for quick removal of the console. I disconnected them from the terminal boards. The two main switches, Control Switch and Navigation Lights switch are custom made. I used the iPhone for both lighting and taking photographs. After a close examination, I realised that it would be best to strip rewire the whole control panel to suit the requirements of a model.

              2_bridge model update_ stripping wiring harness_sml.jpg

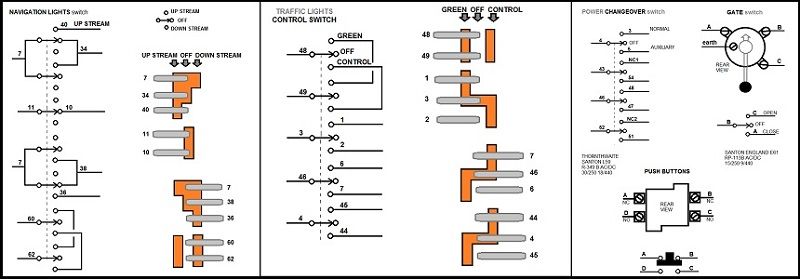
              Examined each switch connections and made schematic drawings of them.

              control switch connections-sml.jpg

              original switch circuitry-sml.jpg

              Now I have a better idea of how to use these switches for my purpose.

              #333705
              Peter Hausamann
              Participant
                @peterhausamann71795

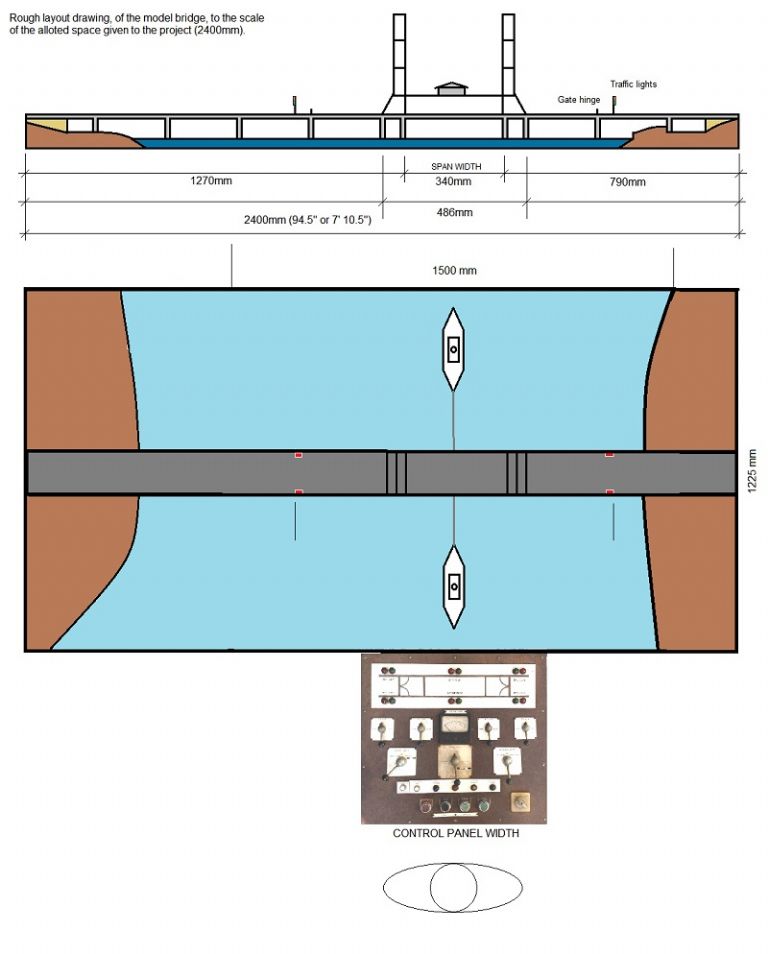
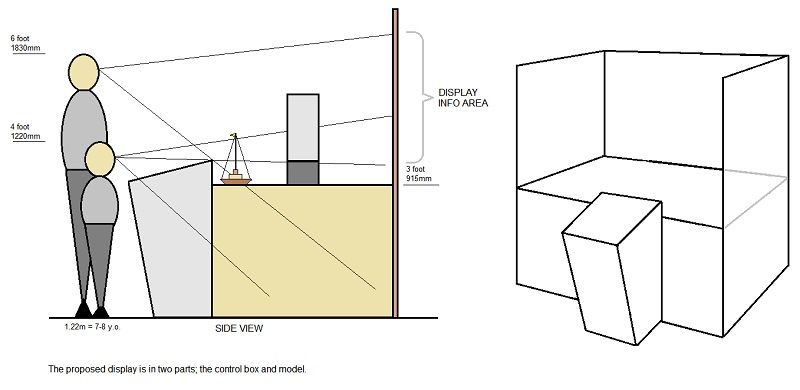
                Here is the layout I have proposed to the museum with their approval.

                bridge display idea_sml.jpg

                basic bridge display plan-sml.jpg

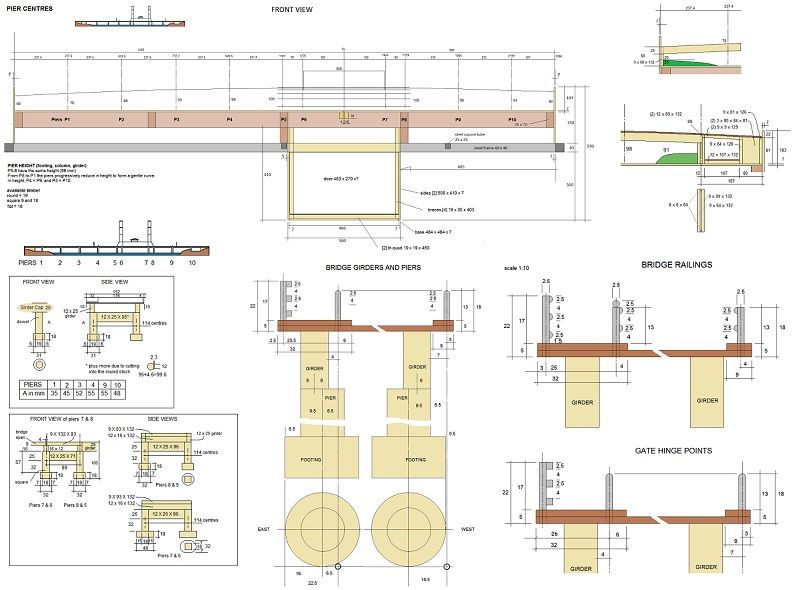
                It took me several weeks to draw up the plans for building the display table, control box (under the table), a 1/72 scale drawing of the bridge, and a circuit design and schematic diagram for its DC Power Supply Unit (PSU).

                Here is a collage of some of those drawings (all done with the standard Microsoft paint program.

                bridge plans-sml.jpg

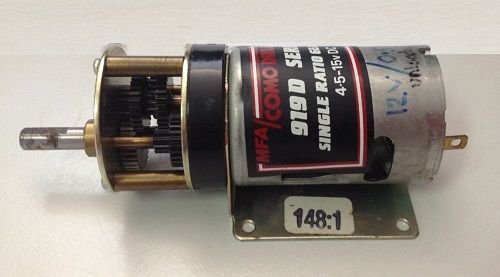
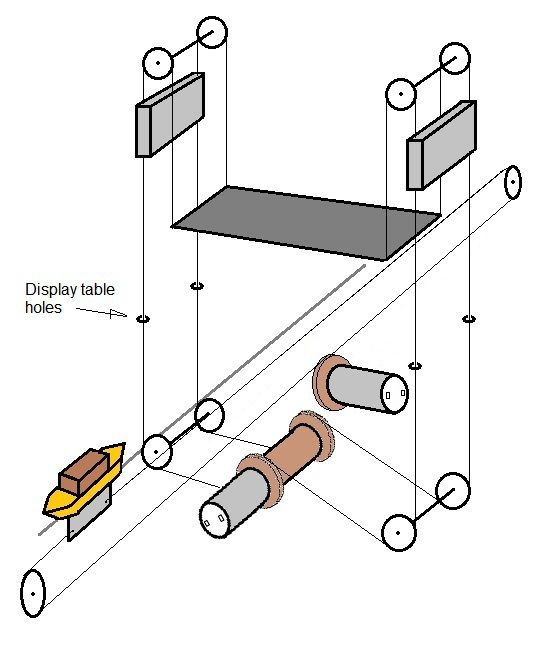
                This drawing is to give you an idea of how both the lift-span and boat become mobilized. I am using two DC motors with 148:1 gear reduction (donated) together with their pulley-cable system.

                motor cabling.jpg

                img_0142.jpg

                By the way – MERRY CHRISTMAS to all the members of Model Engineering.

                #333883
                I.M. OUTAHERE
                Participant
                  @i-m-outahere

                  I have been over that bridge ! It is also very similar to the bridge over the clyde river at batemans bay on the nsw south coast . Unfortunately i have never seen either in action !

                  #333886
                  Peter Hausamann
                  Participant
                    @peterhausamann71795
                    Posted by XD 351 on 25/12/2017 10:49:49:

                    I have been over that bridge ! It is also very similar to the bridge over the clyde river at batemans bay on the nsw south coast . Unfortunately i have never seen either in action !

                    Guess what? I too have never seen a lift-span bridge in action!

                    Thanks for info on the Clyde River Bridge. It looks similar to the Harwood Bridge near Grafton, which the Wardell Bridge is considered its smaller brother. The differences is that the Harwood and Clyde have extended trusses on either side for added strength. The Wardell, in compensation, has long multi fingered piers deeply embedded into the river bed.

                    #333899
                    Jeff Dayman
                    Participant
                      @jeffdayman43397

                      Hi Peter, Great work so far on a very interesting project.

                      One item I noticed on the "boat drive" pulleys/winch/motor in your schematic was that the ropes are entering the winch on opposite sides. If this is done, when the motor rotates one way it will tighten the boat drive string until it snaps, and the other way, will unwind it all off the winch. If the ropes both enter the winch on same side, your boat will move back and forth as intended.

                      One further idea – to tension your ropes an easy way is to tie loops at each end and join them with a small extension spring.

                      The bridge drive winch looks like it will work fine, both sets of cables either side of the deck need to either raise or lower at the same time.

                      Keep us posted on your progress, again you've made a great start.

                      Edited By Jeff Dayman on 25/12/2017 15:04:48

                      #333918
                      Peter Hausamann
                      Participant
                        @peterhausamann71795
                        Posted by Jeff Dayman on 25/12/2017 15:01:11:

                        Hi Peter, Great work so far on a very interesting project.

                        One item I noticed on the "boat drive" pulleys/winch/motor in your schematic was that the ropes are entering the winch on opposite sides. If this is done, when the motor rotates one way it will tighten the boat drive string until it snaps, and the other way, will unwind it all off the winch. If the ropes both enter the winch on same side, your boat will move back and forth as intended.

                        One further idea – to tension your ropes an easy way is to tie loops at each end and join them with a small extension spring.

                        The bridge drive winch looks like it will work fine, both sets of cables either side of the deck need to either raise or lower at the same time.

                        Keep us posted on your progress, again you've made a great start.

                        Edited By Jeff Dayman on 25/12/2017 15:04:48

                        Thank you Jeff Dayman for the boat pulley correction. I now amended the drawing as such:

                        motor cabling amended.jpg

                        In regards to having the cable extended from the other side of the span I had decided to leave them out. The reason being is that the counterweights are only for appearances and will be made from balsa with aluminium clamps. I am going to rely on the span weight of about a kilogram or more to keep the cable tension.

                        In regards to spring tension, I have already been collecting springs from cannibalizing DVD players and TV sets for parts. I am hoping to only use them for the boat system. I will attach them to the boat vane that goes through the gap in the display table.

                        Thanks again. Please feel free to point out any discrepancies. Though I am limited by funding, I often improvise where I can.

                        Edited By Peter Hausamann on 25/12/2017 19:07:29

                        #334603
                        Peter Hausamann
                        Participant
                          @peterhausamann71795

                          Wish to give you all a…

                          snoopy-newyear-1.jpg

                          #334685
                          Peter Hausamann
                          Participant
                            @peterhausamann71795

                            After the timber arrived I marked out all the pieces, cut them out, and assembled it like a kit. I was pleased that there were no hiccups. All the tabletop screws were countersunk, filled with wood putty, and sanded back. The line across the table is the 3 mm gap for guiding the boat vane.

                            3_bridge model update_display table.jpg

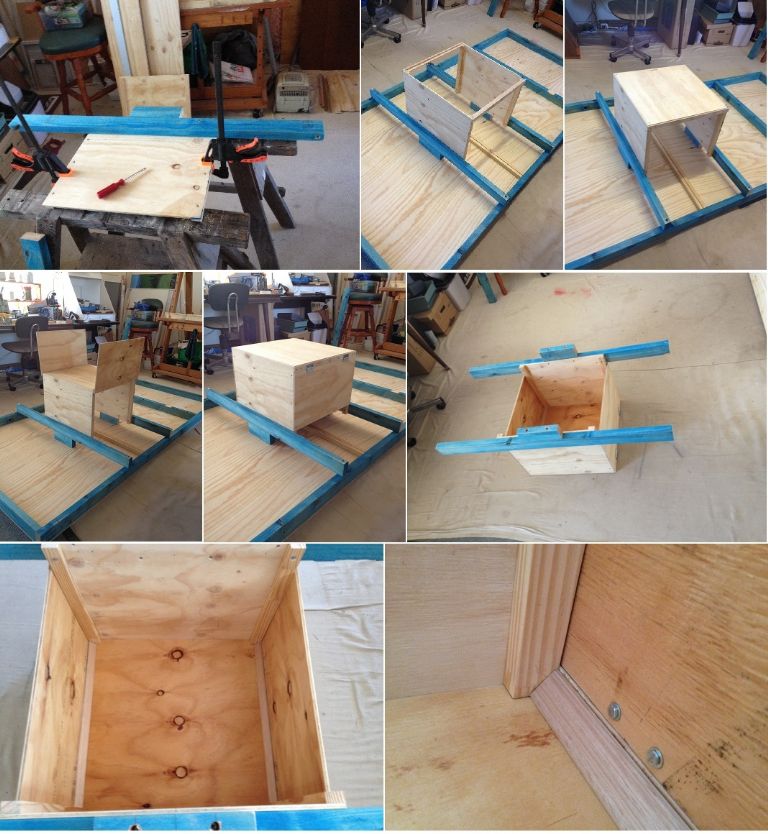
                            A control box was built for under the display table. It will contain the motors, pulley-cable systems, and various electronics. The box has two access doors.

                            4_bridge model update_working compartment box.jpg

                            Edited By Peter Hausamann on 31/12/2017 22:00:58

                            #334847
                            Peter Hausamann
                            Participant
                              @peterhausamann71795

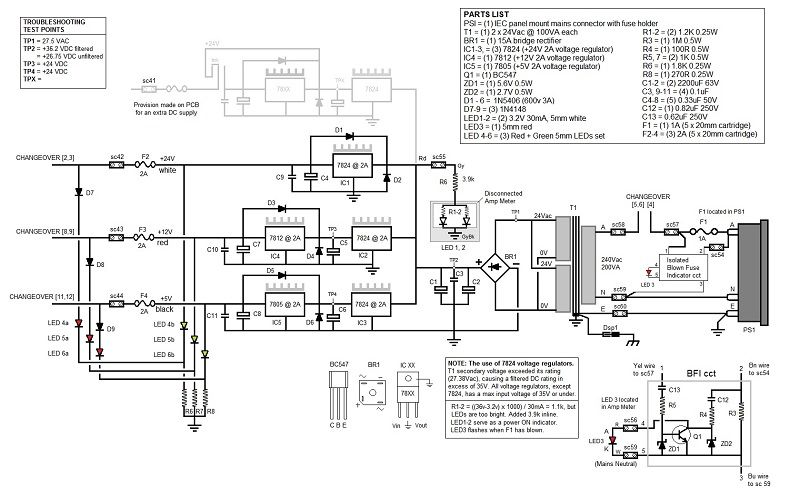
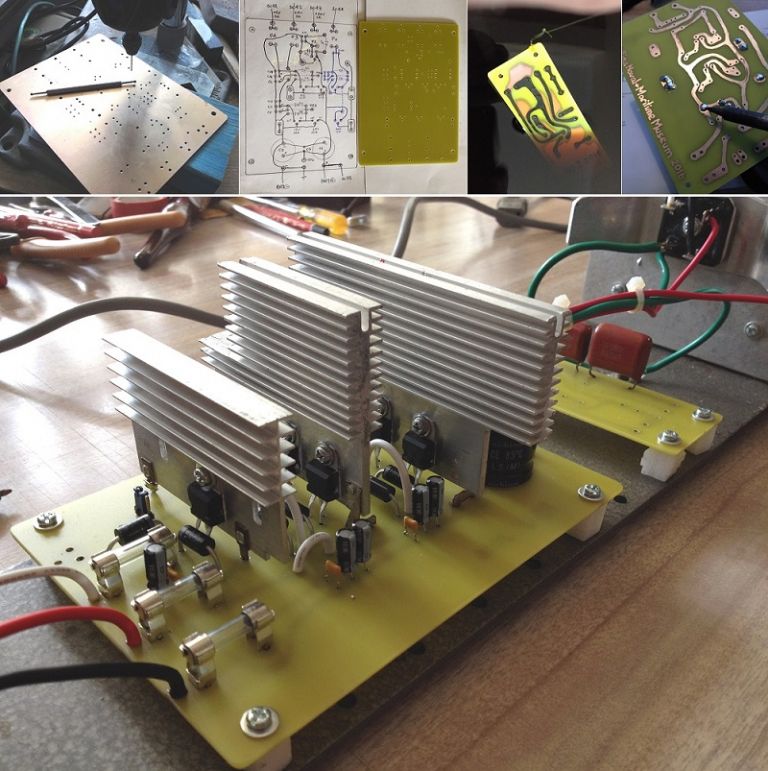
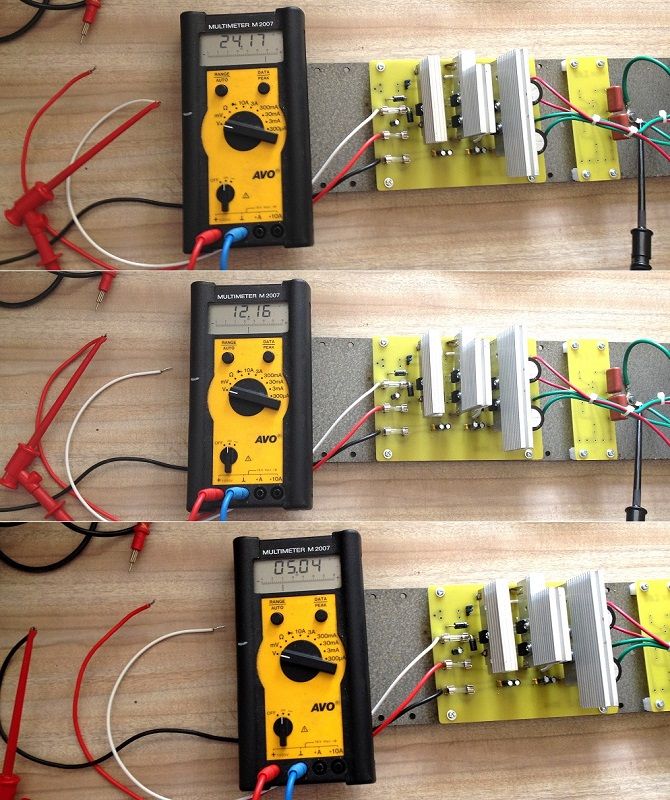
                              First requirements for the console was to build a DC Power Supply Unit (PSU). Voltages required are 24, 12, and 5. Each capable of handling 2 amperes.

                              power supply unit sml.jpg

                              pcb making-sml.jpg

                              9.psu-tested-sml.jpg

                              Edited By Peter Hausamann on 02/01/2018 00:25:53

                              #334859
                              clogs
                              Participant
                                @clogs

                                wow…….. wish I had the time………nice to see a blue sky………u lucky people………hahaha……

                                all the best to u lot down there, from the frozen north…….hahaha………clogs………

                                #335267
                                Peter Hausamann
                                Participant
                                  @peterhausamann71795
                                  Posted by clogs on 02/01/2018 07:53:04:

                                  wow…….. wish I had the time………nice to see a blue sky………u lucky people………hahaha……

                                  all the best to u lot down there, from the frozen north…….hahaha………clogs………

                                  Hello clogs, thanks for dropping in. It is nice to get a visit now and again.

                                  While you have a heater going, I got a fan blowing. It will be the other way around in due course. At least Spring and Autumn are similar… my favourite seasons.

                                  #335271
                                  Peter Hausamann
                                  Participant
                                    @peterhausamann71795

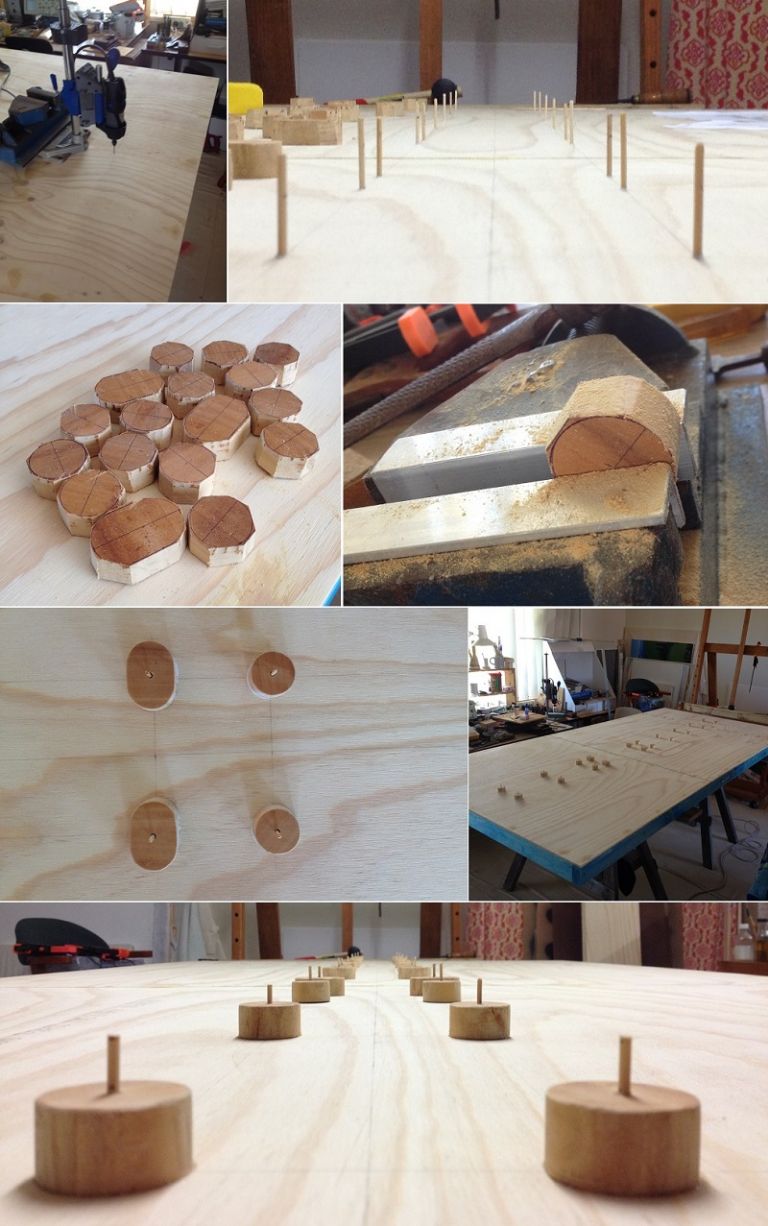
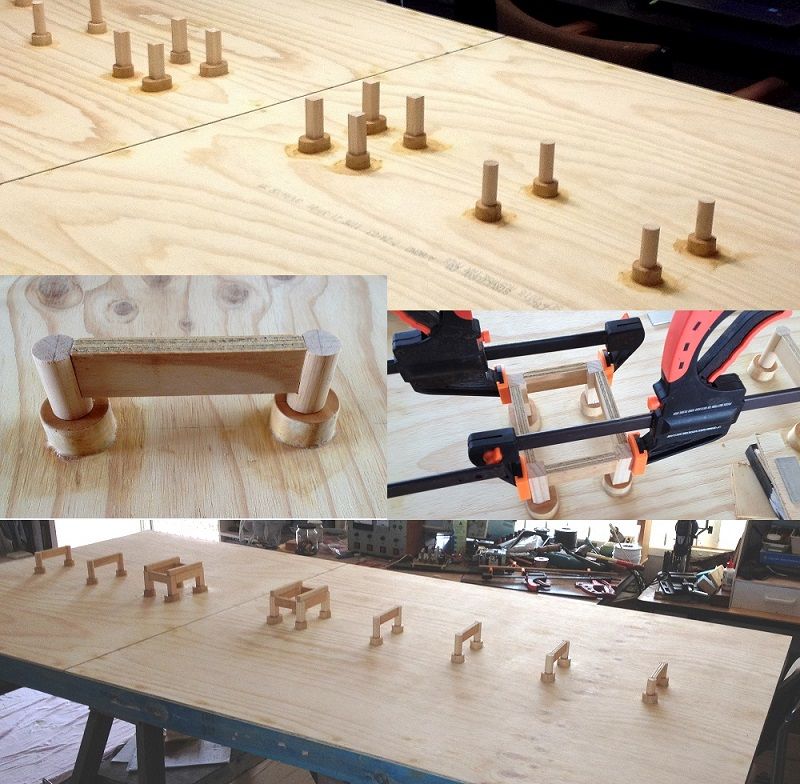
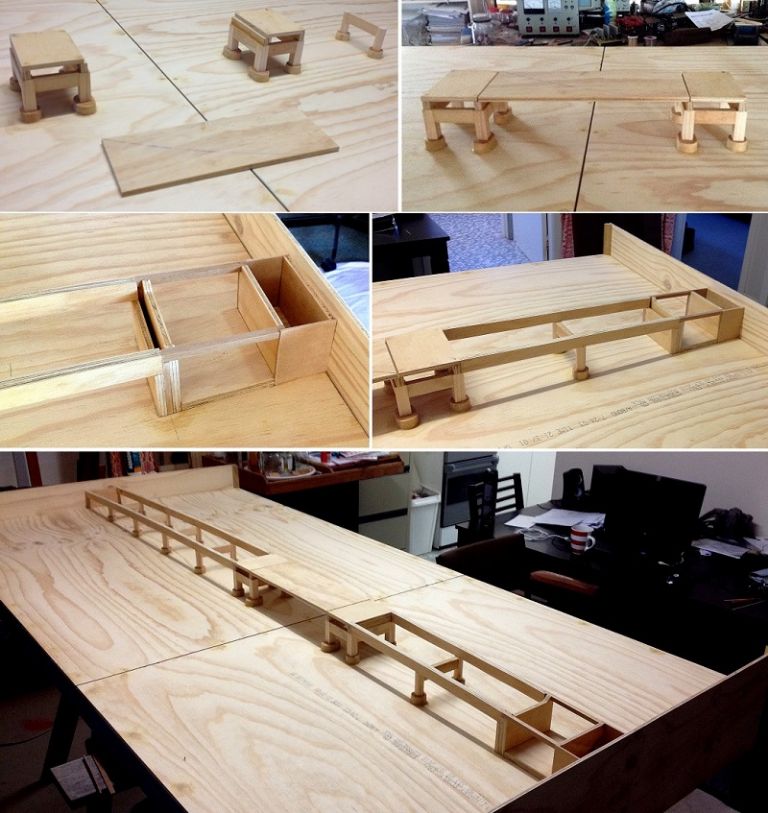
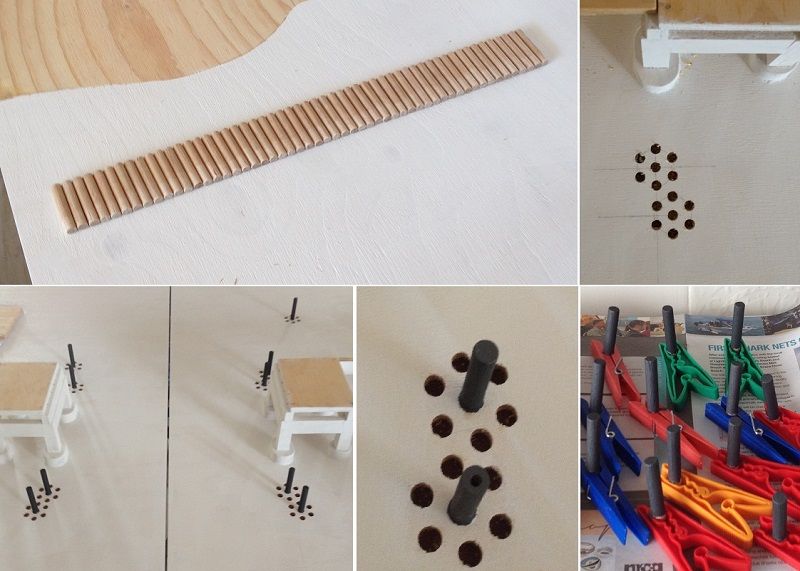
                                    Building the bridge foundations required me to first located exactly where the centres of the footings will go. Then drill them to insert 3 mm bamboo skewer sticks for doweling. The from scrap board I cut and filed into shape the footings. Drilled their centres and glued them over the doweling into place.

                                    6_bridge model update _footings_sml.jpg

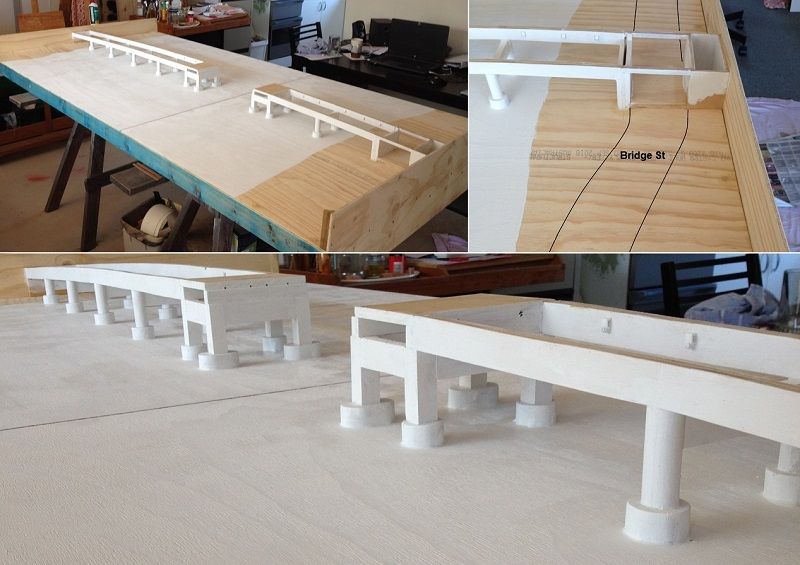
                                    Then used wood putty to fill any gaps between footings and water (table top). Drilled the piers, glued and positioned them into place. Bracing was also added. Each set of piers has its own length for the bridge is slightly arched over the river.

                                    7_bridge model update _piers_sml.jpg

                                    Then the girders were added. The loose board is the span base plate. The boxed area at one end is for allowing Bridge Street to pass under the bridge,

                                    8_bridge model update _girders_sml.jpg

                                    #335555
                                    Peter Hausamann
                                    Participant
                                      @peterhausamann71795

                                      9_bridge model update _under-structure undercoat_sml.jpg

                                      Fender Piers

                                      10_bridge model update _fender piles-sml.jpg

                                      #335658
                                      Peter Hausamann
                                      Participant
                                        @peterhausamann71795

                                        Throughout the project I have been scavenging parts from unserviceable electrical appliances, TVs, PCs, etc. The heatsinks used on the Power Supply Unit (PSU) were from PC PSUs.

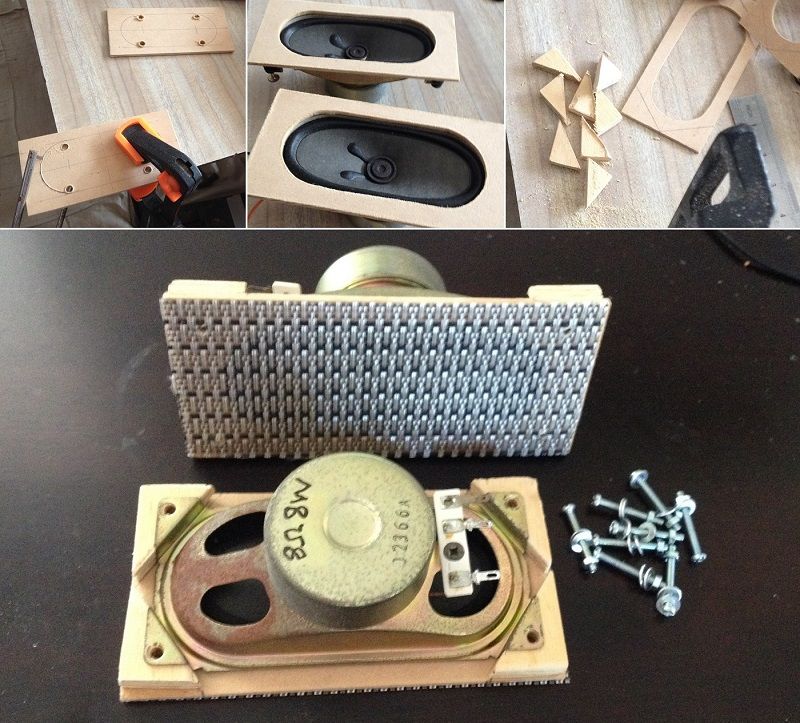
                                        I needed a small pair of speakers for certain sound effects (alarm bell, boat engine, and perhaps a fog horn). Found a good pair of speakers from an old analogue TV set. However, the diaphragm was exposed and I had to make a mounting bracket so the diaphragm would not touch anything (or it would muffle the sound).

                                        13_bridge model update_speaker encasement_sml.jpg

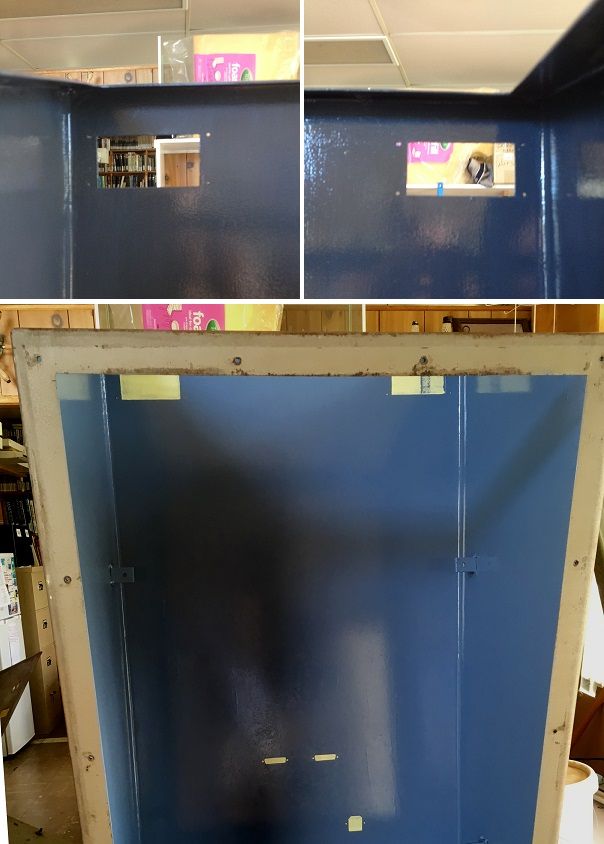
                                        While I was at the museum to cut out speaker holes, etc., out of the console, there was talk about showing photographs of the console interior as part of the display. Then I opened my big mouth and said why not replace the front panel with a sheet of thick clear Perspex. So now the console will also be a diorama of sorts _ a wiring diorama. This means that the interior needs to be cleaned up, painted, and revamped. Though the control panel will also be revamped its antiquated looking exterior is to remain as is.

                                        console connectors.jpg

                                        14_bridge model update_speaker slots.jpg

                                        #335662
                                        SillyOldDuffer
                                        Moderator
                                          @sillyoldduffer

                                          Thanks for sharing Peter. Top marks for interest, planning, build quality, and innovation. Plus I'm astonished by the speed at which you and other forum members work. In my workshop it takes an hour or two to find a screwdriver and then I have to have a tea-break!

                                          Dave

                                          #335676
                                          Peter Hausamann
                                          Participant
                                            @peterhausamann71795
                                            Posted by SillyOldDuffer on 07/01/2018 08:58:00:

                                            Thanks for sharing Peter. Top marks for interest, planning, build quality, and innovation. Plus I'm astonished by the speed at which you and other forum members work. In my workshop it takes an hour or two to find a screwdriver and then I have to have a tea-break!

                                            Dave

                                            Hello Dave.

                                            Sorry to give you that impression.

                                            I am currently half-way through the project. I came to this forum late. So I am posting photos of progress in piecemeal so not to inundate everybody with a sudden dose of 100 photographs. Hope you don't mind.

                                            #335693
                                            Neil Wyatt
                                            Moderator
                                              @neilwyatt

                                              Progessing well (and rapidly).

                                              Neil

                                              #335835
                                              Peter Hausamann
                                              Participant
                                                @peterhausamann71795

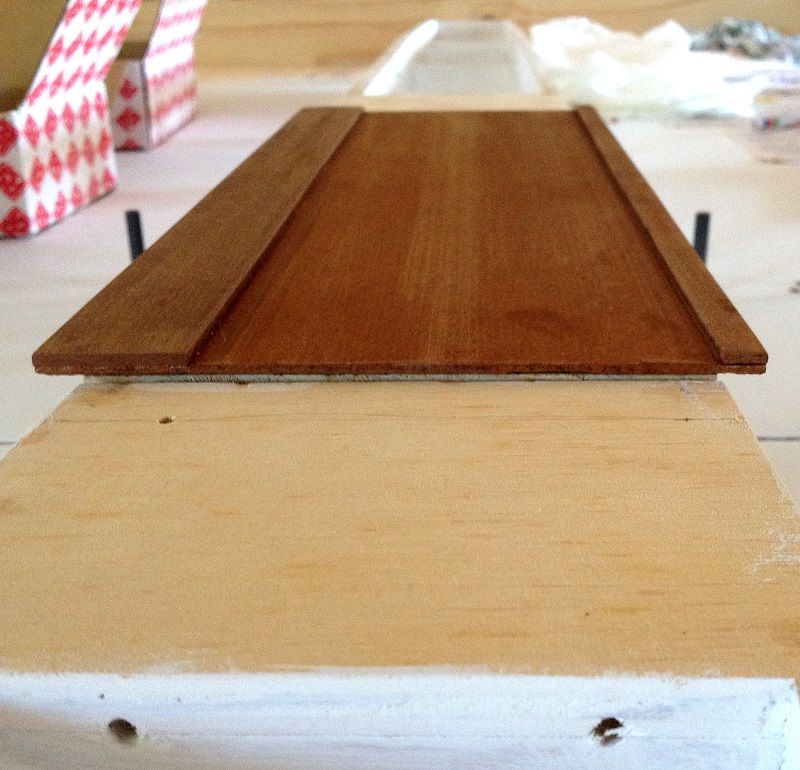
                                                Added 3 mm Masonite sheets for road base, kerbing, and footpath to span plate.

                                                img_0718 -sml.jpg

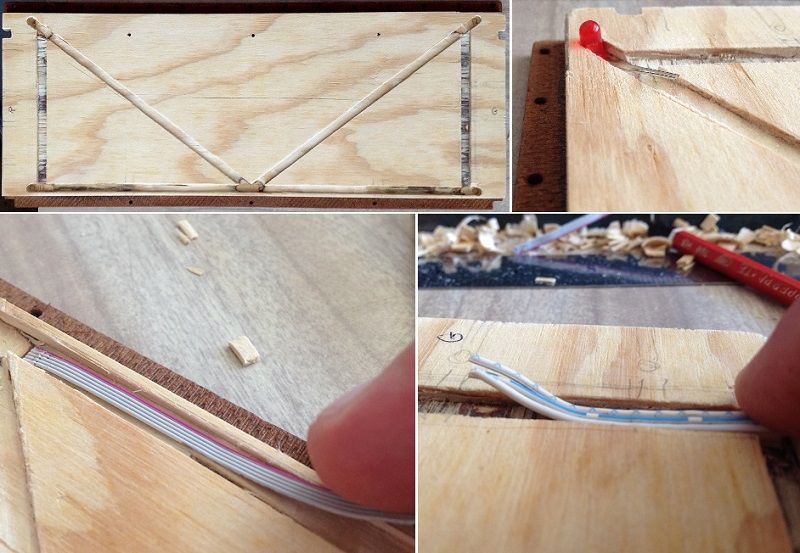
                                                The underside has red and green navigational beacons, plus 8 contacts (shown later). To hide the wires, I decided to carve out trench to route the wires to far side of span where the framework will be. Then the wires can be attached to the framework and routed to the span hut without being too noticeable.

                                                15_bridge model update _span part 1_sml.jpg

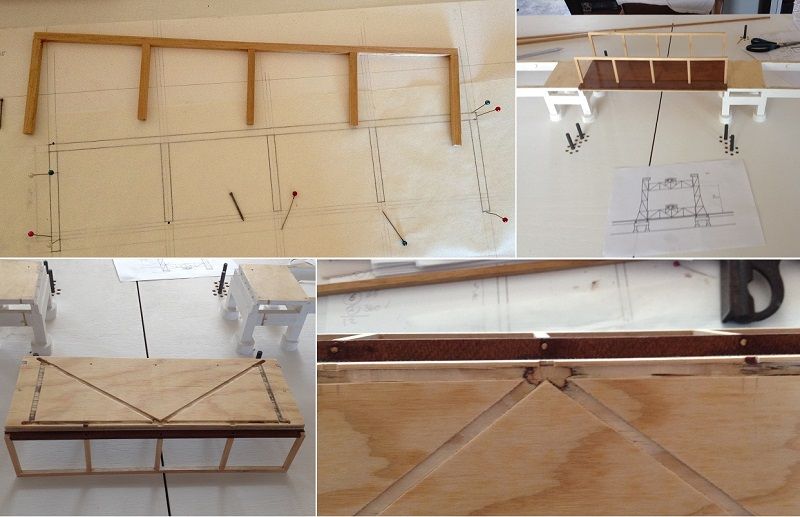
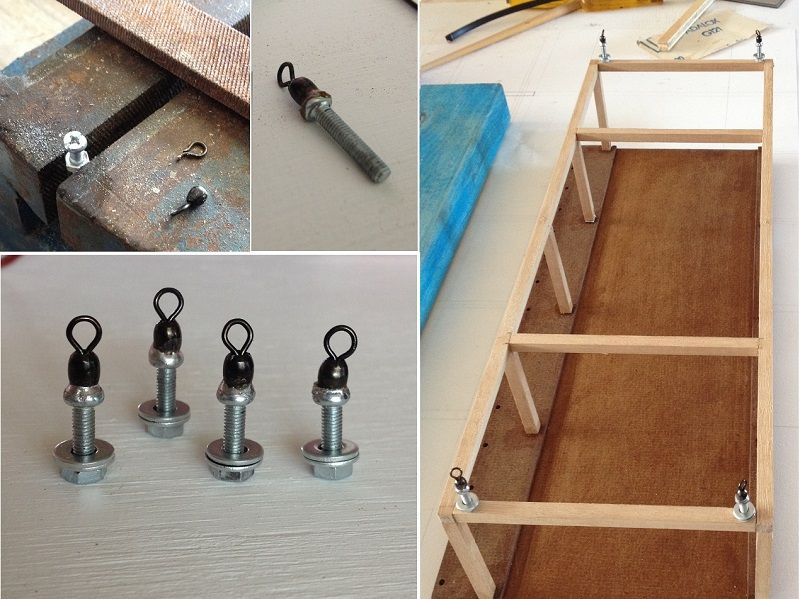
                                                Then I drew up a template for the framework and started making the span frame. Used 2.5 mm bamboo skewer sticks for doweling wherever I could.

                                                16_bridge model update _span part 2_sml.jpg

                                                While building the frame a solution anchoring the span cables to the frame came to mind. I used half a fishing swivel attached to a bolt head.

                                                17_bridge model update _span part 3_sml.jpg

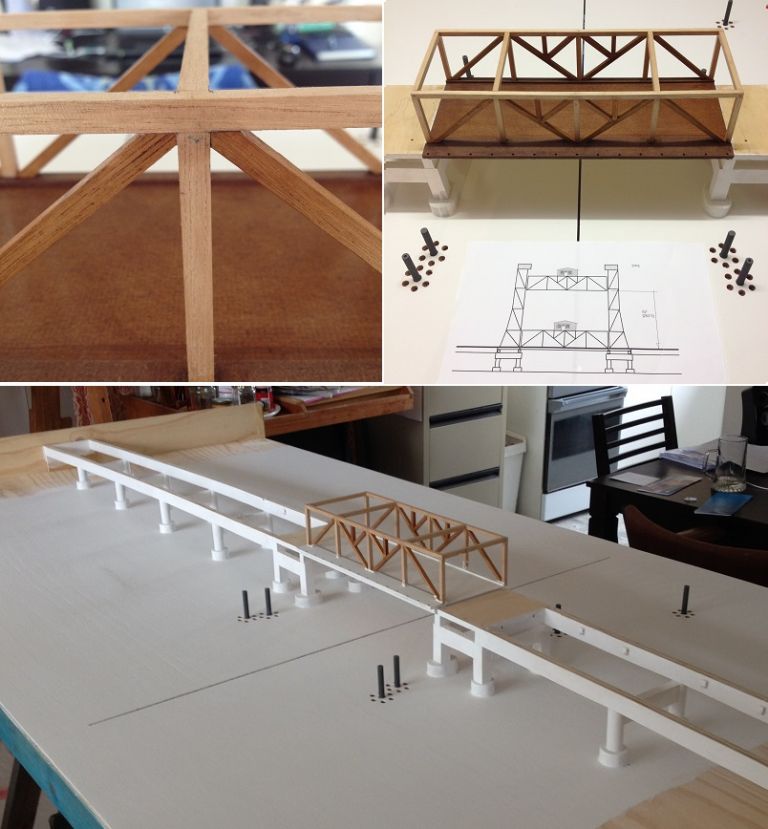
                                                Then I placed the span on the bridge to get an idea of how the rest of the bridge may present itself.

                                                18_bridge model update _span part 4.jpg

                                                #335942
                                                I.M. OUTAHERE
                                                Participant
                                                  @i-m-outahere

                                                  WOW! that's some nice work there Peter !

                                                  I would never have thought a swivel could be used for model making !

                                                  Have you done any other model making work ? Possibly model planes ? You seem to be very good at it !

                                                  I'm looking forward to more of your project !

                                                  Must get back up to Ballina one day for a fish also to check out the museum and your model !

                                                  ian.

                                                  #335947
                                                  Jeff Dayman
                                                  Participant
                                                    @jeffdayman43397

                                                    Hi Peter, you are doing a great job on the bridge model project and are moving right along. Thanks for sharing the pics too. JD

                                                    #335966
                                                    Peter Hausamann
                                                    Participant
                                                      @peterhausamann71795
                                                      Posted by XD 351 on 08/01/2018 17:51:39:

                                                      WOW! that's some nice work there Peter !

                                                      I would never have thought a swivel could be used for model making !

                                                      Have you done any other model making work ? Possibly model planes ? You seem to be very good at it !

                                                      I'm looking forward to more of your project !

                                                      Must get back up to Ballina one day for a fish also to check out the museum and your model !

                                                      ian.

                                                      Hi Ian.

                                                      Another Aussie, Great!

                                                      Sorry mate, no other models. This is my first.

                                                      Though I have been in the RAAF, I cannot bring myself (yet) to model planes. It's not the same as the real thing.

                                                      Oh, by the way. The bridge won't be in the museum for quite a few months yet.

                                                      Edited By Peter Hausamann on 08/01/2018 20:02:33

                                                    Viewing 25 posts - 1 through 25 (of 78 total)
                                                    • Please log in to reply to this topic. Registering is free and easy using the links on the menu at the top of this page.

                                                    Advert

                                                    Latest Replies

                                                    Viewing 25 topics - 1 through 25 (of 25 total)
                                                    Viewing 25 topics - 1 through 25 (of 25 total)

                                                    View full reply list.

                                                    Advert

                                                    Newsletter Sign-up