Learning CAD with Alibre Atom3D

Advert

Learning CAD with Alibre Atom3D

Home Forums Model Engineers’ Workshop. Learning CAD with Alibre Atom3D

Viewing 25 posts - 26 through 50 (of 841 total)
  • Author
    Posts
  • #378140
    John Hinkley
    Participant
      @johnhinkley26699

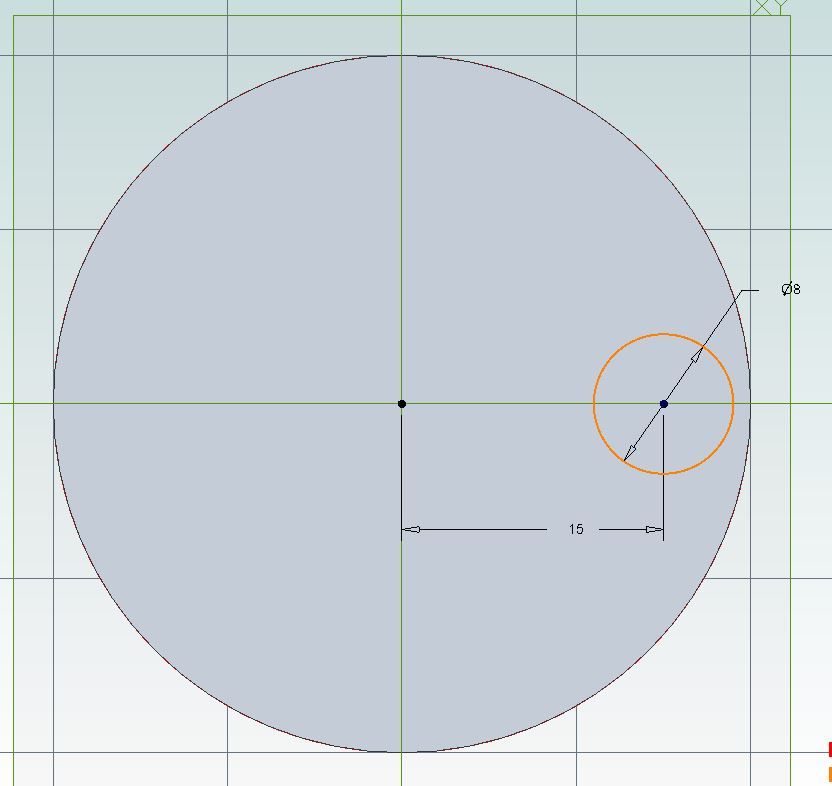
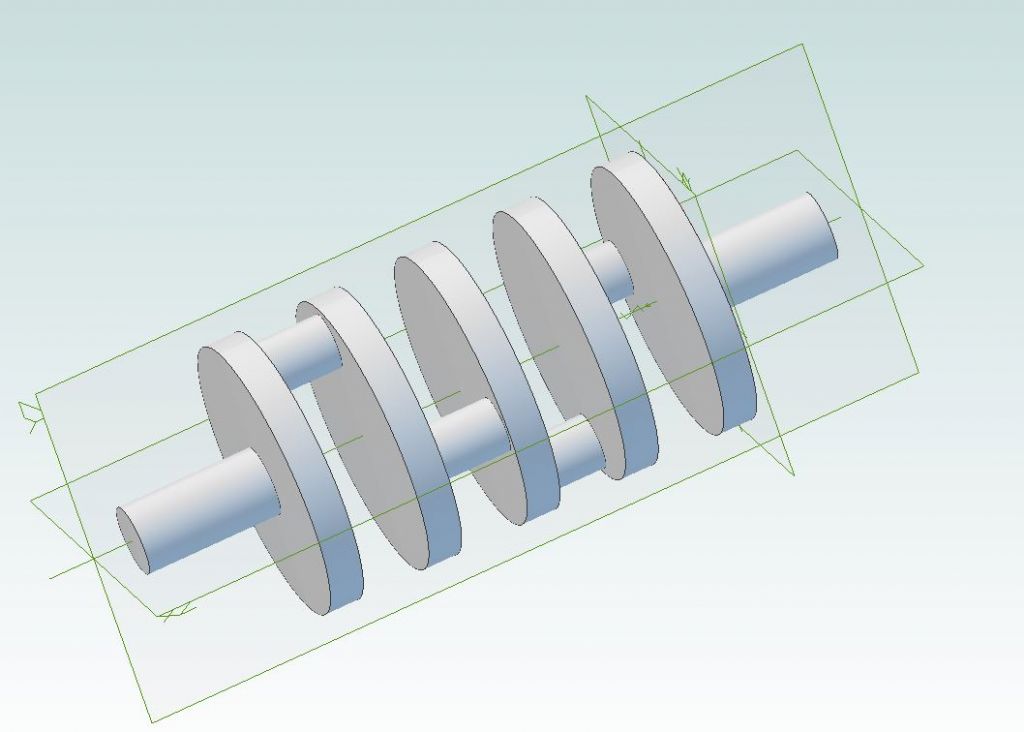
      Can someone please put me right on a question with atom3d? I have downloaded and installed the program as per MEW 274. I followed the tutorial and felt sufficiently inspired to tackle something more complicated. I drew up a crankshaft for a four cylinder engine that I'm designing. All seemed to go ok except I can't get the crank pins in the correct relative position with respect to the crank webs. The circles in sketch mode are restrained to the grid and I can't find any way to edit the centre coordinates. Nor for that matter, any of the nodes. The grid and snap to grid options are both deselected in system preferences. I've tried searching the internet without success, hence my appeal here. In essence, I want to know how to alter the properties of an individual part.

      John

      Advert
      #378142
      David Jupp
      Participant
        @davidjupp51506

        John,

        If you have turned snaps off, just apply dimensions in the sketch to move the circle centres to wherever you wish.

        You should be able to drag the circle centre to get things roughly where you want.

        If more convenient, you might be able to use sketch constraints in place of (for example) zero dimensions.

        Edited By David Jupp on 28/10/2018 19:50:23

        #378143
        JasonB
        Moderator
          @jasonb

          John on the sketch of the crank pin what colour is the circle, red, orange or black?

          #378150
          John Hinkley
          Participant
            @johnhinkley26699

            David,

            I'm sorry, I don't know what you mean by "apply dimensions in sketch" nor the term "constraints". They don't have the same connotations as in my current cad package. Can you elaborate a bit, please?

            Jason,

            The circle is black.

            John

            #378152
            JasonB
            Moderator
              @jasonb

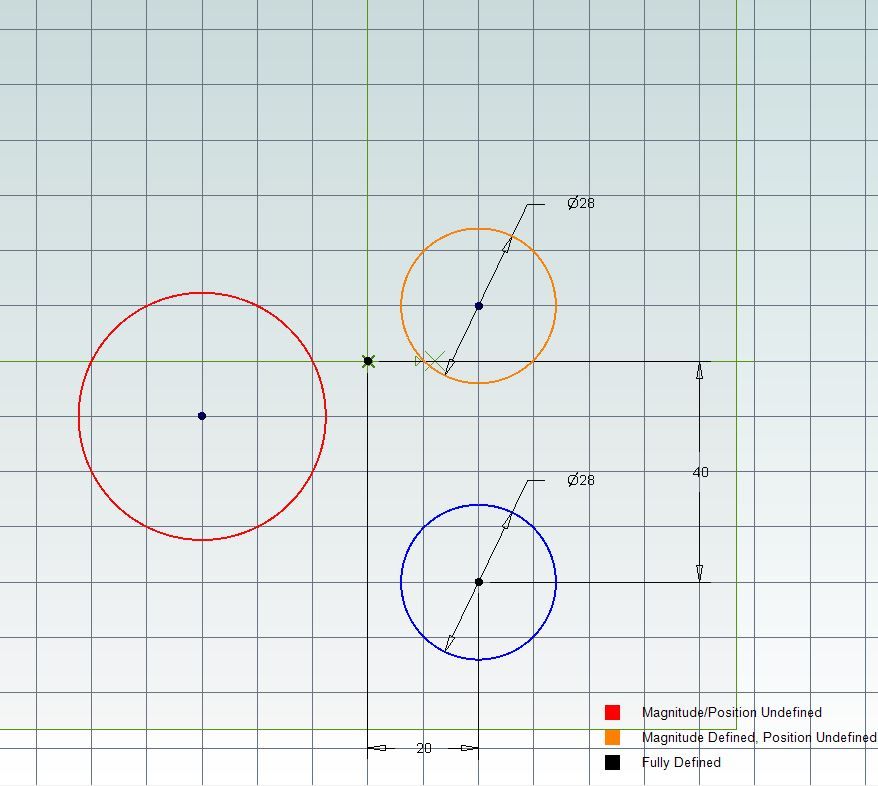
              John if you go to the "sketch options" box and click "toggle sketch dimensions" it should then show the distance your circle is from the two axis. Now use the select icon and you can double click these dimensions and alter them.

              The fact your circle is black means it is "fully defined" that is you have set the diameter and set its position. Snapping to grid would leave it red or orange if you had just set the diameter.

              defined and dimed.jpg

              Edited By JasonB on 28/10/2018 20:36:47

              #378153
              Nick Hughes
              Participant
                @nickhughes97026

                John,

                This video should help you understand constraints (you may not have all the constraints in the video available to you in Atom though)


                There's more videos here (Don't worry Alibre was Geomagic before it was re-aquired )

                https://www.youtube.com/playlist?list=PLvpFHPSB33Eegf8Rm4sHMA26ujGeBewv-


                Edited By Nick Hughes on 28/10/2018 20:48:09

                #378157
                David Jupp
                Participant
                  @davidjupp51506

                  John,

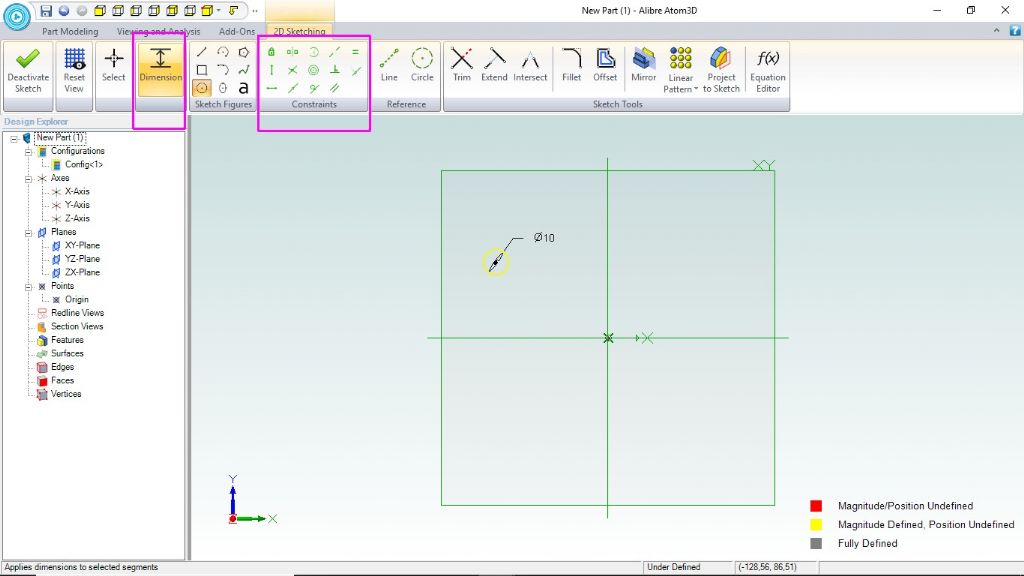
                  Others have at least partly covered this – this image shows where to find the dimension tool and the sketch constraints.

                  dims 1.jpg

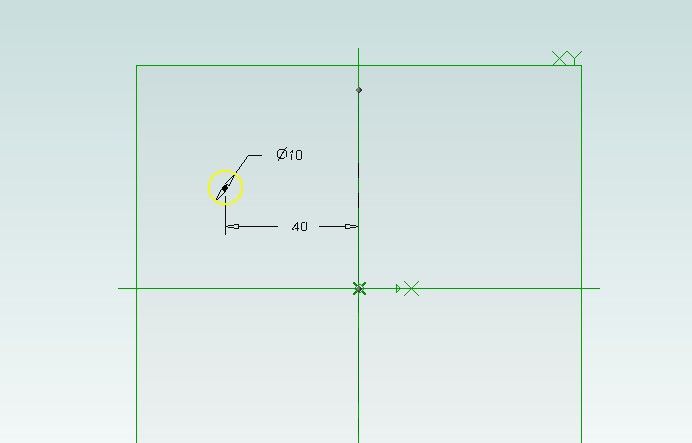
                  In this one I've used a dimension to fix the distance between Y axis and circle centre, by clicking on the axis, then the circle centre (with dimension tool active).

                  dims 2.jpg

                  #378159
                  Neil Wyatt
                  Moderator
                    @neilwyatt

                    Here's my example:

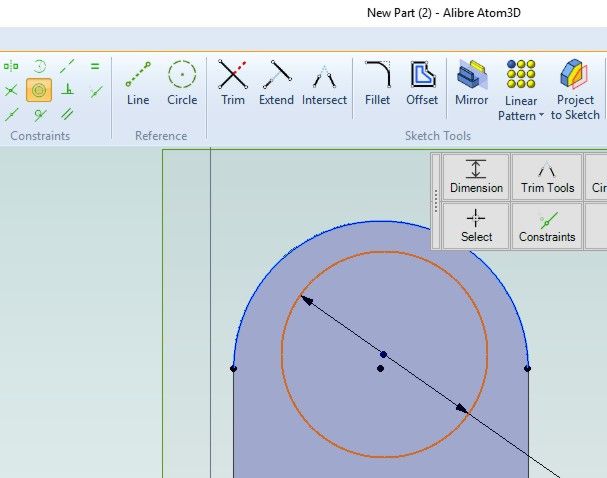
                    I have created a rectangular crankweb, 10mm wide, then put a 5mm fillet on each corner. This makes each end a semicircle.

                    On the face of the web I drew a circle 7mm diameter for the crankpin.

                    With the 'concentric constraint' tool selected I first selected the outer curve of the web:

                    concentric.jpg

                    Once this is done, clicking the centre of the crank will move it to the centre of the outer curve.

                    Your problem may be that you need to be actively editing the sketch that creates the crankpin to set its position.

                    #378161
                    John Hinkley
                    Participant
                      @johnhinkley26699

                      Jason, Nick and Dave,

                      Thank you so much for the leads. Quite a bit to absorb, there! I'll have to experiment tomorrow when I fire the computer up again, instead of this iPad.

                      John

                      #378163
                      David Jupp
                      Participant
                        @davidjupp51506

                        John – as Neil points out, you have to re-enter the sketch to make changes; right click on the sketch name in the 'Design Explorer' (on left hand side of screen) – then choose 'Edit' to get back inside the sketch.

                        Most 3D Features are based on a Sketch, features are built up to form your Part.

                        Your crankshaft probably consists of several features, each with its own sketch defining the profile.

                        #378164
                        JasonB
                        Moderator
                          @jasonb

                          If it is a crank with round webs then draw a single web and extrude to thickness. Then use the linea pattern to give 5 equally spaced webs. Pick the inside face of the first web and draw your pin, select dimension tool and set its position from the axis

                          crank1.jpg

                          Deactivate sketch then extrude to geometry selecting the opposite face of the second web as the target. do the other pins the same positioning them at the positions you want. Finally put the shafts at either end.

                          crank2.jpg

                          Edited By JasonB on 28/10/2018 21:12:48

                          #378166
                          JC54
                          Participant
                            @jc54

                            I have tried to use several different CAD systems in the past but my limited braincells have failed to understand them. When I saw that MEW had got a good deal on a top class CAD system and was going to do a series on it aimed as us with limited knowledge,,, plus a dedicated thread on forum, I thought that's for me. I had to buy a new computer to run this software, got it loaded and tried it. So far so good. Had a look at the thread on forum and thought "am I in the right place?" I presumed (obviously incorrectly) that this thread was to help us struggling beginners—- NO it just has stuff on it that we have no idea what is being discussed!!! I have re read the tutorial so far and still cannot follow what is being said on here. John

                            #378173
                            JasonB
                            Moderator
                              @jasonb

                              John all questions are welcome, it is just that some trying Atom3D have used other programs in the past and may pick things up faster than others and want to draw more than 1 part per month.

                              As I said earlier reading through part one can seem quite daunting, maybe if I have time I'll try and do a video of the base being drawn but will need to set the camera up better and fit it in around work.

                              #378175
                              David Jupp
                              Participant
                                @davidjupp51506

                                John (C) – Try to follow the tutorial form the magazine initially. If you get stuck with that, ask here, giving as much detail as you can about where you did get to, or what instruction didn't make sense.

                                The tutorial starts off as list of steps to follow – as it progresses in future episodes I think more explanation will be included.

                                Don't be shy about asking the most basic of questions – it can be those basic operations that are not initially obvious to the new user (especially if things work a little differently from other software previously used). Your questions will also help those that are too shy to ask for themselves.

                                #378176
                                Swarf Maker
                                Participant
                                  @swarfmaker85383

                                  Jason, as always ever trying to be helpful on this forum! Can I suggest a better way to make videos of the use of CAD?

                                  There are screen capture programmes that will do this for you, so no need to set up a camera to look over your shoulder. As it happens,one is available to users of Fusion 360 and is one of the ways that a F360 user is able to communicate a problem to the programme developers. It is also used to make F360 training videos. That programme is called 'Screencast' but I believe that other such programmes are available.

                                  #378177
                                  JasonB
                                  Moderator
                                    @jasonb

                                    Swarf I have just tried the Windows one but it will not show the drop down menus etc. Anybody suggest one (free) ?

                                    Think I have found one that works, stay tooned.

                                    Edited By JasonB on 29/10/2018 07:48:57

                                    #378179
                                    JasonB
                                    Moderator
                                      @jasonb

                                      A bit fuzzy but will do for now. I am using a different Alibre so the icons are laid out differently but are all teh same as Atom.

                                      I have also put a 1/4" hole in the part to show you can work in imperial and metric and also added small chamfers to the other external edges. I tried to go a bit slowly so the drop downs show up. Watch in You-tube at full screen size.

                                      #378211
                                      John Hinkley
                                      Participant
                                        @johnhinkley26699

                                        Jason,

                                        Before I throw in the towel, do you have time to explain how I can edit the dimensions of a circle in sketch mode, including the centre position? All I get when I select a drawn circle and the dimension tool is the diameter of said circle. Nowhere can I get the centre co-ordinates as shown in your screen shot. There doesn't seem to be any way to edit the entity's properties. (I'm using the nomenclature which I'm used to in my present 2D CAD package. )

                                        Thanks,

                                        John

                                        #378216
                                        David Jupp
                                        Participant
                                          @davidjupp51506

                                          John,

                                          Look at the second photo in my post of 28/10/2018 20:46:13

                                          Place a dimension from the centre point of circle to some other geometry that you wish to set its distance from (for example an axis).

                                          Click the dimension tool icon, click circle centre, click other geometry, move mouse to where you would like to position the dimension, click again to fix that position. Type in the value for the dimension, then click the green tick, or just press return.

                                          Does that help?

                                          Edited By David Jupp on 29/10/2018 12:38:23

                                          Edited By David Jupp on 29/10/2018 12:38:36

                                          #378218
                                          JasonB
                                          Moderator
                                            @jasonb

                                            John. I'll have a look this evening but is it possible for you to post a screen shot (whole screen) of the circle in question.

                                            #378220
                                            David Jupp
                                            Participant
                                              @davidjupp51506

                                              For more detail on sketch dimensioning – try this video

                                              #378231
                                              Neil Wyatt
                                              Moderator
                                                @neilwyatt
                                                Posted by John Hinkley on 29/10/2018 12:12:11:

                                                Jason,

                                                Before I throw in the towel, do you have time to explain how I can edit the dimensions of a circle in sketch mode, including the centre position? All I get when I select a drawn circle and the dimension tool is the diameter of said circle.

                                                First, make sure you are editing the sketch you want to move.

                                                Double click the dimension number with the select tool and you can edit it to what you want.

                                                Position the centre by applying (and changing if necessary) dimensions from other objects edges or reference points, or from planes/axes within your drawing.

                                                Neil

                                                #378237
                                                JasonB
                                                Moderator
                                                  @jasonb

                                                  Neil, there is no dimension to edit but I think I can see John's problem.

                                                  Edited By JasonB on 29/10/2018 15:15:27

                                                  #378262
                                                  John Hinkley
                                                  Participant
                                                    @johnhinkley26699

                                                    A quick update to pre-empt any further replies. Thanks to the help given by David, Neil and Jason I have cracked this problem. Now to move on to the next one …………

                                                    Thanks to all.

                                                    John

                                                    #378287
                                                    Lionel Pullum
                                                    Participant
                                                      @lionelpullum53107

                                                      Hmm new to this package, but I note that you can "turn on" hole call outs in the 2D drawing module (either through the system prefs or clicking on a view and selecting Manage View), but having done that I have no idea how to use it, or whether it is implemented. Reading the help file it says that you must first create a threaded hole with the Hole tool in the thread group which is not an option in AA3D, but that you can manually create a call out by right clicking a hole in the 2D drawing and chosing Insert Hole Callout – this option is not offered either with or without the sketch mode activated. So my questions are (i) am I just being an idiot, (ii) is this feature implemented in AA3D and if not why does is appear in the GUI?

                                                    Viewing 25 posts - 26 through 50 (of 841 total)
                                                    • Please log in to reply to this topic. Registering is free and easy using the links on the menu at the top of this page.

                                                    Advert

                                                    Latest Replies

                                                    Viewing 25 topics - 1 through 25 (of 25 total)
                                                    Viewing 25 topics - 1 through 25 (of 25 total)

                                                    View full reply list.

                                                    Advert

                                                    Newsletter Sign-up