Learning CAD with Alibre Atom3D

Advert

Learning CAD with Alibre Atom3D

Home Forums Model Engineer & Workshop Learning CAD with Alibre Atom3D

Viewing 25 posts - 376 through 400 (of 841 total)
  • Author
    Posts
  • #388835
    JasonB
    Moderator
      @jasonb

      If you put a measurement on a drawing you should not have to go back and remeasure the item after altering the part, it does that automatically. You do need to save and close the drawing and then reopen after altering the part.

      Another thing you can do is when initially creating a drawing if you go to "more options" you can select "design dimensions" which will bring over all the dimensioned sizes used in the sketching stage, though it can get a bit messy if you have not been careful where you placed them when sketching.

      Advert
      #388843
      David Jupp
      Participant
        @davidjupp51506

        If you use the 'Design Dimensions' option for 2D drawings as mentioned by Jason above, editing these in the 2D drawing will actually update the 3D part too.

        #388919
        Tim Taylor 2
        Participant
          @timtaylor2
          Posted by David Jupp on 02/01/2019 10:51:27:

          If you use the 'Design Dimensions' option for 2D drawings as mentioned by Jason above, editing these in the 2D drawing will actually update the 3D part too.

          That's one on the things I really like about A3D. You can make an edit in the 2D drawing or on an individual part while working in the assembly mode, and when you save it, all the original part files get updated as well – no need to go back and do them individually.

          Tim

          #389444
          David George 1
          Participant
            @davidgeorge1

            Help!!!!!! I am trying to draw a thread on a shaft that I have drawn but there is no toolbar with the option. I have looked and the help feature says right klick mouse with Alt key but nothing happens how do I get to open a toolbar. I have looked though other posts to see if others have had the same problem but there are on or two to look through and couldn't see any of the same. I have only recently started to learn this system as I have had other pressures but still any help would be appreciated.

            David

            #389446
            David Jupp
            Participant
              @davidjupp51506

              David – 'cosmetic threads' are not supported in Atom3D, they are available in Alibre Design (the Help file is common to all versions).

              If you want to produce a 'real' thread using helical tools, make sure you have version 2018.2 (Helical tools were added to Atom3D for v2018.2 – the MEW trial licence will allow updates from 2018.1.1). You can use Helical cut to 'cut' a thread, or helical boss to 'build up' a thread.

              I'm not sure where you get RMB + Alt key from, I'm not familiar with that combination. RMB (right click) on any feature should bring up a context menu.

              #389477
              mick
              Participant
                @mick65121

                Some real progress, I've generated a component and conventionally machined it and also produced drawings. I don't seem to able to upload screen shots to demonstrate this. I have encountered one small problem, there is an 8mm tapped hole in the back face of the component 21mm from the base and on the verticial centre line. The horizontal centre line of the component is 20 mm from the base. Drawing the sketch is no problem, but extruding it to 25mm deep is. I assume I need to create an axis line for the extrusion to follow but I don't seem to be able to armed with the knowledge I've so far gained from the tutorials.

                #389484
                David Jupp
                Participant
                  @davidjupp51506

                  Mick, if you use the 'back face' of the part to place your hole sketch on, the hole will be by default normal to that face. Use the 'to depth' type for your extrude cut to make the hole in the part.

                  If you are trying to add 'real threads' – follow up the hole operation with a helical cut, using the hole cylinder as the axis for the helical feature. Or you can add an axis – click on the 'Axis' button in the 'Reference' portion of the Part Modelling Ribbon. Hover over the buttons in the dialogue for tool-tips.

                  There are probably several different ways you could tackle this…

                  #389486
                  Tim Taylor 2
                  Participant
                    @timtaylor2

                    What David said…..

                    rotate part so back face is visible
                    click on the face then open 2D sketch
                    draw your sketch & close sketch mode
                    use extrude cut to depth

                    #389492
                    Tim Taylor 2
                    Participant
                      @timtaylor2

                      Also the helix extrude and cut functions can be a little tricky and are less than intuitive – essentially, you need to create a scaled sketch of the profile to be extruded or cut, located where the extrude or cut will be — then with it selected, select the plane, height and pitch, then apply. There are a couple youtube videos out there that show the basics.

                      You might want to create a dummy part or two and play with it until you are familiar with how it works. Once you get the hang of it, it's not all that difficult.

                      If you don't need to show a real thread, you can use the "note" function on your 2D drawing to show specifics, as threads and hole call outs are not currently supported in Atom3D.

                      Tim

                      #389493
                      Andrew Evans
                      Participant
                        @andrewevans67134

                        A quick question for David. Are the files created with Atom 3D fully compatible with Alibre Design? I may want to upgrade in the future. And what is the compatibility like with other 3D CAD packages?

                        #389501
                        David Jupp
                        Participant
                          @davidjupp51506

                          Andrew, yes Atom3D uses same files formats as Alibre Design.

                          Regarding compatibility with other 3D CAD check out import & export option at bottom of this page – note that transfer between CAD systems typically is just a 'dumb' model (you don't get the full design tree).

                          #389517
                          mick
                          Participant
                            @mick65121

                            Hi. All. The method you all describe is exactly what I'm doing, however when I go to extrude (remove metal) the sketch all the information, sketch number, to depth and the distance are displayed but the OK tab is no illumined and so I can't finish the operation. I don't seem able to upload screen shots and so I can't graphically demonstrate the situation.

                            #389521
                            John Low-Shang
                            Participant
                              @johnlow-shang88486

                              Hi All. Down under in OZ we just recieved issue 273. Wiil Alibre Atom3d be offered on trial to readers outside the UK. Alibre distributer for OZ seems to be in NZ.

                              Thanks John

                              #389523
                              David Jupp
                              Participant
                                @davidjupp51506

                                Mick – mail me the file and I'll take a look.

                                #389592
                                Andrew Evans
                                Participant
                                  @andrewevans67134

                                  Thanks David – appreciated

                                  #389598
                                  David Jupp
                                  Participant
                                    @davidjupp51506

                                    Posted by John Low-Shang on 05/01/2019 14:11:52:

                                    Hi All. Down under in OZ we just recieved issue 273. Wiil Alibre Atom3d be offered on trial to readers outside the UK. Alibre distributer for OZ seems to be in NZ.

                                    Thanks John

                                    The trial offer is for all readers who are interested, regardless of geographical location. I'm already aware of readers from several countries who have taken the trial. The issuing of the trial licences happens centrally – your local reseller needn't be directly involved, though you'd obviously contact them if you decided to buy a permanent licence.

                                    Yes Gordon at BayCAD is the reseller for Australia.

                                    #389785
                                    Tim Taylor 2
                                    Participant
                                      @timtaylor2

                                      A neat little trick I figured out for adding "real threads" to a part using the helical cut function, that gives a nice tapered entry (and exit for internal threads).

                                      Create the sketch profile to be cut at least one thread width above the part, then exit sketch mode
                                      Select the sketch and the helical cut function
                                      Click on the face to be cut (if an internal face, position part as needed to make it visible)
                                      Set the length to be cut to the desired cut depth plus the offset
                                      Set the pitch to a value slightly greater than the cut width.(for example, if you use a 0.050 diameter circle for the cut sketch, set the pitch to 0.060)
                                      Select apply.

                                      David – is there another way to do this using the advanced tab?

                                      Thanks!

                                      #389787
                                      JasonB
                                      Moderator
                                        @jasonb

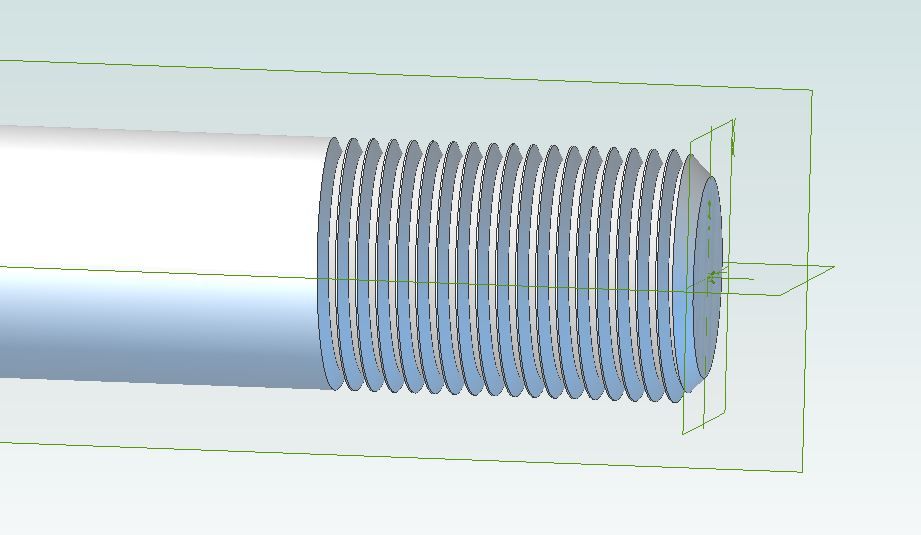
                                        Easy way to get a neat entry and exit is to simply chamfer the hole or end of the cylinder first. Just like real machining where you would clean up the hole with a CSK bit and cut a chamfer or use the file to clean uo the end of a screw.

                                        I would be very wary of altering the pitch to get a "nice looking" thread particularly if you later want to 3D print the part as your thread won't be correct..

                                        screw waterworth.jpg

                                        Edited By JasonB on 07/01/2019 07:08:08

                                        Edited By JasonB on 07/01/2019 07:11:19

                                        #389788
                                        Tim Taylor 2
                                        Participant
                                          @timtaylor2

                                          Yep, that would work as well……….need to set the chamfer equal to or greater than the depth of cut, correct?

                                          #389789
                                          JasonB
                                          Moderator
                                            @jasonb

                                            Yes as you would when doing it with metal.

                                            #389791
                                            David Jupp
                                            Participant
                                              @davidjupp51506

                                              Tim – I think your description is about starting the cut beyond the limit of the part. That is perfectly valid.

                                              The advanced tab on the helical tools is for changing the end condition – typically used for coil springs which can have a flattened end.

                                              #389792
                                              JasonB
                                              Moderator
                                                @jasonb

                                                You can also get a visually pleasing end to a male thread by drawing your profile part way along the shaft where you want the thread to stop. You then use that sketch to do a circular cut all the way around the cylinder which is in effect a run out groove just like if screwcutting the thread. Copy and paste the profile sketch and past it as a new sketch or use "project to sketch" then use that for the helical cut.

                                                run out groove.jpg

                                                #389864
                                                mick
                                                Participant
                                                  @mick65121

                                                  Will generating thread forms be covered in the MEW tutorials? If not how do you go about it as I've tried playing with the helical part of the software where all I've succeeded in doing is producing a spring like coil running along the centre line of the diameter I was hopefully going to create an external form on.

                                                  #389871
                                                  Tim Taylor 2
                                                  Participant
                                                    @timtaylor2

                                                    Mick,

                                                    I find the helix cut function done as Jason described above is easier and looks better.

                                                    You can do it with the helical boss function, but it is more cumbersome. What you have to do is to first create the object to be threaded with the section to be threaded stepped down to the root diameter.Next you create the thread profile that will be added, and place it at the starting location of the thread. Open the helical boss function, select the axis, height and pitch – I find it easier to use the height/rotation option, but use what you feel most comfortable with. Hit "OK" and the thread profile will be extruded – problem is it doesn't have a clean beginning and end, so you need to do an additional revolve and extrude cut to clean it up.

                                                    I created a sketch of a 60 deg thread profile by creating a triangle with all sides constrained to equal length and saved it as a separate part. I open that sketch and copy the triangle, then paste stamp it where needed on the part where the thread is being created – use edit to scale it as needed.

                                                    Hope this helps….

                                                    Tim

                                                    #389873
                                                    JasonB
                                                    Moderator
                                                      @jasonb

                                                      Mick, as the article was written before the Helical function was available in Atom I doubt it will be covered, Neil ar David will be able to confirm.

                                                      Might do a quick screen recording of the one above.

                                                    Viewing 25 posts - 376 through 400 (of 841 total)
                                                    • Please log in to reply to this topic. Registering is free and easy using the links on the menu at the top of this page.

                                                    Advert

                                                    Latest Replies

                                                    Viewing 25 topics - 1 through 25 (of 25 total)
                                                    Viewing 25 topics - 1 through 25 (of 25 total)

                                                    View full reply list.

                                                    Advert

                                                    Newsletter Sign-up