Lathe tool sizes, shims and cutting face geometry.

Advert

Lathe tool sizes, shims and cutting face geometry.

Home Forums Beginners questions Lathe tool sizes, shims and cutting face geometry.

  • This topic has 15 replies, 13 voices, and was last updated 5 May 2023 at 23:36 by Clive Foster.
Viewing 16 posts - 1 through 16 (of 16 total)
  • Author
    Posts
  • #644022
    Ed Blackwell
    Participant
      @edblackwell55633

      Hello. I have measured the distance from the base of my tool holder to the centre of my headstock chuck. This is 9mm. My initial thinking was to buy 8mm HSS tools and shim them up to the 9mm. However, looking at the geometry of preground cutting tools, an 8mm tool shimmed up to 9mm will still not meet the centre of my workpiece. Am I thinking too hard, or do I need to shim my cutting tools up on an individual basis so the cutting edge of each tool is dead centre ?

      How critical is it to get HSS tools exactly to the centre of items being turned ?

      Many thanks for any input and apologies if this has been covered before.

      Advert
      #11472
      Ed Blackwell
      Participant
        @edblackwell55633
        #644040
        Bo’sun
        Participant
          @bosun58570

          Yes, you should shim them individually.

          A little off-centre for larger diameter longitudinal turning probably won't notice, but for small diameters and face turning get the tool on centre height. Apart from anything else, with face turning you'll end up with a small pip. Too high and the tool tip rub.

          Having said that, I seem to recall some debate a little while ago about toll height.

          #644048
          Howard Lewis
          Participant
            @howardlewis46836

            If the tyool is not on the cehtre line of the workpiece, it will not cut properly.

            Ideally, make ma Centre Height Gauge to which tools can be set.

            Chicken and egg!

            Set the cutting edge bof the tool to a centre, best in the Headstock Spindle.

            Firmly clamp a bar in the 3 jaw chuck and take a light facing cut (Or cuts, until it cleans up. )

            When the tool is on centre height, there will be no pip in the centre of the bar.

            Set the underside of the blade on the gauge to rest on the cutting edge of the tool, and lock in position.

            It can then be used to set other tools that you mount in the front toolpost.

            Tools mounted in a rear toolpost will need to be mounted inverted, and a set to the upper face of a second, lower blade on the Centre Height Gauge, in conbtact with the underside of the balde usewd for setting front mounted tools..

            Howard

            #644055
            SillyOldDuffer
            Moderator
              @sillyoldduffer

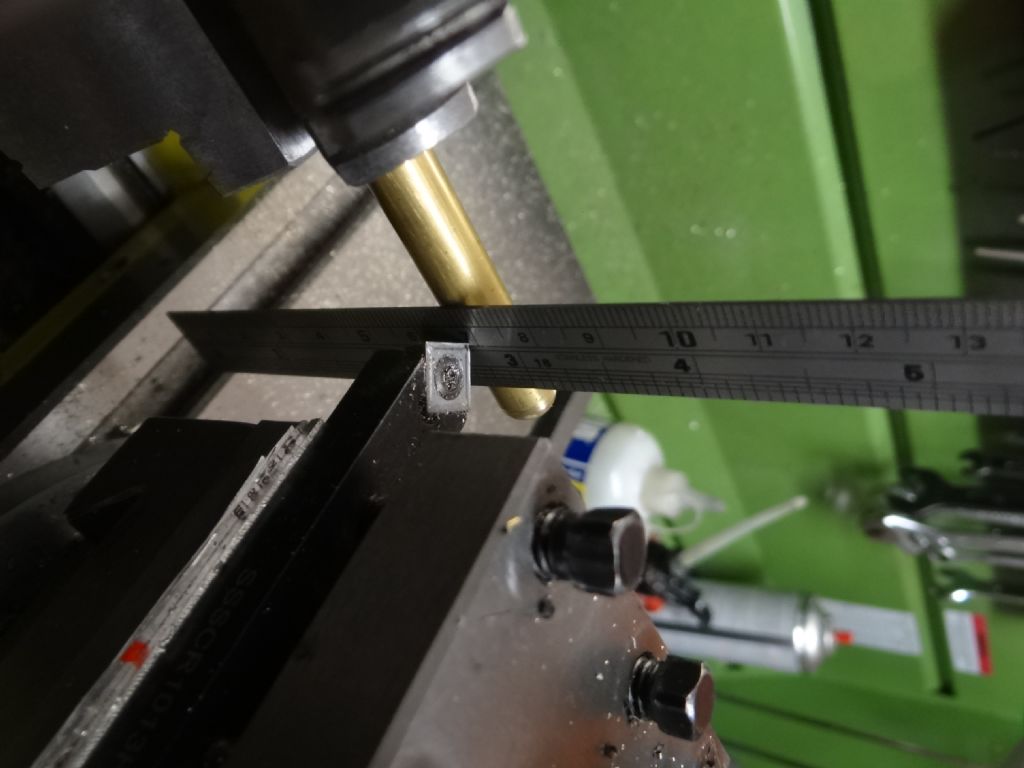
              I always shim to height, using a steel rule nipped against a rod to gauge it:

              dsc04505.jpg

              The rule sits vertical at centre height, otherwise it leans.

              Some forum discussion about centre height recently because a Southbend book recommends surprisingly high, but this depends on the tool having enough relief. Most of us position tools at or slightly above centre height, and it works. Avoid cutting below centre height because it causes chatter an dig ins.

              The heights of tool shanks seem nominal to me, basically saying a 12mm shank won't fit a 10mm tool-holder. Guidance only.

              Dave


              Edited By SillyOldDuffer on 05/05/2023 13:43:07

              #644057
              Peter Cook 6
              Participant
                @petercook6
                Posted by Ed Blackwell on 05/05/2023 10:05:35:

                However, looking at the geometry of preground cutting tools, an 8mm tool shimmed up to 9mm will still not meet the centre of my workpiece.

                You will also need to check/adjust the shimming each time you re-sharpen the tool.

                #644060
                Mick B1
                Participant
                  @mickb1

                  I've found on my Warco that the floor of the toolpost slot is 0.5" or 12,7mm below centre height within maybe a couple of thou or suchlike. So I buy 1/4" square secrion HSS toolblanks, grind the cutting geometry so as to take little or nothing off the top face at the cutting edge, and use a milled alli holder with a 0.250" thick base.

                  I only have to do a bit of shimming if I find I've taken too much off the top, and I've developed bench grinding technique to tthe point where that doesn't happen too often.

                  If the OP can use and obtain 10mm. square blanks, wouldn't it work to grind the top of the cutting edge to 9mm or the actual tool-slot-floor to CH dimension? Then shimming would only be needed to get you out of schtuck with a tool inadvertently ground too far down.

                  #644065
                  JasonB
                  Moderator
                    @jasonb

                    Dave's (Silly old duffer) method is best kept for setting HSS tools as that can chip carbide inserts particularly **GT ones

                    #644066
                    not done it yet
                    Participant
                      @notdoneityet

                      As always, the tool stick-out must be minimal and the shank and tool holder/tool-post/cross slide/carriage must all demonstrate close to zero deflection, in use.

                      Light facing cuts, with a very short stick-out and on centre line of the cross slide will present much less deflection than an overhanging cutter, outboard of the cross slide and likely on a well-worn lathe. It thus requires a modicum of common sense when taking heavy long-travel cuts – when the deflection of the cutting edge may mean the cutter is operating below the ideal setting.

                      There are ‘ideals’ and there are ‘real-world’ settings when cutting metal, so some very slight adjustment from the ideal may be necessary, especially with a small and worn hobby machine.

                      #644068
                      Clive Foster
                      Participant
                        @clivefoster55965

                        In these days of relatively inexpensive dial gauges and indicators it's surely more sensible to make a bench "tool setter" device to directly measure the actual height of the cutting edge and calculate the shim thickness needed.

                        Fit a dial gauge with an elephants foot, attach to a suitable upstand fixed to an adequately flat base and the worlds your mollusc. I imagine the colour coded plastic shim sheets will be up to the deed on our smaller machines so keeping track of what shims you have becomes easy.

                        Not forgetting some thicker ones if you need to build up seriously for smaller tooling.

                        That said I prefer sharp internal corner angle, whether bought (alloy extrusion is usually good) or welded up, for rough setting of undersize tooling as the upright side helps keep the tooling centred under the clamp bolts. A trick that works just as well with QC systems like my Dicksons.

                        The more economically minded can do adequately well with a long lever pivoted close to the short end and a ruler on the long end. If you can read 1 mm a 1 to 10 ratio gives 0.1 mm, 4 thou, resolution. Well beyond what can reasonably achieved with a centre height gauge or Dave's method. Which latter I loathe in principle because its accuracy decrease as the stock gets larger. Around 1" or 25 mm diameter is the easily useful limit. Its ability wreck a sharp edge being merely a side benefit!

                        For insert tooling it's just a pure mathematical exercise reading off holder and insert dimensions from the data sheet to work out the shims needed. Tolerances for any half decent system are way better than you can achieve with a centre gauge.

                        For me the most convenient type of centre height gauge is the optical style. Basically just a thick piece of perspex held up right by a suitable base with a line scribed at centre height on both sides. If the two lines and the tool tip set nearly touching the blade eye up coincident the tool is on centre height. The coincidence principle means it can be viewed from a distance without noticeable error. Shove a mirror on the back at 45° and you can look down on it rather than along which is sometimes better.

                        Just the thing for setting QC systems.

                        Probably the easiest type to make too. So nice when really easy and really good come in the same box.

                        Clive

                        #644083
                        Bazyle
                        Participant
                          @bazyle

                          1/4" HSS is perfectly adequate for amateurs unless you are making a 1:1 model of the Titanic's propshaft,

                          Start collecting bits of scrap metal from bits of computer to drinks cans to use a shims. Soon becomes easy. Keep the shim material needed with each tool with a rubber band.

                          #644090
                          duncan webster 1
                          Participant
                            @duncanwebster1

                            How important tool height is depends on the work diameter. When I was first paid to drive a lathe we had 4 way tool post and a box of packing, nothing thinner than 1/16", so the best you could get was plus minus 1/32". We didn't do small stuff.

                            #644101
                            Howard Lewis
                            Participant
                              @howardlewis46836

                              If the toolis below centre height, it will behave as if it has excessive front clearance.

                              Above centre height it will rub rather than cut.

                              Having faced the end of a bar, with a tool correctly mounted on centre height, there will, be no pip in the middle ,of the face.

                              Exact clearance angles are probably not ABSOLUTELY vital. 8 degrees or 12 when you are aiming for 10 will not bring the end of the world.

                              Beware of excessive angles, especially Top rake. The thinner the tool edge, the less metal is present to conduct away the heat bgenerated by cutting. The tool will over heat and wear more quickly..

                              (My parting tool and chamfering tools have no top rake at all, and work just fine! ) Others may well disagree with the above, but it works for me., and has dine for many years

                              As said, minimise tool overhang. The mmore mrigid the tool set up, the better finish you will get, and less chance of chatter.

                              Howard

                              #644113
                              Jelly
                              Participant
                                @jelly
                                Posted by Howard Lewis on 05/05/2023 19:07:14:

                                (My parting tool and chamfering tools have no top rake at all, and work just fine! ) Others may well disagree with the above, but it works for me., and has dine for many years

                                On the contrary, neutral and negative rake can give excellent results, sometimes better than a positive rake!

                                To which end I have a negative rake parting blade ground specifically for brass, which is much less prone to grabbing and leaves a superior surface finish.


                                It's just a case of users of smaller lathes needing to be aware of the additional cutting power needed so as to not overload their motor, and minimising stick out to prevent the additional force exerted on the tool damaging a toolbit with a small cross-section.

                                For this reason conventional wisdom was that model engineers lathes lacked the power to use these tool geometries…

                                But given that even a modestly proportioned modern lathe like a Warco WM250V comes with a 1.1kW/1.5hp motor, I don't think that holds anymore.

                                Edited By Jelly on 05/05/2023 20:40:09

                                #644121
                                Richard Millington
                                Participant
                                  @richardmillington63972

                                  I have a washer screwed to a length of faced round bar with a base at the other end. It is set up that when the base is on the saddle the bottom of the washer is at centre height.

                                  #644130
                                  Clive Foster
                                  Participant
                                    @clivefoster55965

                                    For folk like us really sharp is much more important than correct to book clearance angles.

                                    I've pretty much given up on any form of rake on the top for normal work leaving the top of the HSS blank flat. Saves mucking about with tool height. Whether by shimming or QC adjustment. In practice it limits the sensible depth of cut to around 50 thou / 1mm, unless I turn the coolant on, but a couple of extra passes are rarely a problem most of the time.

                                    Sharpening on the periphery of the wheel to give a curved hollow grind makes it really easy to touch up the edge to a sharpness approaching a decent razor blade. The slipstone stone or diamond sharpening stick is supported only at the top and bottom of the tool so it is inherently stable with no tendency to rock. I reckon most inexperienced folk, and fair few experienced ones on a bad day, make a tool ground with a flat face worse rather than better when touching up by hand. It's really difficult to avoid rocking when working freehand. Most folk would probably be better off if they had some form of roller guide, as used with plane blades, to fix the angle.

                                    Once you have a noticeable flat below the cutting edge it's dead easy to re-sharpen off the periphery of the grinding wheel. A sturdy toolrest is great help. Many of the affordable imports have distressingly flexible ones spoiling a fundamentally good grinder.

                                    Ages back I purchased a Creusen grinder on an RJH vacuum filter stand with only one toolrest. So I measured up the remaining one and made a slightly improved copy. Did proper drawings with full documentation and photographs of the machining taken intending to write it up for MEW figuring it could easily be adapted to just about any other breed by simply changing appropriate dimensions. Still have the files and picture but they rite up never happened.

                                    Clive

                                  Viewing 16 posts - 1 through 16 (of 16 total)
                                  • Please log in to reply to this topic. Registering is free and easy using the links on the menu at the top of this page.

                                  Advert

                                  Latest Replies

                                  Home Forums Beginners questions Topics

                                  Viewing 25 topics - 1 through 25 (of 25 total)
                                  Viewing 25 topics - 1 through 25 (of 25 total)

                                  View full reply list.

                                  Advert

                                  Newsletter Sign-up