Lathe spindle alignment

Advert

Lathe spindle alignment

Home Forums Workshop Techniques Lathe spindle alignment

Viewing 25 posts - 1 through 25 (of 55 total)
  • Author
    Posts
  • #648109
    Iain Downs
    Participant
      @iaindowns78295

      I recently turned a 50mm long 'pipe' in steel with an external diameter of 20mm and internal bore of 16mm. Both inside and outside were around 0.02mm or so narrower at the chuck end. I particularly wanted this to be highly accurate, particularly the inside as I wanted to press bearings in.

      I managed to get some approximation of what I wanted with the aid of some wet and dry, but this wasn't really ideal.

      I had to wait for a new test bar as my existing MT3 test bar had rusted rather nastily.

      What I found was that the test bar did in fact lean away from the cross slide by around this factor. This seemed independent of the rotation of the test bar.

      When I bought the lathe (a 7×14 Real Bull CJ18A from now defunct SPGtools), it was suggested that I could align the spindle by 'nipping up' the bolts which hold the headstock on.

      I've done this previously when relacing the spindle and this does seem to have some effect.

      My questions are:-

      Should I be able to get better alignment with my mini lathe (Mr Schlesinger and so on)

      Is nipping up / freeing the headstock botts the best way to do this?

      I ask these questions as I'm not particularly keen on stripping down the lathe if I'm not going to be able to fix this.

      I look forward to your help!

      Iain

      Advert
      #16446
      Iain Downs
      Participant
        @iaindowns78295

        Can I fix or will Mr Schlesinger stop me?

        #648113
        Clive Brown 1
        Participant
          @clivebrown1

          I do not have experience of this particular machine, bur adjustment of the headstock bolts is unlikely to improve the alignment IMO. The more usual method of improving the alignment of a small lathe is to shim or otherwise adjust the bolts holding the lathe down to its stand. This is often misleadingly called "levelling". The idea is to remove twist from the bed. Search this forum, there have been a number of threads describing the method.

          #648116
          Iain Downs
          Participant
            @iaindowns78295

            HI, Clive.

            The lathe is rather small and is not secured to the bench. There's no particular way of doing that – not straightforwardly anyway.

            I can try applying some shims or such and see if it makes any difference.

            Thanks

            Iain

            #648117
            old mart
            Participant
              @oldmart

              0.02mm in 50mm is not much. When you put a testbar in the chuck, even a rusty one, does it run true over at least 75mm, measured with an indicator on the cross slide? The spindle would have to be rotated by hand during the test. If that is not going to work, then an actual cut with a decent size bar, say 25mm steel or aluminium with about 80mm sticking out of the chuck. Both ends should be the same if the spindle is in line with the bed. Leaving the turned bar in the chuck, the headstock bolts can be slackened off and with the indicator, half the error taken out before retightening the bolts. This is trial and error, another skim should prove the results. The only headstock that I have taken off was not adjustable at all. I took the headstock off the museum's Smart & Brown model A when wanting to remove the spindle and found it was fitted to the prismatic bedways and line bored to the bed during manufacture. It only needed cleaning and bolting up to be perfectly aligned. Now I know how, I can remove the spindle in 15 minutes without touching anything else.

              #648124
              Huub
              Participant
                @huub

                I also can't bolt my mini lathe (HBM DC300) down to the table so I can't align the head stock by shimming. I have taken the head stock of the bed and scraped/sanded the seating of the head stock so that it aligns OK (0.015 mm/100 mm). It took me a day to do it. That is however not easy to do because to remove the head stock, the electronics, gears and motor have to be removed first.

                #648126
                Andy_G
                Participant
                  @andy_g
                  Posted by Iain Downs on 10/06/2023 21:06:22:

                  The lathe is rather small and is not secured to the bench. There's no particular way of doing that – not straightforwardly anyway.

                  I also have a CJ18A 7X14 lathe (from Amadeal). Tweaking the headstock bolts shouldn't do anything if it is properly bolted down.

                  You can easily correct that level of error by shimming the mounting 'feet'. (You can easily induce a much greater error, too!)

                  The lathe can be secured from below, using the tapped mounting holes for the rubber feet. I used a length of rectangular hollow steel and filed / sanded it until it contacted all 4 feet. A piece of 0.0015" shim under one foot was needed to true it up.

                  If you are interested, I described the process (and its effect) here:

                  (The parting off at the end was very tentative because of previous problems that I'd had – I would go a lot quicker now!)

                  Edited By Andy_G on 11/06/2023 00:09:49

                  #648138
                  Chris Mate
                  Participant
                    @chrismate31303

                    Lathe:The 360 degrees thing: Your cutter positioned but not turning, the work turns.
                    Can somebody explain the relation between cutting along a bar(Outside single point cutter) or inside a bar(boring) from the perspective of the placement of the cutter tip to workpiece being cutted at a certain degree entry out of 360 degrees while the work is turning through 360 degrees as well as ther tailstock positioned to the centre of the work turning. 380 degrees are involved but actual cutter positioning is fixed at a certain degree out of 360 degrees.
                    My point is moving the headstock in relation to the work up/down/letf/right, which of that has an effect or no effect out of which part of the 360 degrees, same for tailstock.
                    With this you got the centreline from headstock through your work to tailstock.

                    With the above in mind, say theoretically your toolp{ost and cutter could have turned around the work as well, how would that be effected by alignment-?

                    #648153
                    Iain Downs
                    Participant
                      @iaindowns78295

                      Thanks for the responses, guys.

                      Old Mart I *think* that this is what I was hoping would work, but as Huub says, it's a bit of a pain to do. I will give that a go, though.

                      Andy – that was very interesting. Did you check the trueness of the lathe after the work? I see that you'd checked that it was the same after bolting as before, but that assumes that the bed was in true to start with. That's something I will have to consider, probably later as I don't have the stock for that and my welding skills are … dubious!

                      In passing, my parting off has been much better since I changed the guides for the cross-slide under the bed. Teh replacements are brass and somewhat heavier than the original bars. I found this on a you-tube video, but can't recall which one other than that the author had a distinctive nasal voice. 20mm mild steel seems quite reliable these days even at higher speeds. Having said that sometimes it doesn't work for no apparent reason!

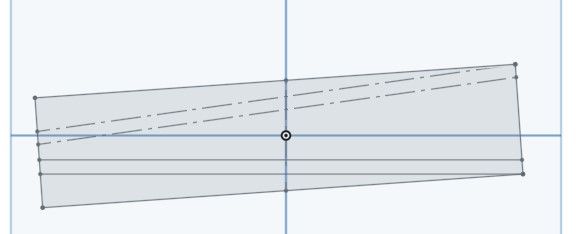
                      Chris, If I've understood your question correctly, the diagram below might help..

                      cutting at an angle.jpg

                      The angled rectangle is the bar in a chuck which leans away from the operator. Left hand side is the chuck end. Note that the chuck is in line with the spindle and the bar rotates around its axis.

                      the bottom horizontal lines represent the travel of the cutter. the lower one is the outside, then inner the bore.

                      The dotted lines are what the travel would be on the other side of the bar..It's a bit hard to see, but if you tilt your head so that the bar is horizontal you will see what I mean.

                      Thus the part near the chuck is narrower (inside and out) than the end.

                      Hope that makes sense!

                      Iain

                      #648165
                      Andy_G
                      Participant
                        @andy_g
                        Posted by Iain Downs on 11/06/2023 10:43:32:

                        . Did you check the trueness of the lathe after the work? I see that you'd checked that it was the same after bolting as before, but that assumes that the bed was in true to start with. That's something I will have to consider, probably later as I don't have the stock for that and my welding skills are … dubious!

                        Yes – I knew it was turning parallel before I started, so didn’t want to alter anything too much. It’s within about 0.01 mm over 100mm so I’m not inclined to mess with it. I wouldn’t bother with welding – just get hold of a length of rectangular hollow section steel – I only resorted to welding to use what I had around.

                        #648170
                        Iain Downs
                        Participant
                          @iaindowns78295

                          Thanks, Andy. A trip to the scrapyard may follow!

                          At the moment, I have the lathe in bits with the headstock off. Nipping the bolts had no positive effect, though I could make things worse by loosening some bolts – particularly the front right one.

                          My first attempt is to make sure that the surfaces are all clean and deburred. I thought I did this before, but who knows?

                          As the deviation is about 0.03 over 50mm and the headstock is 100mm long, I should need a .06mm shim (in total – two 0.03 might be better). If the deburring fails I will try that before trying to get clever with filing and sanding.

                          Iain

                          #648190
                          Hopper
                          Participant
                            @hopper

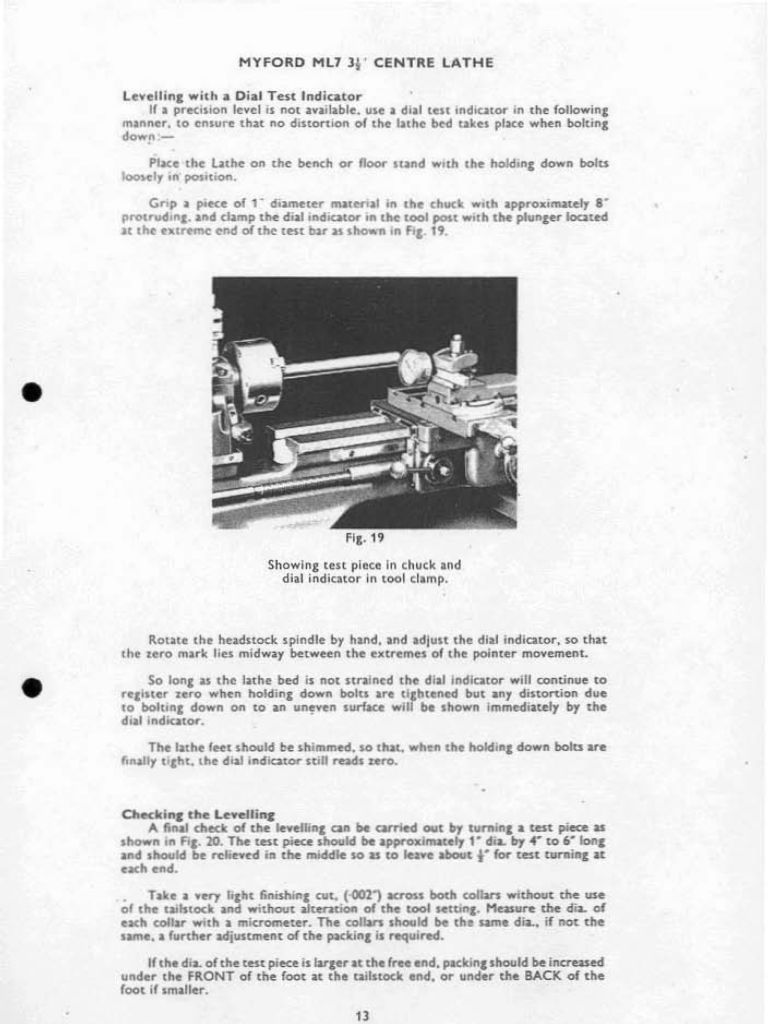
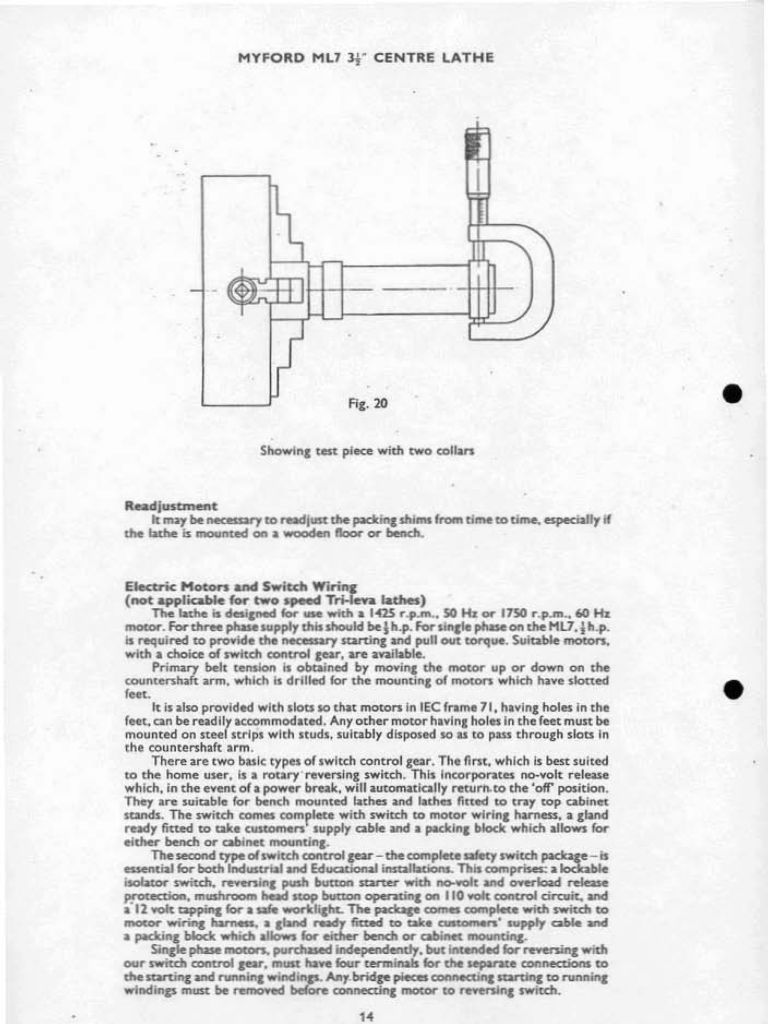
                            If you are going to bolt it down to a solid steel base as per the video, you might be best off to set it to turn parallel as he did by shimming the tailstock feet to get it to turn parallel. Standard procedure on many lathes, including Myfords. See Myford manual pages below. See the bottom of the first page. Saves risking doing irreparable harm to the headstock mounting.

                            myford manual 1.jpg

                            myford manual 2.jpg

                            #648199
                            Iain Downs
                            Participant
                              @iaindowns78295

                              Hi, Hopper. I tried lifting the corners of the splash tray on which the lathe is bolted, which should have had the effect of twisting the bed – at least a little. In fact this had little effect on the alignment.

                              Since then I've removed the headstock and applied some shims (aluminium foil turns out to be 0.01mm in width) which has considerably improved the alignment.

                              It would seem that the alignment bar isn't quite as perfect as the advertisement indicated, so I'm not quite sure how good yet, but probably between 5 and 10 microns over 50mm. I'm sitting here wondering if an extra shim might bring it even better or to leave well enough alone…

                              Next step (tomorrow) is to put it back together and take a test cut. I will report.

                              Iain

                              #648204
                              Hopper
                              Participant
                                @hopper
                                Posted by Iain Downs on 11/06/2023 16:22:50:

                                Hi, Hopper. I tried lifting the corners of the splash tray on which the lathe is bolted, which should have had the effect of twisting the bed – at least a little. In fact this had little effect on the alignment.

                                As flexible as the bed appears to be in the video above, I would expect a splash tray would flex before the bed would.

                                #648213
                                SillyOldDuffer
                                Moderator
                                  @sillyoldduffer

                                  Posted by Iain Downs on 11/06/2023 12:43:53:

                                  As the deviation is about 0.03 over 50mm …

                                  Just a thought, but have you confirmed the pipe isn't bending under cutting pressure? Long jobs bend most when cutting furthest from the chuck where the cutter tends to remove less metal than the lathe dial suggests. The dial is more likely to be right close to the chuck where the job is well-supported.

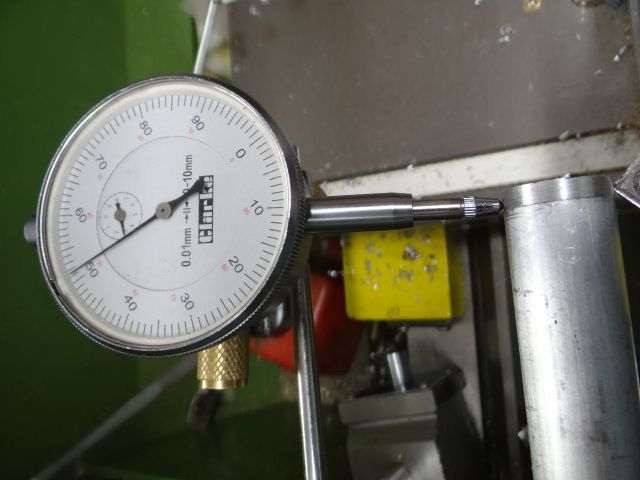
                                  In this demo, I bent a 150 long length of ⌀20mm solid aluminium rod 0.08mm off-axis just by pushing it hard with my finger:

                                  dsc06754.jpg

                                  A cutter driven in by the cross-side screw is much more forceful. I managed to bend the rod nearly 3mm off-axis before getting scared I might damage the nut:

                                  dsc06756.jpg

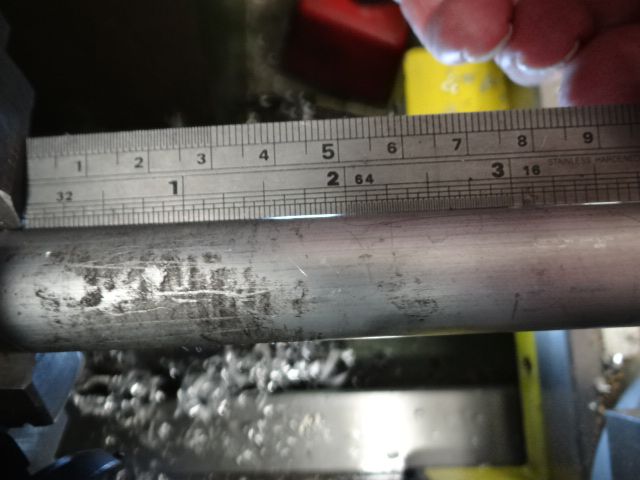
                                  Not a good picture next – I couldn't hold the rule and camera accurately enough to highlight the whole curve. But laying a rule along the rod with a light underneath shows the rod is bent:

                                  dsc06757.jpg

                                  I notice work starts to bend when turning anything more than about 3x diameter long beyond the jaws, worse when taking heavy cuts with carbide. Anything over 6x diameter in length is likely to bend under its own weight and has to be supported – tailstock, steady or lump of wood.

                                  Dave


                                  Edited By SillyOldDuffer on 11/06/2023 18:25:31

                                  #648214
                                  Iain Downs
                                  Participant
                                    @iaindowns78295

                                    Hi, Dave.

                                    I'm pretty sure that it's not the pipe bending. Mainly because the MT3 test bar shows a deflection pretty close to what I measured with the 'tube'.

                                    The tube started off as 27mm mild steel (EN1A possibly Pb) with a stick out of about 60mm. The inside was bored to 16mm and then the outside cut down to 20mm.

                                    During the outside turning, I checked diameter with a micrometer at several places and fairly often and it was consistently showing smaller at the chuck end.

                                    So I'm fairly sure it's the alignment. After I've turned a new tube tomorrow, I can let you know the good news or admit I'm an idiot and the problem is elsewhere!

                                    Iain

                                    #648223
                                    Niels Abildgaard
                                    Participant
                                      @nielsabildgaard33719

                                      All my lathes have been put solidly (bolted to) a solid foundation before I started to worry about accuracy

                                      wp_20200310_004[1].jpg

                                      #648224
                                      Chris Mate
                                      Participant
                                        @chrismate31303

                                        When I got my 330 Lathe new, it came with a metal stand not Cast Iron, and was given advice to lift it like 200mm.
                                        So when I did that I thought it a good idea to fit a heavy 90Kg 12mm metal plate between lahe and tray which sits on stand and bolt all together. I understand that doing that you might or will twist the bed unless this plate is grinded 100% on all sides parrallel.

                                        I proved that I can shift the taper cut from chuck side to tailstock side depending on where I shim the tailstock end of the bed. After much effort I got it to cut straight on very light cuts unconnected to tailstock, however this did not stay put over time. Before test cutting I made sure it was squared in chuck at least by measuring runout near and far form chuck.

                                        What I did not do so far was to mount the lathe on rubber mounts instead, so the bed will reflect the factory gring quality in cutting.

                                        About twisting the bed, I am just not sure how accurate this twist method overall is to a fit grinded job in theory if that is even possible, probably only on sturdy sections like on large expensive latghes with cast iron bases, but even they are "twisted" by feet adjustment. Maybe grinding it to accuracy is the last step.

                                        Edited By Chris Mate on 11/06/2023 19:44:41

                                        #648228
                                        Michael Gilligan
                                        Participant
                                          @michaelgilligan61133
                                          Posted by Iain Downs on 11/06/2023 18:35:54:

                                          Hi, Dave.

                                          I'm pretty sure that it's not the pipe bending. Mainly because the MT3 test bar shows a deflection pretty close to what I measured with the 'tube'.

                                          […]

                                          .

                                          Perhaps worth noting Dr Schlesinger's approach to test bars [mandrels]

                                          … it’s clearly described on p5 of the book.

                                          MichaelG.

                                          .

                                          Ref. __ https://www.pearl-hifi.com/06_Lit_Archive/14_Books_Tech_Papers/Schlesinger_Georg/Testing_Machine_Tools.pdf

                                          Edited By Michael Gilligan on 11/06/2023 20:19:29

                                          #648251
                                          Hopper
                                          Participant
                                            @hopper
                                            Posted by Chris Mate on 11/06/2023 19:43:36:

                                            When I got my 330 Lathe new, it came with a metal stand not Cast Iron, and was given advice to lift it like 200mm.
                                            So when I did that I thought it a good idea to fit a heavy 90Kg 12mm metal plate between lahe and tray which sits on stand and bolt all together. I understand that doing that you might or will twist the bed unless this plate is grinded 100% on all sides parrallel.

                                            I proved that I can shift the taper cut from chuck side to tailstock side depending on where I shim the tailstock end of the bed. After much effort I got it to cut straight on very light cuts unconnected to tailstock, however this did not stay put over time. Before test cutting I made sure it was squared in chuck at least by measuring runout near and far form chuck.

                                            What I did not do so far was to mount the lathe on rubber mounts instead, so the bed will reflect the factory gring quality in cutting.

                                            About twisting the bed, I am just not sure how accurate this twist method overall is to a fit grinded job in theory if that is even possible, probably only on sturdy sections like on large expensive latghes with cast iron bases, but even they are "twisted" by feet adjustment. Maybe grinding it to accuracy is the last step.

                                            Edited By Chris Mate on 11/06/2023 19:44:41

                                            As the video posted above shows, the minilathe bed is about as flexible as a wet noodle if not bolted down to a solid base. But 12mm flat plate can be quite flexible, by precision engineering standards, especially if perched on top of the type of sheet metal cabinet supplied with many lathes. A stout box construction of square tube or angle iron is more solid than flat plate.

                                            The trick to bolting down a lathe to a solid base, which seems to be universally forgotten, is shown in the Myford manual pages above. You don't surface grind the bench or base to be flat, You measure any gaps when the lathe is sitting loose on the base and insert shims so you don't distort the lathe when tightening the bolts.

                                            I think if Myford recommends using shimming the bed feet to achieve parallel turning, you can rely on their hundred years or so in the lathe manufacturing business

                                            I have to say I am astonished at how flexible the minilathe bed is in this video, as measured with a DTI.

                                            #648254
                                            Michael Gilligan
                                            Participant
                                              @michaelgilligan61133

                                              To massively reduce the inevitable flexibility …

                                              Niels Abildgaard has the practical solution: his tablet of stone !!

                                              [ that steel box section is a very good runner-up though ]

                                              MichaelG.

                                              Edited By Michael Gilligan on 12/06/2023 06:29:14

                                              #648320
                                              Iain Downs
                                              Participant
                                                @iaindowns78295

                                                I decided that a bit of measurement was in order.

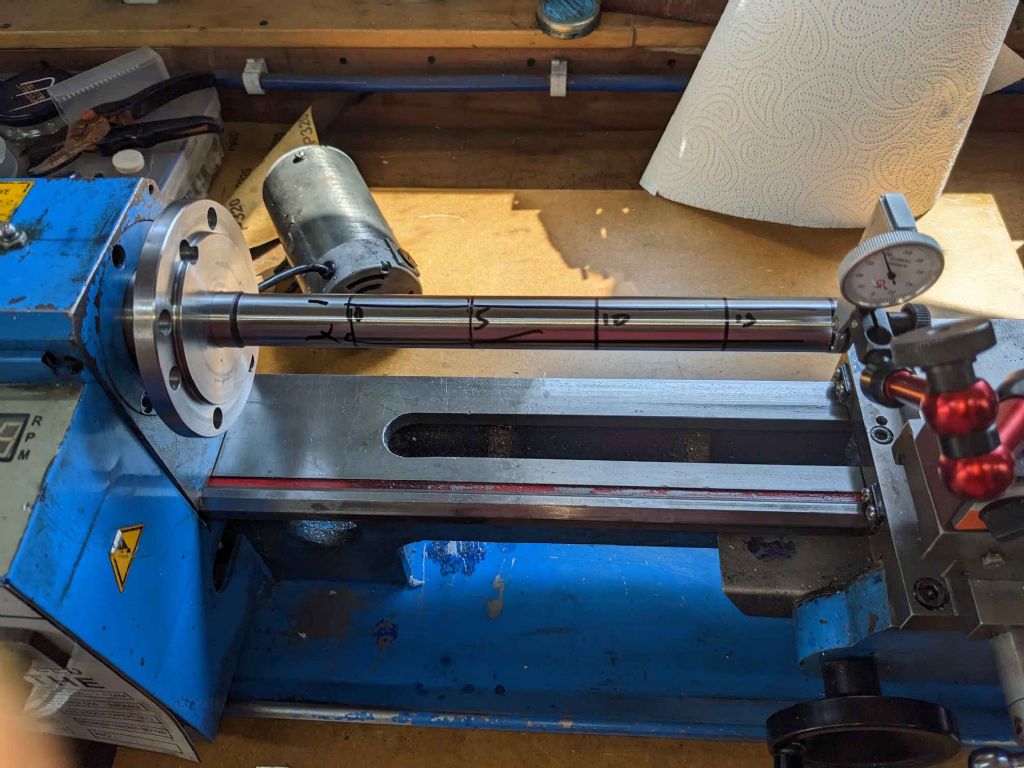
                                                I put my test bar in the spindle and marked rings at 50mm intervals and lines lengthwise at roughly 90 degrees. the bar is consistent diameter through the measured area within a couple of microns.

                                                The picture below is the test set up.

                                                spindle alignment measurement.jpg

                                                I took care to set up the indicator (a 2 micron jobbie from China) in line with a centre in the spindle first.

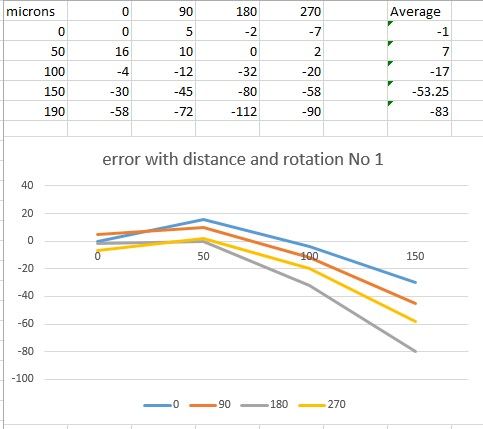
                                                Here is a snapshot of the results. Note that I repeated this twice with the test bar in different positions and each time ran through the measurements twice – the results were not identical, but were reasonably consistent.

                                                spindle alignment.jpg

                                                you will see that the spindle appears to move away and then towards the indicator with a maximum error (on average) of 83 microns 150mm down the bar. I can only assume that this is due to a twisted bed, something I'm not in a position to fix at the moment.

                                                This does seem to show that the average error is now under 20 microns (< one thou) for the first 100mm, which is reasonable.

                                                I'd be interested to get input from anyone who is better equipped to interpret this data – I certainly am not!

                                                I will be on the lookout for a bit bit of steel at some point – there is a scrapyard in ripon and I think this is an application which is fine for some IDontKnowWhatItIsIum as long as it's sizeable and heavy.

                                                Iain

                                                #648323
                                                Michael Gilligan
                                                Participant
                                                  @michaelgilligan61133
                                                  Posted by Iain Downs on 12/06/2023 16:43:49:

                                                  I decided that a bit of measurement was in order.


                                                  […] you will see that the spindle appears to move away and then towards the indicator with a maximum error (on average) of 83 microns 150mm down the bar. […]


                                                  .

                                                  Good thinking yes

                                                  I’m happy to be wrong, but … My first instinct is that the bar should be sagging under its own weight, and therefore your figures need to be inverted.

                                                  The ‘bump’ at the beginning is a bit odd, but it’s small enough to possibly be an indicator error

                                                  … alternatively; if it’s real, then I would be checking the fit of the Morse Taper rather carefully.

                                                  MichaelG.

                                                  .

                                                  Edit: __ Apologies: What I wrote may be nonsense … I’ve just realised that you were using a lever indicator on the [presumed] centre-height of the bar, not a plunger measuring vertically.

                                                  Your arrangement could complicate the geometry somewhat. blush

                                                  Edited By Michael Gilligan on 12/06/2023 18:05:49

                                                  #648328
                                                  Chris Mate
                                                  Participant
                                                    @chrismate31303

                                                    Anybody familiar with Rollies dad method of averaged Horizontal and Vertical measurement bar does not need to be straight or runout on chuck does not matter, I found this interesting.
                                                    Rollie's Dad's Method of Lathe Alignment-PDF

                                                    #648329
                                                    Huub
                                                    Participant
                                                      @huub

                                                      The bump in the measurements could indicate wear (not worn) of the lathe bed. It can also indicate that the gibs are to tight or a combination of both.
                                                      Measure once moving the carriage from left to right and once moving from right to left. If you find similar results, the gibs are not to tight.

                                                      20 microns/100 mm isn't bad for a "stock" mini lathe. Beware, it would mean 0.04 mm in turned diameter. If you are happy with these results, than all is OK.

                                                      If you have a chuck mounted, the first 40 mm of the lathe bed aren't used. So it is to be expected that this part of the lathe bed is in mint condition.

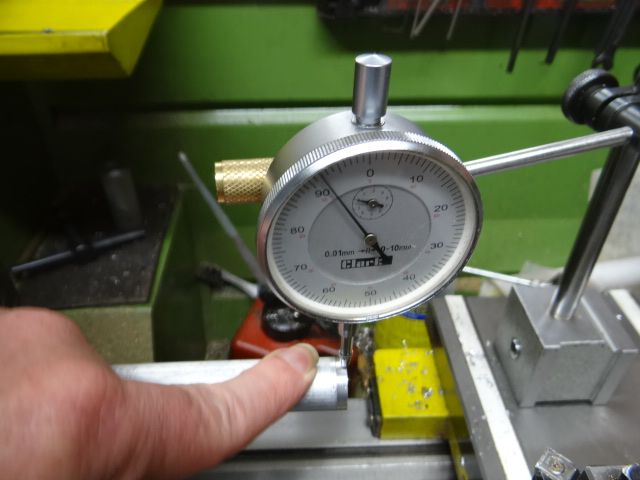
                                                      This is how I measure the headstock alignment with the chuck in place:
                                                      Measuring headstock alignment

                                                      Edited By Huub on 12/06/2023 19:10:04

                                                    Viewing 25 posts - 1 through 25 (of 55 total)
                                                    • Please log in to reply to this topic. Registering is free and easy using the links on the menu at the top of this page.

                                                    Advert

                                                    Latest Replies

                                                    Home Forums Workshop Techniques Topics

                                                    Viewing 25 topics - 1 through 25 (of 25 total)
                                                    Viewing 25 topics - 1 through 25 (of 25 total)

                                                    View full reply list.

                                                    Advert

                                                    Newsletter Sign-up