Lapping a Unimat 3-jaw chuck

Advert

Lapping a Unimat 3-jaw chuck

Home Forums Beginners questions Lapping a Unimat 3-jaw chuck

Viewing 3 posts - 26 through 28 (of 28 total)
  • Author
    Posts
  • #630068
    Julius Henry Marx
    Participant
      @juliushenrymarx92355

      Hello:

      Posted by Hopper on 18/01/2023 13:52:44:

      > You can't adjust the jaws if they are held in place by the clover leaf plate.

      Quite so, I was not planning on using one.

      > … a grinding stone needs to be spinning fast.

      This morning I remembered having purchased (long ago) a Dremel diamond coated (cylindrical) bit.

      As I never throw away anything, it was a matter of looking around for it and eventually finding it.

      As I remembered, it was worn down enough for me to think it would not do much harm if I attempted to use it mounted on the tailstock with my new 8mm chuck.

      Fortunately I did not bugger up the jaws and was able to get rid of the runout, much more than I expected.

      Granted, the Dremel grinding bit has a ø of ~3/16" (~ 4.59mm) and the mill bit I used to measure the runout has a ø of 6.0mm, so they sort of fit, making for a great result when measuring the runout.

      I now have to measure it with something larger to check if the result holds, so to speak.

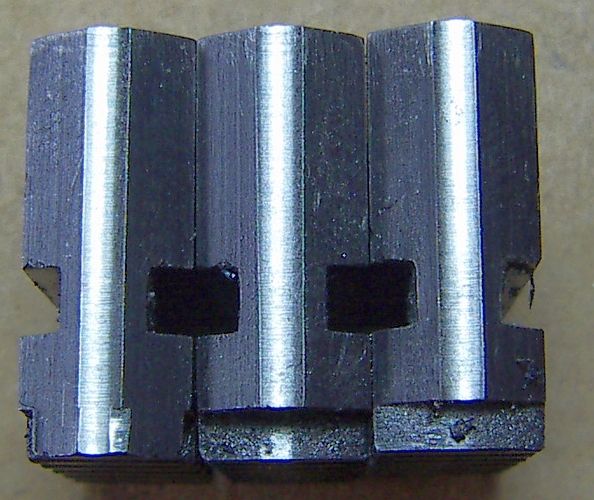
      Here's what the jaws look like now:

      jaws_fix.jpg

      One of the jaws was in worst shape than the others which were done faster.

      I posted a video of the clock while measuring the run out with the Unimat running as slow as I could get it to go.

      Sorry for the bad quality of the video, it is the first one I've ever made but it clear enough to see the result.

      After checking everything out, I disassembled the chuck again (a breeze, now that I got the hang of it), cleaned it thoroughly and oiled it.

      Thank you very much to all who pitched in to help. 8^)

      Best,

      JHM

      Edited By Julius Henry Marx on 18/01/2023 18:54:41

      Advert
      #630314
      mgnbuk
      Participant
        @mgnbuk

        Thta does look promising Julius & your video plays fine for me.

        My "solution" for a Dremel mount is a work-in-progress & it won't be as "high tech" as Hopper's :

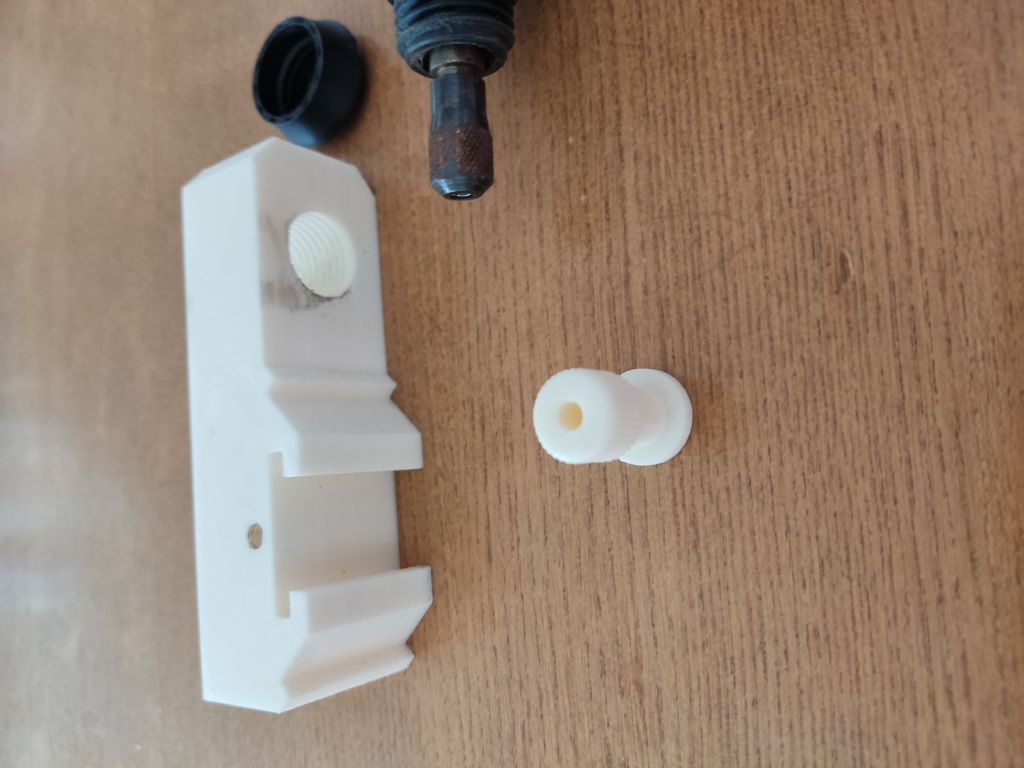
        1674225061369.jpg

        A 3D printed adapter to suit a Dickson toolpost – the photo has come in sideways, but it doesn't really matter.

        The formation to mate with the toolpost fits very nicely & with 6 perimeters the print is solid enough to resist similar clamping lever forces to a steel holder. The printed M5 threads in the body & height adjuster required a tap running though them to remove a very small amount of plastic to get a screw to fit snugly. The thread for the Dremel needs work – the example above is M18x2, which is the nearest to the M19x2 or 1/2" x 12 thread usually quoted for the Dremel nose from the "standard" threads in FreeCad. I used this with the idea of opening up the thread with a tap (1/2" x 12 BSF, as M19 x 2 taps are pricey ! ), but will re-visit this aspect on the "Threads workbench" to try to define a custom thread that fits the tool without need for a tap.

        Unfortunately my PC was stuffed by a failed Windows update on Saturday (thanks Microsoft ! ) & the 3D model was one of the files that the repairer hasn't saved (the nature of the failed restart after the update required specialst help – a unfortunate first for me & I wasn't up to date with backing up ), so will have to start the project again from scratch. Should go easier this time (until I get to the custom threading bit anyway) but I do need the practice with FreeCad !

        Nigel B.

        #630333
        Julius Henry Marx
        Participant
          @juliushenrymarx92355

          Hello:

          Posted by mgnbuk on 20/01/2023 14:58:07:

          Thta does look promising Julius & your video plays fine for me.

          My "solution" for a Dremel mount is a work-in-progress …

          So is mine, which I may eventually need for something else in the future.

          But …

          I think that Dremels are too large and heavy for what the Unimat 3 is, the older Model 328 much more than the Model 395.

          So I will make a holder for the flexible shaft atatchment which will only need an easy to tap 1/2" x 20 hole or an equivalent common steel nut.

          I'll probably have a piece of 8mm steel plate laser cut with an adequate profile, turn most of the hex part of the nut to a suitable diameter and then braze it or press fit it into a hole made on the holder.

          It will be much easier to work with the Dremel in the Unimat 3 that way.

          My only concern is that the flex shaft is not mounted on bearings, so any *precision* jobs will probably not have too much of that due to the inherent lack of rigidity unless passes are very light.

          Best,

          JHM

        Viewing 3 posts - 26 through 28 (of 28 total)
        • Please log in to reply to this topic. Registering is free and easy using the links on the menu at the top of this page.

        Advert

        Latest Replies

        Home Forums Beginners questions Topics

        Viewing 25 topics - 1 through 25 (of 25 total)
        Viewing 25 topics - 1 through 25 (of 25 total)

        View full reply list.

        Advert

        Newsletter Sign-up