How to be accurate!

Advert

How to be accurate!

Home Forums Workshop Techniques How to be accurate!

Viewing 25 posts - 1 through 25 (of 30 total)
  • Author
    Posts
  • #505850
    Avon
    Participant
      @avon

      I have been trying to bore a 0.6" hole in an aluminium pulley using my S&B Model M Mk 1. To my mind this is a very simple task in a machine that shouldn't have any issues whatsoever. This was my technique:

      1. Drill the centre using firstly 1/4" then 1/2" HSS drills held in the tail stock.

      2. Progressively bore the hole until it was 0.590" using a home made cutter held in a holder that my father had made: looks to be maked from hex bar turned and drilled to mount a cutter ground from 3/16 rod.

      3. Final cut of 0.005" to remove the last 0.01" from the diameter of the hole. End result a hole that is 0.604" – usable, but 0.004" greater than intended.

      Possible causes:

      a. I didn't look carefully when applying the cut and added 0.007" – I'm pretty sure I didnt.

      b. The cutter bar 'sprang', but I was careful to make the final cut a light one to avoid that and had made several passes of the previous cut to make sure it was 'on size'.

      c. When I thought the hole was 0.590 it was actually 0.594". This is possible as I'm using a digital caliper to measure the inside diameter and I do get different readings on occasion, but I was careful to check for consistent readings before deciding how much to remove.

      d. Did I grind the tool incorrectly? I attempted to have a slight rake and with a rounded cutting edge – I certainly wouldn't claim to have set it to any particular angle and there was some slight buildup of aluminium on the cutter, but if anything I would have expected that to reduce the depth of cut not increase it.

      I'm keen to be able to turn accurately and would like to know where others think I might have gone wrong.

      Grateful for your thoughts.

      Advert
      #16213
      Avon
      Participant
        @avon

        Seems obvious, but though I think I’ve done things correctly I’m still inaccurate

        #505852
        Michael Gilligan
        Participant
          @michaelgilligan61133

          To me c seems the most likely culprit  *

          The internal jaws of your caliper are unlikely to be true ‘knife edges’

          MichaelG.

          .

          * … but it was probably a conspiracy 

          Edited By Michael Gilligan on 07/11/2020 17:35:51

          #505855
          mechman48
          Participant
            @mechman48

            I think you answered the question yourself… 'spring back'. did you do a couple of spring passes at 0.594". Did you take out any backlash from the crosslide before adding the final cuts, it's best to creep up on final cuts by taking 1/2 of what you think you need. Did you not remove the alluminium build up from the tip prior to final cut, all contribute to that bit 'extra' on sizes.

            George.

            #505856
            Martin Connelly
            Participant
              @martinconnelly55370

              0.005 is what the tool needs to take off however with a smaller depth of cut the tool probably took off more than this.

              Small cuts do not work the same as large cuts. This is why people do spring passes. A large depth of cut deflects the tool more than a small depth of cut. As a result the position of the dials for the 0.59 bore will cut again if there is no movement of the dial and the tool passed through the bore again.

              The best thing to do is get to 0.59, back off the tool and slowly bring it back in to contact with the bore. Reset the dial at this point and then start to tickle the bore to achieve what you want, measuring after each pass.

              A good way to bore to size is to stop something like .015 oversize/undersize for shaft/bore. then reset the dial as above and take off 0.005, check the bore, repeat with half of what is left to remove then the final pass should be similar to what has been done on the previous two passes.

              Martin C

              #505857
              Clive Foster
              Participant
                @clivefoster55965

                Small boring tools need much more clearance underneath than you might expect from simple eye judgement.

                After being frustrated by similar issues to yours once too often I did some drawings of tool clearance and hole diameter which made it clear that my eye-up of what ought to be right went wrong for holes below about 1" diameter. If you have CAD facilities its a useful exercise to do yourself.

                DIY means you will learn more than just looking at a drawing.

                Draw an 120° arc of hole wall extending up past the cutting point and down past the bottom of the hole. Add a basic triangle for the cutter point and clearance taking into account the boring bar diameter. My issues were with clearance at the bottom of the hole. If the tool is atouch to deep and too wide at the bottom it can be lifted a touch leading to inconsistent results as the actual feed isn't what it says on the dial. Once its no longer touching the tool springs clear to its natural radius.

                Push off with a rounded end tool is also quite likely unless its razor sharp. The diameter cut is set by feed – spring. When sneaking up a few thou at a time its easy for the spring component to build up a little on each cut until the feed setting is great enough to release all the spring at once.

                Small bores are tricky. As ever the the rule is sharp tools mean good behaviour.

                Clive

                #505858
                Pete Rimmer
                Participant
                  @peterimmer30576

                  Could be spring cuts but you seem to have the covered.

                  Next time you have to do such a job, turn a plug gauge from scrap steel and measure it with a micrometer. Make it 2 thou smaller than your bore. When you're turning your bore and getting close to size, use the plug gauge instead of your internal caliper. It will tell you when you are 2 thou away from size. You could even make a 2-stepped plug gauge at size and a couple of thou under.

                  As you gain experience you won't need the plug gauge except for very fine work and these experiences will be fewer.

                  Oh, and never lean on the tailstock when using a small lathe for finishing passes, like some people do. It's easy to affect the cut with your body weight.

                  #505862
                  Nigel McBurney 1
                  Participant
                    @nigelmcburney1

                    I would not use a digital caliper with knife edge jaws on precision measurements. When machining aluminium at least 15 to 20 degrees of top rake is required,its best to use the smallest nose rad on the tool,that will give a good finish,should there be aluminium build up on the tool tip ,regrind the tool on the top face. If the above is applied there should be no spring on the tool,on small cuts on aluminium. I was taught never to let a tool rub and keep the tool sharp,I never saw anyone where I worked in my early years taking spring cuts,I first came across the mention of spring cuts in the model engineering press,my attitude to that was get the tooling right.If I was boring a small hole my last cut would only be .001/.0015 deep.

                    #505864
                    Ramon Wilson
                    Participant
                      @ramonwilson3

                      Hello Avon

                      I'm with Michael – digi calipers are never reliable when it comes to measuring a bore accurately. Theres the flats for a start as he says and the potential for differing readings each time they are applied no matter how careful they are used.

                      If you want an 'accurate' bore then turn a plug gauge first bearing in mind that a size diameter will not enter a size bore. It doesn't measure it of course but If the correct allowance is made then boring until a plug guage will just enter will give you a very accurate result.

                      Hope that 's of use

                      Ramon (Tug)

                      #505869
                      old mart
                      Participant
                        @oldmart

                        The plug gauge that Ramon suggests is more accurate as measuring the outsides of something is always easier than the bore. I would make the front half of the gauge stepped 0.001" smaller than the exact size. That should enter the hole and the exact size not want to.

                        The ears on my old Mitotoyo digital calipers do actually measure holes accurately with practice and patience, but my Chinese copys will not. For holes up to 2 1/2" I would prefer a rocker telescopic gauge, over that my tube mike will fit.

                        Edited By old mart on 07/11/2020 18:31:30

                        #505885
                        John Baron
                        Participant
                          @johnbaron31275

                          Hi Avon, Guys,

                          If I want an accurate hole size, I make a "D" bit and use that. For a one off in aluminium I would use silver steel and not even bother hardening it, for steel it needs to be hardened.

                          The only problem with a "D" bit is that for a deep hole you have to do a lot of pecking.


                          Edited By John Baron on 07/11/2020 20:05:06

                          #505893
                          Ramon Wilson
                          Participant
                            @ramonwilson3

                            Hi guys, a few views that may be of interest

                            Whilst closely related, the boring of a hole and its 'accurate' measurement are two differing matters.

                            Someone mentions 'razor sharp tooling' – absolutely top priority and particularly so if the material has a propensity to glaze or harden eg EN24T or push off – bronze and gunmetal

                            Finish is also important for accurate measurement and also is dependant on sharp tools. It is best then if using HSS to remove the tool within 10-15thou for a final touch up on the off hand grinder – really beneficial on the materials above. This leaves plenty on to touch on again and establish where you are before that final cut. Use the biggest bar that will enter the hole for rigidity and do take several passes on the same setting on those last few thou.

                            Personally I would never use carbide trying to attain such accuracy on my now elderly Myford – others may disagree with that but results achieved as described speaks for themselves.

                            Unless you are blessed with some decent bore measuring kit then a plug guage is really the only way to go – for accuracy. It won't measure but will compare and if a good fit the hole will be very accurate to that desired.

                            I usually turn plug guages from EN1A – easy to turn and polish that last couple of thou down to size with emery for a very smooth surface. Commercial plug guages are hardened and ground – not usually an option to the home ME. It is very difficult to polish down a thou difference in diameter 'as a step' which a proper gauge would have. That's not to disagree with Mart – just my opinon. Much better to make two of differing sizes.

                            On the IC engines I have made I have always used this method to bore the housings for the ball races. I make the plug guage to the lower tolerance of the bearing fit – when the guage goes in it's just about the ideal fit on the bearing.

                            Not wanting to teach granny here chaps but that's my experience on this sometimes troublesome issue – particularly for beginners. Hope it helps someone.

                            Tug

                            Edited By Ramon Wilson on 07/11/2020 20:50:17

                            #505895
                            old mart
                            Participant
                              @oldmart

                              I would not polish, I can get a finish on most steels that looks like ground if needed, and with carbide inserts, I never use HSS on the lathe unless it's a twist drill.

                              #505913
                              Ramon Wilson
                              Participant
                                @ramonwilson3
                                Posted by old mart on 07/11/2020 21:24:13:

                                I would not polish, I can get a finish on most steels that looks like ground if needed, and with carbide inserts, I never use HSS on the lathe unless it's a twist drill.

                                Each to his own Mart but after a near lifetime of machining metal – work and home – I know what I would prefer – at home. HSS any day. Yes I know the latest carbides are good – I'm not saying there's anything wrong with them but I've done enough bores over the years to know which gives the best results on home based equipment.

                                Carbides are meant to 'work' – most home users kit can't provide the power nor the feed rate required for it to work at its best.. HSS and good old carbon steel for that matter can produce superb results in the right hands.

                                If you have the ability to produce a plug guage down to less than half a thou on diameter straight off the tool and without a polish then my hat goes off to you. You're a fair turner indeed smiley

                                Regards – Tug

                                Edited By Ramon Wilson on 07/11/2020 22:52:45

                                #506039
                                old mart
                                Participant
                                  @oldmart

                                  Perhaps you haven't tried inserts made for aluminium for finishing cuts on steel. A 0.0005" depth of cut is easy with these inserts and the best thing about them is that the cheap Chinese ones are not nasty any more.

                                  Edited By old mart on 08/11/2020 16:04:08

                                  #506046
                                  bricky
                                  Participant
                                    @bricky

                                    Mart ,could you explain to me how you achieve such a fine depth of cut.I can't get at a guess less less than .125mm on my Myford large bore and half a th on my old Myford.I don't have digital read outs so I assume you do and that is how you do it.

                                    Frank

                                    #506053
                                    Nick Hughes
                                    Participant
                                      @nickhughes97026

                                      Hi Frank,

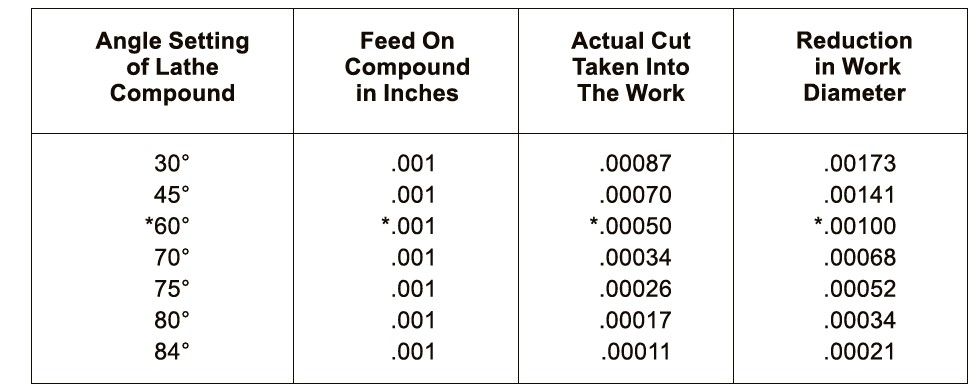
                                      You set the compound/top slide at a shallow angle and use that to apply the cut depth:-

                                      screenshot 2020-11-08 171858.jpg

                                      Nick

                                      #506054
                                      Ramon Wilson
                                      Participant
                                        @ramonwilson3

                                        Mart – firstly let me assure I wasn't being facetious or condescending – if you can produce such a finish then you are indeed a fair turner yes

                                        Now I confess, though I have heard about how good they are I have not tried the 'aluminium' inserts. I do think I actually may have some, given me by a friend, but I'd have to check to be sure. I don't have an aversion to using carbides just that I've never liked pushing my S7 to the revs and feed required. Bear in mind that's based on using carbides near twenty years ago – things have moved on at a phenominal rate in engineering since then and no doubt in the field of carbides too.

                                        To me it comes down firmly to what kind of kit you have. I don't have a gearbox on my Myford so its permanently set in the second finest feed unless I'm screwcutting – I find then that HSS ground to give a smooth finish is one thing but to achieve a finish – off the tool – for something as precision as a plug gauge needs that last thou or so polishing to remove any irregularities in the surface – I said emery – I should have course said wet and dry used with paraffin.

                                        It's still the way I'd go about it but I'm always prepared to try something new so I would appreciate any info on the specific tips you are using – what, where, etc – who knows I may even be tempted wink

                                        Regards – Tug

                                        #506055
                                        Martin Connelly
                                        Participant
                                          @martinconnelly55370

                                          Just like to state (in case it is not obvious) that the angle marking for the compound on some lathes is not always as you may expect. The normal position for the compound for most people is parallel to the spindle axis and this is the 90° position for the table above. So the 84° position is not far off parallel to the spindle axis. The usual place that this issue shows up is when beginners try to set the compound to 29.5° to cut a 60° thread form and have problems because they have set up at 90-29.5 ie 60.5°.

                                          Martin C

                                          #506063
                                          Avon
                                          Participant
                                            @avon

                                            Dear All,

                                            Many many thanks for your many and varied responses. In summary:

                                            1.Think about using a plug guage rather than calipers,

                                            2, Small cuts, and

                                            3. Make d..n sure that tool is sharp.

                                            I think this is a thread I may refer too again in the future.

                                            Thank you all for your comments.

                                            Peter

                                            #506070
                                            bricky
                                            Participant
                                              @bricky

                                              Hi Nick,

                                              That is something I will use in future, thank you for the chart.

                                              Frank

                                              #506071
                                              Howard Lewis
                                              Participant
                                                @howardlewis46836

                                                One other thing.

                                                The jaws of a calliper are not razor sharp, they have a finite, albeit small, width.

                                                Consequently the jaw will not lie truly on a diameter, but will, be measuring across a chord of the circle, and so read slightly under actual size. Normally a bore gauge would be used, but since the hole is too small for such instruments, a different method, such as a plug gauge can be used.

                                                But there are adjustable gauges available to measure such dimensions Simple expanding ball gauges (which need to be measured with a Micrometer or calliper ) telescopic gauges upto the sophisticated three point internal micrometer type gauges. (But not for the impecunious! ). Precision and accuracy tend to cost

                                                You could turn, grind and harden a piece of Silver Steel, to make a D bit to finish the bore to size. But the D bit will have to be used absolutely on the centreline, or it will act like a boring bar and produce an oversize bore.

                                                Howard

                                                #506074
                                                Michael Gilligan
                                                Participant
                                                  @michaelgilligan61133
                                                  Posted by Howard Lewis on 08/11/2020 18:33:46:

                                                  One other thing.

                                                  The jaws of a calliper are not razor sharp, they have a finite, albeit small, width.

                                                  […]

                                                  .

                                                  dont know … isn’t that what I mentioned in the first response ?

                                                  MichaelG.

                                                  #506075
                                                  bernard towers
                                                  Participant
                                                    @bernardtowers37738

                                                    I have my compound set to about 5.75degs which gives you a 10 to 1 ratio on long travel to axial so you have predictable tenths. Credit to GHT

                                                    #506077
                                                    Emgee
                                                    Participant
                                                      @emgee
                                                      Posted by bernard towers on 08/11/2020 18:49:44:

                                                      I have my compound set to about 5.75degs which gives you a 10 to 1 ratio on long travel to axial so you have predictable tenths. Credit to GHT

                                                      I too have used this method when grinding from the toolpost, but you also have to reduce the Z axis length of travel if turning/boring/grinding up to a shoulder.

                                                      Emgee

                                                    Viewing 25 posts - 1 through 25 (of 30 total)
                                                    • Please log in to reply to this topic. Registering is free and easy using the links on the menu at the top of this page.

                                                    Advert

                                                    Latest Replies

                                                    Home Forums Workshop Techniques Topics

                                                    Viewing 25 topics - 1 through 25 (of 25 total)
                                                    Viewing 25 topics - 1 through 25 (of 25 total)

                                                    View full reply list.

                                                    Advert

                                                    Newsletter Sign-up