How best to fix a partly failed Silver Solder joint?

Advert

How best to fix a partly failed Silver Solder joint?

Home Forums Beginners questions How best to fix a partly failed Silver Solder joint?

Viewing 25 posts - 1 through 25 (of 30 total)
  • Author
    Posts
  • #7531
    SillyOldDuffer
    Moderator
      @sillyoldduffer
      Advert
      #183940
      SillyOldDuffer
      Moderator
        @sillyoldduffer

        Hi all,

        I've nearly finished Mogen Kilde's Miniature Side Lever Steam Engine (ME 11 Jan 2011). It is my first model engine and I've got a problem. The work also included my first attempt at silver soldering because I used Silverflow 55 to attach the brass steam chest to the mild steel cylinder.

        The joint is OK except for a 5mm gap at top right where the solder failed to flow into that part of the joint. Trying to run the engine on air reveals that the piston operates only on the downtroke and that my dodgy joint leaks on what should be the upstroke.

        What's the best way of fixing a mildly botched silver solder joint please? I can't find anything on fixing brazing mistakes in my books. Should I simply reheat the cylinder and apply more silver solder to the gap or am I in big trouble? (I've done electronics where remelting old solder isn't a good idea – it's often better to remake with fresh solder.)

        Despite the setback I have to say that this is a fantastic hobby!

        Thanks,

        Dave

        #183954
        dave greenham
        Participant
          @davegreenham19379

          Hi Dave.

          Afraid so, you will have to re solder it, but don't panic. For some reason, the solder on a soldered joint, takes far more heat to melt than new solder. You'll be . Go for it, and don't be afraid of melting the already soldered joint. It can happen. But its unlikely.

          Dave

          #183955
          JohnF
          Participant
            @johnf59703

            Hi Dave, I'm not into steam but silver soldering is the same whatever its being used for. It depends on whether the joint is clean or not, the best way maybe to start from scratch that is un-solder the joint clean up and re-solder it.

            However if the joint is clean then apply flux around the joint, re-heat and apply solder, if you are lucky all will be well. The decision is one you will have to make but you have little to loose by trying a repair and whilst doing this it should be clear to you if the solder has flowed OK or not. If not just separate the parts and start over.

            Regards John

            #183963
            julian atkins
            Participant
              @julianatkins58923

              hi dave,

              i agree with the contributions above except groove the dodgy joint and clean out as far as possible and rather than use silverflo 55 use instead easyflo 2 and gently heat up to the right temperature.

              easyflo 2 melts at lower temperature than silverflo 55 so no risk of disturbing the already done sound joints if you are careful.

              if you want to send me the part to fix please pm me.

              cheers,

              julian

              #183972
              pgk pgk
              Participant
                @pgkpgk17461

                Never having silver soldered but for my education may I ask the following?

                A 5mm gap strikes me as wide for 'soldering' as opposed to 'brazing' as in the differece between two tinned surfaces coelescing or building a bridging lump. So what is the sort of max gap one can bridge? Indeed what is the optimum gap for a silver braze? In this situation is there any benefit to using a wedge of one of the materials to be joined to wedge silver solder into the gap before reheat or indeed depending on the shape of the defect to drill it out and create a plug?

                #183975
                IDP
                Participant
                  @idp

                  Is the dodgy joint mechanically sound, if it is do you actually need to re-visit it with silver solder or would a lower melting point soft solder 'bridge the gap'. If you do opt to use this option be advised you will not be able to go back to silver soldering afterwards. Just a thought.

                  Regards, IDP

                  #183977
                  JasonB
                  Moderator
                    @jasonb

                    First question, are you going to actually run it on steam? if not then think about soft solder or JB Weld, could even wick a bit of superglue in there.

                    I'm assuming it is a 5mm long gap in the thin line of the solder joint.

                    If you will steam it then I'd consider a higher temp soft solder or clean up as best you can, flux and resolder the area

                    #183995
                    Neil Wyatt
                    Moderator
                      @neilwyatt

                      > I'd consider a higher temp soft solder

                      +1

                      If only because reheating for silver soldering will leave you with a major job to clean it all up and possibly refinish various surfaces.

                      Neil

                      #184000
                      KWIL
                      Participant
                        @kwil

                        To me the clue lies in the "mild steel" reference.

                        Mechanically clean the joint and just around it as well as you can, use a high temperature flux (ie not easyflow, which more often than not goes black too soon and prevents the proper joint cleaning action) and get the joint hot, steel takes a higher temperature to ensure the silver solder flows nicely. Because the existing joint silver solder is now an alloy with the metals to be joined at the actual interface the melting temperature will be higher than just the silver solder grade melting temperature.

                        Personally I would not bother with another solder grade and certainly would steer away from any non silver solder use.

                        #184005
                        Michael Gilligan
                        Participant
                          @michaelgilligan61133
                          Posted by KWIL on 21/03/2015 10:31:46:

                          Mechanically clean the joint …

                          .

                          Could be tricky to achieve that; if JasonB is correct in saying:

                          "I'm assuming it is a 5mm long gap in the thin line of the solder joint."

                          MichaelG.

                          Edited By Michael Gilligan on 21/03/2015 11:20:22

                          #184008
                          IanT
                          Participant
                            @iant

                            I'll go with Kwil on this – provided the " gap " is not too wide then I'd re-solder it.

                            I'm kind of assuming here that the brass bit is sat squarely on the steel bit and that there was a good 'mechanical' fit in the first place. Otherwise, you will not manage to fill the gap using capillary action – it won't work. I guess another concern is that the work was not 'bound' correctly (applying heat can move things around a little) and that the existing solder has set at an angle (e.g. one end of the joint is higher than the other). If you are happy that it's just a poor solder joint however – then the following should work.

                            BTW – The existing solder joint should have a slightly higher melting point than any newly applied solder (because of alloying. I certainly would not try to take it apart (or use soft solder…)

                            Clean around the area as best you can first – I'd give it a really good soak in pickling solution (I use citric acid) – at least 24hrs with something gentle like citric and then slightly abrade & prick around the area that needs actual treatment to get any old flux/muck off. An old toothbrush is sometimes sufficient. You need it really clean.

                            Another thing that I do is mix my flux with methylated spirits (instead of water). I use a type of 'Sif' silver flux and I don't get a "creamy" flux (as is often referred to in the texts) but more of a 'gritty' mix. However, this can be packed around the joint (with a pointed lolly stick) and seems to really keep the area clean well provided you don't really overheat it.

                            Talking of which – try to get the assembly up to heat quickly – but evenly – without playing the torch on the area you are going to work on too directly. I use ceramic blanket to keep the heat focused – it's not expensive and works really well for small assemblies.

                            The flux will 'flare' as the meths burns off (but not bubble) and as the assembly goes red the flux will turn clear. Heat your silver solder rod and dip it in (powered) flux and then dab it on the area you need to seal. If it's hot enough, it will melt – other wise the work is not up to heat – so don't try melting the solder onto the work. Re-dip the solder and wait a second or two and then try again. You need the work to melt the solder to get capillary action (in order to fill the gap). Once you get 'melt' run the solder along the gap but you shouldn't need to do too much – the solder should get pulled along and into the joint almost instantly. As soon as this happens – remove the heat and leave to cool naturally (no dunking in water etc).

                            There may be other methods/theories that will work but I've done this myself – so I know it works. Soldering (and brazing) is one of those things. Just when you think you've "cracked it" – you do something fairly routine and it don't work as well as you expected. I hope practice does help make perfect eventually however.

                            Hope this helps Dave – good luck

                            Regards,

                            IanT

                            #184011
                            IanT
                            Participant
                              @iant

                              I used to use just firebricks for my soldering hearth – but they suck a lot of heat and things seem to take much longer to get up to heat.

                              I've been using variations on this set-up using ceramic blanket for a while now and it works much better. It does 'glow' almost white hot at times and seems to get a bit brittle but I think I only paid about £6 for it (3-4 years ago) – so it's not expensive to renew. The rear 'wrapper' is a piece of stainless steel left over from a domestic cooker extractor – and it never gets hot – the original paint is still intact.

                              The steel (laser cut) assembly is being SIF-bronzed (which takes a good deal more heat than silver solder) and the ceramic really helped to get it up to yellow-red heat quickly (I couldn't hold the torch and take the photo at the same time though!).

                              Regards,

                              IanT

                              Ceramic Blanket 1Ceramic Blanket 2

                              #184021
                              Mark P.
                              Participant
                                @markp

                                Just re-solder it, there is no black art to silver soldering despite what you hear.

                                Mark P.

                                #184026
                                Neil Wyatt
                                Moderator
                                  @neilwyatt

                                  This is a finished part.

                                  There is no reason why the joint has to be silver-soldered, the model will never be run with superheat and ordinary tin/lead solder would have been perfectly adequate for the join in question first time round.

                                  Once the part has been reheated for silver soldering the work to clean up will be almost as much as making a new one from scratch. If this leaves the bore oversize a new piston may be needed…

                                  Some decent flux and ordinary solder, or even high-temperature retainer can rescue the part with minimal clean up.

                                  Neil

                                  #184033
                                  IanT
                                  Participant
                                    @iant

                                    Sorry Dave – Mea Culpa!

                                    I was focused on the "How best to fix a partly failed Silver Solder joint?" – and lost sight of the fact that these parts have been finish-machined. Reheating (to the levels required for silver soldering) might well cause distortion problems – as Neil has pointed out.

                                    Regards,

                                    IanT

                                    #184036
                                    Michael Gilligan
                                    Participant
                                      @michaelgilligan61133
                                      Posted by Neil Wyatt on 21/03/2015 13:50:30:

                                      … or even high-temperature retainer can rescue the part with minimal clean up.

                                      .

                                      I've just been pondering this one [over a totally off-topic Wensleydale cheese sandwich & French Onion soup] … I would be inclined to try Loctite 290, and, if practical, apply just a little vaccuum to the 'pressure side' of the joint.

                                      MichaelG.

                                      #184066
                                      SillyOldDuffer
                                      Moderator
                                        @sillyoldduffer

                                        Very many thanks to everyone! Excellent responses.

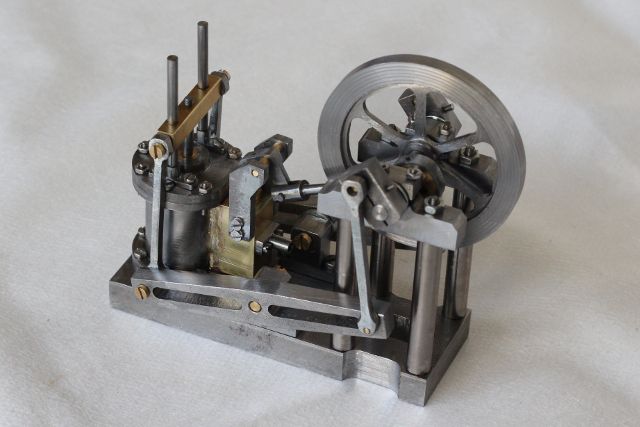
                                        As a picture is worth a 1000 words here is a snap of the best side of the engine. It is 100mm long and needs more tidying up apart from the duff joint.

                                        engine.jpg

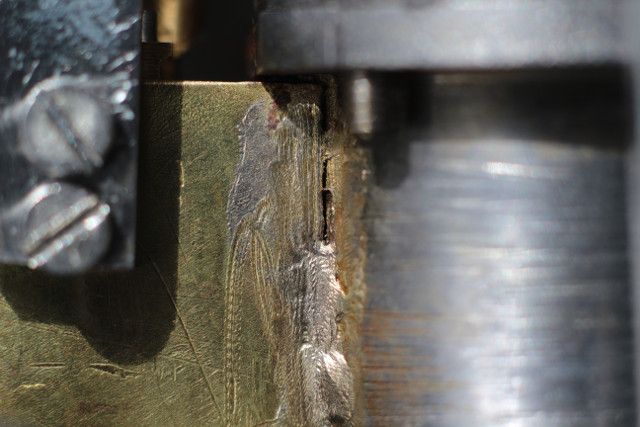
                                        Next a close-up of the bad joint which is on the other side of the cylinder. The scale is given away by the out-of-focus M2 screwheads.

                                        gap.jpg

                                        As it came from the hearth the fillet ended in an unsightly blob that I ground off with a Dremel. That's what skidded over the brass leaving the odd circular marks.

                                        pgk spotted that my original post is ambiguous about the size of the gap; it's about 5mm long not 5mm wide. The overall joint seems to be mechanically sound but I'm suspicious about what lies beneath especially under the cylinder flange.

                                        As it's unlikely that the engine will ever taste live steam I'm going to try soft soldering as per Neil and IDP. Michael's Locktite suggestion is very tempting but I don't have any 290 to hand and can't go shopping until Tuesday. Wensleydale will on my list.

                                        Having read all your advice I'm much more confident about what to do next!

                                        Special thanks to IanT who for answering the questions I should have asked for before melting expensive metal! My next go at silver-soldering will pay close attention to his words.

                                        I tried to get EasyFlo but it seems to be Unobtainium because of the Cadmium content.

                                        Julian's kind offer is very much appreciated. I'm trying to build skills but will be in touch if all else fails.

                                        I shall report progress later.

                                        Now I have a really big problem. Foolishly expecting adulation I made the mistake of showing the engine to my family today. Someone should have warned me of the need for slick, convincing answers to: "what's it for?" "does it work?" "how long did that take?" and worst of all "how much did it cost?" It seems that not everyone appreciates model engineering…

                                        Best regards,

                                        Dave

                                        #184071
                                        IanT
                                        Participant
                                          @iant

                                          Very nice Dave – well done!

                                          IanT

                                          #184179
                                          SillyOldDuffer
                                          Moderator
                                            @sillyoldduffer

                                            Hoorah, it's fixed!

                                            I used electrical solder to fill the gap and then ran a fillet over the existing brazing so that the whole joint is colour coordinated. Now my guilty secret is hidden forever.

                                            The hardest part was cleaning up the cylinder afterwards.

                                            The engine very nearly runs. I think it would go if the valve piston was a slightly better fit and/or my electric tyre inflator had more puff. Guess what I'll be doing tomorrow.

                                            Thanks again,

                                            Dave

                                            #184181
                                            JasonB
                                            Moderator
                                              @jasonb

                                              Nice little engine Dave

                                              For future reference I would say that you did not get the parts hot enough particularly the large cylinder, the slightly lumpy look of the solder that is there is a tell tale sign. A higher temp flux like HT5 which KWIL suggests and a bit more heat should help the next engine go together without problems.

                                              J

                                              #184184
                                              Neil Wyatt
                                              Moderator
                                                @neilwyatt

                                                If its 'nearly running' a tweak to the valve timing might be what you need, also be sure you have no tight spots – if you have a way of 'running in' the engine, even just mindlessly keeping it spinning with your hand, it might make a difference.

                                                Neil

                                                #184217
                                                Keith Hale
                                                Participant
                                                  @keithhale68713

                                                  Alloy not flowing is normally down to three factors.

                                                  1) flux exhaustion (so use a longer life flux eg HT5)

                                                  2) incorrect joint gap or and more commonly

                                                  3) cold spots in the joint. If the whole of the joint is not at a temperature above the melting point of the alloy. The alloy will simply freeze and stop flowing.

                                                  How do I know if the joint is hot enough – watch the flux. Make your flux into a paste. (use water or meths if you prefer). Apply to the joint and heat.

                                                  When it has turned molten and itself is flowing the joint is hot enough. That is the whole of the joint.

                                                  Apply the alloy. It will flow by capillary action and fill the joint.

                                                  I am not a fan of "hot-rodding" ie dipping a warm rod into flux powder to apply flux unless it is used as a means of adding extra flux. In my experience relying on hot-rodding tends to promote a welding technique of heating, – that of heating the rod not the joint. This can lead to cold spots in the joint and is common in assemblies with a less thermally conductive steel component.

                                                  For more information see **LINK**

                                                  Keith

                                                  #184260
                                                  SillyOldDuffer
                                                  Moderator
                                                    @sillyoldduffer

                                                    Thanks guys – more useful info.

                                                    I have had the engine running today using air from a car foot pump plus a 2L lemonade bottle as a reservoir. I hope the exercise is doing me good because it was hard work!

                                                    Neil was right about 'mindlessly spinning' the engine to loosen it up and also about checking the valve timing.

                                                    I'm pretty certain the bad joint was caused by poor technique. I was holding the blowlamp in my left hand and applying solder with my right. This meant that rear-right corner of the joint were the solder didn't take was "in the shade" and – as suggested – it's likely that it wasn't hot enough. Lesson learned: make sure all the parts and all parts of the parts are hot enough. Now I need more practice using all the advice offered!

                                                    Cheers,

                                                    Dave

                                                    #184261
                                                    Peter Bond
                                                    Participant
                                                      @peterbond14804

                                                      The hearth's a good idea, but I'd be inclined to treat the fibre with rigidiser to help prevent fibres getting airborne; the other thing that may help is a coating of zircon paint (helps reflect and provides some flux resistance).

                                                      The reason solders (ok, brazes!) don't remelt as readily is that some of the more volatile components – zinc, for example – have boiled out. So you have a harder solder than the one you started with…

                                                      A bigger torch is often helpful; if the heat's being removed too quickly (draughts, for example) then the torch will struggle. The Flamefast gas/air torches are rather handy in silversmithing for both annealing and soldering large objects, if you have a suitable compressor to drive them. Naturally aspirated forge burners such as Rex Price's or Larry Zoeller's are another alternative; both are Venturi/eductor type burners and can put out quite a lot of BTUs (despite being American )

                                                      Oh, and while I remember – my MIG set will do brazing too, although I've not had cause to try it so far.

                                                      Edited By Peter Bond on 23/03/2015 19:51:13

                                                    Viewing 25 posts - 1 through 25 (of 30 total)
                                                    • Please log in to reply to this topic. Registering is free and easy using the links on the menu at the top of this page.

                                                    Advert

                                                    Latest Replies

                                                    Home Forums Beginners questions Topics

                                                    Viewing 25 topics - 1 through 25 (of 25 total)
                                                    Viewing 25 topics - 1 through 25 (of 25 total)

                                                    View full reply list.

                                                    Advert

                                                    Newsletter Sign-up