Home workshop accuracy & tolerance?

Advert

Home workshop accuracy & tolerance?

Home Forums Workshop Techniques Home workshop accuracy & tolerance?

Viewing 25 posts - 1 through 25 (of 35 total)
  • Author
    Posts
  • #497307
    samuel heywood
    Participant
      @samuelheywood23031

      Just wondering how accurate you can work to as a hobbyist with hobbyist tools?

      Not coming from an engineering background it's all been a steep learning curve for me,just to get passable (at least to myself) with the basics.

      On a scale of 1-10, i'm probably not quite @ the 1 yet!

      That said, it's astounded me that i can make things(very slowly!) better than your typical commercial offerings .Astounded i tell you!, given my level of competence.

      I guess if i can work to a thou i'm pretty pleased with myself.

      Yes, I realise there's no point working to tighter tolerances than what's actually needed.(Except it's all good practice for yours truly, for that day when it's truly needed.)

      I'm guessing most of you,(like me) are more often concerned with how parts fit together rather than their exact size?

      I am however curious, how accurate can you be with hobby tools?

      Do you need to use hand finishing for ultimate accuracy?

      I'm all ears, hope to learn a thing or two…….

      Advert
      #16196
      samuel heywood
      Participant
        @samuelheywood23031
        #497309
        Ady1
        Participant
          @ady1

          I use green grit paper to polish stuff if required, removing minute amounts that a machine couldn't do

          #497312
          Jeff Dayman
          Participant
            @jeffdayman43397

            The chair to bench interface module (the hobbyist) is by far the biggest factor in what accuracy can be achieved. Even with very basic hand tools high accuracy can be achieved. It just takes lots and lots of well spent time practising.

            If you can work repeatably to a thou you are doing well and this level of accuracy will likely do just fine for many of those types of projects model engineering hobbyists do.

            One mistake people seem to make with steam projects is to make clearances too tight. Generally steam engines work better with a little extra clearance. As Stewart Hart used to have on his posts " a little clearance never got in the road." Good luck, make stuff, don't stress about accuracy too much.

            #497317
            Ed Duffner
            Participant
              @edduffner79357

              I bought my milling machine back in 2011 and have made a number of things since, learning from various places e.g. this forum, youtube etc how to machine parts. I also received some engineering training at BAe Bristol back in the eighties, mostly for sheet metal work though, which required high accuracy "and no scratches. Scratches are potential cracks in the aircraft industry!". smiley

              Whilst I've owned the milling machine and now also a small lathe, I believe some of the most important tools to have in the shed/workshop are good quality measuring tools. If something can be measured accurately and often during manufacture, there's a good chance it will end up at the required size first time.

              Bad measuring tools are out there. I have an imported protractor that reads 89° when its edges are perpendicular.

              A question comes up on the forum quite often "I have a new lathe and milling machine, what other tools do I need?". I think I would suggest good quality measurement tools.

              I must admit I get a bit annoyed when I see videos on youtube where vises (vices?) or work-pieces are set up which are two or three thou out of alignment and the person might say "that's good enough for what I do!" I think to myself , why not spend a minute or two getting it square or at least a lot better? A bit of patience and some tenacity are also good tools!

              Ed.

              – Sorry to waffle, just offering my tuppance.

              #497319
              Brian H
              Participant
                @brianh50089

                I try to work as accurately as possible and assess the item when it has been made. Surfaces that 'in air' I would accept within 0.010".

                Surfaces in contact with other surfaces I accept within 0.005" if there is no pressure involved.

                For pressurised faces with a gasket I try to get within 0.001".

                Pressurised faces with metal to metal joints such as steam valves, I would scrape in.

                These are all tolerances 'plucked' from the air so to speak.

                In practice I find that most faces that are not scraped come within 2 or 3 thou.

                I used to be an inspector and Quality Manager in the aircraft industry as well as being a model engineer and I learnt my lesson on my first steam engine where the fits were very accurate and the engine was too stiff to turn at all.

                Brian

                Edited By Brian H on 23/09/2020 06:55:11

                #497325
                not done it yet
                Participant
                  @notdoneityet

                  Drawings often fail at the first hurdle by not giving tolerances for the different dimensions. Often only the second part, that fits the first, needs to be precisely machined to fit that first part – we are not (generally) making serial builds that may need ‘off the shelf’ replacement parts later.

                  I don’t make models and most of the bits I have made, over the years, have been to the nearest couple of thou., or more, to the old part.

                  Look at youtubers and note those that machine parts, supposedly to close tolerances, but then simply turn their part around in a standard 3 jaw chuck and just carry on machining, with concentricity errors likely greater than those ‘supposed’ tolerances worked to.🙂

                  I never had bore gauges and always made a close fitting plug as a guide, if shrink fitting. Plug size plus a couple or few thou. was the target. Piston rings for a small, high revving engine were best purchased, but those for a vintage engine were never needed to be as precise – as the bores may well have had some wear or ovality.

                  Many parts might need some hand finishing to achieve a finish to close tolerance (surface finish or often to get rid of some slight taper, anyway). Even scraping is never better than the straight edge or surface plate – and scraping can be done by hand or with a (hand-held) machine.

                  Remember, too, that all measurements taken also have a tolerance/error of their own. I only expect/hope my dro to be good to one less digit than displayed and no more. Often more than good enough for me, but on the occasions I require/want the precision of that last digit, the part is measured carefully.

                  Finally (for me), there is little point making a part to close tolerance if the other part has a different tolerance requirement. Carry on as you are and cross any bridges as you come to them, is my advice.

                  #497335
                  Martin Kyte
                  Participant
                    @martinkyte99762

                    I would say that we were able to work to very close limits when required. What we probably cannot achieve is repeatability by which I mean we cannot expect just to rechuck/recollet blanks and dial up the same settings and expect exactly the same sized part. Working with dead centres, lapping, scraping etc are all techniques we would use rather than precision grinding for example. We tend also to have the luxury of swapping the order in which we make stuff. For example turning a shaft to fit a reamed bore rather than having to produce a bore to fit the shaft. Probably the biggest limitation is surface finish with less rigid machines, slower speeds and less sophisticated cutting tools.

                    Lastly we get to make more parts until we get one that fits which you can't really do commercially.

                    regards Martin

                    #497341
                    J Hancock
                    Participant
                      @jhancock95746

                      And when you get really good, make a working model IC engine, where piston/cylinder fits cannot be measured in the average workshop anymore !

                      #497342
                      noel shelley
                      Participant
                        @noelshelley55608

                        As an apprentice I was given the task of making some (400) silver steel pins for a job for RR with a tolerance of .00025" on a Harrison 10 lathe. I won't bore you with the whole story but it took 3 months ! I could have done it better and a lot quicker on my Myford in the shed. Why such accuracy ? it was a setting table for turbine blades. Noel.

                        #497344
                        Neil Wyatt
                        Moderator
                          @neilwyatt
                          Posted by not done it yet on 23/09/2020 07:51:27:

                          Drawings often fail at the first hurdle by not giving tolerances for the different dimensions. Often only the second part, that fits the first, needs to be precisely machined to fit that first part – we are not (generally) making serial builds that may need ‘off the shelf’ replacement parts later.

                          I often think the old-fashioned approach of using descriptive fits (e.g. running fit, sliding fit, push fit) and 'full' or 'bare' dimensions worked well. It was ideal for a generation who didn't have the equipment to measure to 0.001" but were willing to learn to use comparative tools, like calipers.

                          As you suggest it's the fit that matters, knowing the accuracy and precision needed to achieve that fit may make it more repeatable but does not always make it more achievable.

                          A particular hazard is that measuring with high accuracy is as much of a skill as machining accurately, but there is a tendency to believe the 'digital read out' rather than accept the evidence of how two parts feel when mated together.

                          Neil

                          #497345
                          Mike Poole
                          Participant
                            @mikepoole82104

                            Lapping in the home workshop is a practice we don’t hear mentioned very much but should be able to produce work to the limits of most home shop measuring equipment. Temperature will start to become a factor if superfine tolerance is required. Making one part fit another is another matter but not a problem for a one off build.

                            Mike

                            #497346
                            JasonB
                            Moderator
                              @jasonb
                              Posted by samuel heywood on 22/09/2020 23:00:47:

                              That said, it's astounded me that i can make things(very slowly!) better than your typical commercial offerings .Astounded i tell you!, given my level of competence.

                              I'm guessing most of you,(like me) are more often concerned with how parts fit together rather than their exact size?

                              Many commercial items are mass produced with each individual part being made separately so they have a looser tolerance than our often one off items where we have both components to hand and can make one to fit another.

                              Also have you noticed that it take you longer to make something to that last 1/10th of a thou than it does if only working to 1 or 2 thou? It's the same for commercial items which are made to a set price and if that price only allows for a machine finish you won't get a more precise ground finish, or the item with a lower budget won't have such tight tolerances to reduce the reject rate.

                              It is not always a case of a better tolerance is better in all cases, may be better for final use but not better if people won't spend that amount on an item.

                              As said by others it takes a while to get the experience to know when a part can be made to within a couple of though or 1/10 of a thou and definately not worth looking for more accuracy than is really needed, for example most of the time I'll use the digital callipers to check finished size but where needed will get out the micrometer and use it's 1/10 thou vernier scale.

                              #497349
                              Clive Foster
                              Participant
                                @clivefoster55965

                                Measuring gear is inherently more accurate when comparing things of similar size than it is over the whole range. Pretty much anything better than scrap bin level rubbish (I have a cheap mike like that kept as an awful warning for folk) will be as close as you'd need over small distances. In general the more expensive the equipment and the better the brand the wider the range over which actual accuracy is usefully better than specification.

                                The tenths thou vernier found on older good quality imperial micrometers isn't good over more than a couple or three turns of the thimble. But where its good, its good.

                                Generally when using ME affordable equipment you do better working comparatively with the same device rather than switching. It matters not a jot if, in your hands, the external micrometer thinks 1" is actually 1.002" or 0.998", a perfectly reasonable error if both your technique and micrometer are towards the lower end of adequate rather than the top of best we aspire to. But if your micrometer gives 1.002" and your bore gauge gives 0.998" for same nominal size piston in bore and simliar fits may be problematical. External – internal matching on low end verniers and their digital equivalent can be disappointing. Best to check and note any error on yours.

                                In the practical world ± 1 thou true is about as good as the ordinarily impecunious shed based worker can routinely expect. Which makes near enough ± 0.1 thou variation possible, given care, on the bits that need to be right. Generally good enough for "Government work". If nothing else temperature variations tend to make working to close measurements difficult. Which is why we work to what fit "right".

                                There is a list / chart of appropriate tolerances and what they mean in terms of real world fit floating around the internet. Thought I had a copy but can't find it or the original. Perhaps something worth considering for publishing in ME/MEW as part of an article on real world meaning of accuracy. Things like how good does you feed screw need to be for decent threads. Given how the screw and nut wear acceptable badness can be surprising.

                                Folk sometimes forget that 1 thou is small, 0.1 thou very small and 0.01 thou getting into light wavelength range, OK IR not visible but…

                                Best to cultivate good working habits so you automatically turn out decent parts. Actual accuracy depends on your machine but I find something under the order of ± 1 thou is normal enough that I get seriously pissed at 2 thou out. As I should be given what I have.

                                Clive

                                #497352
                                SillyOldDuffer
                                Moderator
                                  @sillyoldduffer

                                  Posted by Ed Duffner on 23/09/2020 01:41:30:

                                  A question comes up on the forum quite often "I have a new lathe and milling machine, what other tools do I need?". I think I would suggest good quality measurement tools.

                                  I must admit I get a bit annoyed when I see videos on youtube where vises (vices?) or work-pieces are set up which are two or three thou out of alignment and the person might say "that's good enough for what I do!" …

                                  Ed.

                                  Certainly agree with Ed's second point – best results are got by taking pains. Not that I practice what I preach, blush!

                                  I'm not convinced about the need for good quality measurement tools, though they make life easier. It's because what I do is 'fitting'. Rather than measure accurately, I use micrometer, digital caliper and the parts themselves as comparators, achieving tight and loose fits to order, but not accurately dimensioned.

                                  Recently I've played more with traditional style screw calipers bought from B&Q, and find they work well without measuring at all. Often setting a caliper on one object and transferring dimensions straight on to the part being made without caring what they are in mm, is the fastest way of working. More usually, plain calipers are slower or cumbersome, but they do allow 'fitting'.

                                  I'm currently using a mix of old and modern techniques. DRO on the mill, supported by comparators, and sanity checked with digital caliper & micrometer. Other way round on my lathe, accuracy achieved by comparison, sanity checked with measuring tools, and the dials only used to get close. Though the lathe's graduated dials are very convenient in this way of working I could manage without them entirely. High accuracy methods aren't used at all, but it's not difficult to get to within 0.02mm, and to match parts better than that.

                                  Fitting collapses in a mumbling heap when fast repeatability is demanded. Good for prototypes and maybe small runs, but otherwise hopeless. If I were one of several workers each asked to make one part of an engine, I couldn't guarantee that my part would fit with theirs. Nor in the absence of checking by fitting as I went along could I expect all the parts made by me to assemble without fuss at the end into a working engine. To do that, accurate measurement is required. Classically high accuracy measuring was tool-room work, in which elite machinists made the jigs, fixtures and gauges used on the production line. Jigs, fixtures and gauges are comparators, so the production worker inherits tool-room accuracy without having to measure anything.

                                  So the best possible measuring isn't a priority in my workshop because I'm a fitter. I don't need a posh micrometer with a certificate or a set of gauge blocks to confirm the micrometer is OK. Not yet anyway.

                                  A disadvantage of inexpensive measuring tools is they don't operate smoothly, are somewhat inconsistent and can't be trusted implicitly. They waste time due to the need to check they're zeroed and have registered correctly. Harder to use a sticky instrument than one in tip-top condition. I usually apply my cheapo micrometer 3 or 4 times to confirm all is well.

                                  As a little time-wasting doesn't matter to me, there's no need for me to spend money on expensive measuring. That's just me though! Others are thoroughly irritated by cheapo shortcomings, which become a source of frustration. To my mind avoiding frustration is a much better reason for buying good measuring tools than expecting to achieve toleranced precision in a shed! But they're not essential.

                                  Dave


                                  Edited By SillyOldDuffer on 23/09/2020 10:35:04

                                  #497357
                                  Vic
                                  Participant
                                    @vic

                                    Good quality measuring tools are often pretty cheap compared to income these days. I do have some cheap items that don’t get used very often but the rest are M&W, Mitutoyo, Starrett, Tesatast and Compac etc. What has become apparent on this forum is that sometimes we don’t know how or what we’re actually measuring, particularly in the area of setting up and checking machines. Fortunately there are a growing number of experienced machinists on YouTube willing to share their knowledge with us.
                                    One item I recently realised that may come in handy is a “bump” style indicator base but I can’t find how best to go about making one. Anyone on here made one?

                                    #497361
                                    Hopper
                                    Participant
                                      @hopper

                                      You can easily work to a tolerance of two tenths of a thou in the home workshop, with some practice, by the time honoured method of using fine emery cloth and oil to attain final size in the lathe. But very rarely do you ever need to do this. Within one thou is easily attainable "off the tool" and plenty good enough for the vast majority of work.

                                      As pointed out, the trap for beginners is to know when to work to a close tolerance such as one thou and when not to. For instance, piston and cylinder on a steam engine might be to within a thou or so. But the outer diameter of the flywheel could be within a eighth of an inch and still work just fine. BUT, getting the outer diameter of that flywheel to run within a thou of concentric to the hole in the middle that mounts it on the shaft is important if you don't want it to wobble in motion. It's all horses for courses.

                                      My measuring tools consist mostly of good condition secondhand old British-made micrometers and a Mitutoyo mike I have had since apprentice days. Dial indicators are new Chinese-made mid-range brands, plus a $20 Mitutoyo knock-off DTI that does the job surprisingly well for the cost (it included mag base!).  My Chinese made mid-range brand digital caliper is good enough for roughing work within maybe three thou but I use the mikes for the final few thou down to a gnat's proverbial.

                                      Edited By Hopper on 23/09/2020 11:06:16

                                      Edited By Hopper on 23/09/2020 11:06:56

                                      Edited By Hopper on 23/09/2020 11:08:15

                                      #497366
                                      JA
                                      Participant
                                        @ja

                                        In middle life I became a sort of designer. We, the company, had a mantra- "Fit, form, function".

                                        If the part had to fit another, you had to give and work to the required tolerances. There are standard tables of fits together with the associated machining opperations which I try to work to. On a lathe I can get +/-0.0002" with a lot of patience. This is just withing the capabilities of my 0-1 micrometer. Below that it is down to polishing but I cannot measure the result. Thankfully the parts we make don't have to be interchangable.

                                        Form was the general shape. At work this was +/- 0.010" but since models have to look good it may be wise to try to work to a smaller tolerance.

                                        Function was the most difficult to pin down. It required a good knowledge of what the part did. As suggested above, don't expect tight tolerances to work on a clock (as I discovered).

                                        Good tools of all types are adventageous!

                                        JA

                                        #497370
                                        Martin Kyte
                                        Participant
                                          @martinkyte99762

                                          Interesting to note that when I made my telescope mirror I was able to achieve a variation of less than 50nm over a 10 inch glass paraboloid disc surface using purely hand work and simple optical measurements . It still astonishes me.

                                          regards Martin

                                          #497371
                                          Circlip
                                          Participant
                                            @circlip

                                            Sam, stop worrying about super ( or not) accuracy. Before Carbides, Dro;s etc. measuring tools were a rule, tape and callipers so how did they (In Industry) manage to make anything work????? They made the parts required that fit together fit together, it was a black art called FITTING. Those that whinge for tolerances on drawings have no understanding of the concept of the MODEL they are trying to emulate. If you're making parts for the Swiss watch industry when interchangability is paramount, then the must have (By some) Mifford is a dogs body for turning parts ALTHOUGH I was taught, no, SHOWN how to turn a balance staff on a Super Seven, but this was a one off and not a multiple order from Rolex or Tissot.

                                            Give a lump of metal and a Micrometer to five "Ingineers" and you'll probably get five different readings as everyone has a different "Feel". Note I said a Mic and not the instrument of the devil, the digital calliper or even the ones with scratched lines and numbers on them, er yes,, a Vernier clopolipper.

                                            Enjoy what you build and make the bits FIT TOGETHER.

                                            Regards Ian.

                                            #497374
                                            Martin Kyte
                                            Participant
                                              @martinkyte99762

                                              . . . and then there is that age old process called easing the fit, used where you have generated your exactly mating parts and have to open everything up to make it run. I have done my fair share of that in the past.

                                              regards Martin

                                              #497378
                                              Circlip
                                              Participant
                                                @circlip

                                                Not many people now have heard the terms "A shy 64th or a proud 16th.

                                                Regards Ian.

                                                #497380
                                                JasonB
                                                Moderator
                                                  @jasonb

                                                  I always work to full or bare rather than proud or shy fractionswink

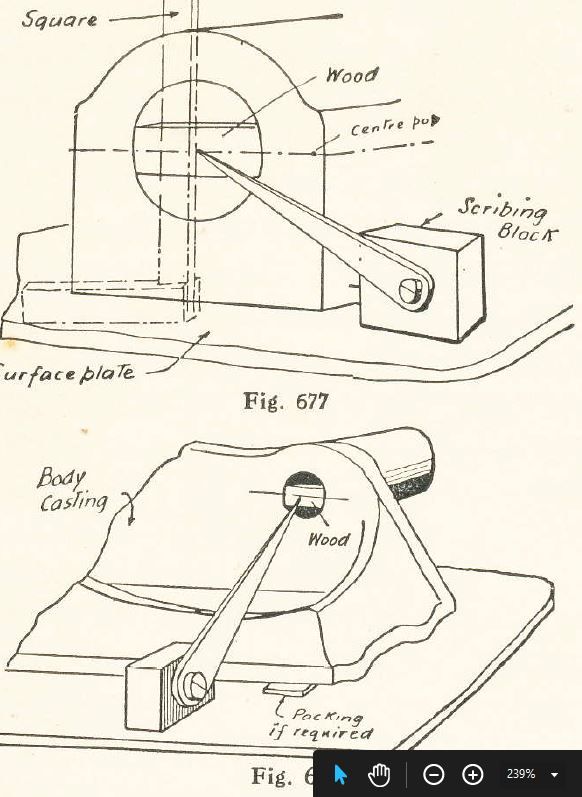
                                                  Funny enough some one sent be an extract from a book yesterday dating from 1915, no digital height gauges then just a simple scribing block no doubt set from a rule.

                                                  greenly 400.jpg

                                                  #497381
                                                  Martin Kyte
                                                  Participant
                                                    @martinkyte99762

                                                    Mind you it was easier to get quality rules.

                                                    Martin

                                                    #497387
                                                    larry phelan 1
                                                    Participant
                                                      @larryphelan1

                                                      Having read all of the above, I just picked up my yardstick and slunk away to butcher whatever I could find !sad

                                                    Viewing 25 posts - 1 through 25 (of 35 total)
                                                    • Please log in to reply to this topic. Registering is free and easy using the links on the menu at the top of this page.

                                                    Advert

                                                    Latest Replies

                                                    Home Forums Workshop Techniques Topics

                                                    Viewing 25 topics - 1 through 25 (of 25 total)
                                                    Viewing 25 topics - 1 through 25 (of 25 total)

                                                    View full reply list.

                                                    Advert

                                                    Newsletter Sign-up