Help required with Colchester lathe

Advert

Help required with Colchester lathe

Home Forums Help and Assistance! (Offered or Wanted) Help required with Colchester lathe

Viewing 15 posts - 1 through 15 (of 15 total)
  • Author
    Posts
  • #186403
    Nigel McBurney 1
    Participant
      @nigelmcburney1

      I have a Colchester Triumph 2000 Square head type,generally in good condition. The apron feed lever is raised to engage the feeds,as soon as it is raised it drops down and stops the feed. I have tried the adjuster for the clutch,from tight to slack,this does not work , the feed works if I manually hold the lever up, so either the clutch is worn or out of internal adjustment, I have found the manual on the web but as usual does not cover faults. I intend to hold the apron assembly in position with wooden blocks remove the cap screws which hold the saddle to the apron,then if possible slide the saddle to one side down the bed to get at the apron internals, has anyone tried to slide a Colchester saddle away from the apron?

      Advert
      #32475
      Nigel McBurney 1
      Participant
        @nigelmcburney1
        #186406
        frank brown
        Participant
          @frankbrown22225

          Never done a Colchester, but how is the auto cross feed drive done, often there is a gear that protrudes higher then the saddle to engage a gear on the cross feed screw.

          Frank

          #186409
          John Stevenson 1
          Participant
            @johnstevenson1

            Yes they will part and slide but you have to do this at the tailstock end of the bed and remove the leadscrew / feedshaft end bracket to allow it to hang down a bit to give the clearance needed between the cross feed gear as Frank says.

            One point to note with square head Colchester's is the apron is sealed, or should be. What happens in industry and I don't know where yours has come from is that coolant gets in, displaces the lubrication oil but leaves enough on the level window to make you think it's full of oil when in fact it's full of rusty water.

            As these run hardened shafts direct onto needle roller bearing it makes a right mess and an expensive one as well.

            Last one I did Colchester's wanted £1,800 for the spare parts !! no typo. As the customer wanted to get rid anyway it had a bit of a tickle up, a few oilite bushes and banged on Ebay.

            The round heads don't suffer from this problem as the apron is open ant the bottom and lubrication is done with an oil can.

            #186429
            Breva
            Participant
              @breva

              Nigel,

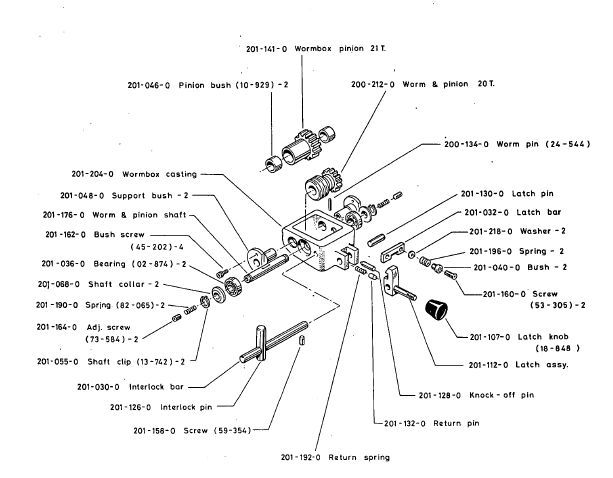
              On a Colchester Bantam the clutch engagement lever / latch assembly, has a spring and detent that holds it up in place when engaged. wormbox.bantam.jpgCould it be that you have a broken or missing spring?

              If you think that a repair / disassembly writeup on doing the clutch on a Bantam would be of any help, let me know. The parts won't be the same but the same principles may apply.

              On the Bantam I had to remove the leadscrew and square shaft before the apron could be removed. This is easy by removing the RH bracket holding both.

              John

              #186486
              Nigel McBurney 1
              Participant
                @nigelmcburney1

                Thank you for the information,I will try when I get over this cold,how do you get a cold in this beautiful weather plus I am recovering from a bad back and as I have to drop the apron I will try a bit later.

                #188101
                GT390
                Participant
                  @gt390

                  I have exactly the same issue and am part way through rebuilding my apron, I hope you do not find what I discovered when I looked inside.
                  As mentioned in the post above, this is a problem area and expensive to fix. When mine is fixed I will have spent more on the apron than I paid for the complete machine.
                  Good news is though, although expensive, all the parts are available from a few different sources, don’t know if I am allowed to post who I found to be the best.
                  As for sliding the saddle, there is an oil pickup pipe from the saddle down into the apron to be aware of. I removed the leadscrew and 2 other shafts first, really easy to do, then you can get a trolly jack and block of wood directly under the apron, take out the bolts and lower on jack. To be honest, the apron weighed less than it looked to me, and I was easily able to lift it off the jack and up on to the bench.
                  Rob

                  Edited By GT390 on 29/04/2015 15:20:31

                  #188158
                  Ady1
                  Participant
                    @ady1

                    One point to note with square head Colchester's is the apron is sealed, or should be. What happens in industry and I don't know where yours has come from is that coolant gets in, displaces the lubrication oil but leaves enough on the level window to make you think it's full of oil when in fact it's full of rusty water.

                    Sounds a bit like the original Wankel RO80s and the oil drain plug in the wrong place so dirty oil got left in the engine

                    If you have one, drill a new drain hole, tap and and plug it and the problem should be sorted

                    Edited By Ady1 on 30/04/2015 01:11:22

                    #188188
                    GT390
                    Participant
                      @gt390

                      A good tip here is to identify how the coolant gets in here in the first place,the cross slide leadscrew and nut sit in a rectangular channel shaped like a bathtub, the bottom has a drain hole about 1/2″ in size, but over time swarf manages to find its way into the bathtub and blocks the drain hole, the hole that the leadscrew passes through is only 1/4″ higher than the bathtub floor, so once the drain is blocked coolant will flow right through here into the apron.
                      The cross slide must be removed every so often to clean this out, that will prevent the problem, to cure it, a bush and seal could be fitted, but you would need to machine both the saddle and leadscrew to do this
                      Rob

                      #188249
                      GT390
                      Participant
                        @gt390

                        Edit to post above :

                        After removing the saddle tonight I discovered that there already is a seal in the apron around the leadscrew….

                        It has not been sealing too well though…….

                        #188372
                        Nigel McBurney 1
                        Participant
                          @nigelmcburney1

                          Thanks for the info,I have just drained the Triumph saddle, oil was murkey and a couple of blobs of coolant, I last drained it about 22 years ago when I bought it,I will leave the oil to settle in the tin and see if there is any water in it.The lathe generally is in very good condition,I bought it at a government auction and it was ex Royal navy, The 3 jaw chuck was used but not worn, the four jaw was new and still greased,the face plate was in its box,the centres ,sleeves drill chuck were still in the crocell goo not used,no steadies,plus a new spare cross slide nut ,new worm gear for the feed shaft and some springs. The address of a small naval station along the south coast was on the face plate box, so why all the new kit,I have often wondered if all the loose equipment had been stolen or lost ,and all the very expensive new parts were replacements. An why does the feed clutch slip on a lathe that has not seen much use,no doubt I will find out. I have also just drained the apron on my Master 2500 the oil was clean,no sign of soluble oil ,though the master gets far more use and the oil is topped up alot more often than the triumph. When I bought the master at another government sale about 12 years ago,it had seen a bit more use,I stripped the cross slide at the time of purchase as it did not feel right , the feed screw was corroded having sat in a pool of corosive liquid in the trough in the saddle, A call to Colchester was made enquiring the price of screw and nut ,oh dear £ 400 plus vat ,a bit too expensive so I made a new cross slide screw on my other lathe and used the existing nut as it was not too worn, I could not find a drain hole in the saddle trough so I drilled one, and from the good condition of the oil it must be working,though my master is a bit newer than the Triumph and may have some seals fitted. I will have to wait a bit before working on the triumph until my backs better, At least the Triumph is free standing and easy to get at ,the master is hard against the shed wall and difficult to get at ,dont put big lathes against a wall,learn from my mistake.

                          #464230
                          David Oyns
                          Participant
                            @davidoyns14057

                            Dear Fellow Engineers

                            I am aware of a post on this subject in January 2020. I have a Colchester Chipmaster lathe on which the carriage assembly fails to disengage at a bed stop when auto-feeding. I have tightened the stop moderately but never allowed significant pressure to build up – too many posts in various manuals of sheared gears or racks.

                            I have changed the apron assembly, tried two different latch castings and associated gears, etc,. checked that the 'knock-off pin' (Part 1905) is free, lubricated all moving parts, checked the movement of the bar (see next paragraph re hole spacing) with which the latch engages, checked each moving part for free movement and each gear mesh for correct play.

                            The apron casting has the serial number G 2011. It originally had the bar (for latch engagement) fitted solid to the casting, lacking the springing with parts including 1949,1850. I then discovered that the bar on this apron had a hole pitch of 1 1/8" rather than the 1 1/4" which appears standard. Furthermore the holes in the apron casting were simply countersunk unlike the 1 1/4" version which are counterbored to accept part 1850 – shoulder bush.

                            I modified the G 2011 casting with counterbores and opened the original screw clearance hole to accept the shoulder bush. The pitch was machined dead size and the bar moves without binding against the spring.

                            I've now run out of ideas – can anyone advise? I appreciate that there is the need to allow pressure on auto-feed when taking heavy cuts; the issue is just how much pressure should be allowed to build up when a bed stop is placed in position – and how would it be checked or regulated.

                            Thanks in advance – and if you respond to this during this current lock-down do, please, keep safe.

                            David

                            #464278
                            DC31k
                            Participant
                              @dc31k

                              When you say it fails to disengage, what do you mean? Does it push the bed stop along the bed? The bed stop needs a good yank on the Allen key to secure it. Dismantle and fettle the stop so it works very well.

                              I think your concern about the bar is a chimera. The springing just gives the latch an easier time when engaging and reduces wear on it.

                              If you look at a post above this, on 14/04/2015 22:05:02 by Breva you see low down on the left spring 201-190-0 and adj. screw 201-164-0 (one each side of the worm). These are where the adjustment is made. The worm slides on its shaft (I think it has a pin in it that goes through the slot in its shaft). The spring pressure each side is what determines how soon the worm will move and disengage the feed.

                              You could try reducing the spring pressure but it is a ball-ache to adjust. I think it may be made easier if you temporarily omit the half nut interlock as this then allows the casting to swing down. Measure how far in the screws are before you start so you can return to 'before' if necessary.

                              I will think of a way to measure how much force it takes to trip it on mine and let you know.

                              #465299
                              David Oyns
                              Participant
                                @davidoyns14057

                                Dear DC31k

                                I am very appreciative of your considered reply and advice which I shall follow.

                                The carriage with feed engaged does push the bed stop along the bed. I have given it a fairly firm tighten but possibly not 'a good yank'. Could you please convert that spec into a torque setting? (chuckle!)

                                One tiny mod I've done is to remove the welch plug which prevents access to the interlock bar by drilling, tapping, then pulling out with a bolt. This done, the plug has a small allen screw fitted which can be removed and a 'puller' bolt employed when the interlock bar needs to be removed again – as I've done several times while trying to fix this issue.

                                Great tip to measure the position of the screws. This is something I would, of course, have realised…….. AFTER adjustment! You may well have saved me a great deal of time and frustration by mentioning this.

                                I wonder if you are right by mentioning the bed stop tightness – perhaps I'm being too timid. When the machine was in service in my school workshop the kids didn't seem to have a problem!

                                Why do I have the machine and several from the school workshop here at home? – because an idiot HM decided that such facilities were 'not really the image the school wishes to promote'. No wonder so many these days do not know which end of a screwdriver to use! The machines should be back at school motivating the students who loved making things and appreciated the skills they learned. End of soapbox!

                                Well, I'll close and follow up your advice. Many Thanks for responding, so good of you.

                                Kind regards, keep safe.

                                David

                                #465687
                                David Oyns
                                Participant
                                  @davidoyns14057

                                  Hi

                                  Just a note to say that, having followed the advice above, the carriage does now stop when striking the bed-stop, so very many thanks for the advice given.

                                  I was unable to make the adjustments with the apron on the lathe – too limited access – but removing the apron (and feed bar/leadscrew) is so quick that it's not worth the fight. I found the adjustment screws very tight and had to be super-careful when holding the pinion with a large screwdriver to oppose the torque of the allen key. I did note the original positions as advised (depth of the adjustment screws in the shaft) using a vernier and put the readings in a safe place.

                                  The adjustment made was a quarter turn in each case. The release was slightly more firm than I would have liked but perfectly workable. I may make a further adjustment, perhaps an eighth of a turn if I have the apron off again.

                                  One word of caution – when replacing the apron the first time I tightened the screws, then found that the wheel was jammed – the pinion had not meshed with the rack. Luckily no damage to rack or pinion. I'm now very careful to check engagement before screws are tightened., moving the carriage to ensure free movement.

                                  Thank you, DC31K. Super advice which has done the trick.

                                  David

                                Viewing 15 posts - 1 through 15 (of 15 total)
                                • Please log in to reply to this topic. Registering is free and easy using the links on the menu at the top of this page.

                                Advert

                                Latest Replies

                                Viewing 25 topics - 1 through 25 (of 25 total)
                                Viewing 25 topics - 1 through 25 (of 25 total)

                                View full reply list.

                                Advert

                                Newsletter Sign-up